Security
Introduction and “how-to” guide to the StreamZero Security and Access Rights Management.
Concept
StreamZero is taking a multi-layered and integrative approach to security and access rights management, protecting systems, networks, users and data alike.
While the security architecture of StreamZero stands alone and operates well in isolation, it is built to integrate with enterprise security systems such as LDAP and Active Directory.
It supports Single Sign On (SSO) through open protocols such as Auth0 and SAML.
This user guide focuses on the application internal - user controlled - aspects of the seurity functions.
Approach
StreamZero applies the proven notion of #Users, #Roles and #Permissions and linking them to the application elements such as #Menues, Views and Pages.
This approach enables the breaking of the application into granular elements and organizing them into groups of like access control areas. The ultimate benefit is the implementation of user rights on a strict “need-to-know” basis.
Security Components
In the following sections you will learn how the security components work and how to set them up for your purpose.
If you want to follow the instructions and examples, you first need to connect to your StreamZero demo instance.
Navigation
The Security menu is found on left hand navigation of Ferris.
- Click on the Security menu to expand it and display all security relevant menu items.
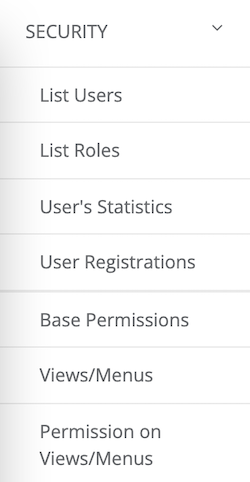
StreamZero Security Navigation
- List Users: Setup individual users and assign one or more roles to them. If StreamZero is integrated with a company own Single Sign On, here is where all users can be viewed. Each user may be deactivated manually.
- List Roles: Setup and maintain individual roles and assign them viewing, editing, executing and other rights pertinent to the character and scope of the role. Roles can be integrated and inheritet with the company Active Directory.
- Users Statistics: Useful grafical statistic displaying the login behavior of individual users, such as login count and failed logins. For Security Admins only.
- User Registrations: Listing pending registration requests. For Security Admins only.
- Base Permissions: Listing the base permissions. For Security Admins only.
- Views/Menus: Listing of all Menu and View (aka Pages, UI) items. For Security Admins only.
- Permissions on Views/Menus: Listing of the assigned permissions of each Menu and View element. For Security Admins only.
NOTE that it is considered a good practice that security related tasks are provided to only a few dedicated Security Leads within the organization. For that purpose, setting up a dedicated Security Lead role is advised.
Authentication and Authorization
Add text
Data Level Security
Add text
Integrations
Add text
Audit Functions
Add viewing function (below)
Add logging and monitoring capabilities
1 - Permissions
Meaning, role and application of Roles.
Roles
This is us - humans - using StreamZero on a day to day basis. And in this section each user is listed with the most important attributes defininig name, e-mail, status and - most importantly - the associated roles.
To get the the Users page, navigate to: Security > List Roles
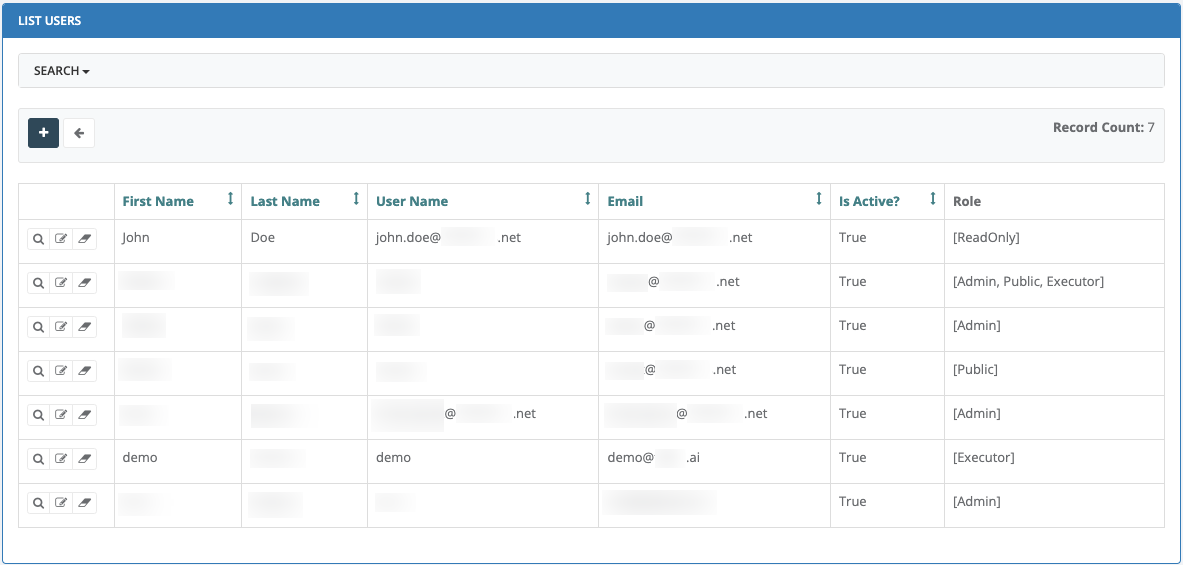
Example: List of Users
Besides displaying the list of all current users, the Users page offers a number of capabilities:
- Add User

- Show User

- Edit User

- Delete User

Note that each of these capabilities depends on the Permissions given to your Role. Some roles may be given full rights (e.g. add, show, edit, delete), where others may only be given viewing rights (e.g. show). As a result, some users may only be seeing the “Show User” magnifying glass icon.
2 - Roles
Meaning, role and application of Roles.
Roles
Roles represent a collection of permissions or rights that can be performed within Ferris. They can be directly associated with the job of job a #User performs.
To get the the Users page, navigate to: Security > List Roles
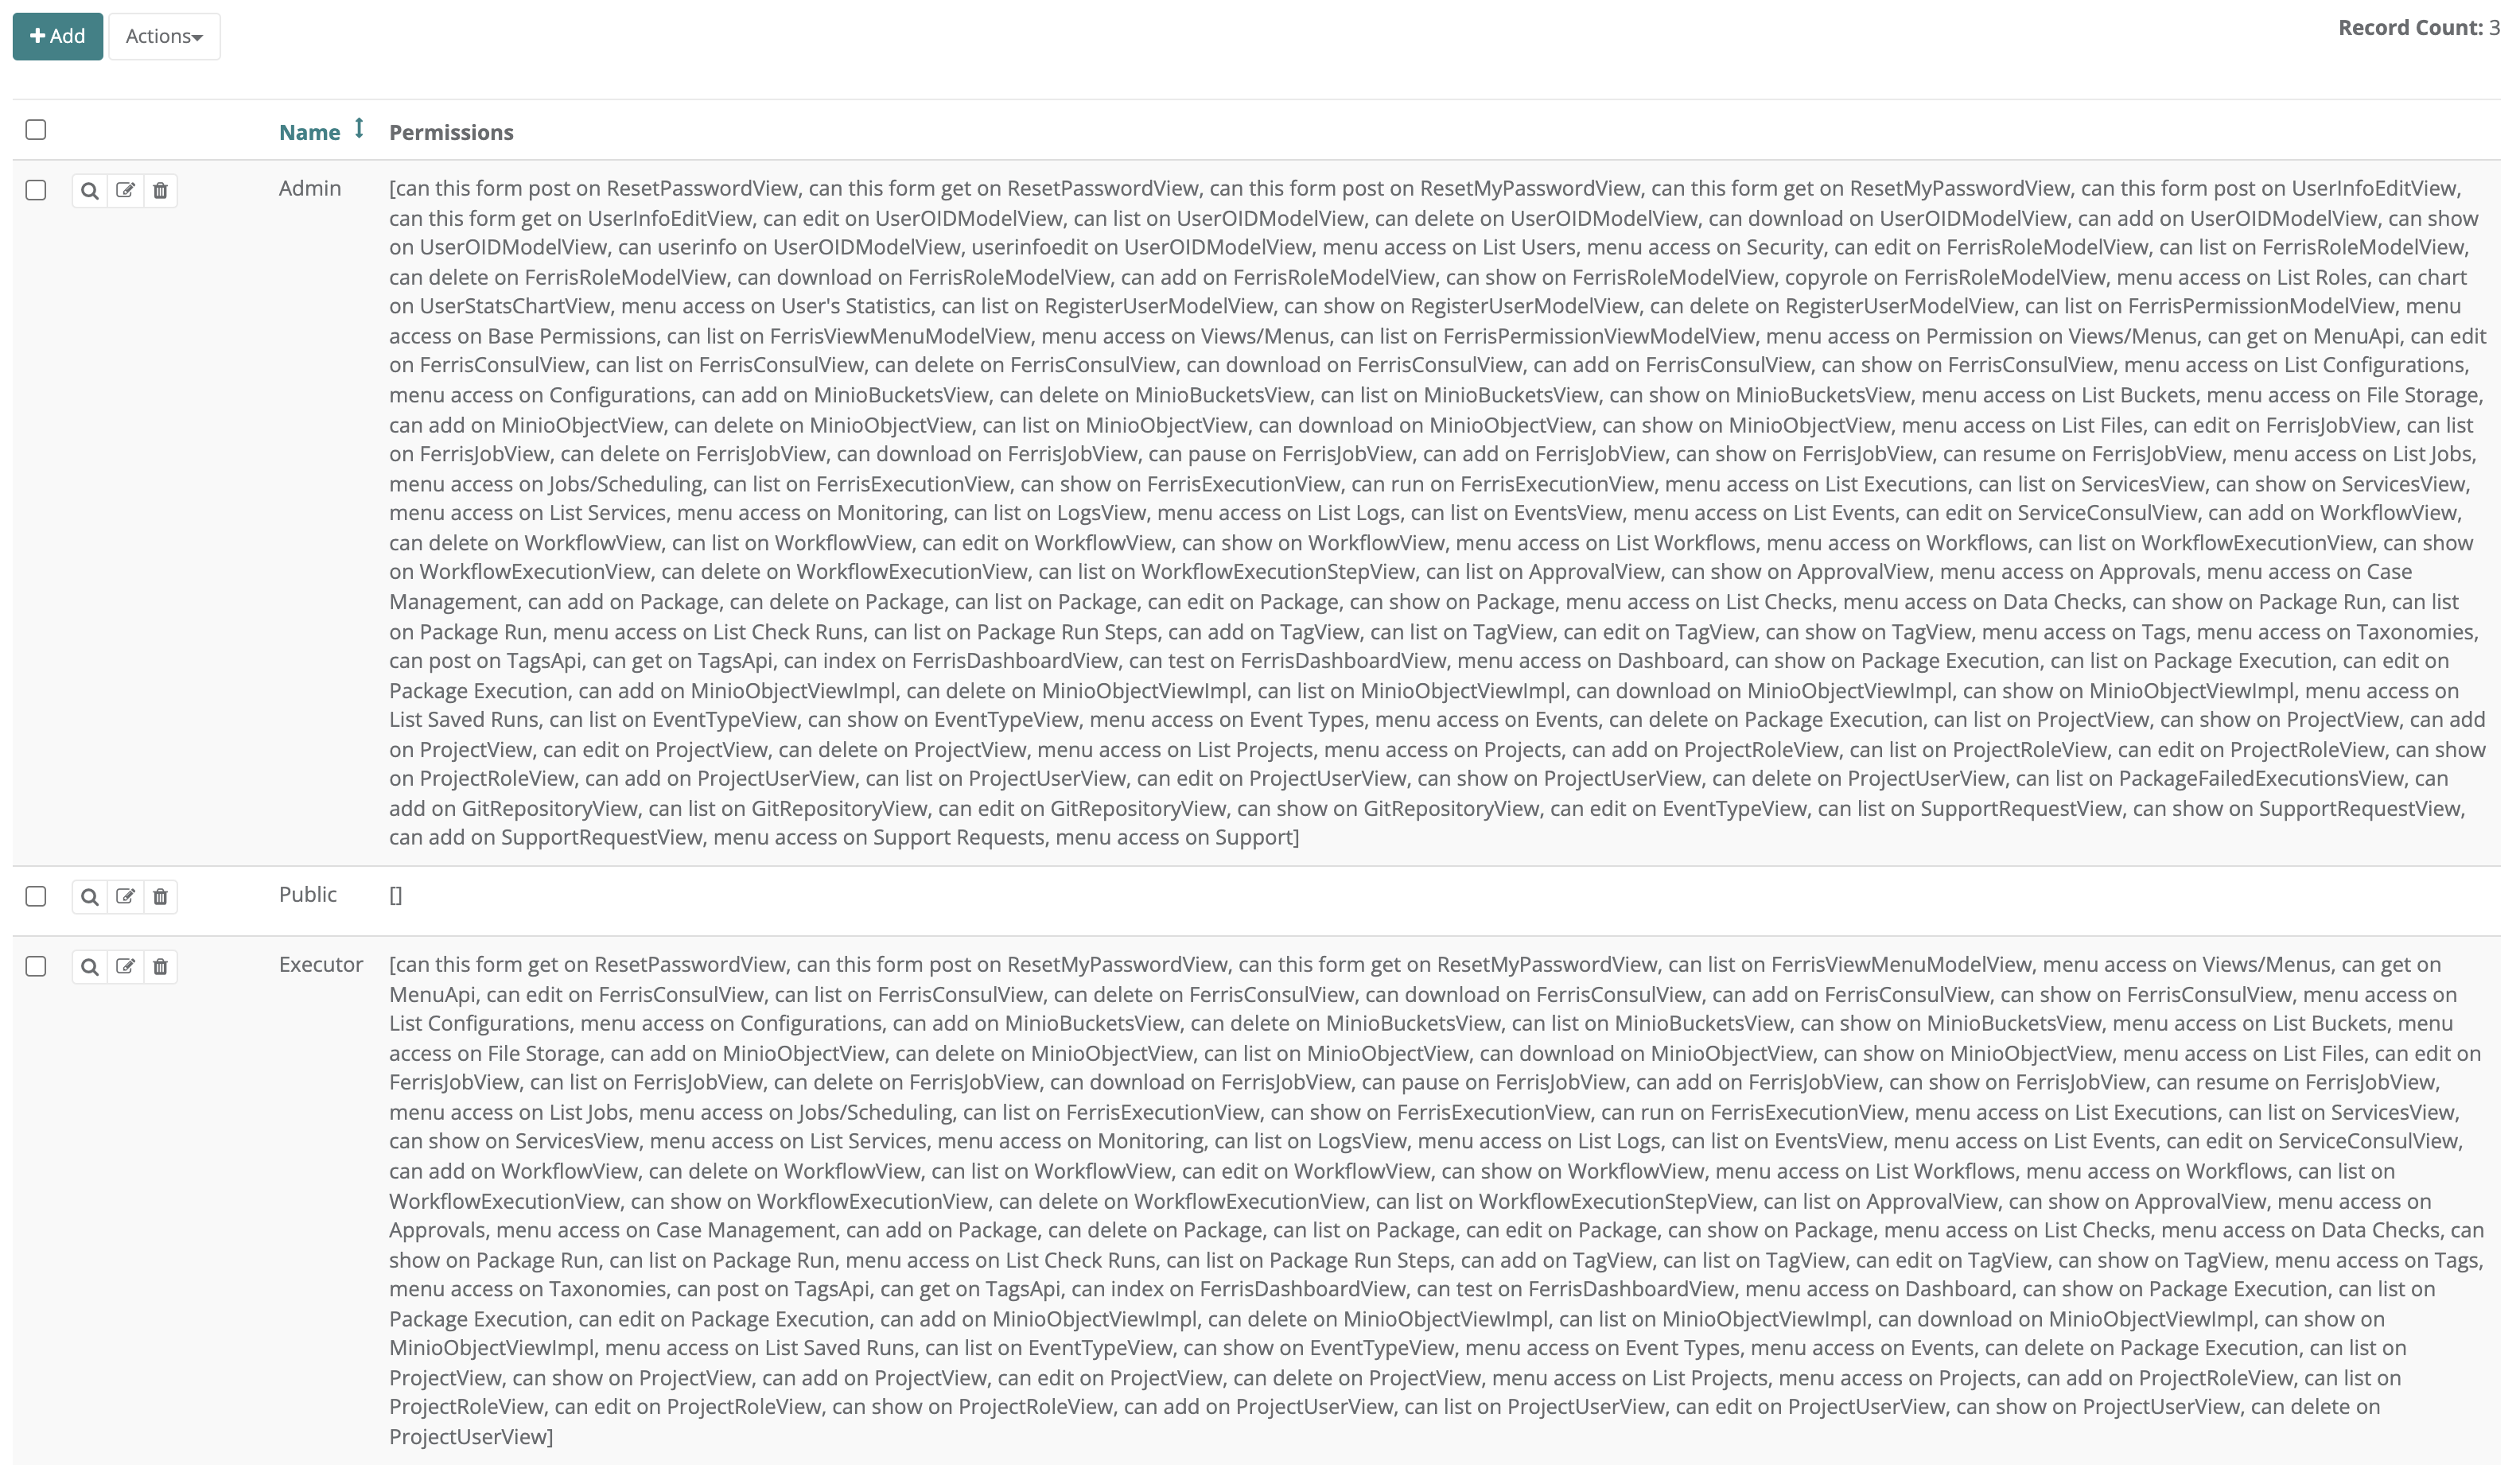
Example: List of StreamZero Roles
Besides displaying the list of all available Roles, the Roles page offers a number of capabilities:
- Add Role

- Actions

- Show Roles

- Edit Roles

- Delete Roles

Note that each of these capabilities depends on the Permissions given to your Role. Some roles may be given full rights (e.g. add, show, edit, delete), where others may only be given viewing rights (e.g. show). As a result, some users may only be seeing the “Show Roles” magnifying glass icon.
Add new Role
Adding a new Role can be done directly within StreamZero by any person who has the necessary permissions to do so. This is normally a designated Security Lead.
Often times, adding new Roles is done by integrating StreamZero with the corporate Identity Access Management (IAM) and Active Directory (AD).
Click on the plus sign to add a new user.
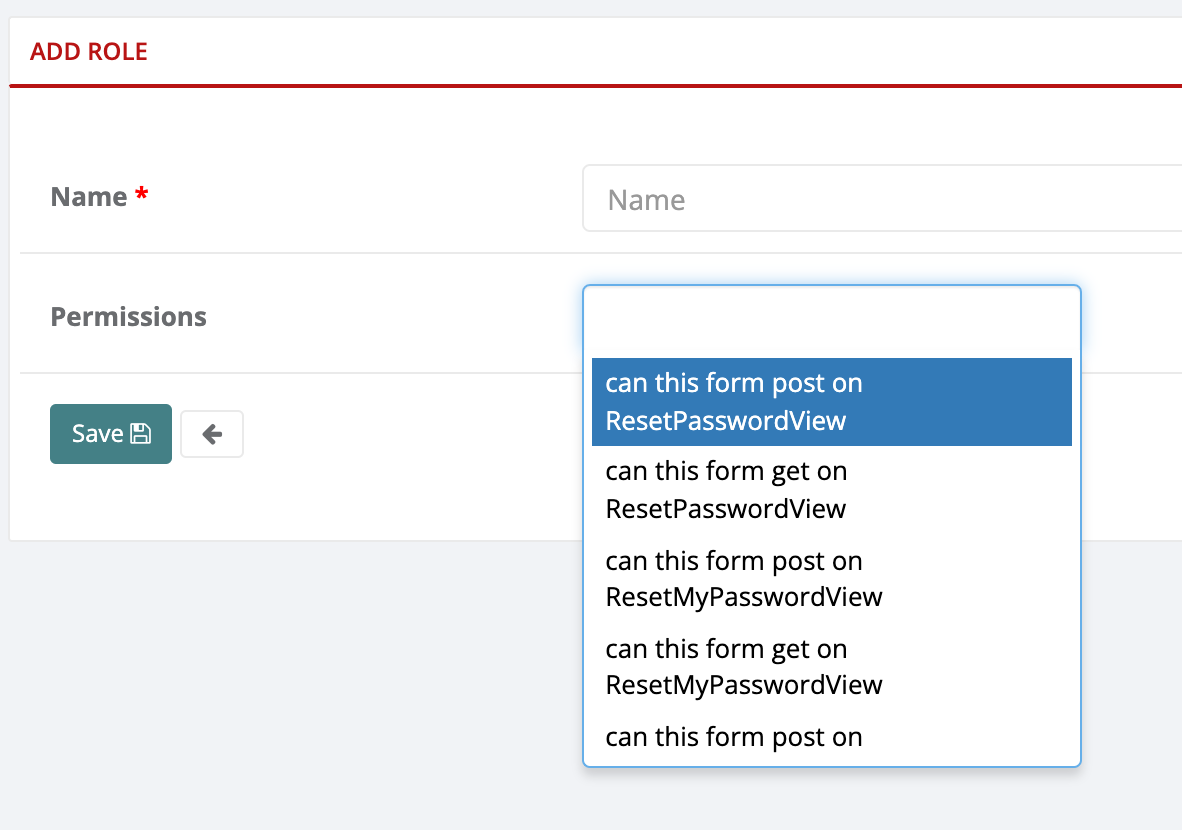
Example: Adding a new Role and Permissions
-
Name: Use a meaningful name for the role, and consider applying naming standards for all Roles
-
Permissions: Chose from the previously setup list of #Permissions
Note that it possible, and common practice, to apply multiple roles to a user. Therefore it is a good idea to keep the number of permissions within one role to a minimum. This enables the enforcement of the “need-to-know” basis for each role.
Actions
In order to apply an Action, first select the Role you want the action to apply to.
- Select a Role then click Actions > Copy Role > click Yes to confirm
- The Role is now copied and can be found in the list of Roles as "[original role name] copy"
3 - Users
Meaning, role and setup of the StreamZero User.
Users
This is us - humans - using StreamZero on a day to day basis. And in this section each user is listed with the most important attributes defininig name, e-mail, status and - most importantly - the associated roles.
To get the the Users page, navigate to: Security > List Users
Example: List of StreamZero Users
Besides displaying the list of all current users, the Users page offers a number of capabilities:
- Add User
- Show User
- Edit User
- Delete User
Note that each of these capabilities depends on the Permissions given to your Role. Some roles may be given full rights (e.g. add, show, edit, delete), where others may only be given viewing rights (e.g. show). As a result, some users may only be seeing the “Show User” magnifying glass icon.
Add new User
Adding a new User can be done directly within StreamZero by any person who has the necessary permissions to do so. This is normally a designated Security Lead.
Most often though, adding new Users is done by integrating StreamZero with the corporate Identity Access Management (IAM) and Single Sign On (SSO) system.
Click on the plus sign to add a new user.
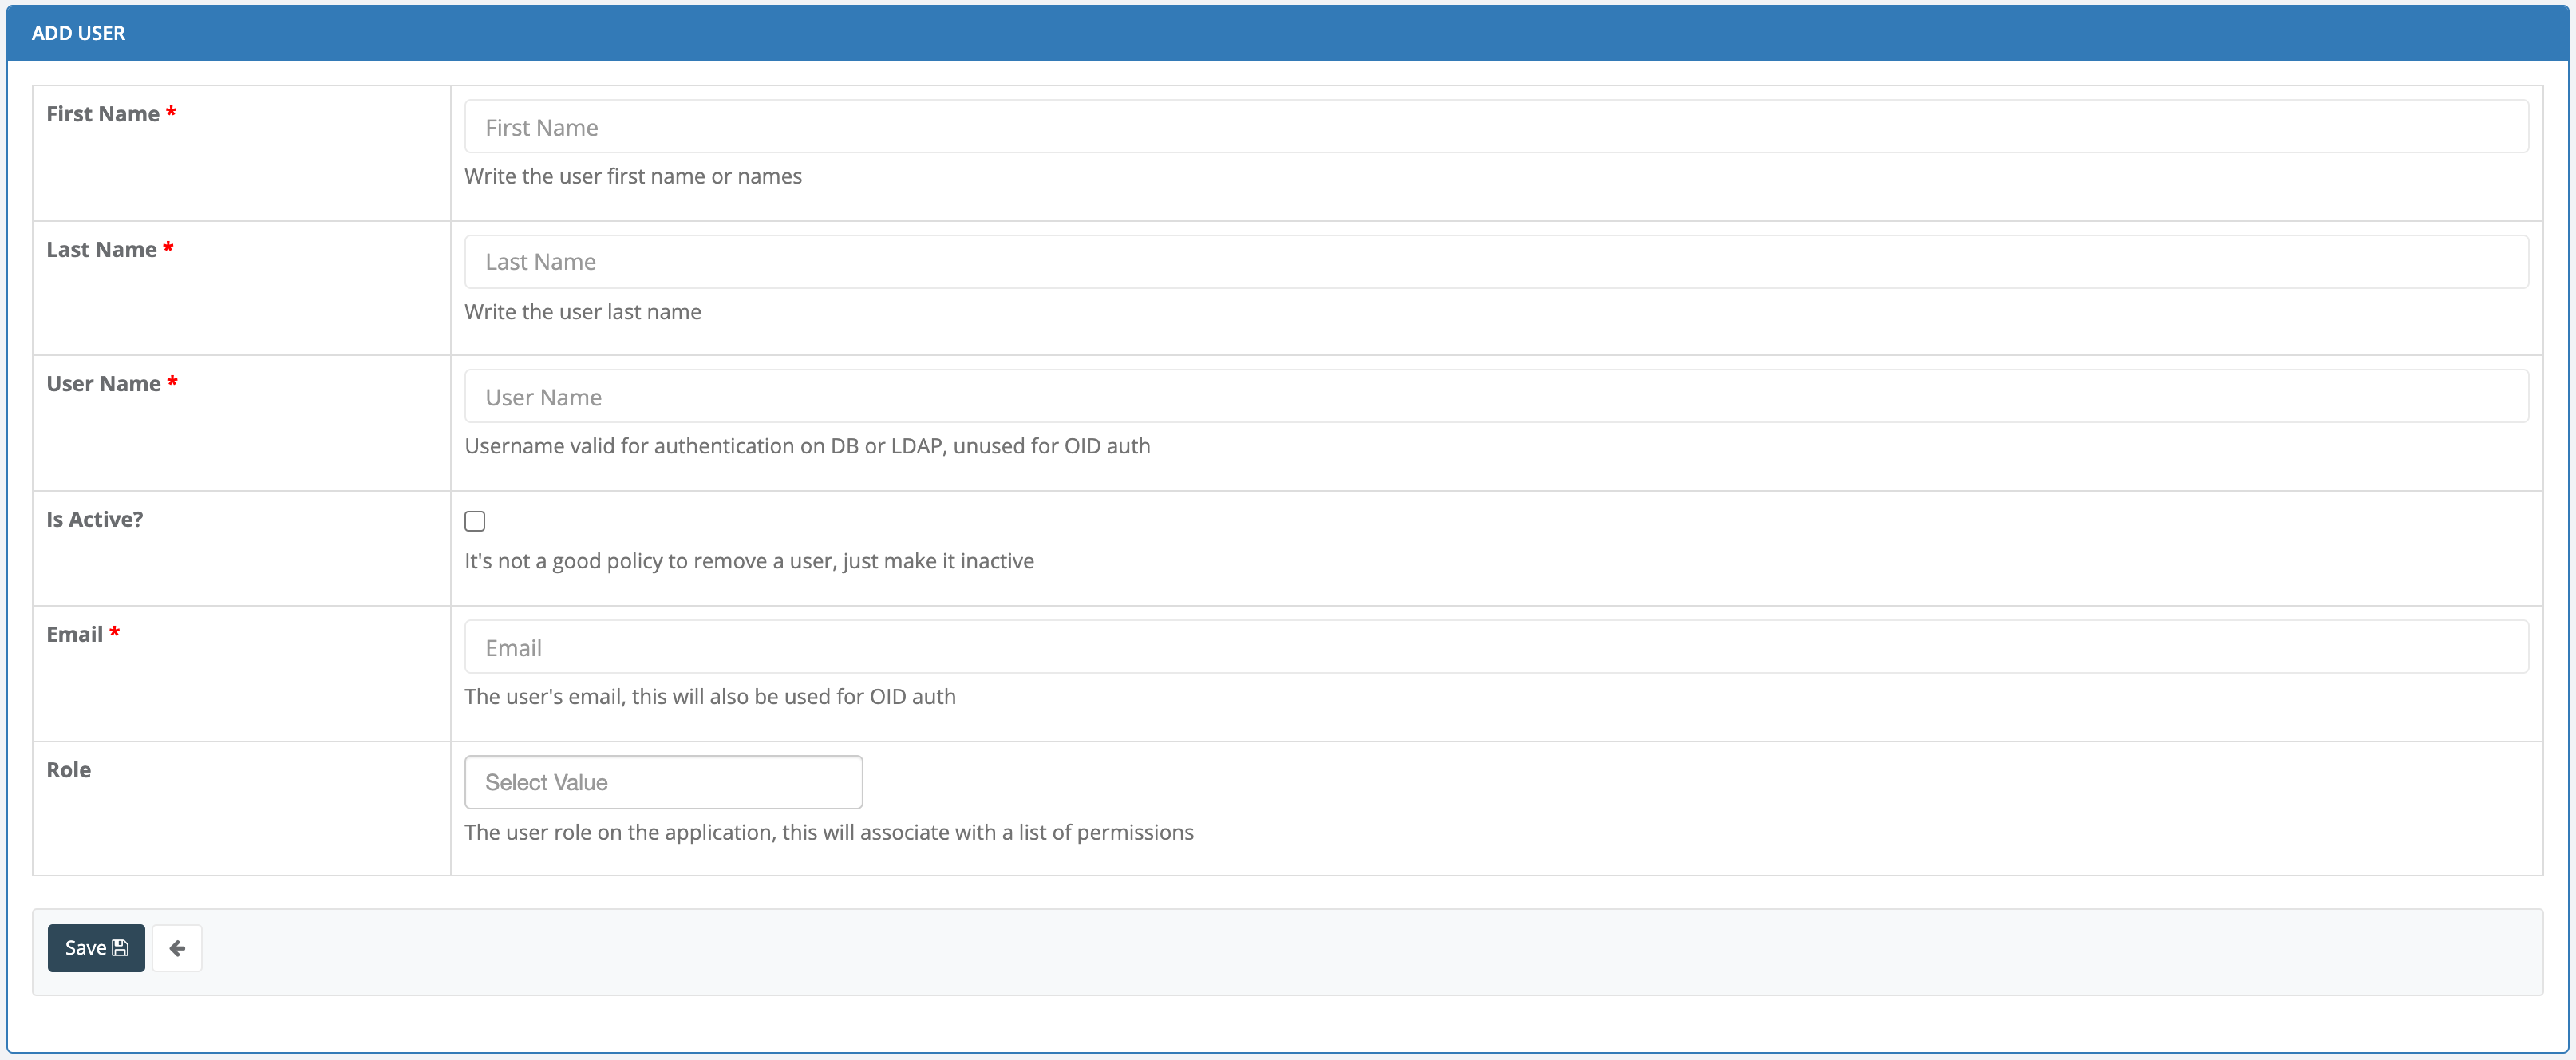
Example: Adding a new StreamZero User
-
First Name, Last Name: Full first and last name of the user
-
User Name: Apply any name or e-mail, but it is advised to adhere to a standard applied to all users.
Possible options may include: Email, Company User ID, first name only or full name
-
Is Active: Keep this boxed checked as long as the user is actively using Ferris.
Uncheck the box once a user is no longer using Ferris. Delete the user after a prolonged period of inactivity.
-
Email: The users email is the primary means of identification and communication.
-
Role: This is where one or more roles - and therefore permissions - are associated with each user.
Roles are setup in advance, and only already existing roles may be selected. A user may be associated to multiple roles.
-
Save: Always save!
Show User
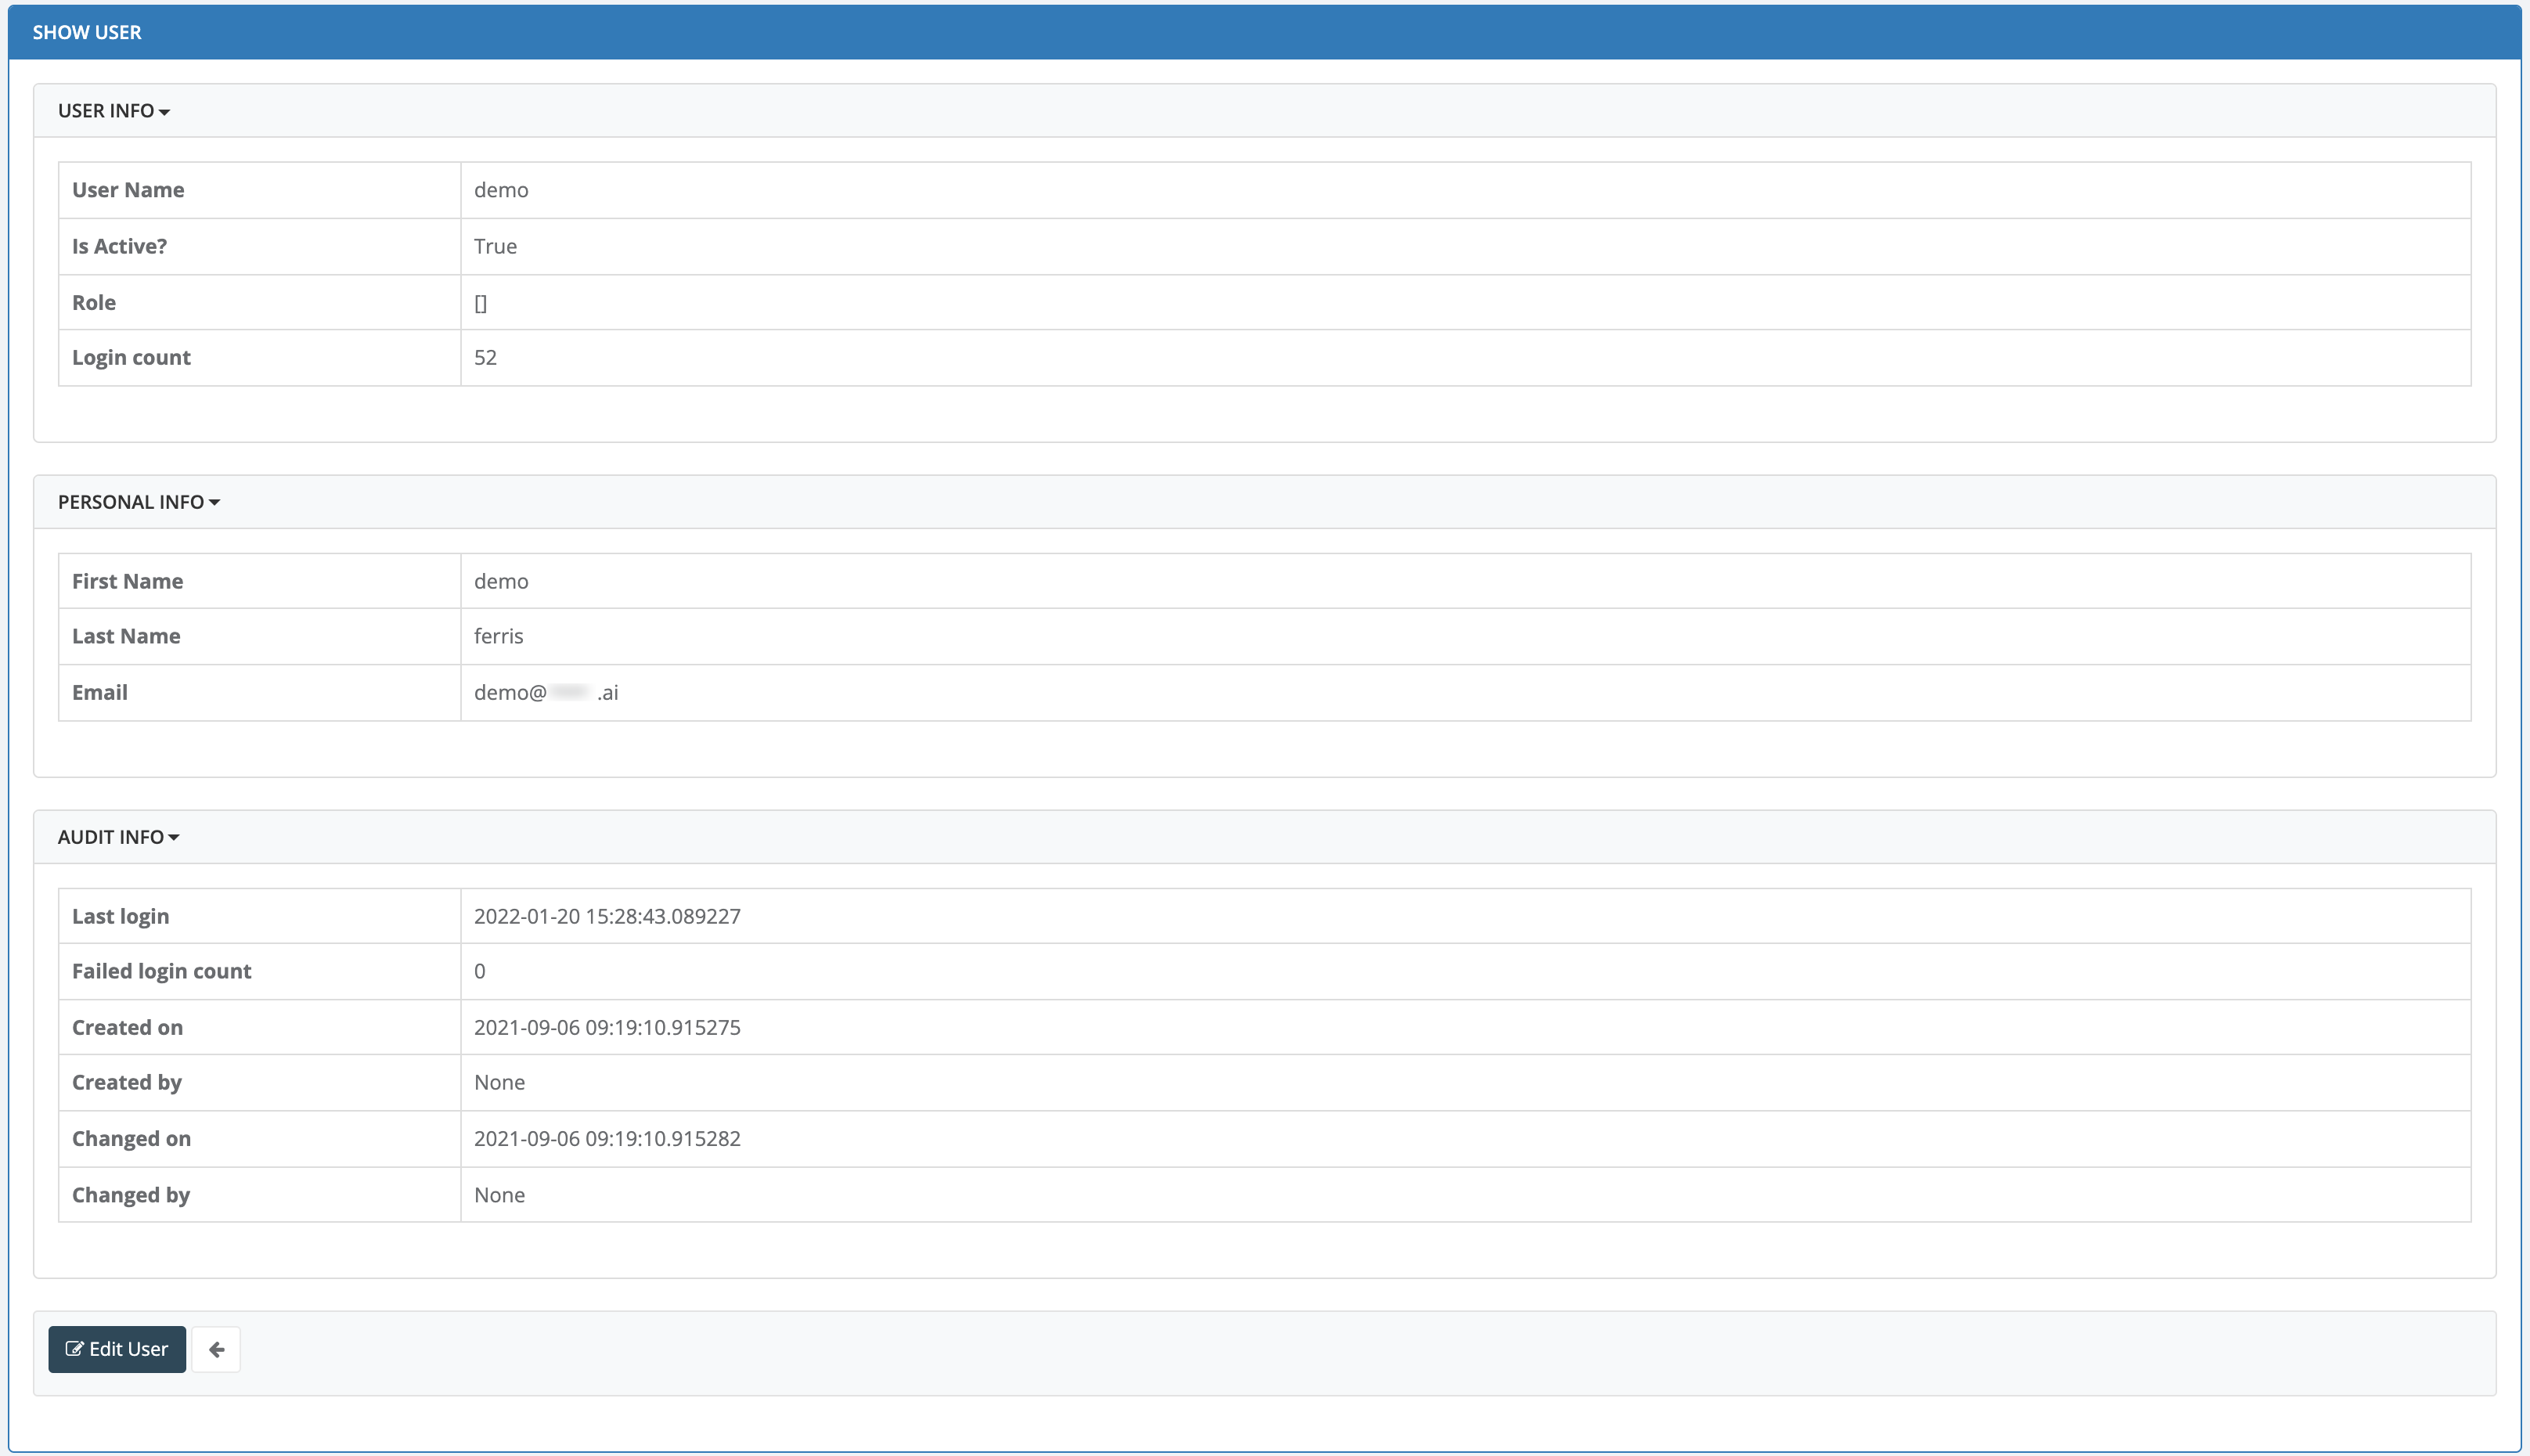
Click on the spyglass icon in front of the user you want to look at.
Example: View only List of StreamZero Users
User Info
- User Name: displays user name
- Is Active: shows whether the user is set to active or inactive. Note that an inactivated user may not be able to loginto Ferris
- Role: Associated roles
- Login Count: Count of how many times the user has logged in in total
Personal Info
- First Name: First name as given during setup. This name may also be provided from the corporate directory
- Last Name: Last name as given during setup. This name may also be provided from the corporate directory
- Email: Email as given during setup. This email may also be provided from the corporate directory
Audit Info
- Last login: Last successful login date and time
- Failed login count: Number of unsuccessful login attempts
- Created on: Exact date and time this user was created (manually or via corporate SSO)
- Created by: StreamZero User or corporate integration service
- Changed on: Exact date and time this user was edited (manually or via corporate SSO)
- Changed by: StreamZero User or corporate integration service
Edit User: Depending on your user rights (permission level) you may be able to enter the Edit function.
Back arrow: go back to the List Users page.
Edit User
Editing User details such as name, email or even Role(s) may be done here.
Note though that if the StreamZero Security is integrated with the corporate Identity Access Management (IAM), adding or removing Roles should be done there in order to ensure the change is permanent and not overwritten at the next syncronization.
Click on the edit icon in front of the user you want to apply changes to.
Delete User
Delete Users permanetly from Ferris.
Note though that if the StreamZero Security is integrated with the corporate Identity Access Management (IAM), deleting users should be done there in order to ensure the change is permanent and not overwritten at the next syncronization.
Also note that before permanetly deleting a user from Ferris, it is advised that the status of the user is first set to “inactive” for a period of time, and until it is sure that the user will not be reactivatet.
Click on the delete icon in front of the user you want to delete.
4 - Statistics
Statistics lists the number of successful as well as failed login counts by user.
Users Statistics
Here a Security Lead finds useful information on any user’s successful as well as failed login attempts.
Navigate to: Security > User’s Statistics
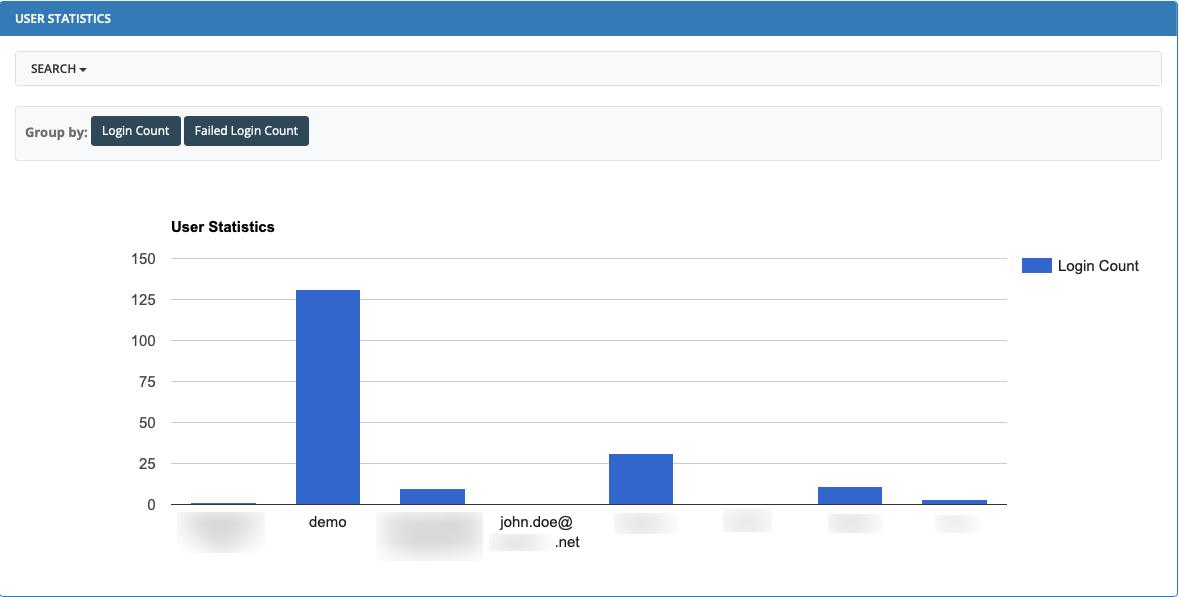
Example: Users Statistics > Login count