This the multi-page printable view of this section. Click here to print.
User Guide
- 1: Landing Page (Dashboard)
- 2: Projects
- 3: Taxonomy/Tagging
- 4: CronJob
- 5: Events
- 6: Executions - Packages
1 - Landing Page (Dashboard)
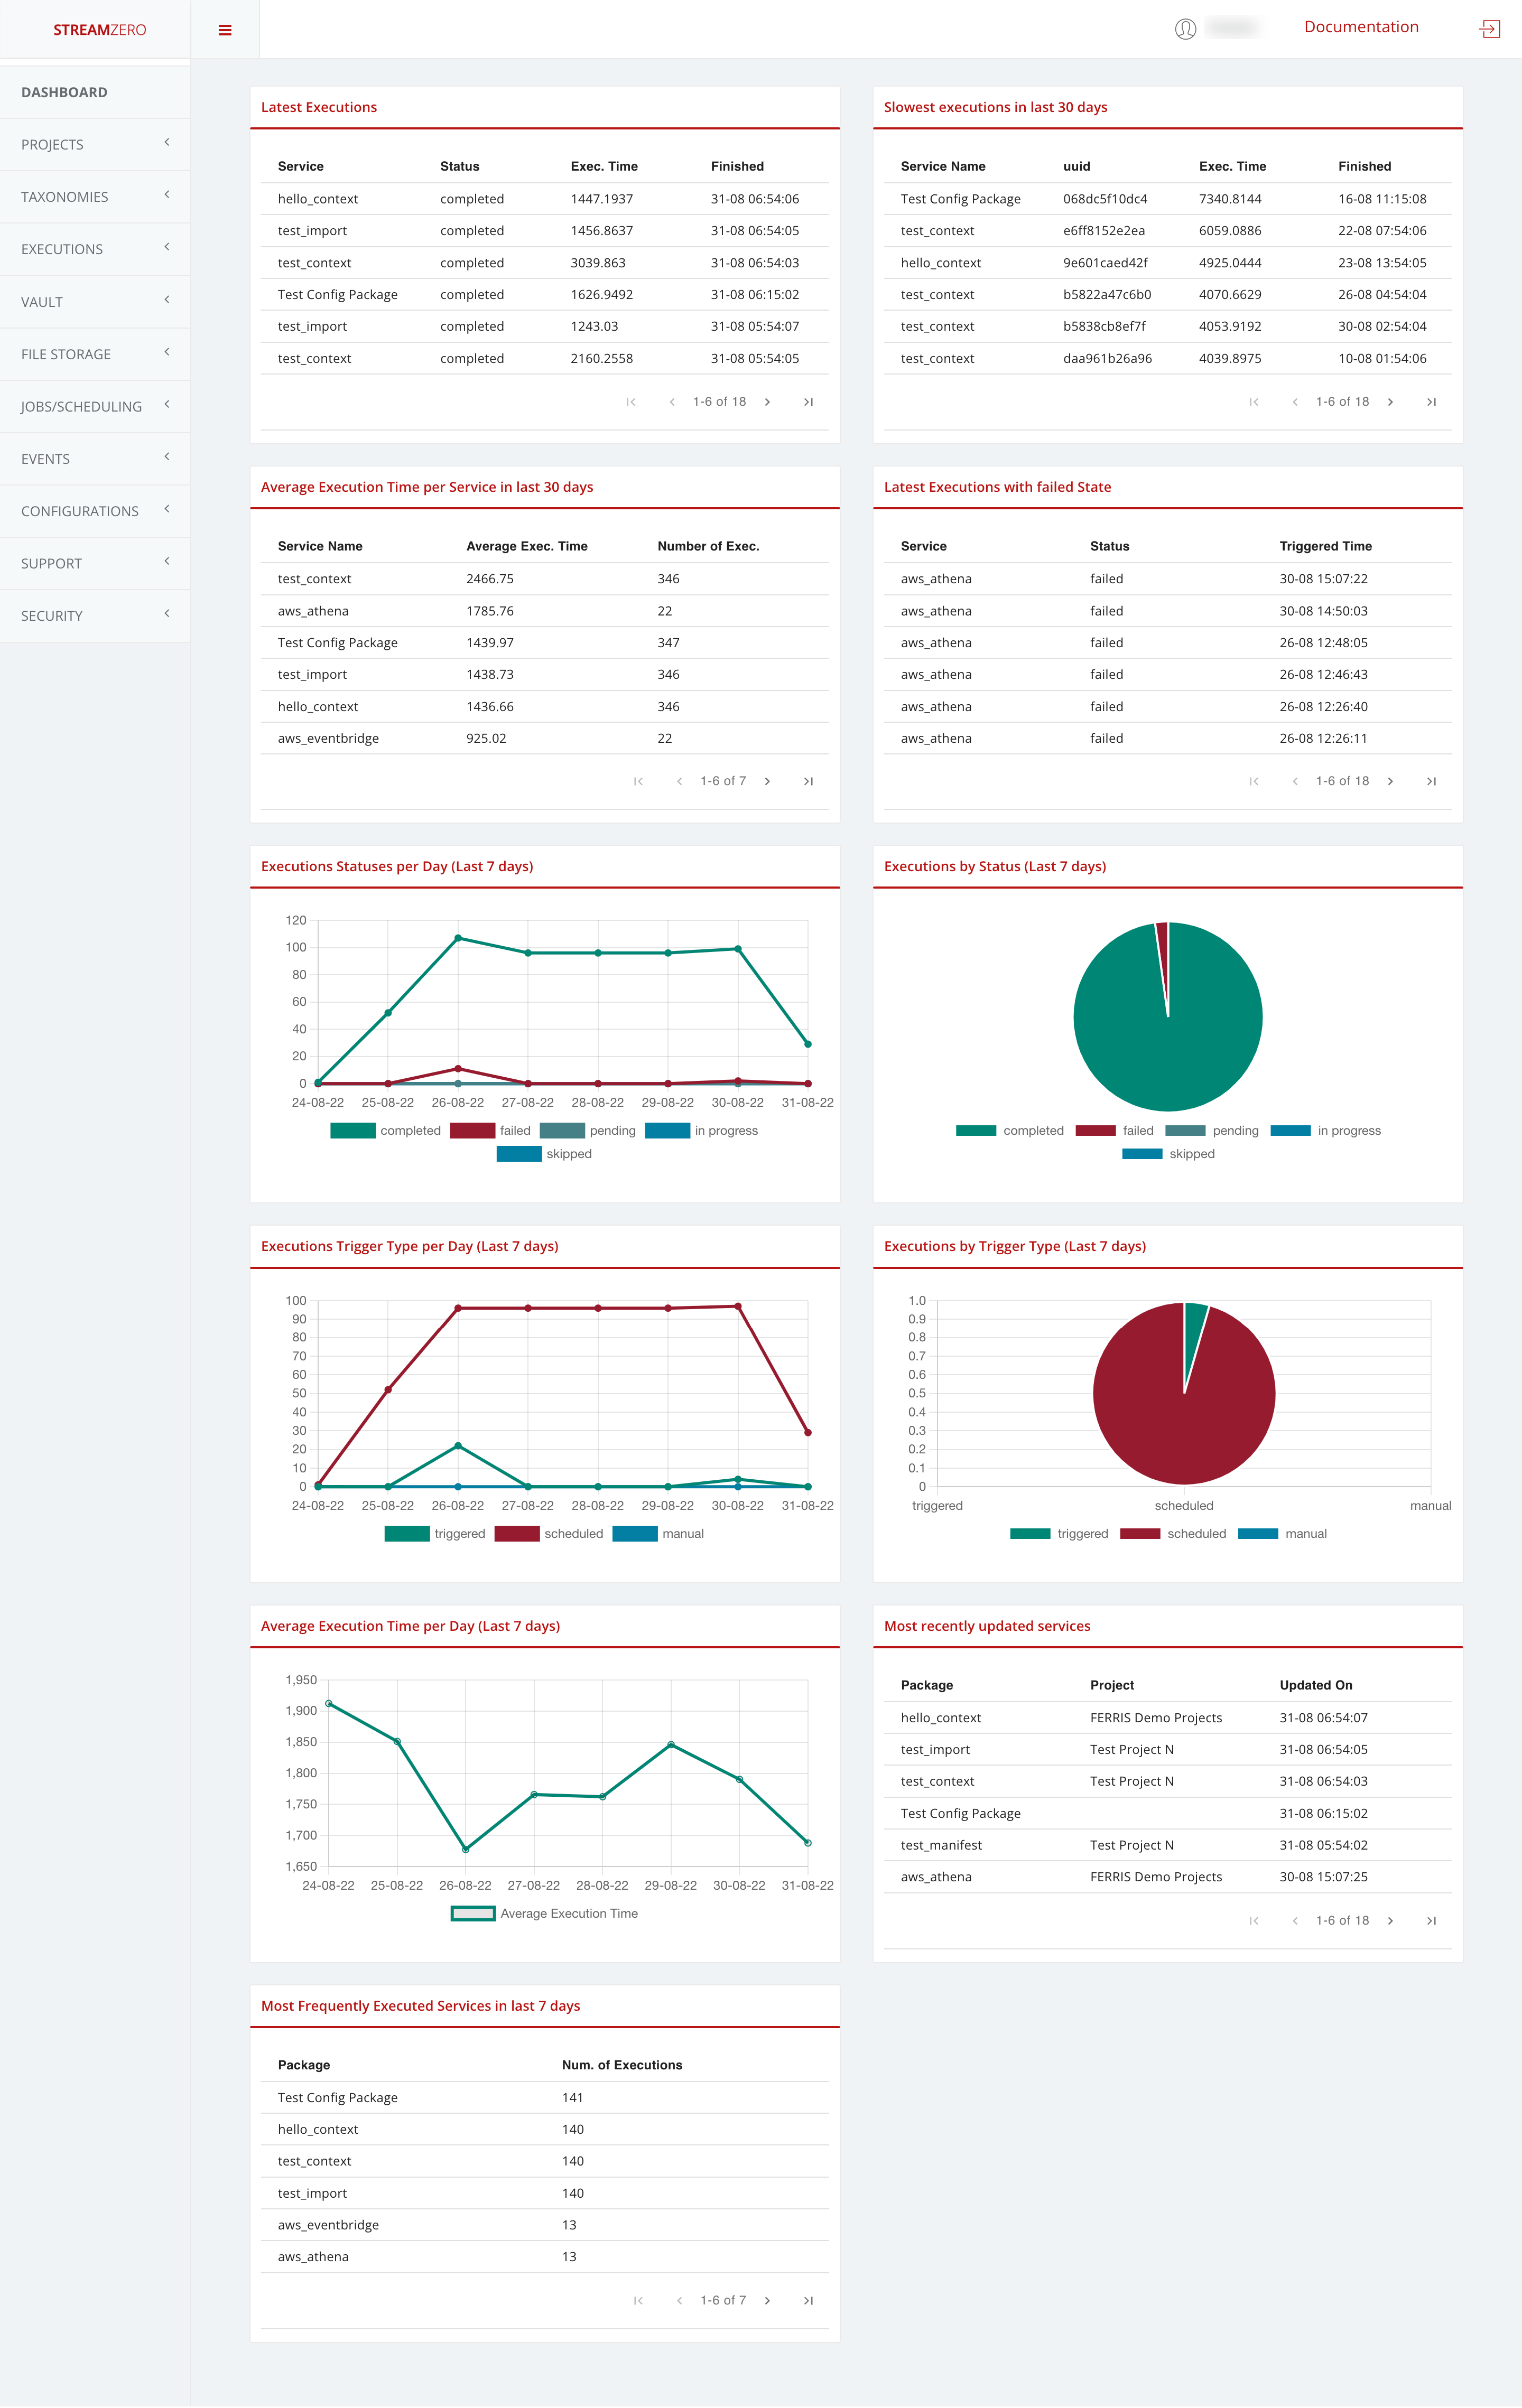
The StreamZero FX Landing page provides insights and analytics around typical platform related metrics mostly related to Data Ops and detailed event handling. It can be finetuned and tailored to customer specific needs.
In this specific use case the insights and analytics of the StreamZero FX Data Platform are highlighted as follows:
-
In the first row, the last 18 executions and the last 18 executions with failed state
-
the last 18 executions showcase the following details:
- Package (name)
- Status
- Execution time
- Finished
-
the last 18 executions with failed state showcase the following details:
- Package (name)
- Status failed
- Triggered time
It allows users of the platform to verify why the triggered package has failed executing.
-
-
In the second row, the executions statuses per day (last 7 days) and the executions by status (last 7 days)
- Completed
- Failed
- Pending
- In_progress
-
In the third row, the exectuions trigger type per day (last 7 days) and the exectuions by trigger type (last 7 days)
- triggered
- scheduled
- manual
-
In the 4th row, the average execution time per day (last 7 days) and the most recently updated packages
- the details of the most recently updated packages are divided as follows:
- Package
- Project
- Updated on (date and time)
- the details of the most recently updated packages are divided as follows:
-
In the 5th row, the most frequently executed packages in the last 7 days with the following details:
- Package (name)
- Number of exections
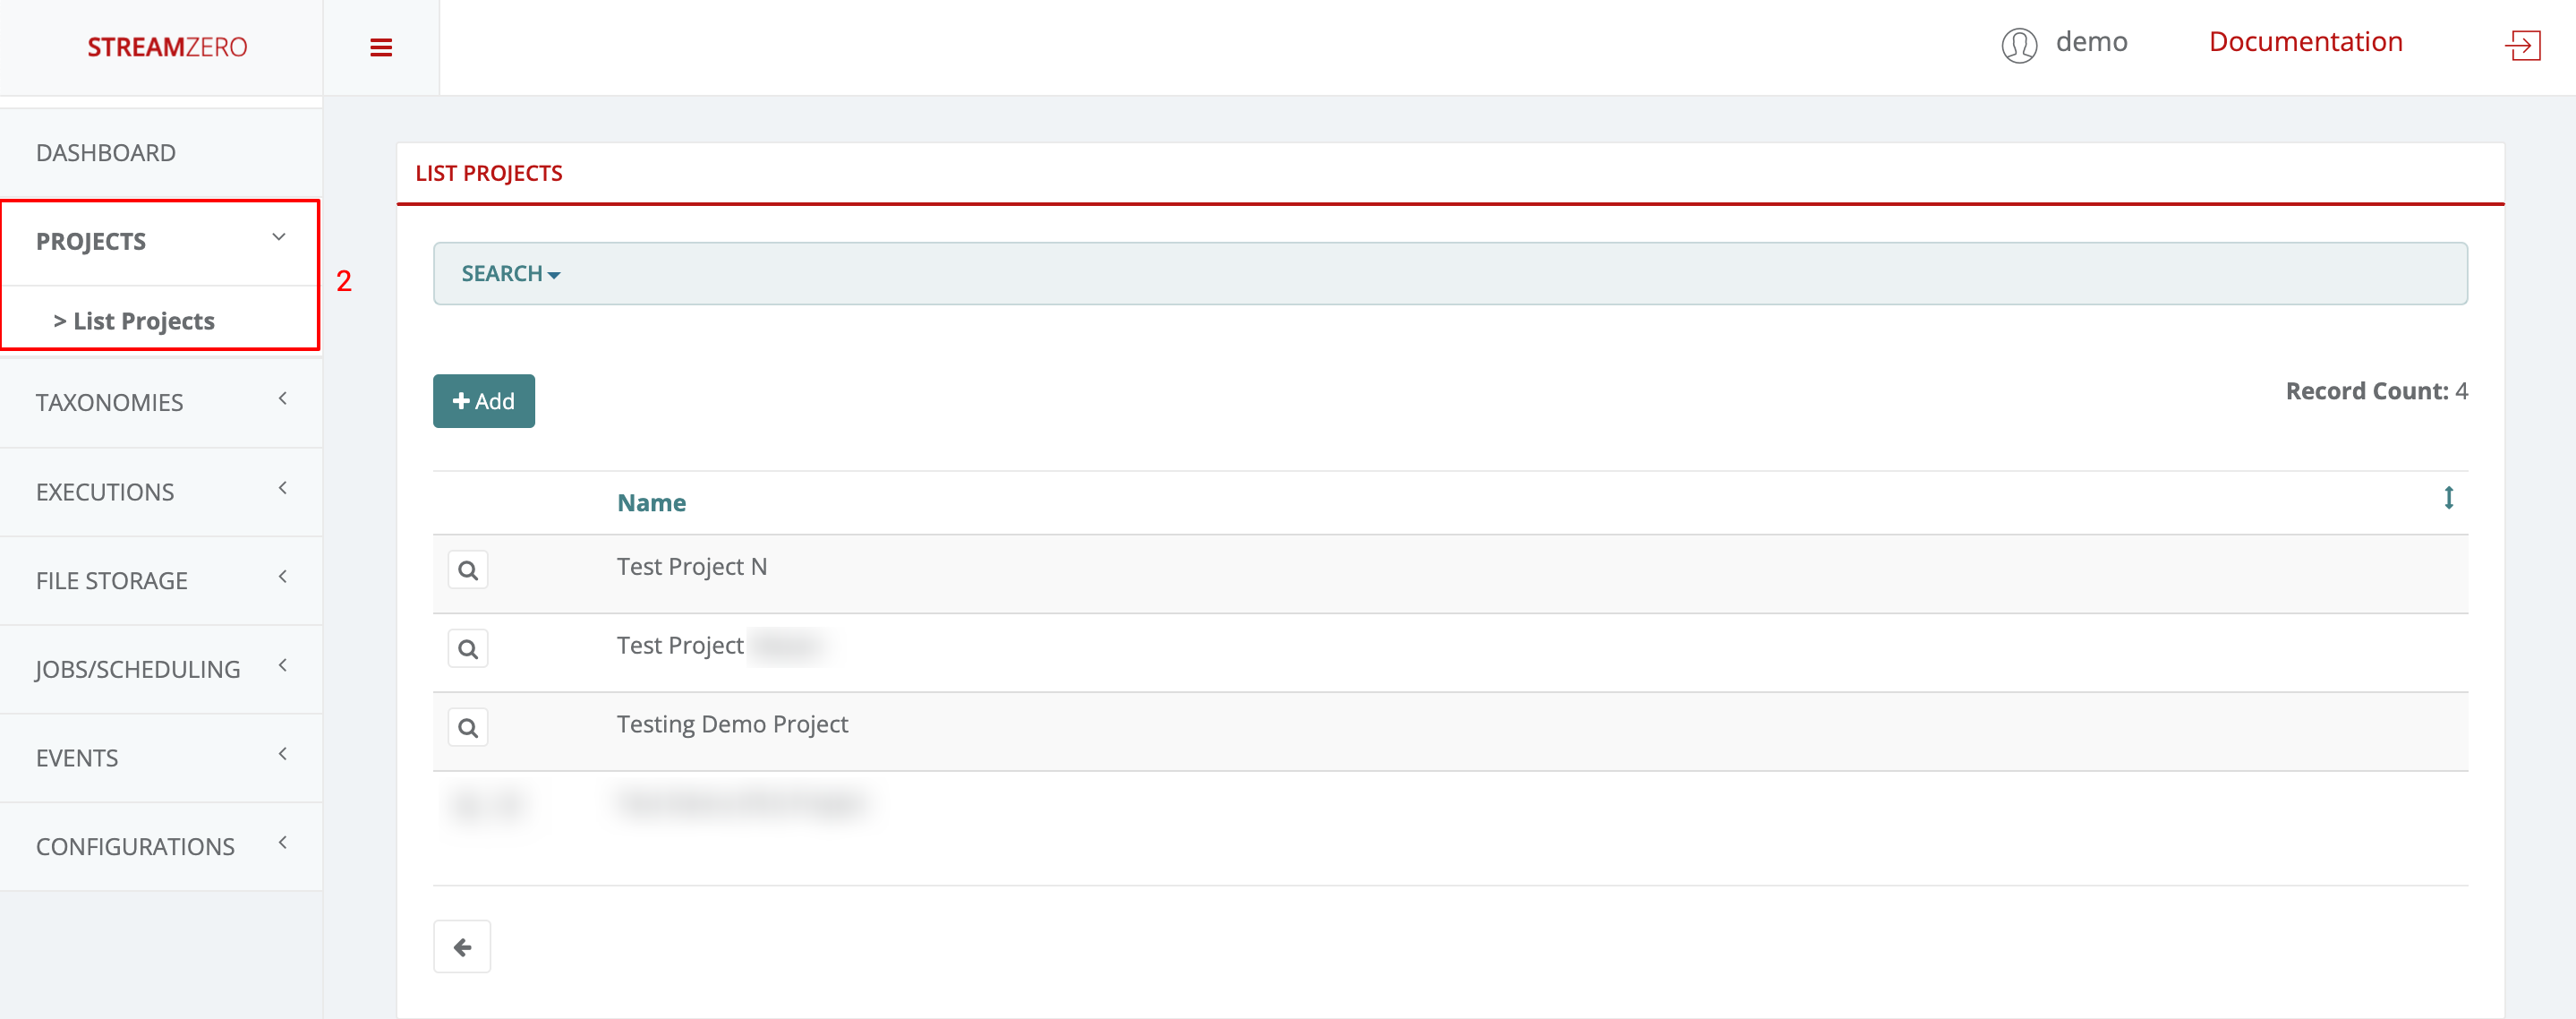
2 - Projects
This subcategory explains the creation of new projects and users withtin these projects.
Project
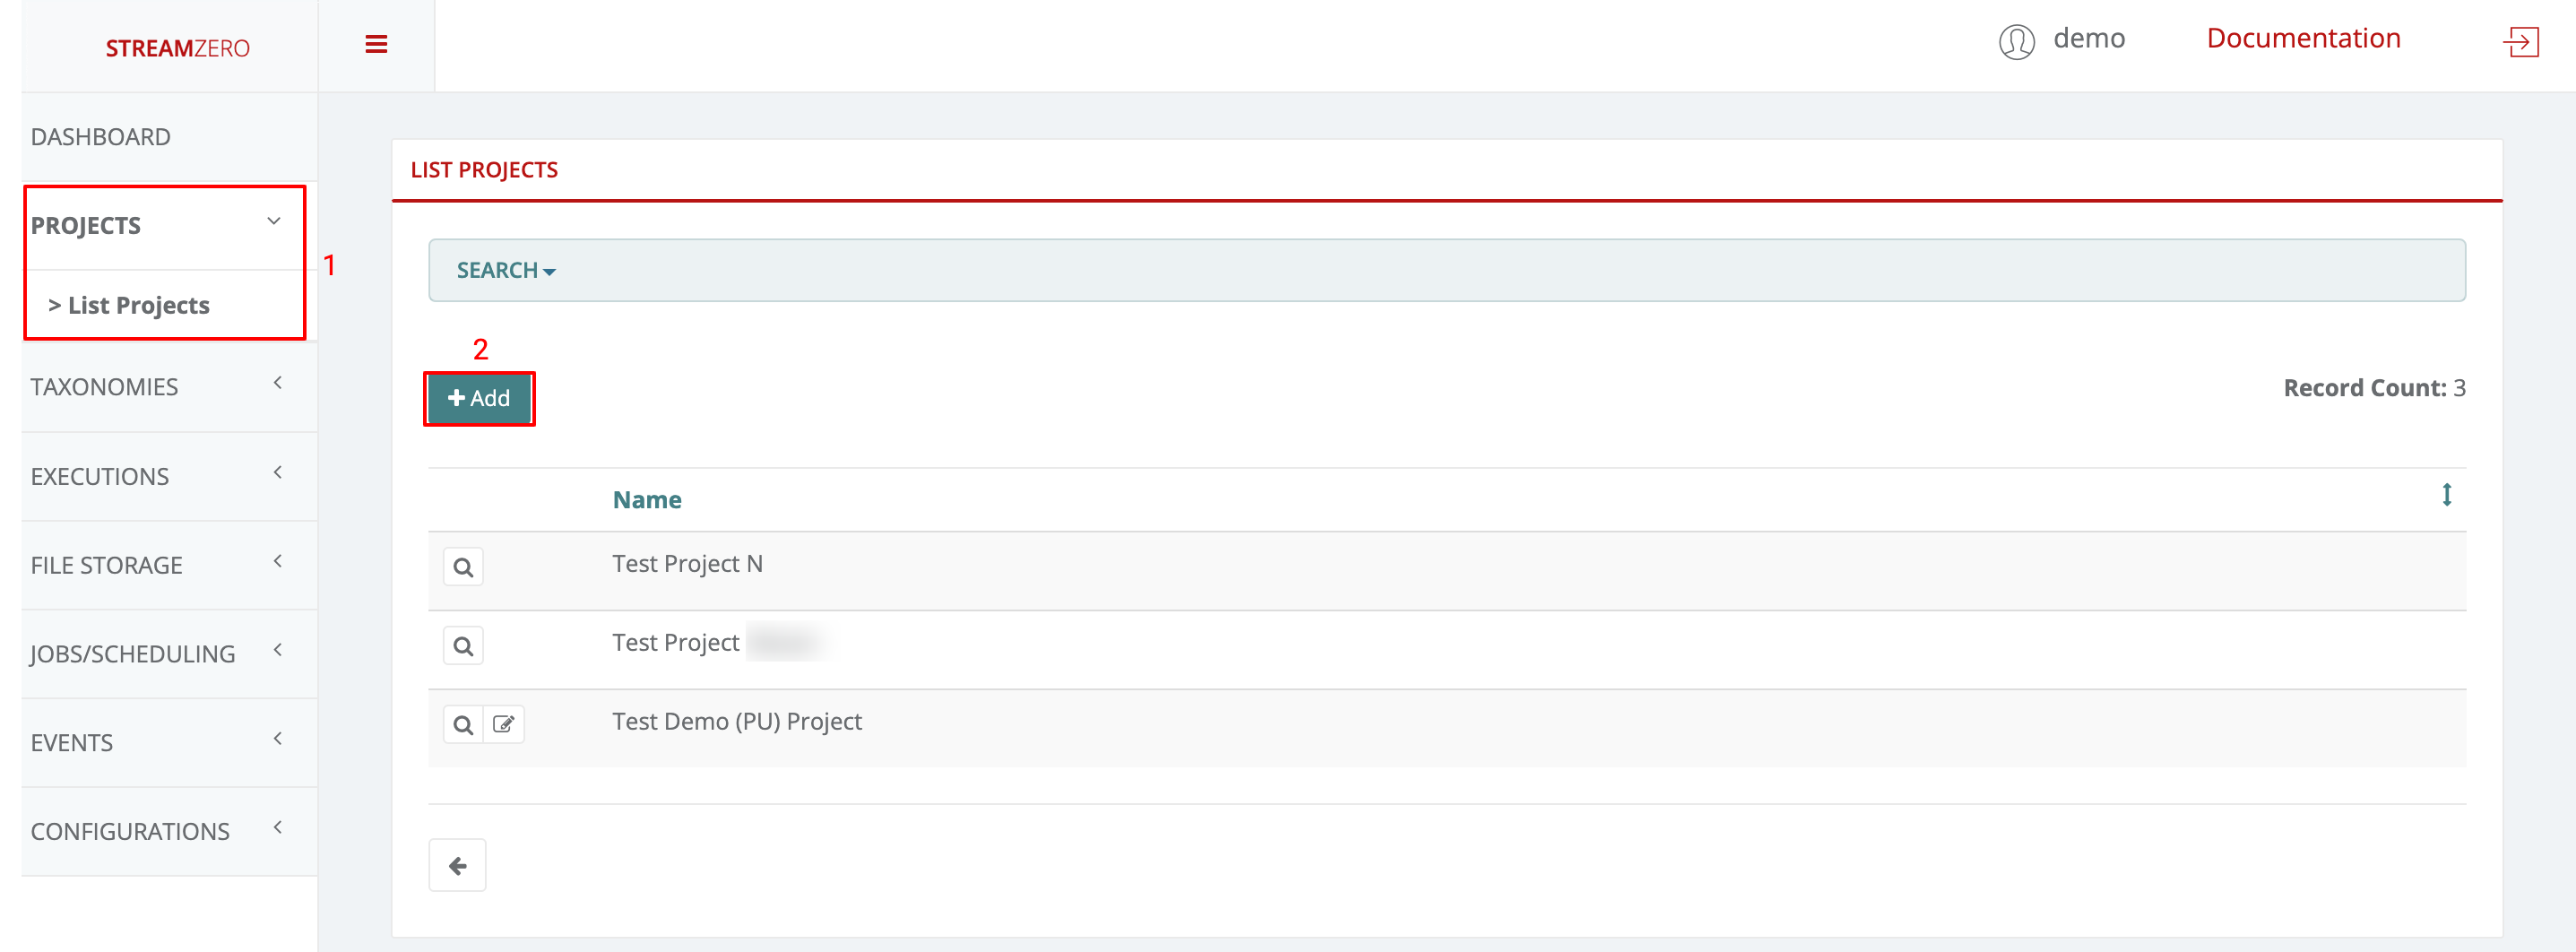
- Click on Projects in the menu on the left side to open dropdown and then on List Projects
- Click on "+Add"
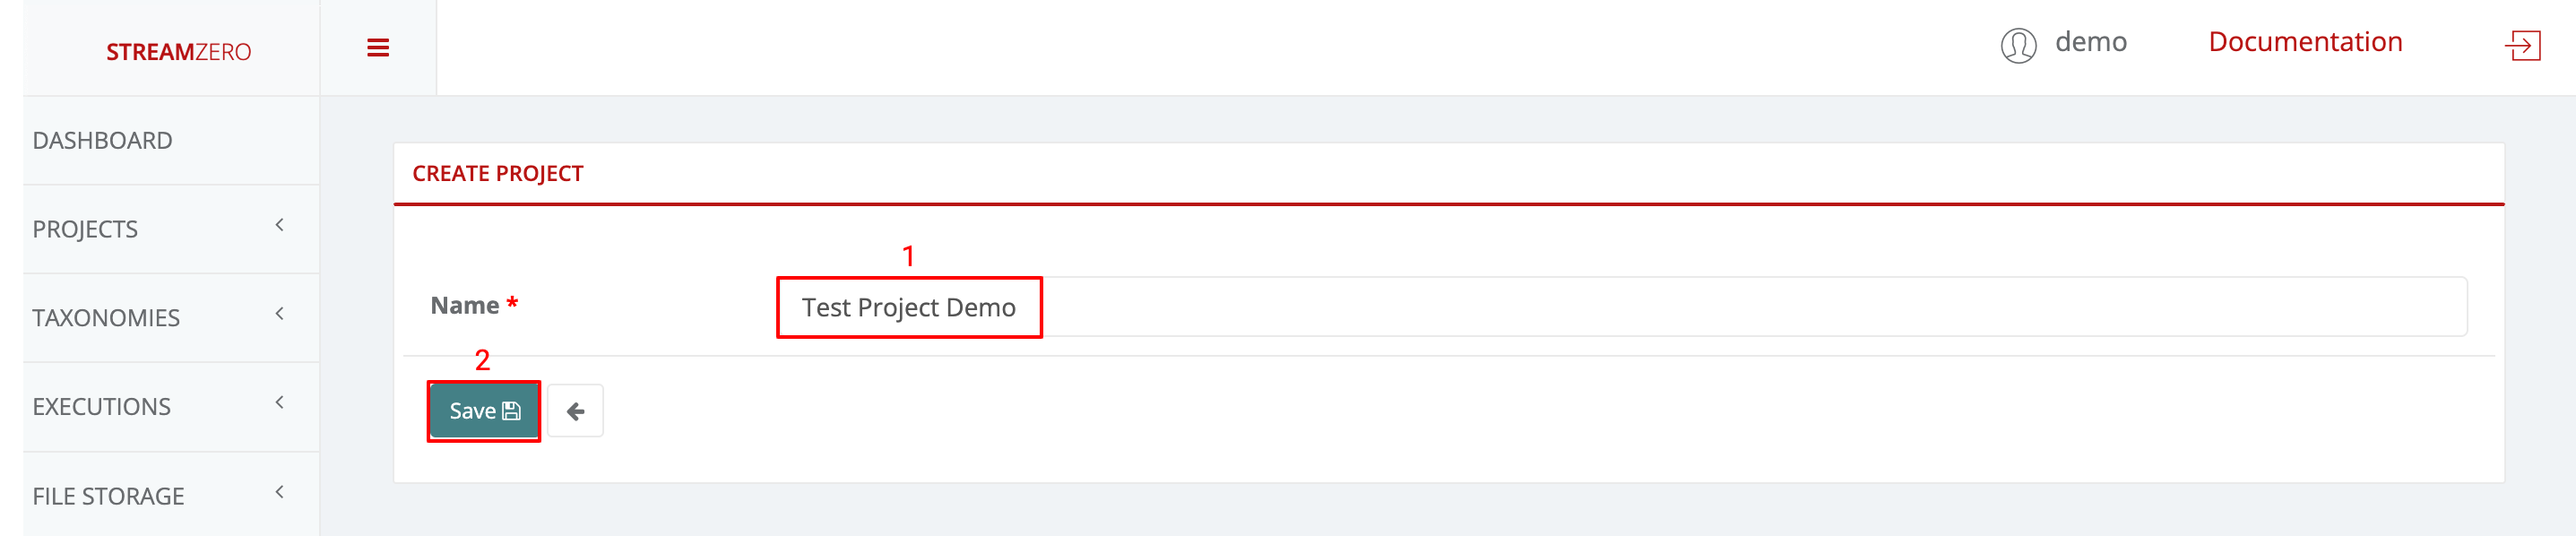
- Name the new project
- Save
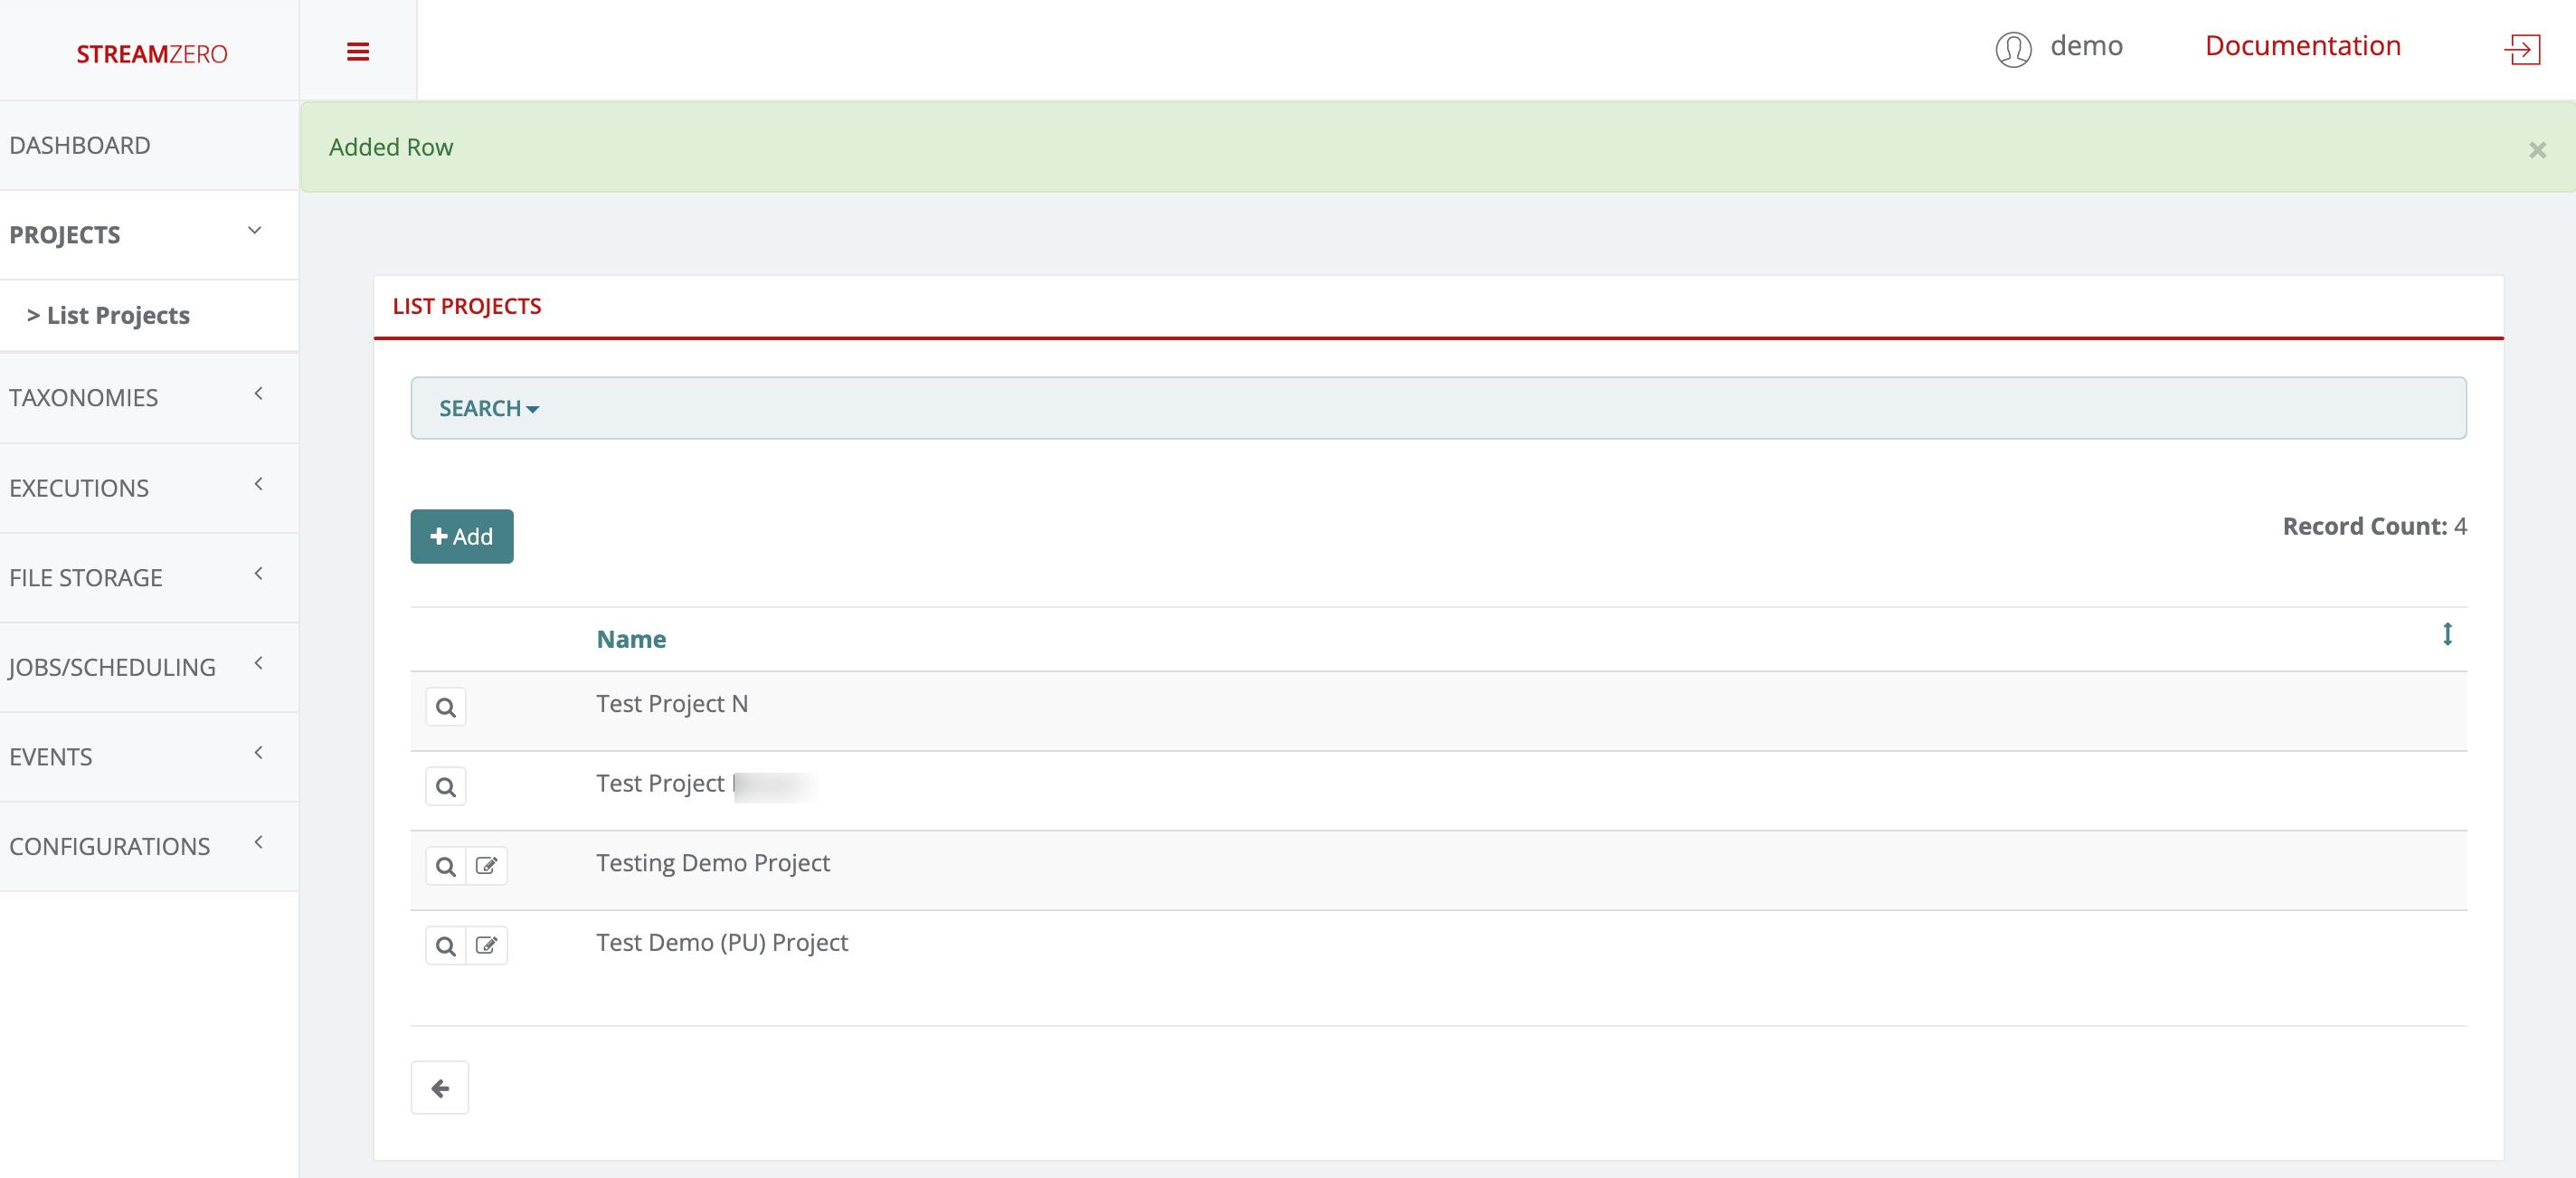
Project on the StreamZero Platform form the overarching organizational bracket for different types of objects. All users, packages, scripts, parameters, secrets and other elements are organized into projects to ease enterprise data management. The default owner for new projects is the Platform Admin (PA).
User creation within the project
Since the Platform Administrator created the Project, he is automatically assigned as the Project Owner. All user roles on the project level are defined in detail as follows:
- Project Owner - has all permissions on project and related entities (packages, users) including deletion of project(s) (and users) created by the PO. By default it is the user that created project
- Project Admin - has all permissions as Owner except deletion
- Project User - has only list / view permissions
Please note that users without Platform Administrator role, do not see any projects and packages they are not assigned to. All project role rights are translated to package level also, eg. a user with Project User role will not be able to edit packages of that project, only to list/view them and run a (manual) execution
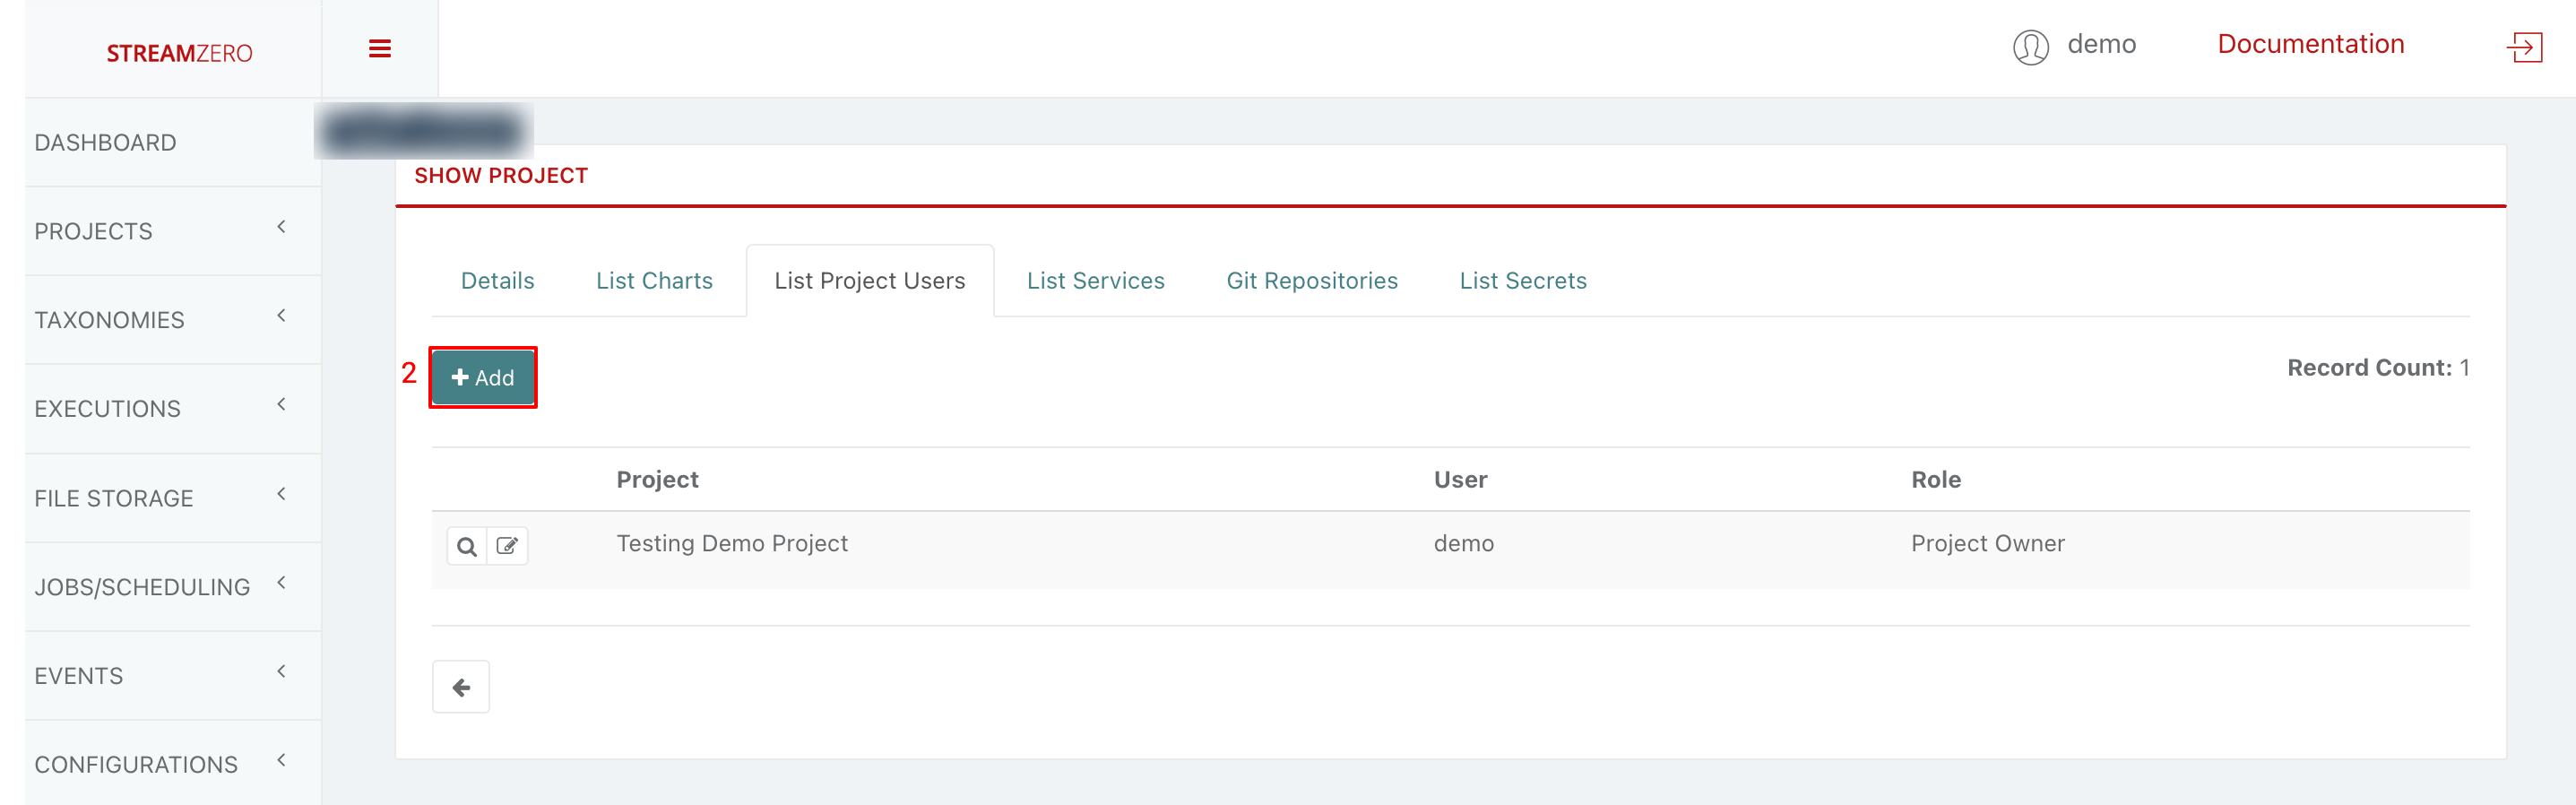
- Click on the magnifying glass to open Project details page

- Click on "+Add" to add a new user to the project
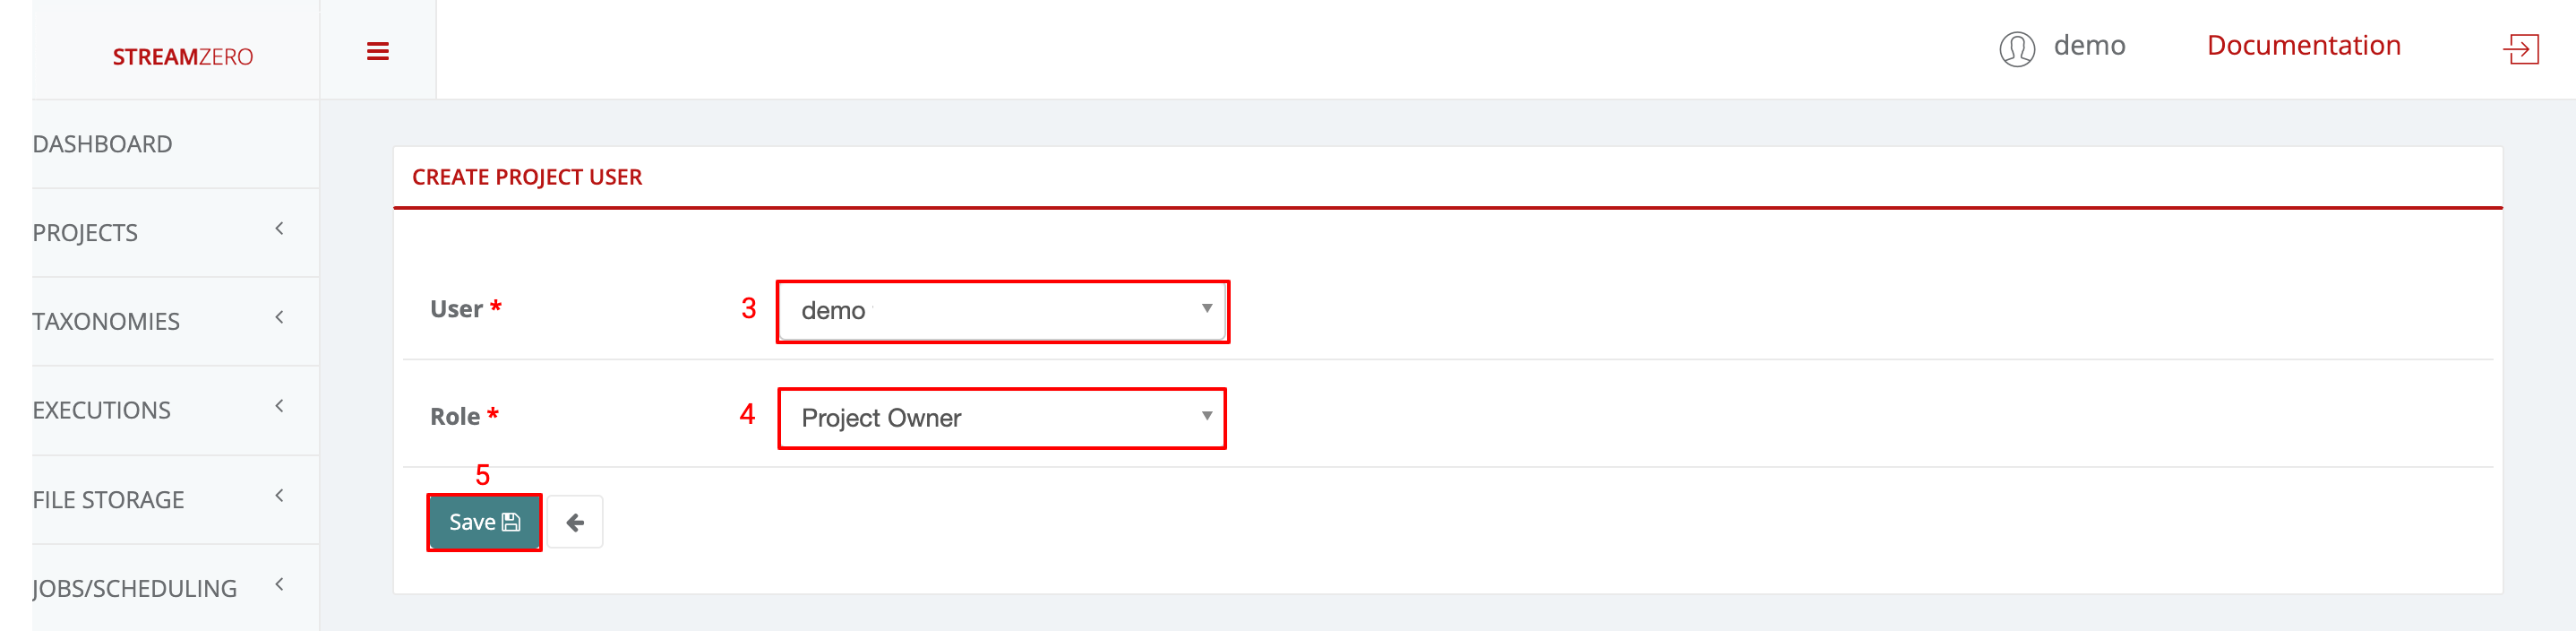
- Choose a user from the drowdown
- Choose a user role from dropdown (Owner; Admin; User)
- Click Save
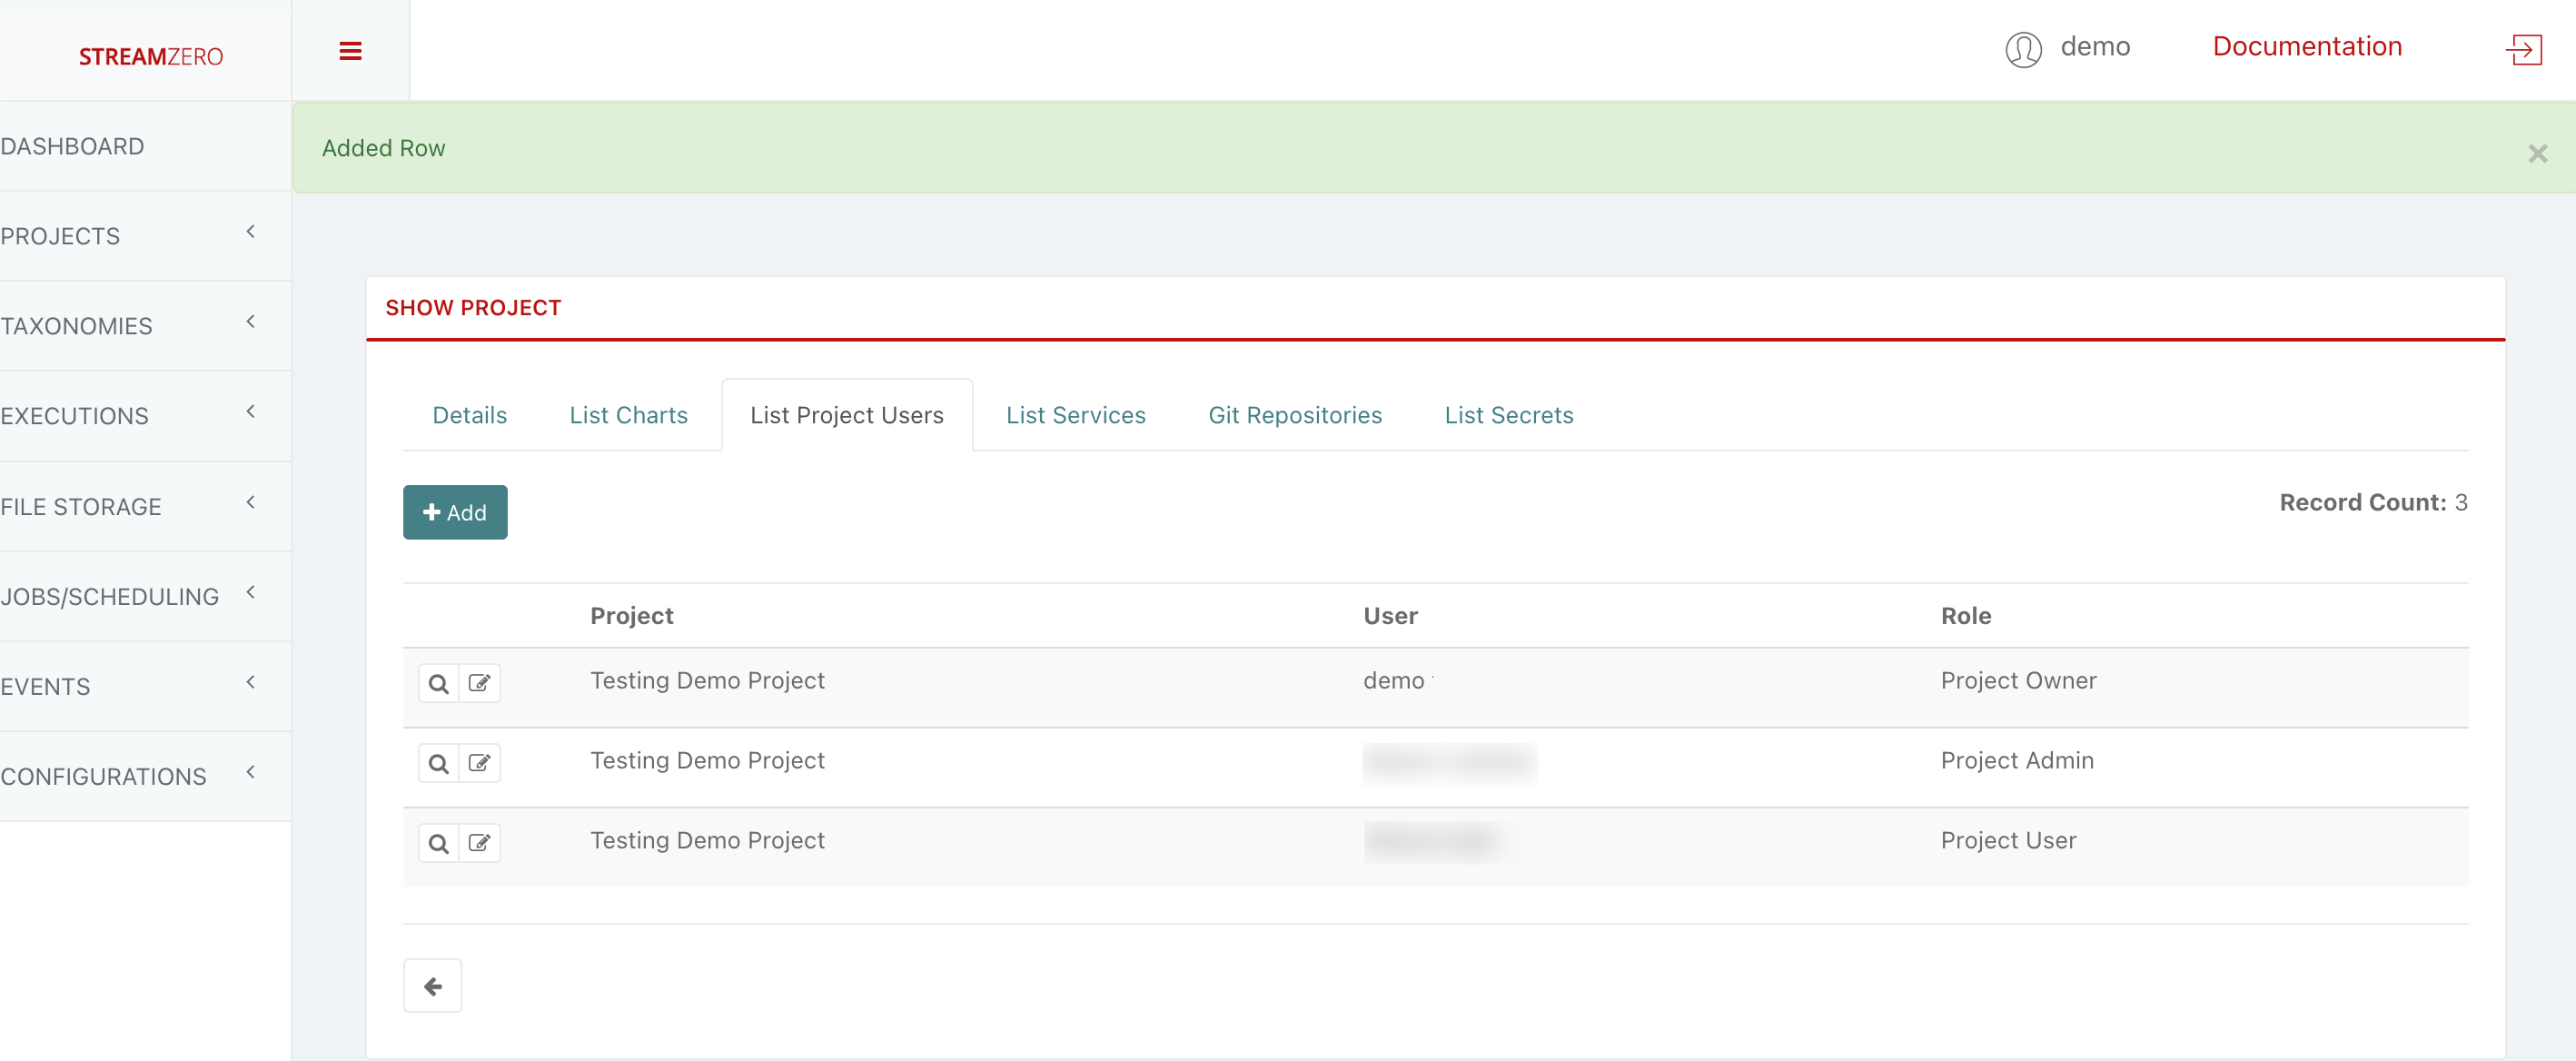
- Check the user has been created
Since new users were created, no package(s) are yet assigned to the project. A project needs to be assigned to an existing package as follows:
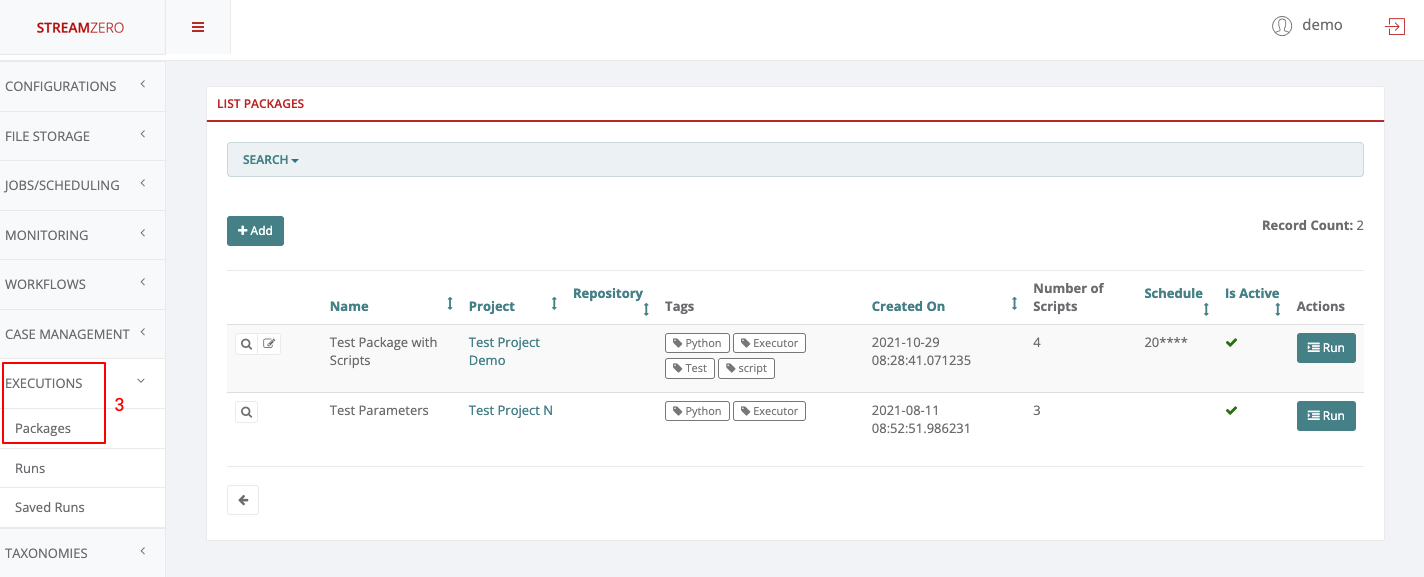
- Click on Executions to open dropdown and then Packages in the menu on the left
- Click on edit
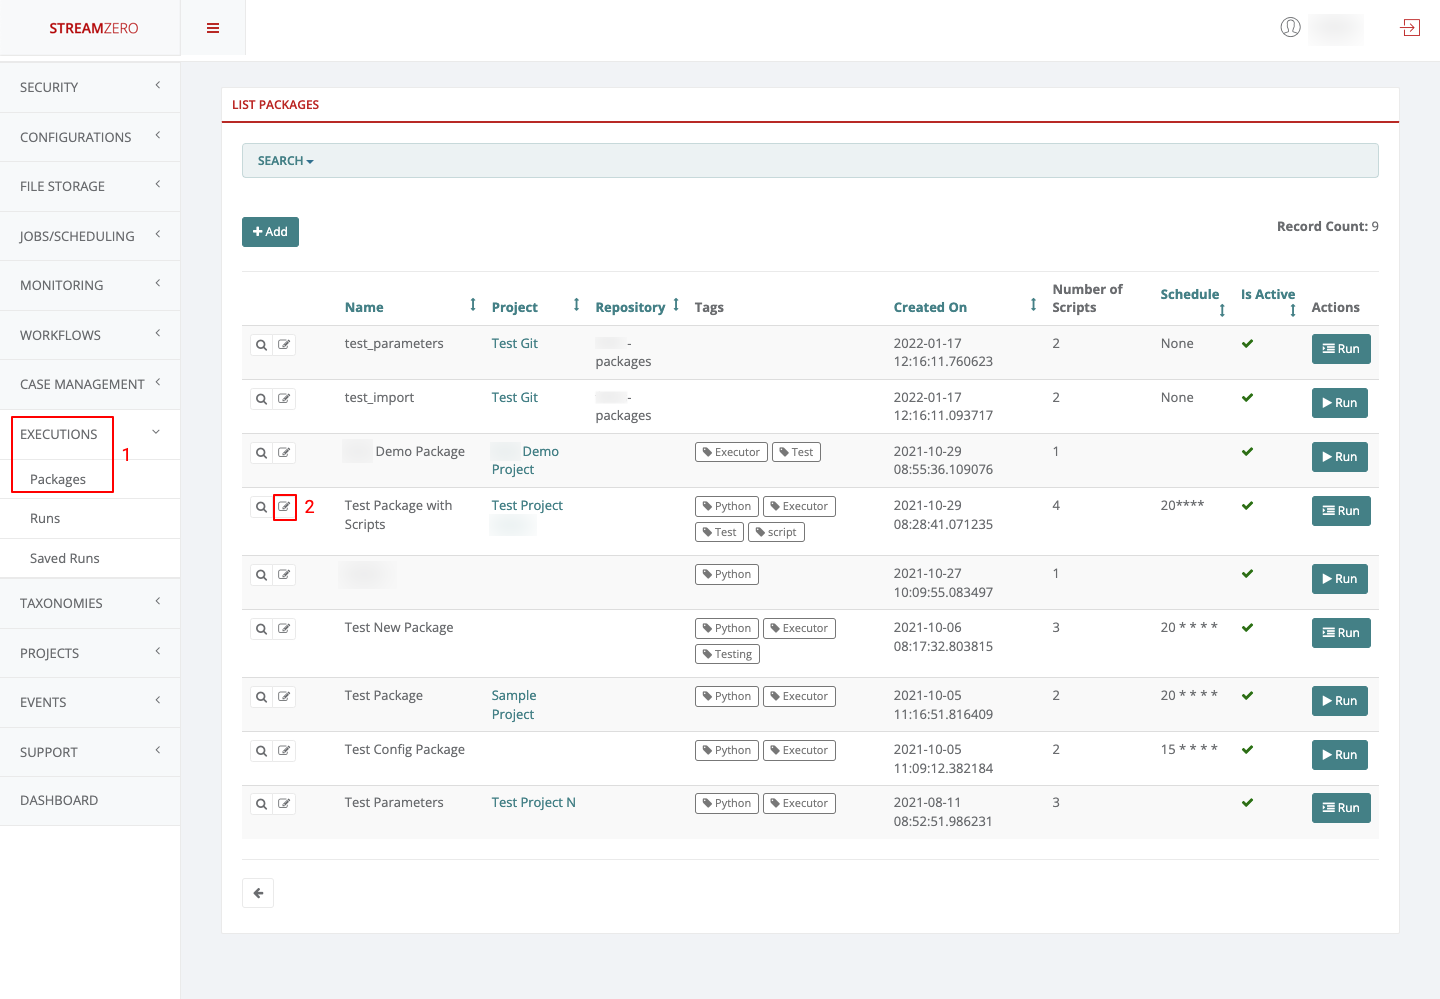
- Choose a project from dropdown
- Click Save

Once that a project was assigned to a package, the users created within that project will be able to perform their chores.
Project Owner
- Log in as “Project Owner”
- Click on Projects to open dropdown and then List Projects

As defined above, a Project Owner can add new projects, view, edit and delete the projects he belongs to.
- Click on Executions to open dropdown and then on Packages

As Project Owner, one can add new packages, view, edit, delete and trigger manual runs and delete the packages within the projects the user belongs to.
Project Admin
- Log in as “Project Admin”
- Click on Projects to open dropdown and then List Projects

As defined above, a Project Admin can add new projects, view and edit the projects he belongs to but can not delete anything.
- Click on Executions to open dropdown and then on Packages
As Project Admin, one can add new packages, view, edit and trigger manually runs within the projects the user belongs to. The Project Admin can not delete the packages, runs or related elements.
Project User
- Log in as “Project User”
- Click on Projects to open dropdwon and then List Projects
As defined above, a Project User can only view the projects he belongs to. He can neither edit, nore delete anything.
- Click on Executions to open dropdown and then on Packages.

As Project User, one can view packages and trigger manually runs within the projects the user belongs to. The Project User can not delete or edit packages, runs or related elements.
3 - Taxonomy/Tagging
Taxonomies or Tags describe the ability to organize and structure types and classes of objects and their correlations within executions/packages, events (event types) and workflows across any given application, use case or project. Tags are searchable and makes it easy to group and relate objects across different components and lifecycle stages.
As a generic base module “taggability” can easily be included in any model, use case or application by the developers/users.
Note: As of the current release the Taxonomy is universal across all projects, use cases and cannot be segregated along different functional domains. It is thus essential to create a unified naming convention to be shared among the different projects & user groups.
Taxonomies / Tags
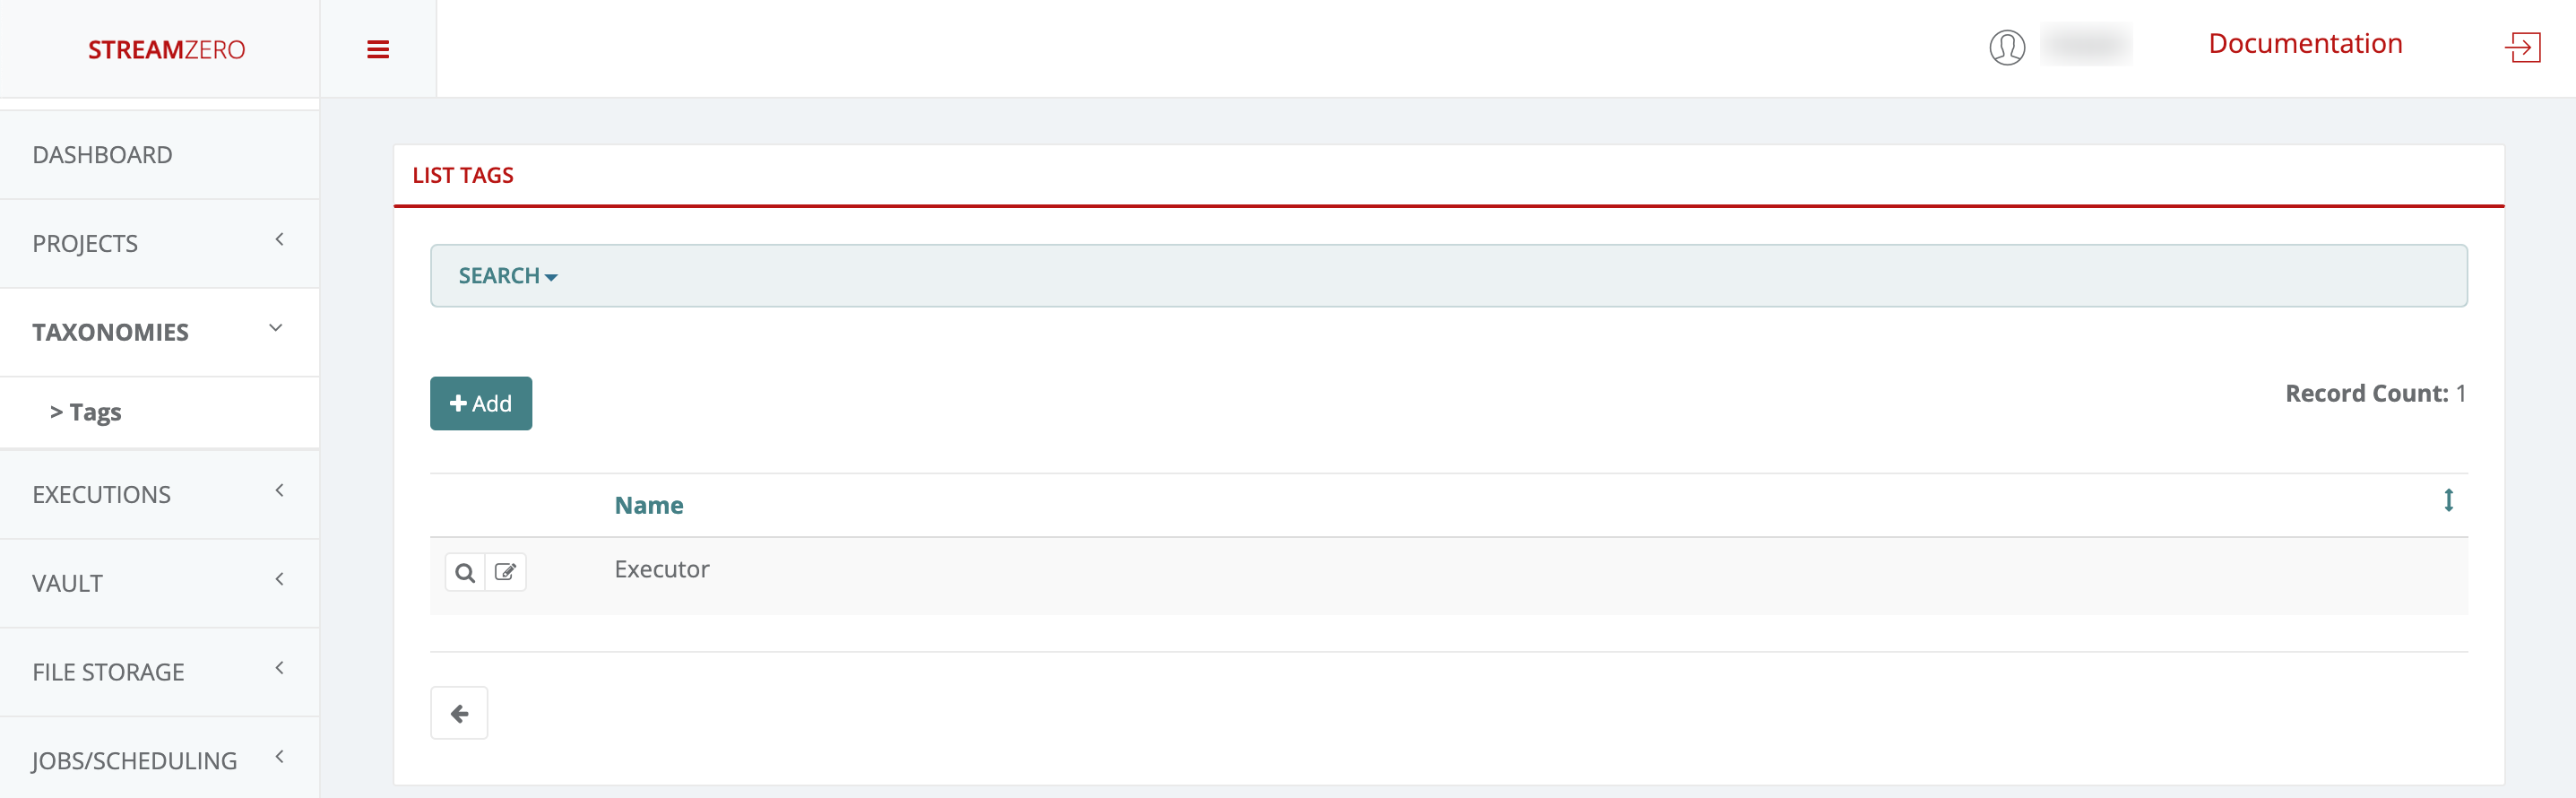
- Click on Taxonomies in the left menu to open dropdown and then on Tags
- Click Add to create a tag

- Name Tag
- Save
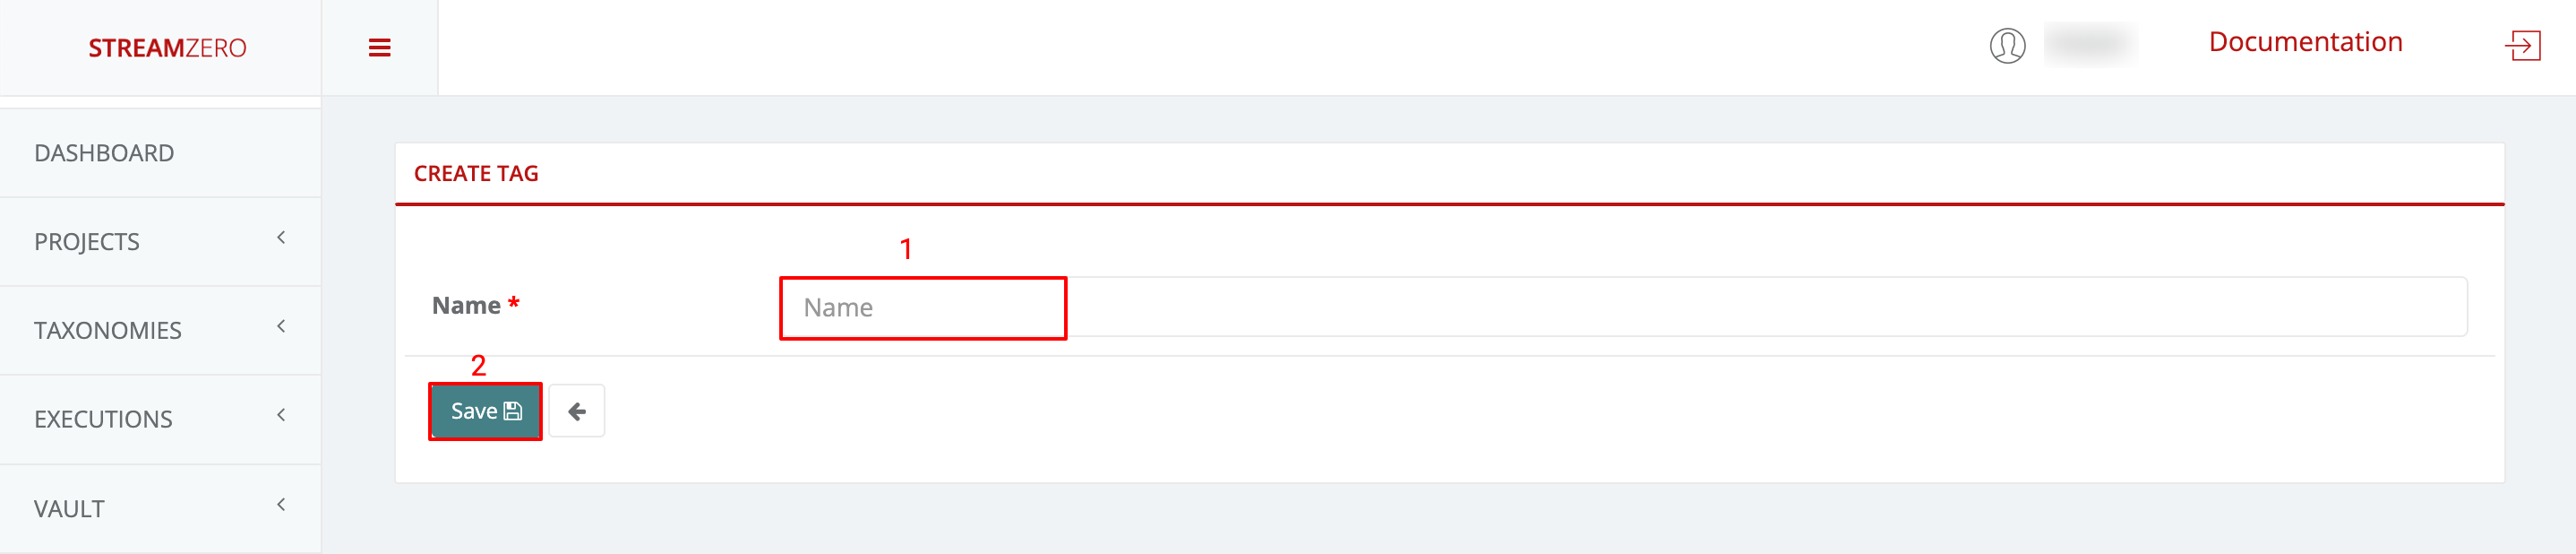
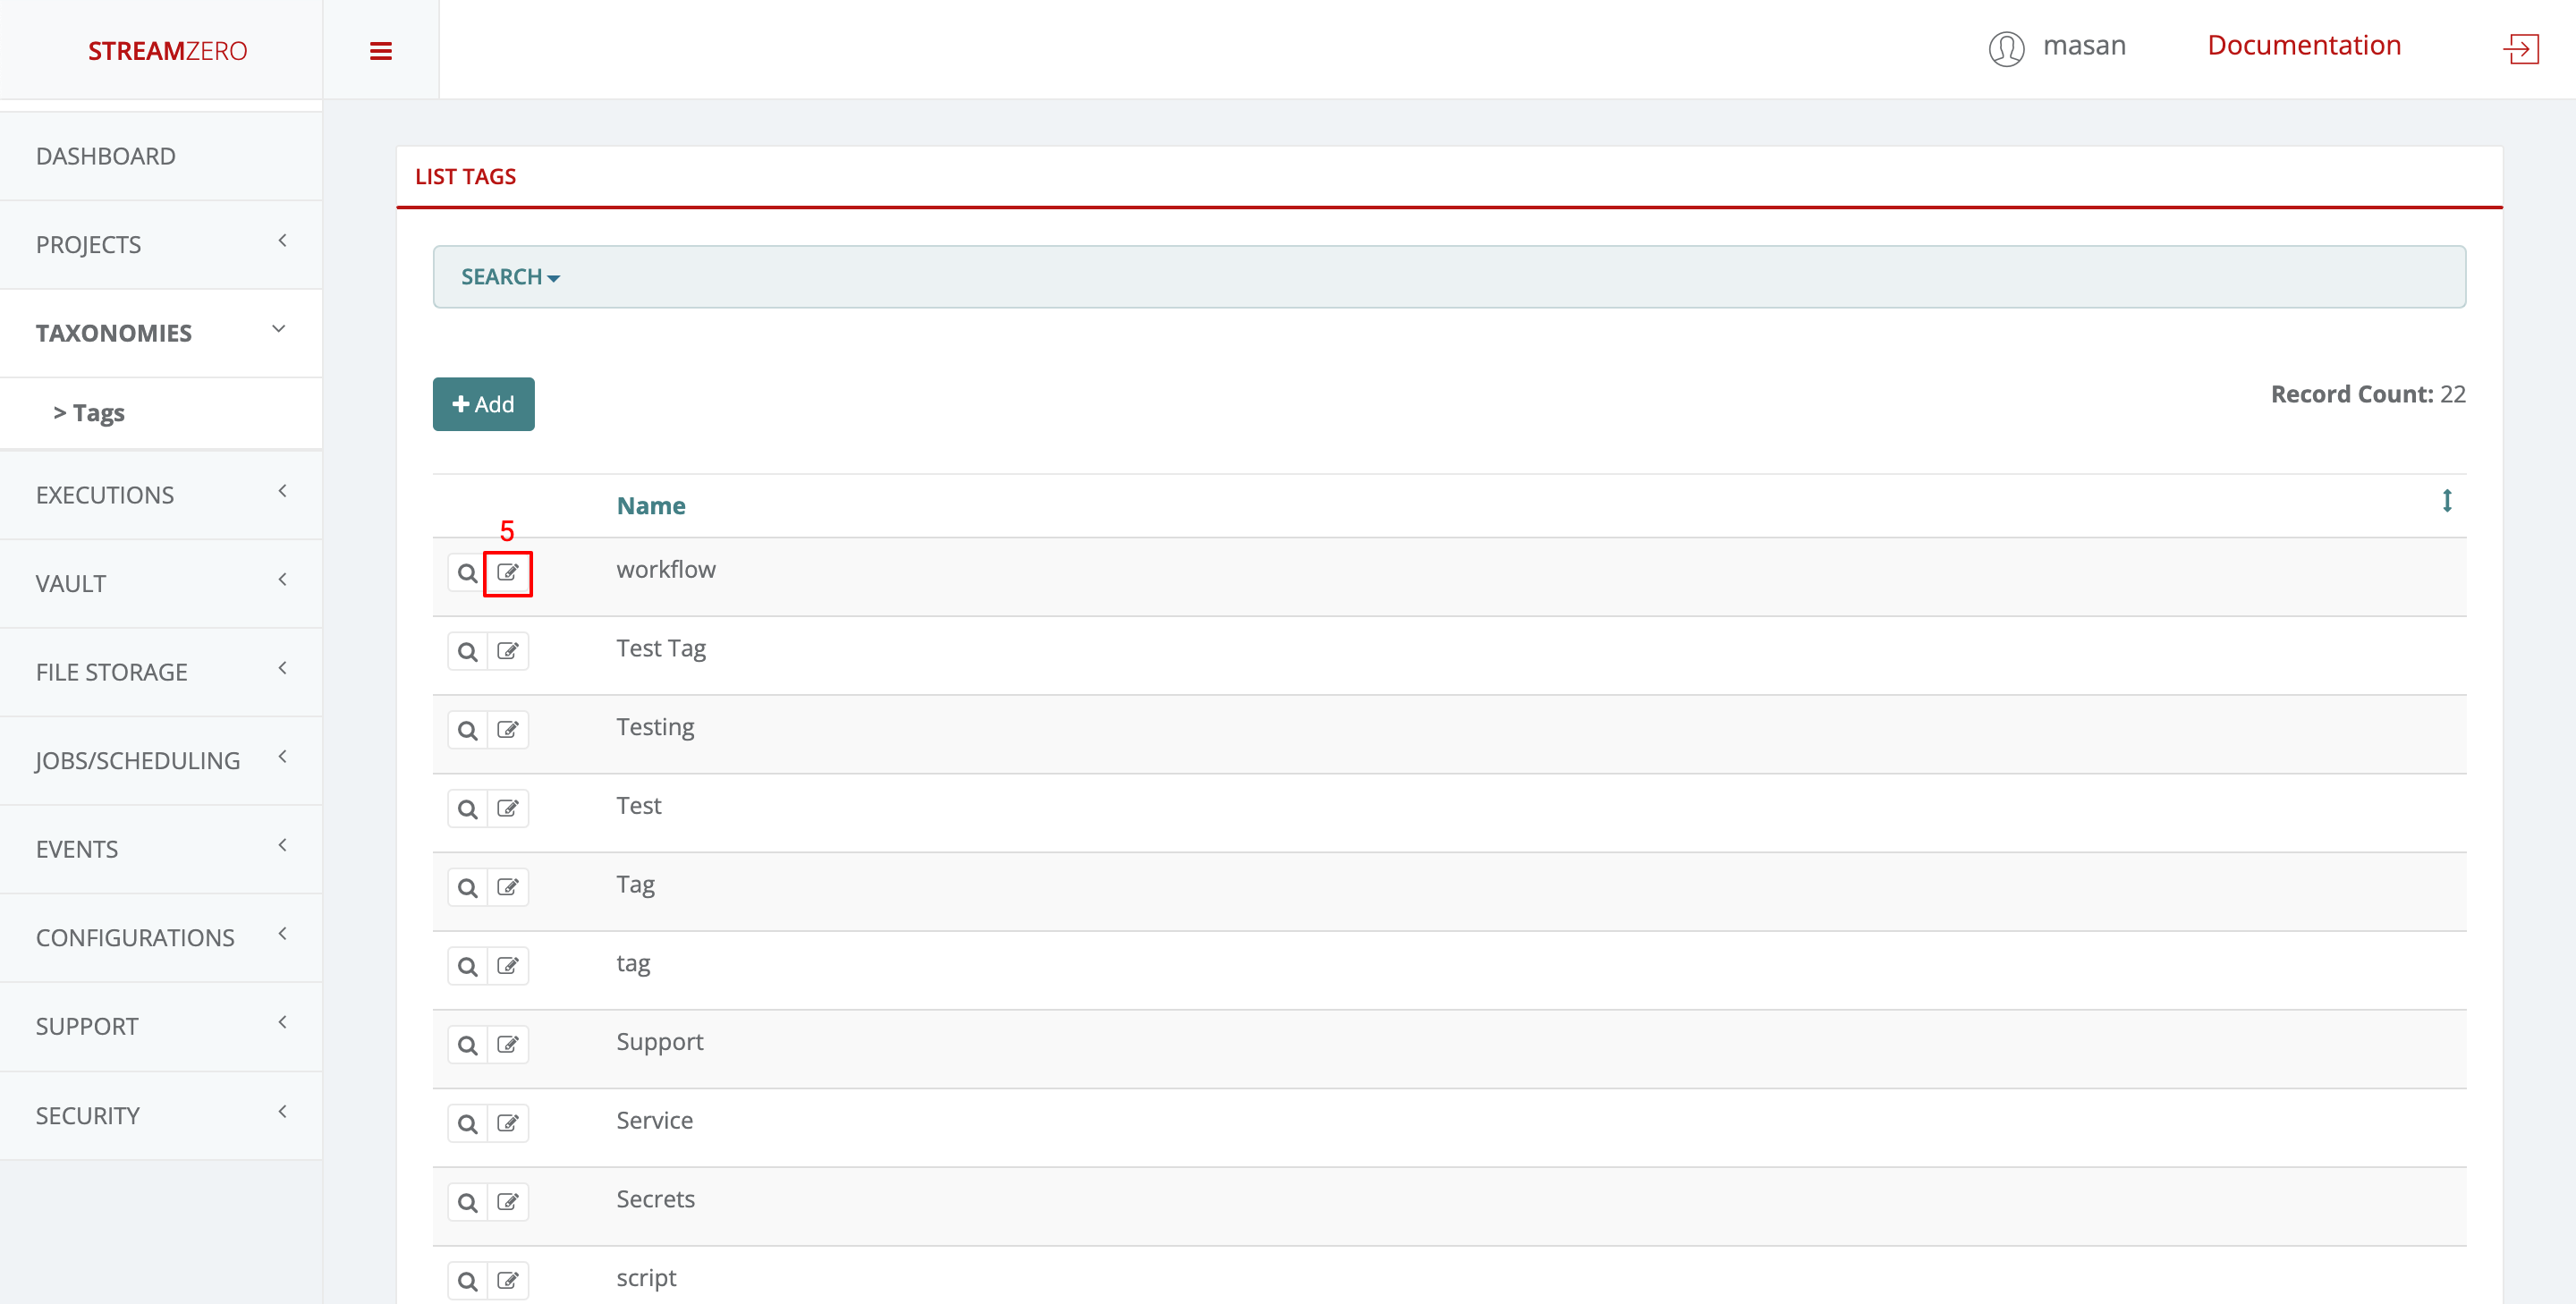
- Check created Tag(s)
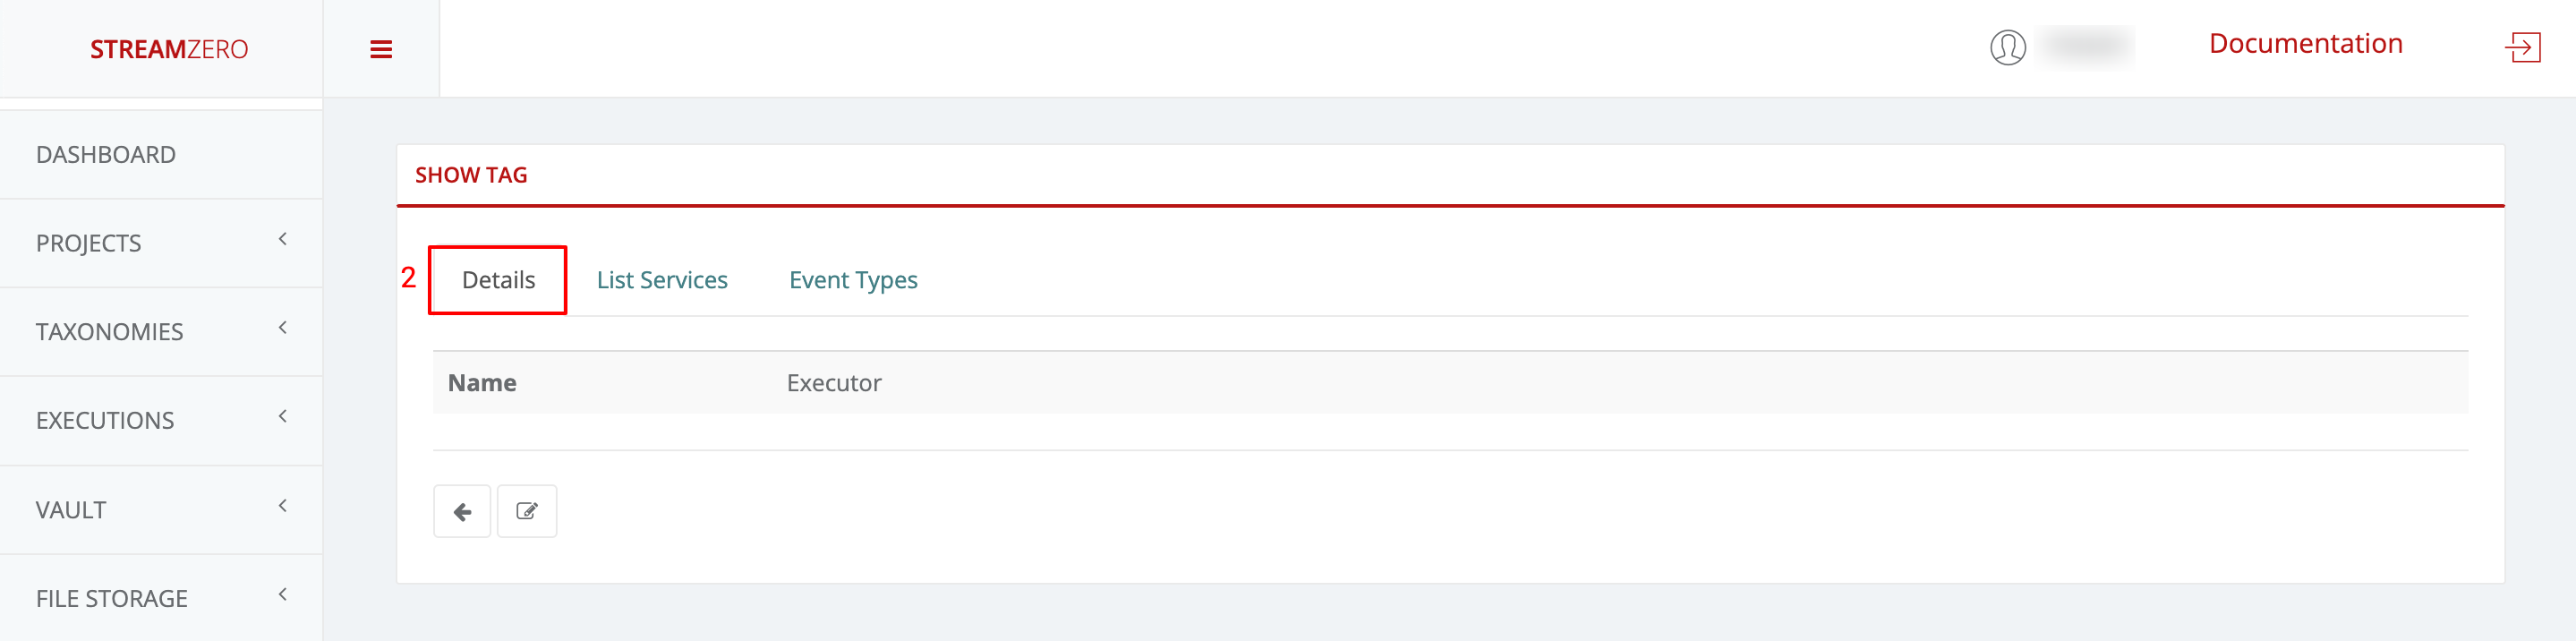
- Click on the magnifying glass to open details (show tag) page
- This will automatically transfer you to the tag details page
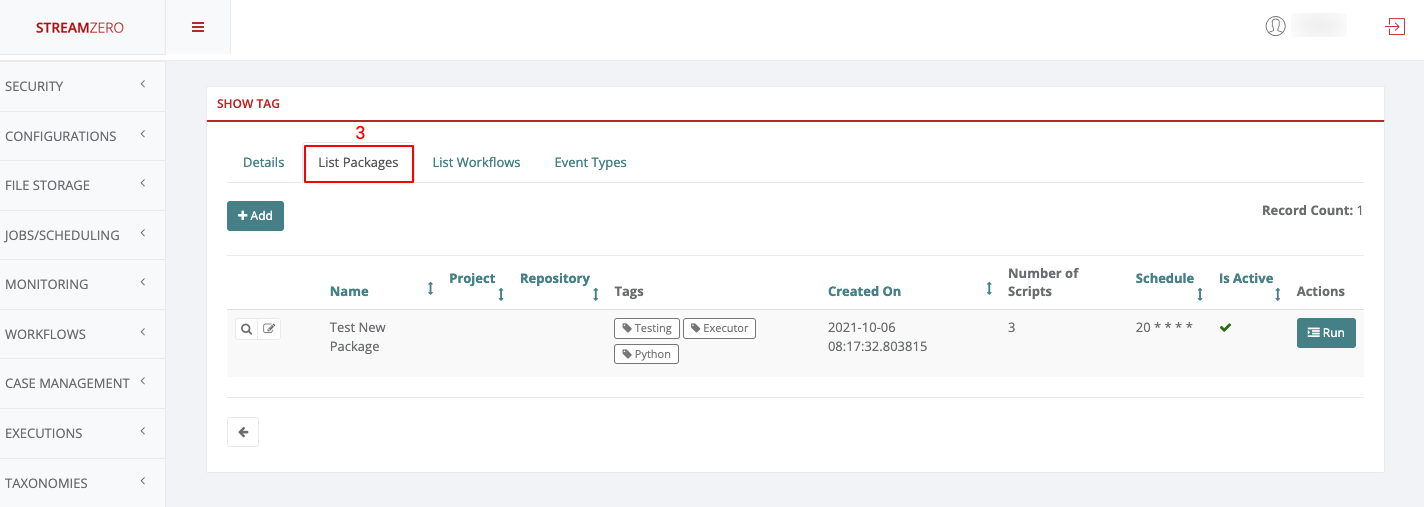
- Click on List Packages to see in which packages the same tag is used
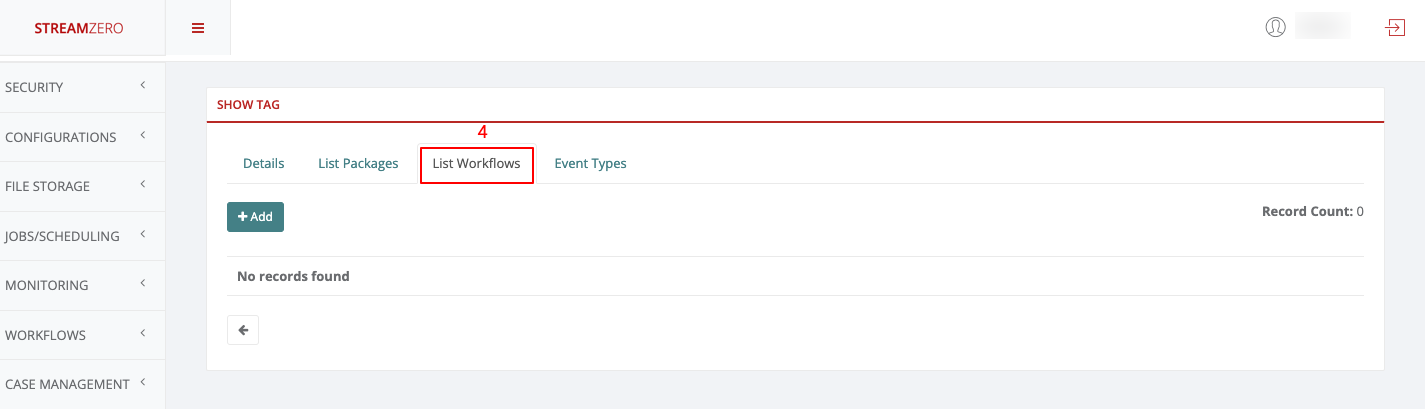
- Click on List Workflows to see in which workflows the same tag is used (in this example no workflow is associated with the tag just created)
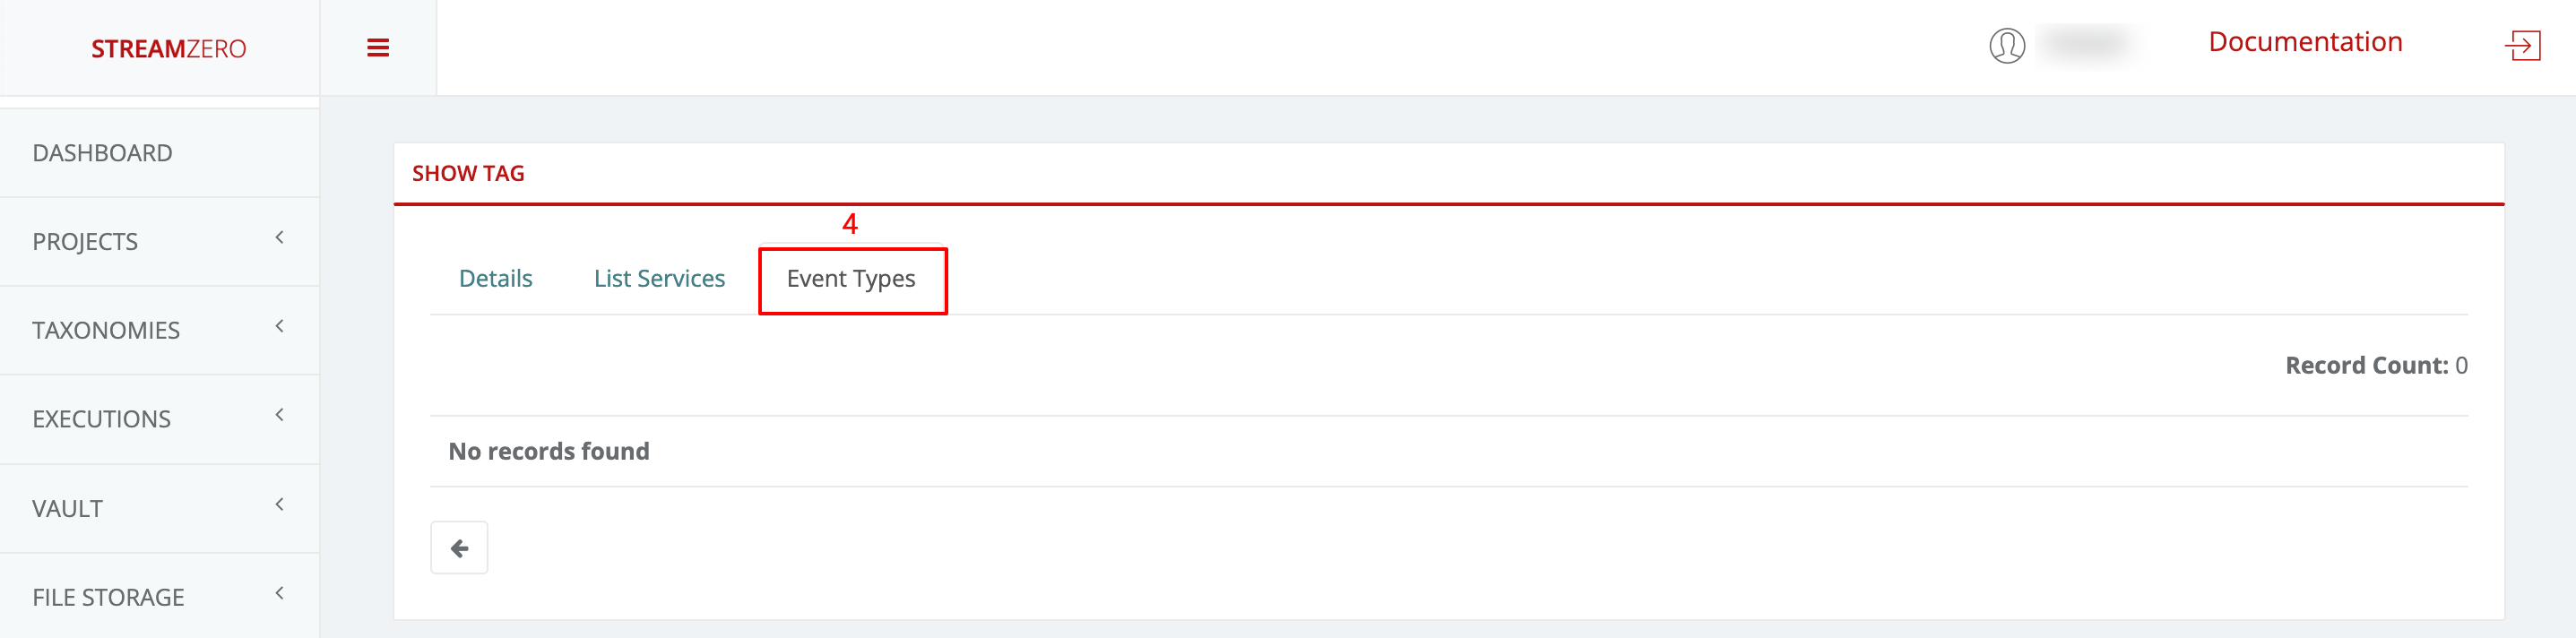
- Click on Event Types to see in which event type the same tag is uses (in this example no event type is associated with the tag just created)
- Click on the Edit icon (List tags page) to edit/rename a tag

Search Tag
- Click Search on top of the List Tags / Details Page
- Click Add Filter to choose a filter (currently only the “Name” filter is supported)
- From the dropdown list choose the tag to be searched for
- Starts with
- Ends with
- Contains
- Equal to
- Etc.
- Insert tag “Name”
- Hit the Search button

- Check search results
4 - CronJob
CronJobs are used to schedule regularly recurring actions such as backups, report generation and similar items. Each of those tasks should be configured to recur for an indefinite period into the future on a regular frequency (for example: once a day / week / month). The user also can define the point in time within that interval when the job should start.
Example:
This example CronJob manifest would execute and trigger an event every minute:
|
|
Cron Schedule Syntax
|
|
For example, the line below states that the task must be started every Friday at midnight, as well as on the 13th of each month at midnight:
0 0 13 * 5
To generate CronJob schedule expressions, you can also use web tools like crontab.guru.
Useful Cron Patterns
| Entry | Description | Equivalent to |
|---|---|---|
| @yearly (or @annually) | Run once a year at midnight of 1 January | 0 0 1 1 * |
| @monthly | Run once a month at midnight of the first day of the month | 0 0 1 * * |
| @weekly | Run once a week at midnight on Sunday morning | 0 0 * * 0 |
| @daily (or @midnight) | Run once a day at midnight | 0 0 * * * |
| @hourly | Run once an hour at the beginning of the hour | 0 * * * * |
20 Useful Crontab Examples
Here is the list of examples for scheduling cron jobs in a Linux system using crontab.
1. Schedule a cron to execute at 2am daily.
This will be useful for scheduling database backup on a daily basis.
|
|
- Asterisk (*) is used for matching all the records.
2. Schedule a cron to execute twice a day.
Below example command will execute at 5 AM and 5 PM daily. You can specify multiple time stamps by comma-separated.
0 5,17 * * *
3. Schedule a cron to execute on every minutes.
Generally, we don’t require any script to execute on every minute but in some cases, you may need to configure it.
* * * * *
4. Schedule a cron to execute on every Sunday at 5 PM.
This type of cron is useful for doing weekly tasks, like log rotation, etc.
0 17 * * sun
5. Schedule a cron to execute on every 10 minutes.
If you want to run your script on 10 minutes interval, you can configure like below. These types of crons are useful for monitoring.
*/10 * * * *
*/10: means to run every 10 minutes. Same as if you want to execute on every 5 minutes use */5.
6. Schedule a cron to execute on selected months.
Sometimes we required scheduling a task to be executed for selected months only. Below example script will run in January, May and August months.
* * * jan,may,aug
7. Schedule a cron to execute on selected days.
If you required scheduling a task to be executed for selected days only. The below example will run on each Sunday and Friday at 5 PM.
0 17 * * sun,fri
8. Schedule a cron to execute on first sunday of every month.
To schedule a script to execute a script on the first Sunday only is not possible by time parameter, But we can use the condition in command fields to do it.
0 2 * * sun [ $(date +%d) -le 07 ] && /script/script.sh
9. Schedule a cron to execute on every four hours.
If you want to run a script on 4 hours interval. It can be configured like below.
|
|
10. Schedule a cron to execute twice on every Sunday and Monday.
To schedule a task to execute twice on Sunday and Monday only. Use the following settings to do it.
|
|
11. Schedule a cron to execute on every 30 Seconds.
To schedule a task to execute every 30 seconds is not possible by time parameters, But it can be done by schedule same cron twice as below.
|
|
13. Schedule tasks to execute on yearly ( @yearly ).
@yearly timestamp is similar to “0 0 1 1 *“. It will execute a task on the first minute of every year, It may useful to send new year greetings 🙂
|
|
14. Schedule tasks to execute on monthly ( @monthly ).
@monthly timestamp is similar to “0 0 1 * *“. It will execute a task in the first minute of the month. It may useful to do monthly tasks like paying the bills and invoicing to customers.
|
|
15. Schedule tasks to execute on Weekly ( @weekly ).
@weekly timestamp is similar to “0 0 * * mon“. It will execute a task in the first minute of the week. It may useful to do weekly tasks like the cleanup of the system etc.
|
|
16. Schedule tasks to execute on daily ( @daily ).
@daily timestamp is similar to “0 0 * * *“. It will execute a task in the first minute of every day, It may useful to do daily tasks.
|
|
17. Schedule tasks to execute on hourly ( @hourly ).
@hourly timestamp is similar to “0 * * * *“. It will execute a task in the first minute of every hour, It may useful to do hourly tasks.
|
|
5 - Events
FX is an event driven platform wich means that each action generating an event can be reused for further triggering of executions. Also within an executing script, an event can be generated and sent as a message. Each event is defined at least by it’s source, type and payload (data). Event message format is following the cloudevents standard. A list of all event types is maintained so the user can bound package execution to certain event type, which means that each time such an event is received, the package execution will be triggered.
Events
Events are messages passed through the platform which are generated by Services.
Events are in the form of JSON formatted messages which adhere to the CloudEvents format. They carry a Header which indicates the event type and a Payload (or Data section) which contain information about the event.
To have a better detailed understanding of how Events are generated, please refer to the Architecture subcategory in the Overview category.
Events
This use case defines how to configure a package to be triggered bt the FX Router when a specific type of event is observed on the platform.
- Click on Events on the left side of the dashboard menu to open drop-down
- Click on Event Types
- Check the predefined Event Types
- ferris.apps.modules.approvals.step_approval_completed
- ferris.apps.modules.minio.file_uploaded
Events can be created within scripts during package execution by sending a message to the Kafka Topic using the ferris_cli python package. For example, a package can be bound to a file_upload event that is triggered every time a file gets uploaded to MinIO using FX file storage module. New event types will be registered as they are sent to the Kafka Topic using the ferris_cli python package.
Further details regarding ferris_cli can be found in the subcategory Development Lifecycle in the Developer Guide.

Executions - Packages -> file upload trigger event
In this use case an existing package will be edited to define the file upload event type.
- Click on Executions on the left side of the dashboard menu to open drop-down
- Click on Packages
- Click on the edit record button to edit the existing package Test Package with Scripts
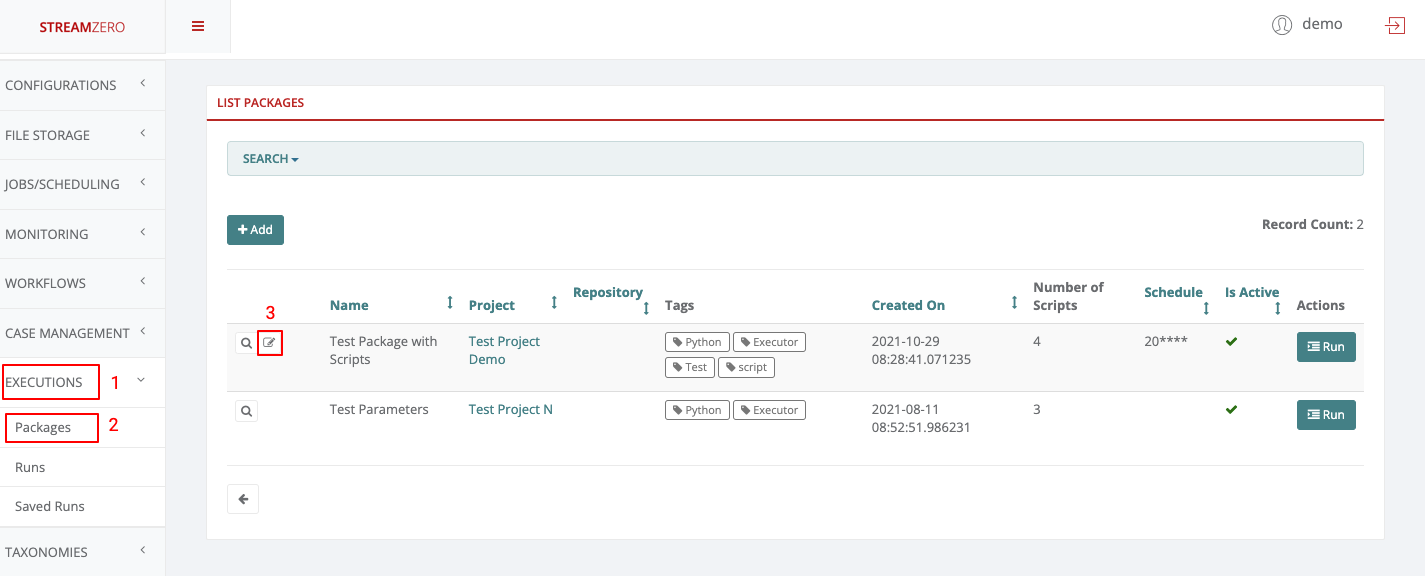
- Delete the CronJob Schedule to allow a Trigger Event Type
- Select the Value of the event type (ferris.apps.modules.minio.file_uploaded)
- Save the edited package.

File Storage
To finalize the process, a file needs to be uploaded to a MinIO bucket (file storage).
- Click on File Storage on the left side of the dashboard menu to open drop-down
- Click on List Files
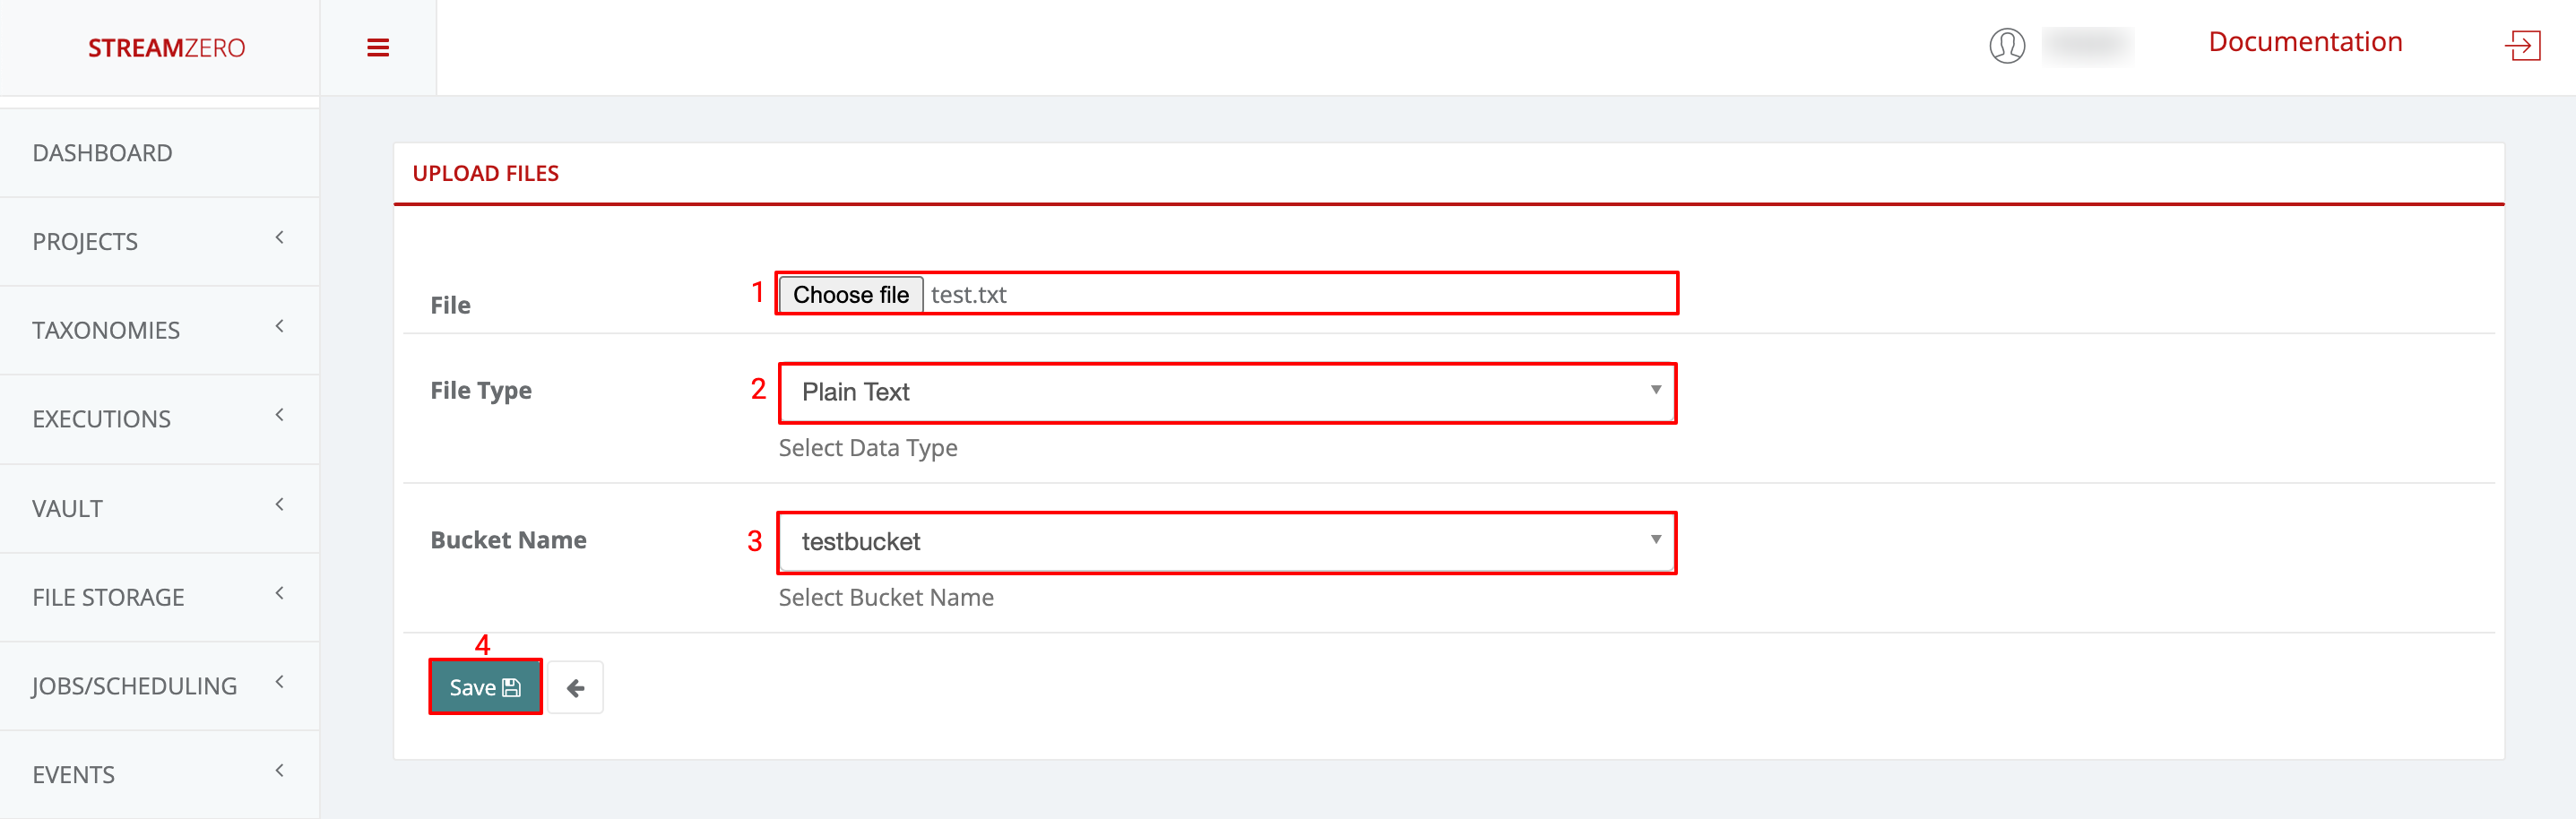
- Click on +Add to upload a file to the bucket

- Choose file to upload
- Choose File Type (CSV Table; Plain Text; JSON)
- Select the Bucket Name
- Click on Save to save the file
To verify if the package execution has been triggered, go back to the initial, edited package.
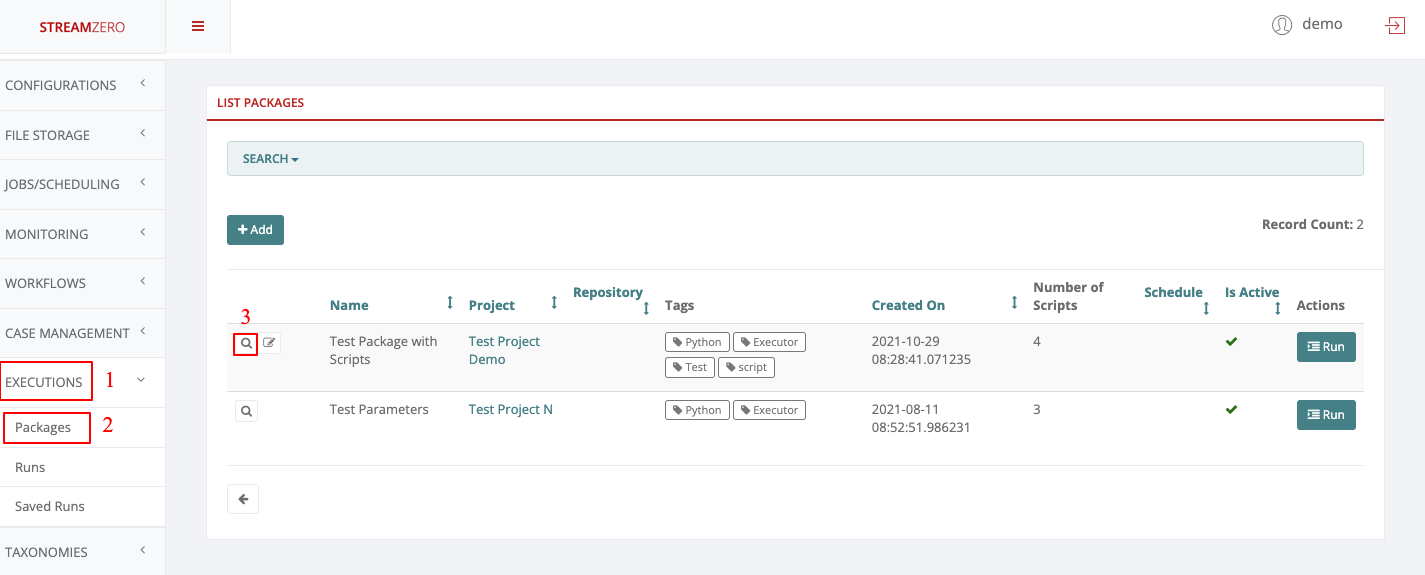
- Click on Executions on the left side of the dashboard menu to open drop-down
- Click on Packages
- Click on the magnifying glass to open the details page of the package Test Package with Scripts
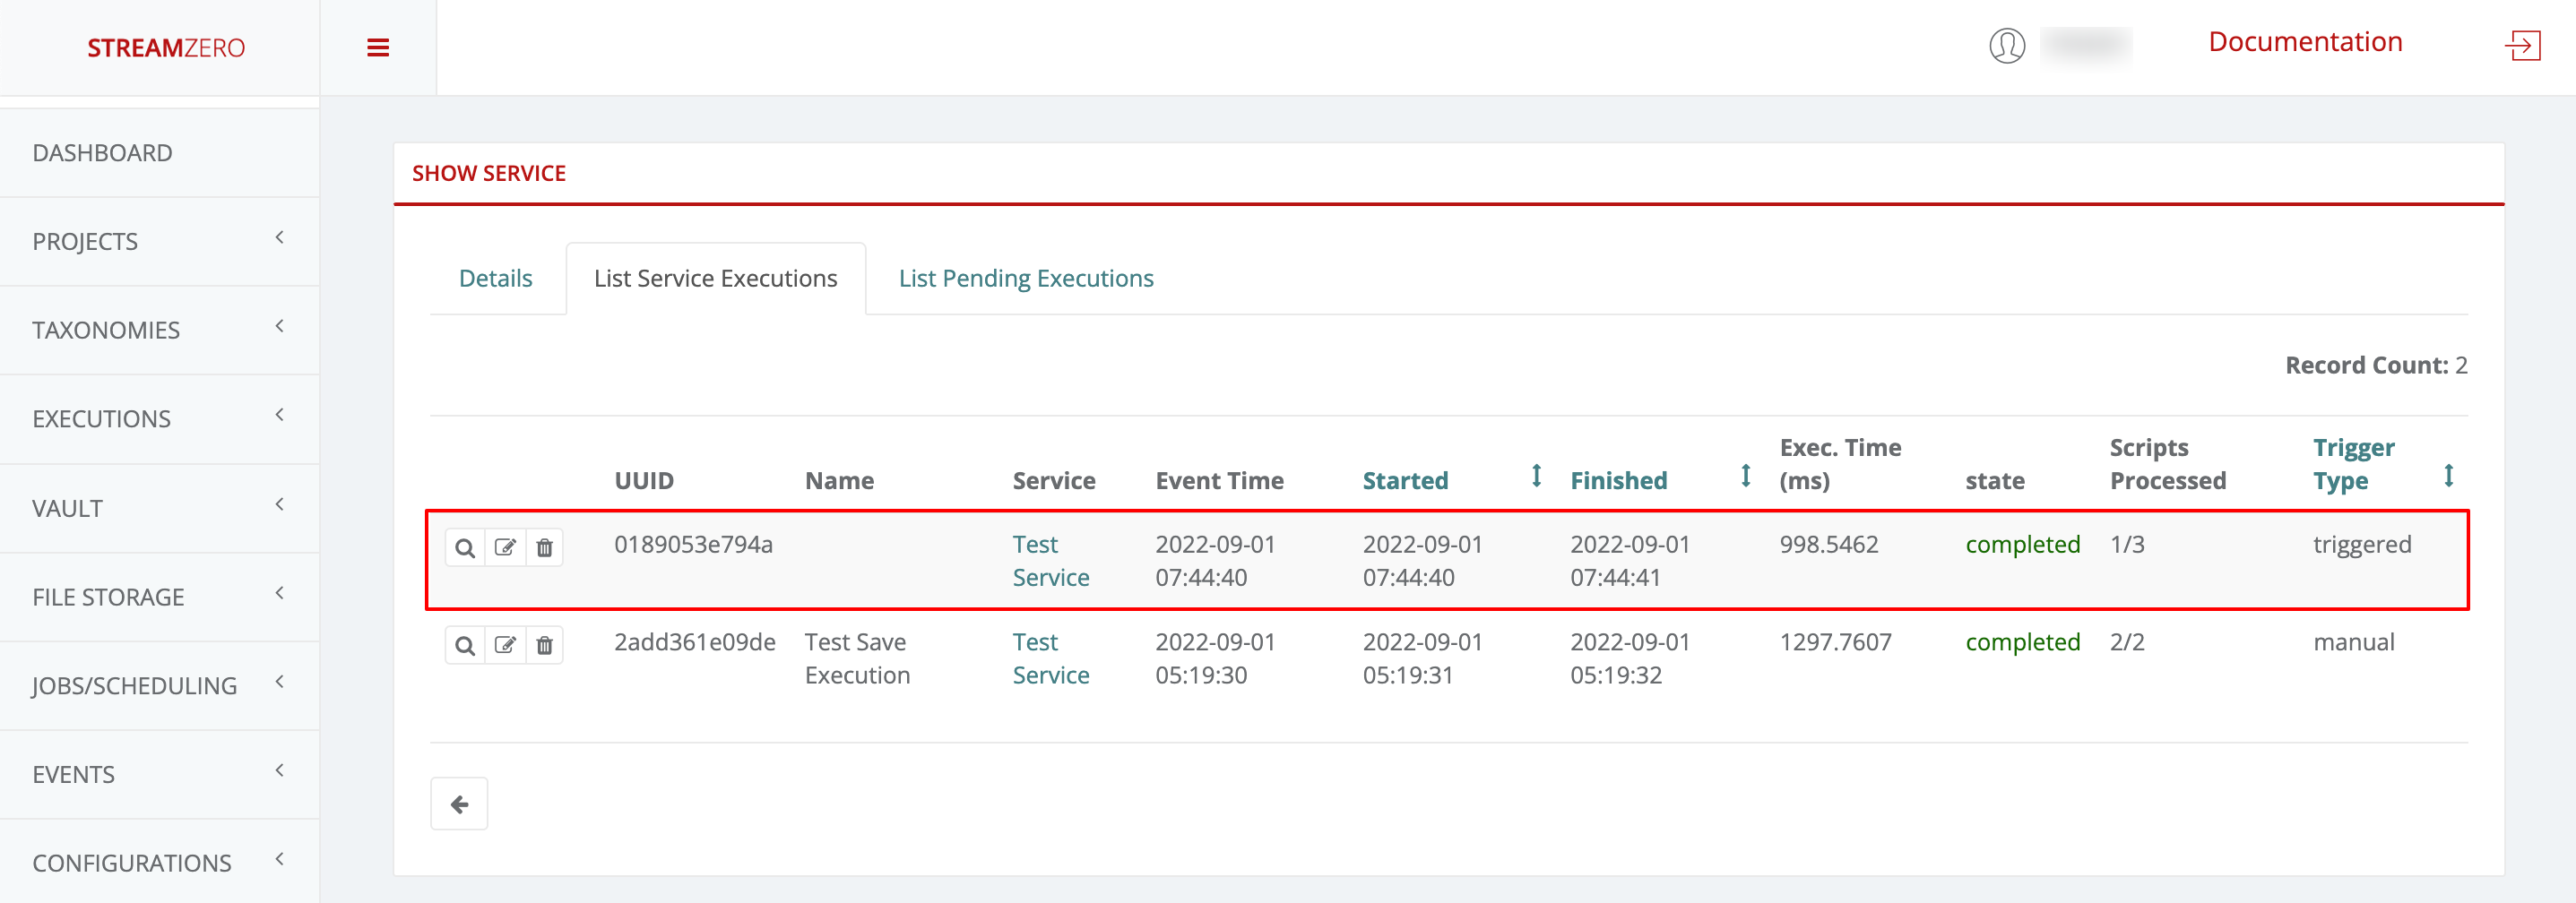
It will automatically open the List Package Executions tab.
- Check the last Event, date and time to verify it corresponds to the time the file was uploaded
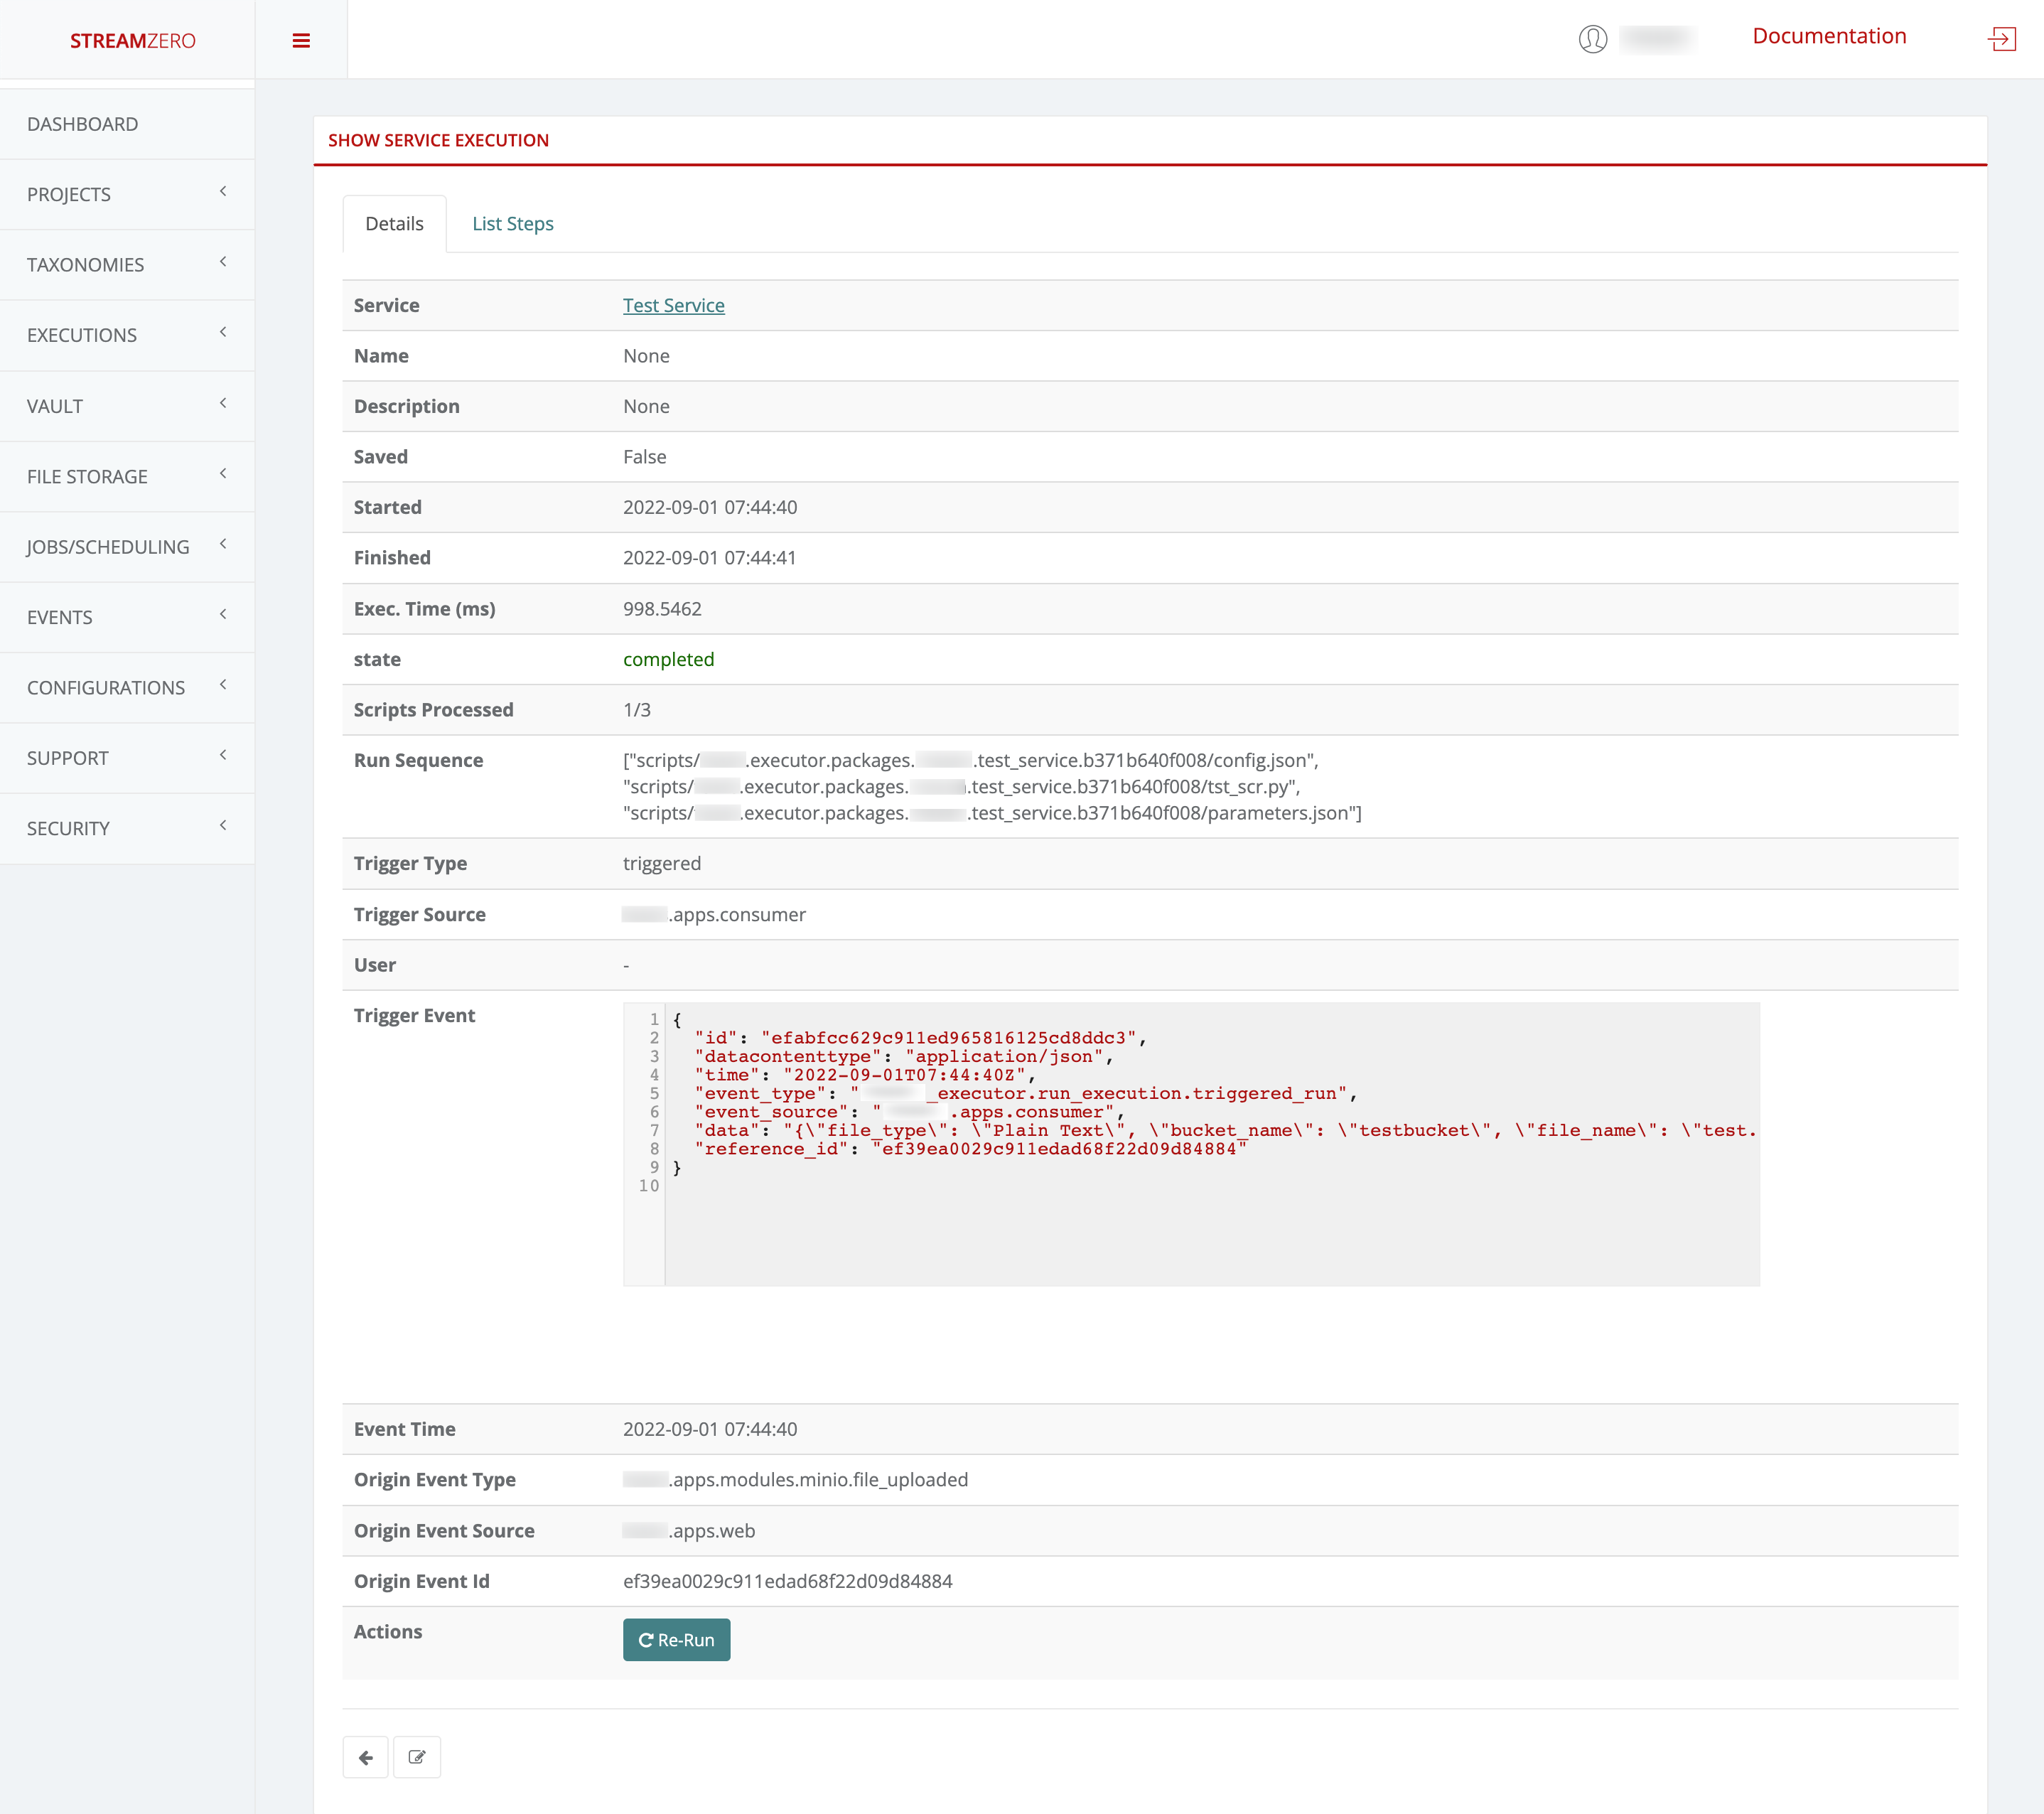
- Click on the magnifying glass to open the details page of the triggered execution
- Check the details page of the event triggered run
Workflow -> approval completed trigger event
To finalize the second trigger event (ferris.apps.modules.approvals.step_approval_completed), an existing Workflow will be used to trigger a Case Management that will need to get approved.
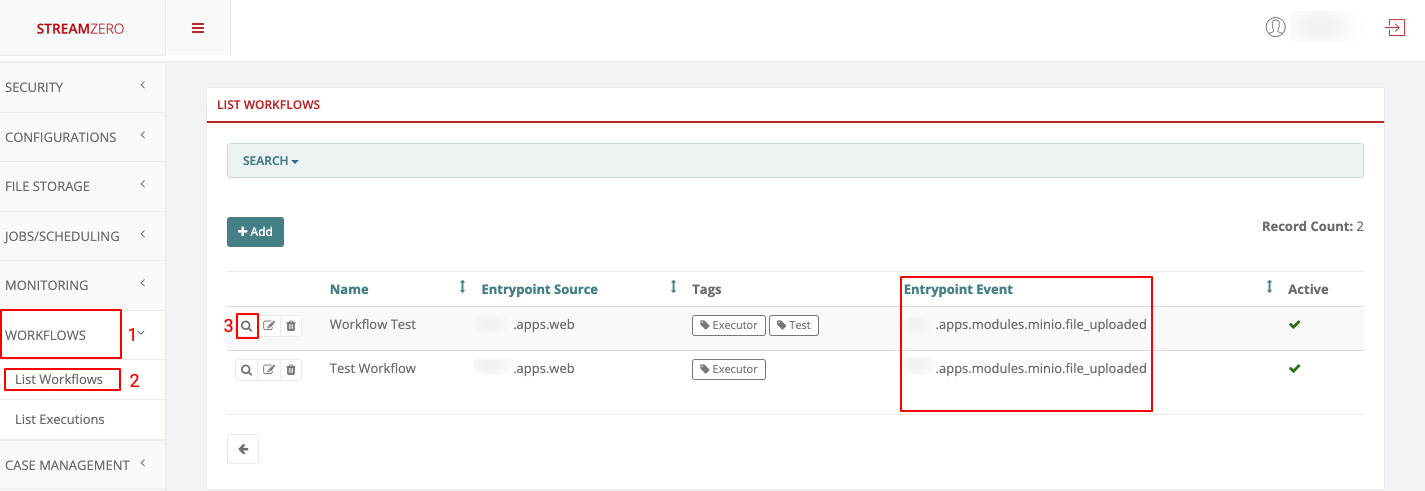
- Click on Workflows on the left side of the dashboard menu to open the drop-down
- Click on List Workflows
- Click on the magnifying glass to show the details page of the workflow
Note that before even getting a closer look at the Workflow details, the Entrypoint Event is displayed -> ferris.apps.modules.minio.file_uploaded
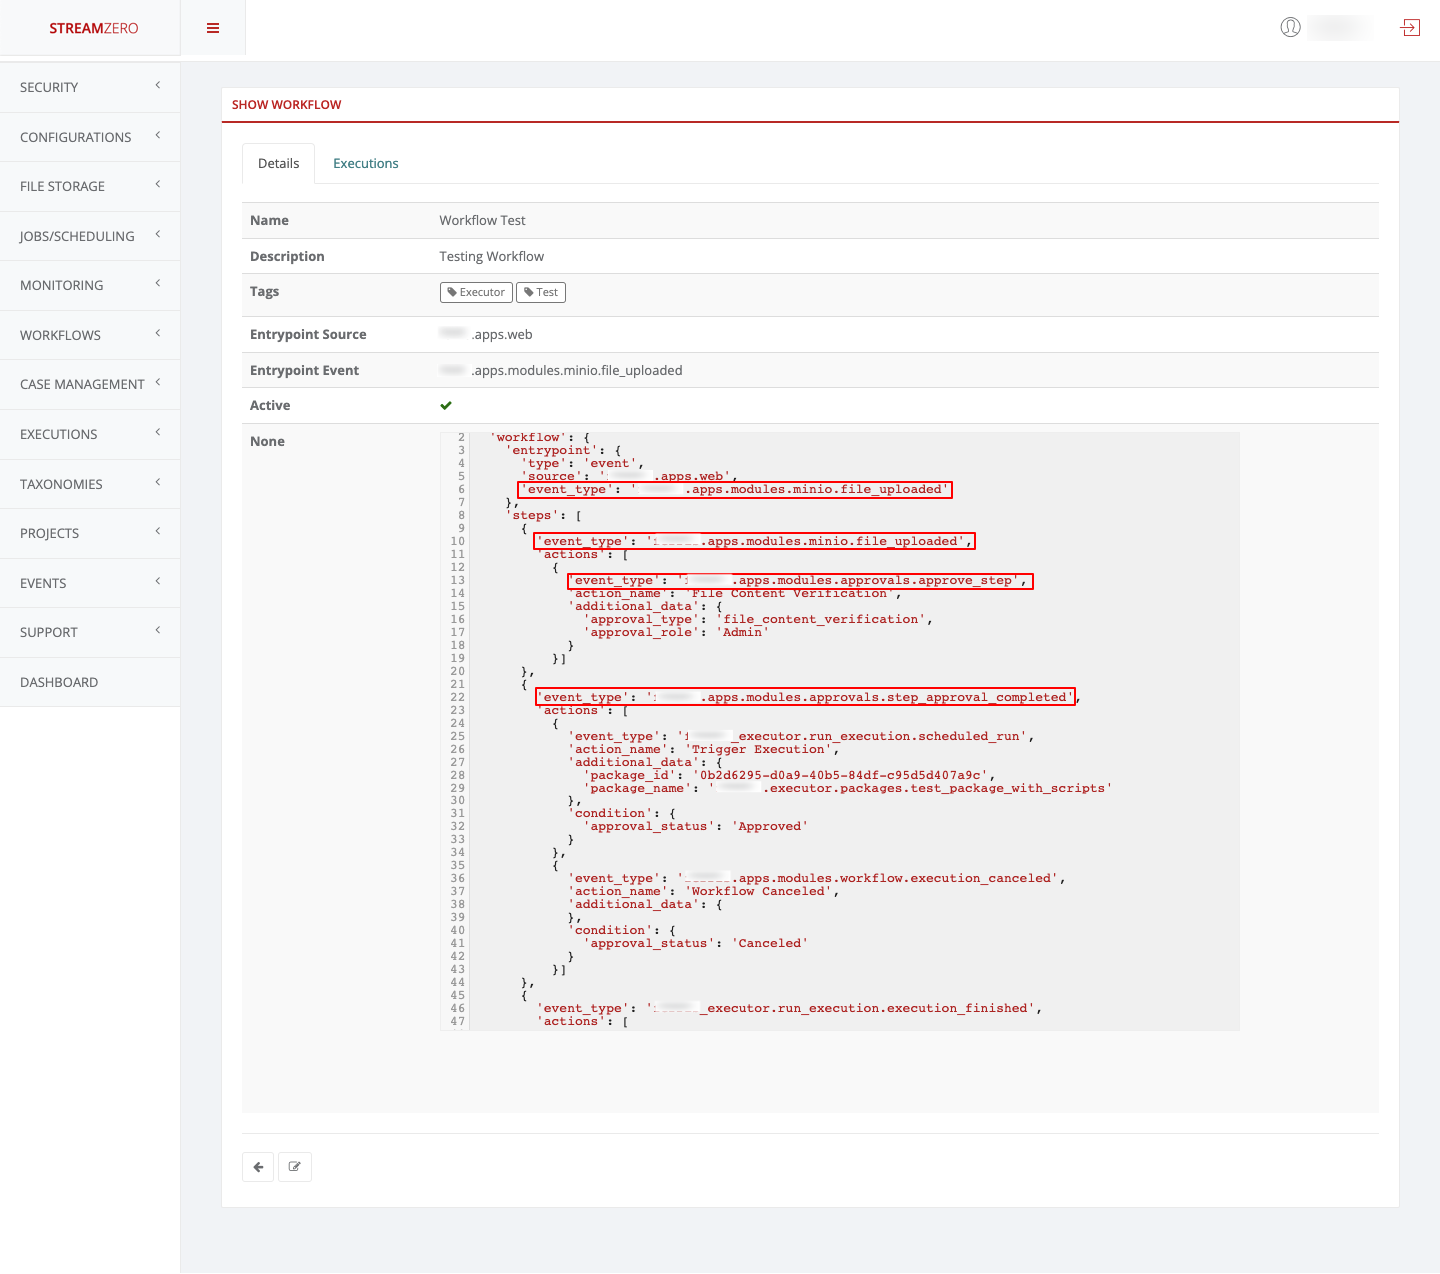
Check the details in the JSON snippet to understand what or which event types will trigger the second event type. The first event type shown in the JSON snippet is: ferris.apps.modules.minio.file_uploaded -> which means that a file will need to get uploaded for the event to get triggered. The second event type shown in the JSON snippet is: ferris.apps.modules.approvals.step_approval_completed -> meaning the uploaded file will need to get approved in the Case Management module before the wanted event gets triggered.
Case Management -> -> approval completed trigger event
- Upload a file to a bucket (the process of uploading a file was described in detail on top of this page)
- Click on Case Management on the left side of the dashboard menu to open the drop-down
- Click on Approvals
6 - Executions - Packages
The Executions/Packages is an event oriented framework that allows enterprise organizations the automation of script processing which can be triggered by:
- Manually: By clicking the ‘Run’ button on the StreamZero FX Management Server.
- On Schedule: As a cron job whereas the Cron expression is added on the UI.
- On Event: Where a package is configured to be triggered bt the FX Router when a specific type of event is observed on the platform.
It allows users to deploy their locally tested scripts without DevOps specific changes or the need to learn complex DSL (description and configuration language). In tandem with Git integrated source code management FX allows distributed and fragmented tech teans to easily deploy and test new versions of code in an agile way with changes being applied immediately.
Contiuous Change Integration / Change Deployment becomes a component based and building block driven approach, where packages can be configurable and parametrised. All scripts and their parameters like secrets and environment variables form packages which makes them reusable for similar jobs or event chains. Event based package triggering allows users to run multiple packages in parallel as a reaction to the same event.
Executions - Packages
Primary entities for “Executions” are packages which are composed by scripts that are executed in a predefined order.
Executions -> Packages
This Use Case defines how to create and run a new package.
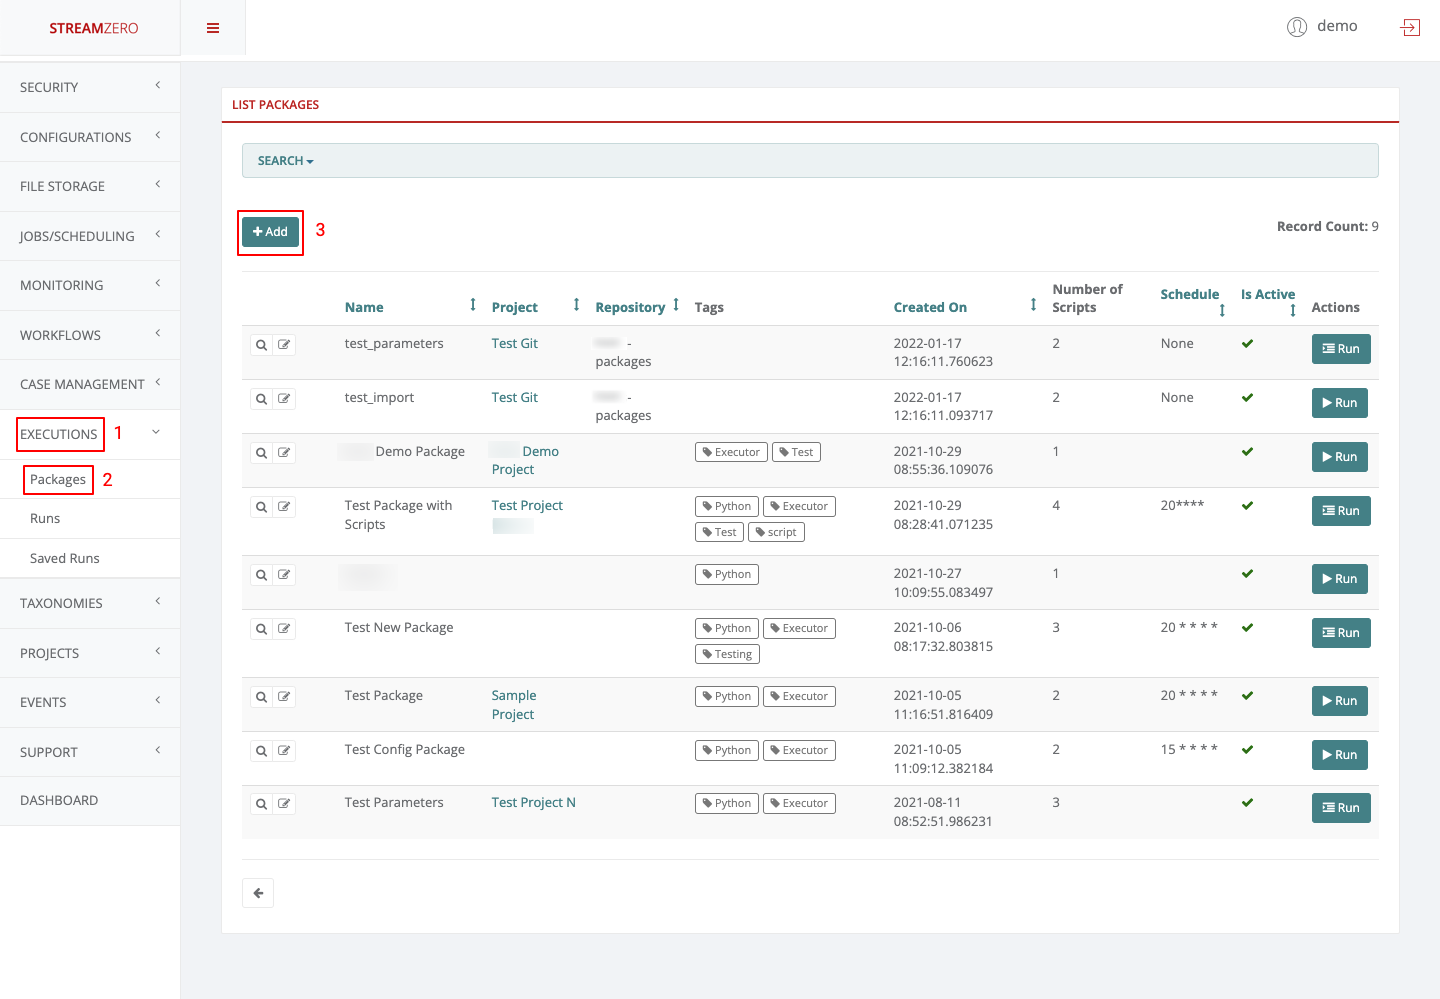
- Click on Executions on the left side of the dashboard menu to open drop-down
- Click on Packages
- Click on +Add to create a package
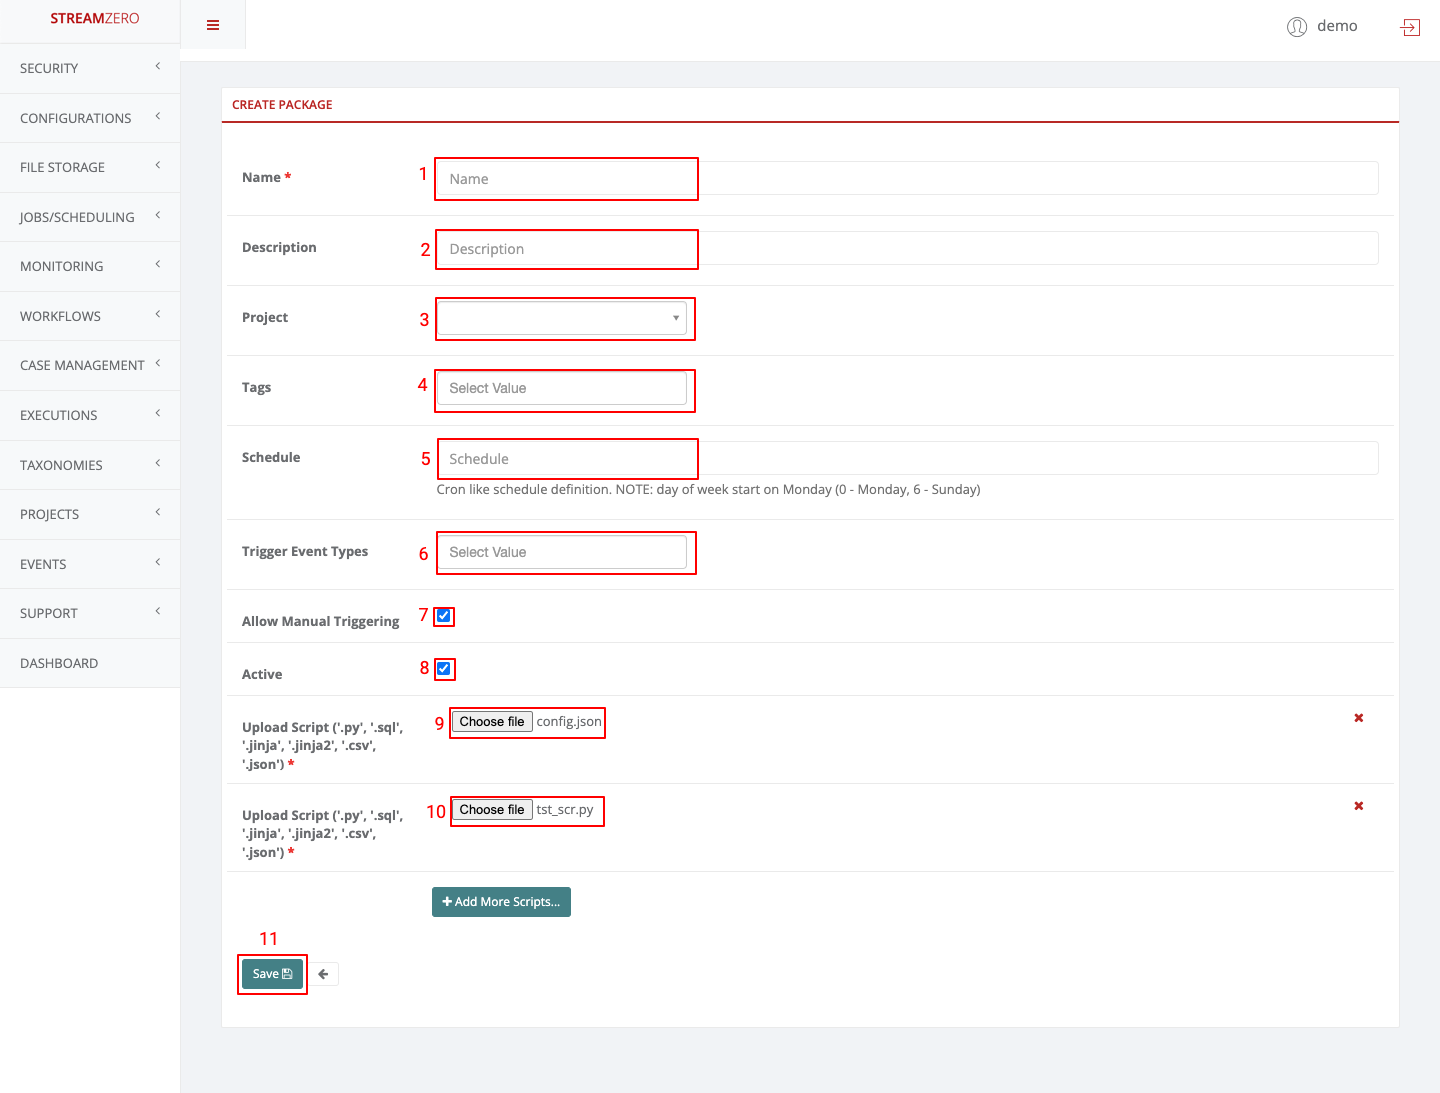
Create Package
| Field name | Steps & Description |
|---|---|
| 1. Name | 1. Name the package |
| 2. Description | 2. Descripe the package |
| 3. Project | 3. Select the project to which the package will be bound |
| 4. Tags | 4. Add Tags of choice manually or select from predefined tags |
| 5. Schedule | 5. Schedule cron job -> “Cron like schedule definition. NOTE: day of week start on Monday (0 - Monday, 6 - Sunday) example: “20****” -> The whole definition of Cron Jobs can be found in the next sub-category of this UserGuide |
| 6. Trigger Event Type | 6. Select Value -> select event type to trigger the exectution of the package -> please visit the sub-category Events to get a better understanding of how to set event triggers. |
| 7. Allow Manual Triggering | 7. Checkbox -> click to allow manual triggering of the package |
| 8. Active | 8. Checkbox -> click to set the package to active |
| 9. File Upload (choose file) | 9. Click on Choose file (Optional) to upload a script -> upload a JSON “config.json” script to configure the package |
| 10. File Upload (choose file) | 10. Click on Choose file (Optional) to upload a script -> upload a python “test_scr.py” script to pull the configuratio from config file and print all items |
| 11. Save | 11. Click Save to save packages |
| Supported File upload Types | 4 different file types are supported: 1. “.py file” -> A PY file is a program file or script written in Python, an interpreted object-oriented programming language. 2. “.json file” -> A JSON file is a file that stores simple data structures and objects in JavaScript Object Notation (JSON) format, which is a standard data interchange format. 3. “.sql file” -> A (SQL) file with .sql extension is a Structured Query Language (SQL) file that contains code to work with relational databases. 4. “.csv file” -> A CSV (comma-separated values) file is a text file that has a specific format which allows data to be saved in a table structured format. |
config.json script
The config.json file contains key/value configuration pairs that can be accessed in scripts at execution time.
|
|
test_scr.py script
This is an example script that shows how configuration from config.json file can be accessed from a script. package_name will be passed to the script as argument and then can be used for fetching configuration using ApplicationConfigurator from ferris_cli python package.
|
|
Check Created Package
The created package should be triggered every 20 minutes of every hour but can also be run manually.
- Click on the magnifying glass icon to open the package’s details page
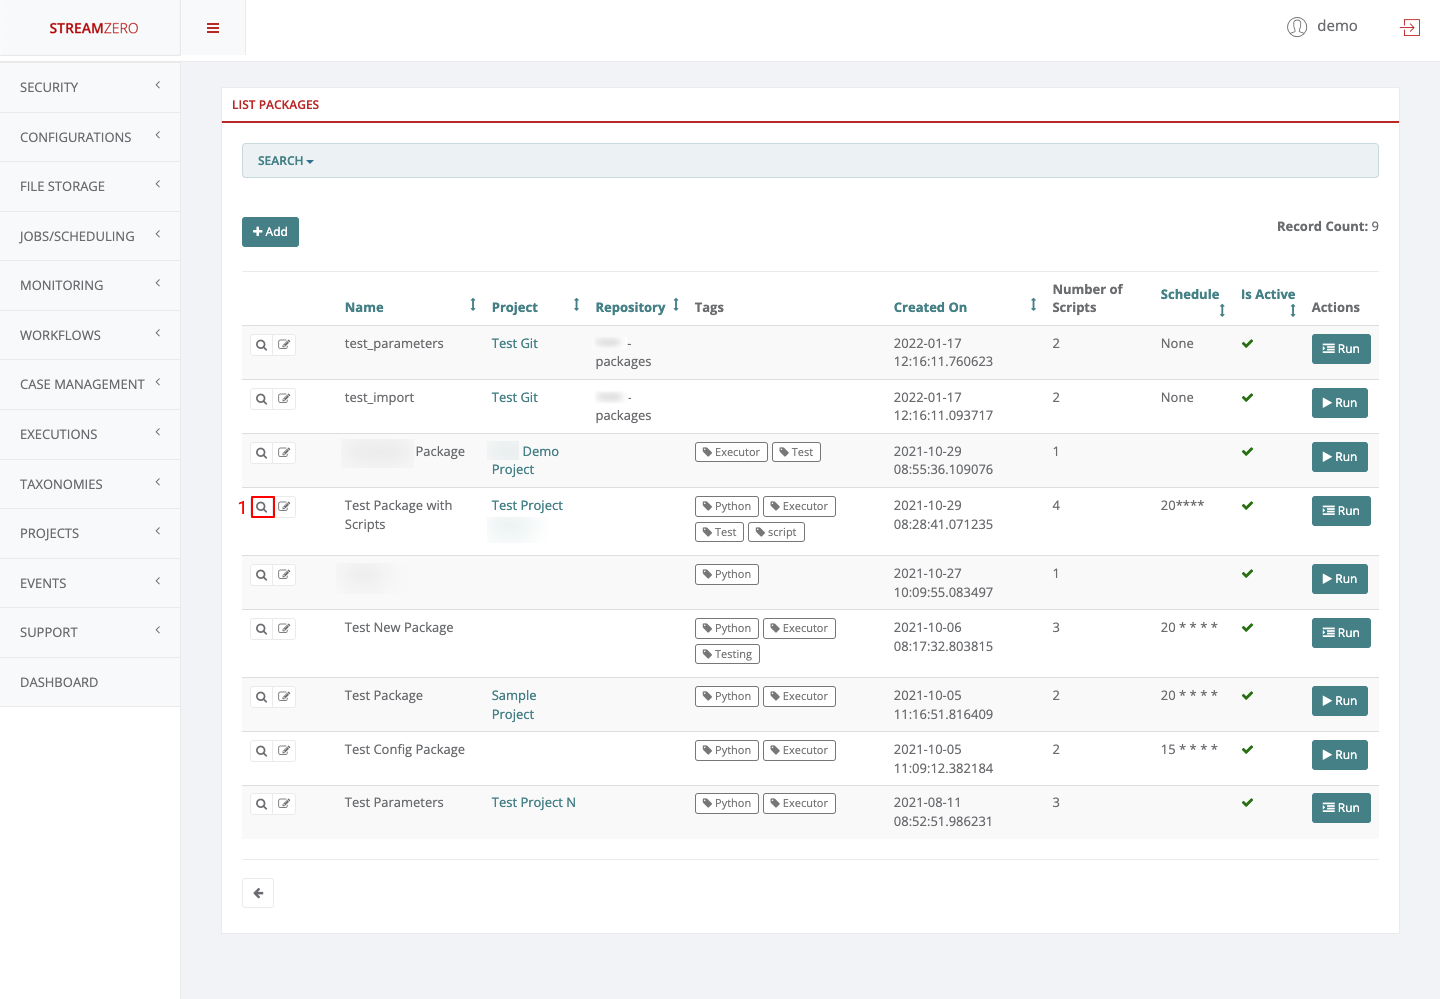
- Check details page
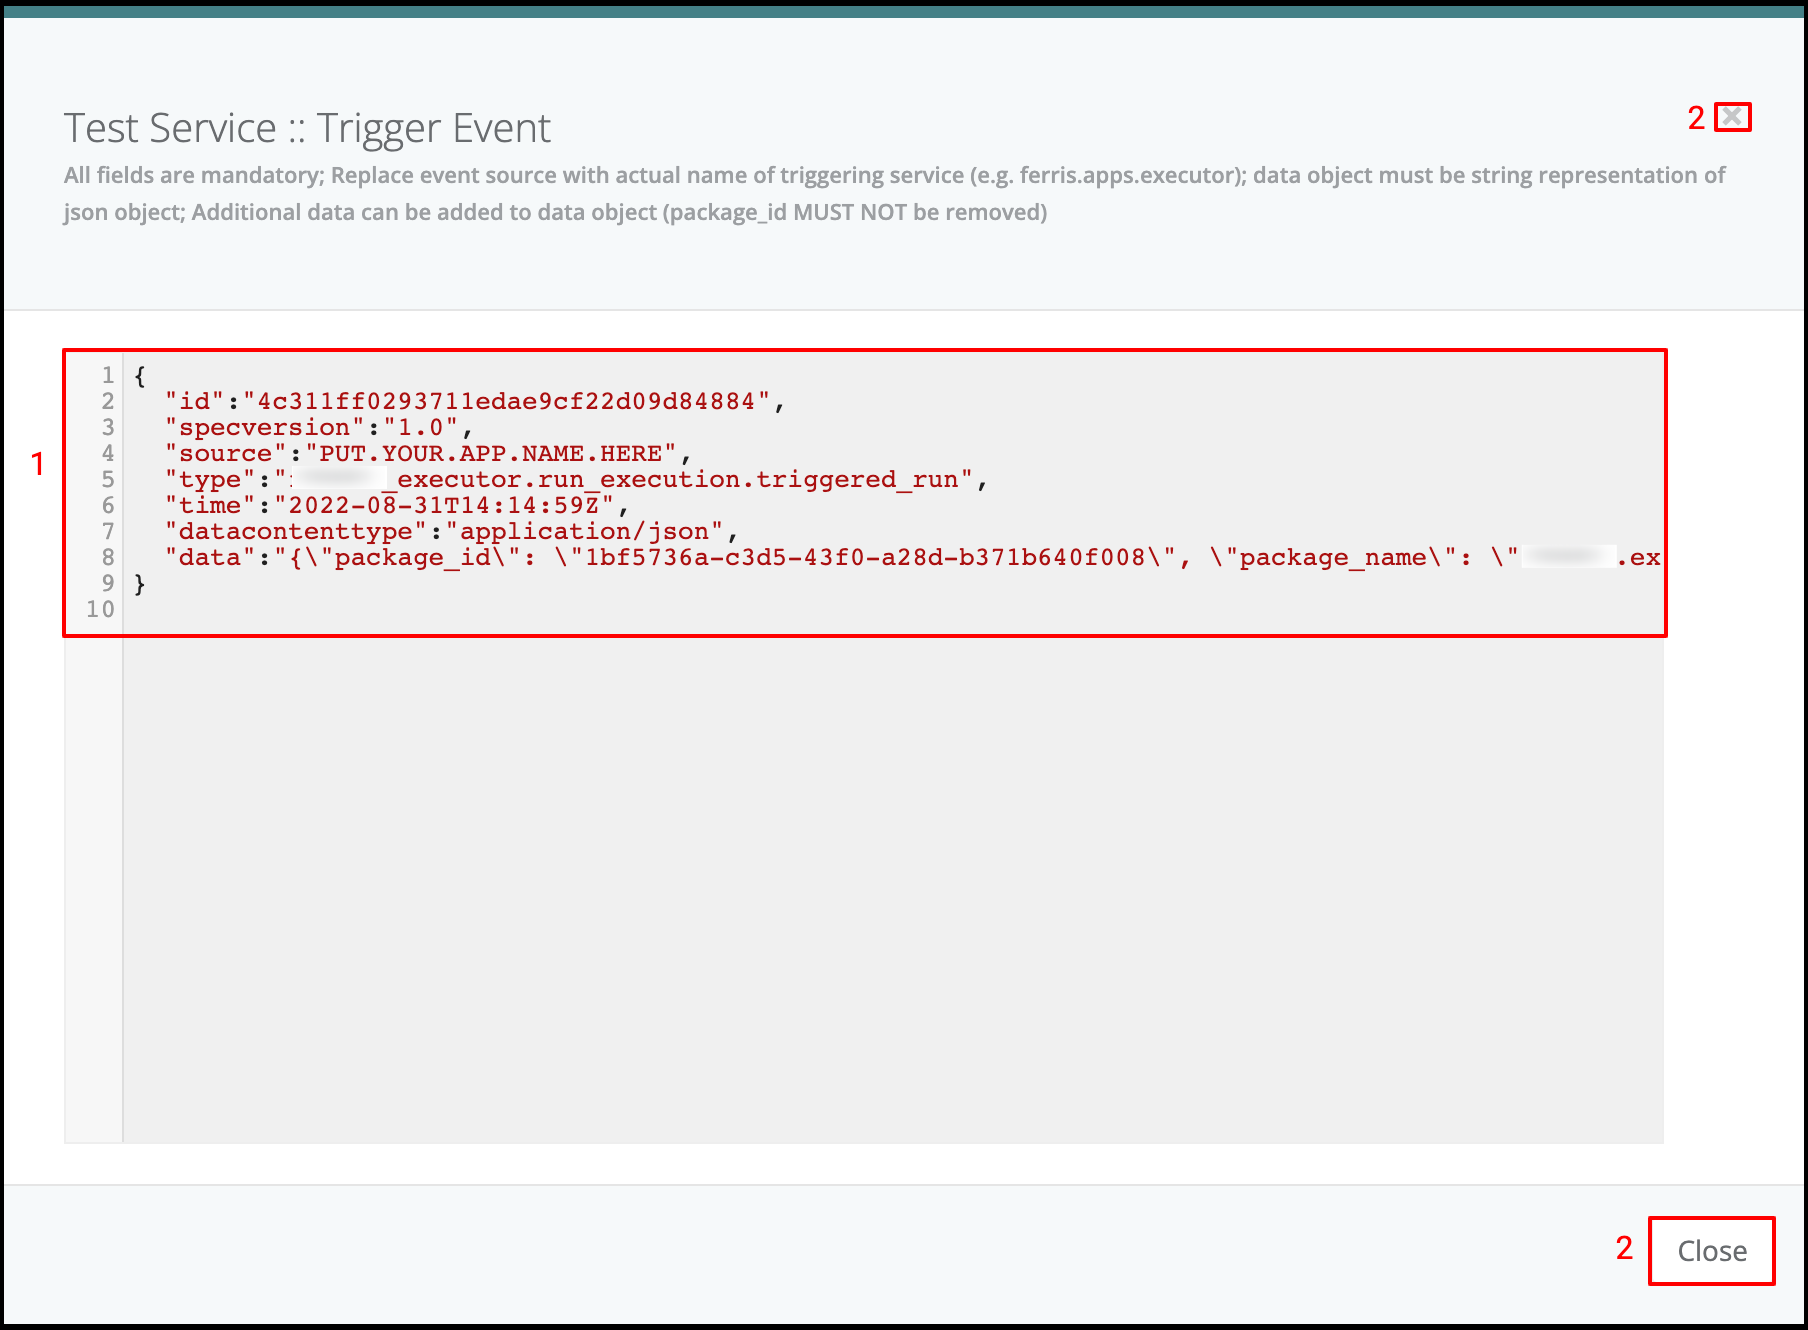
- Click on “Show Trigger Event”

- Check the triggered event details
- Close
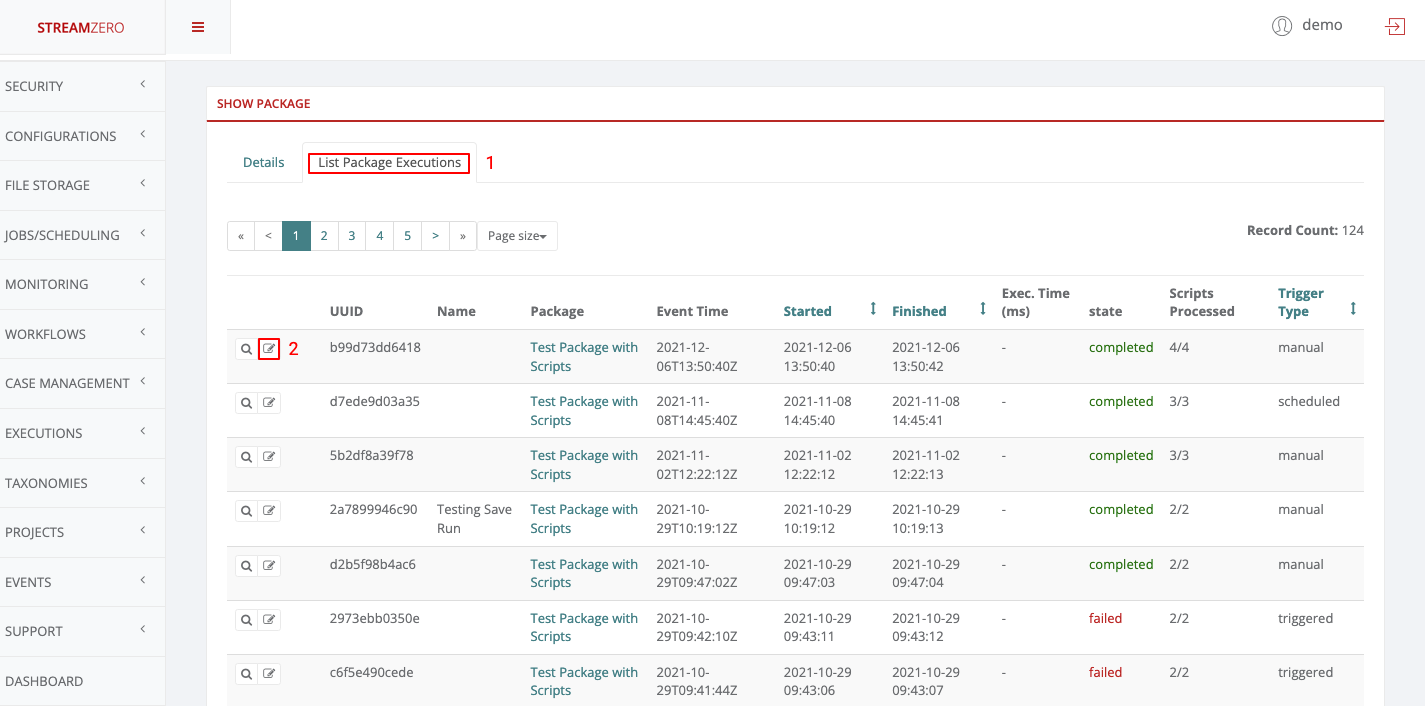
Package Executions / Runs
- Click on the “Run” button down the page to run the package manually

It will automatically transfer you to the “List Package Executions” tab
- Check runs/package executions to see if you manually triggered execution was processed
- Click on the magnifying glass icon of your latest manually triggered run to open details page of the exectuion
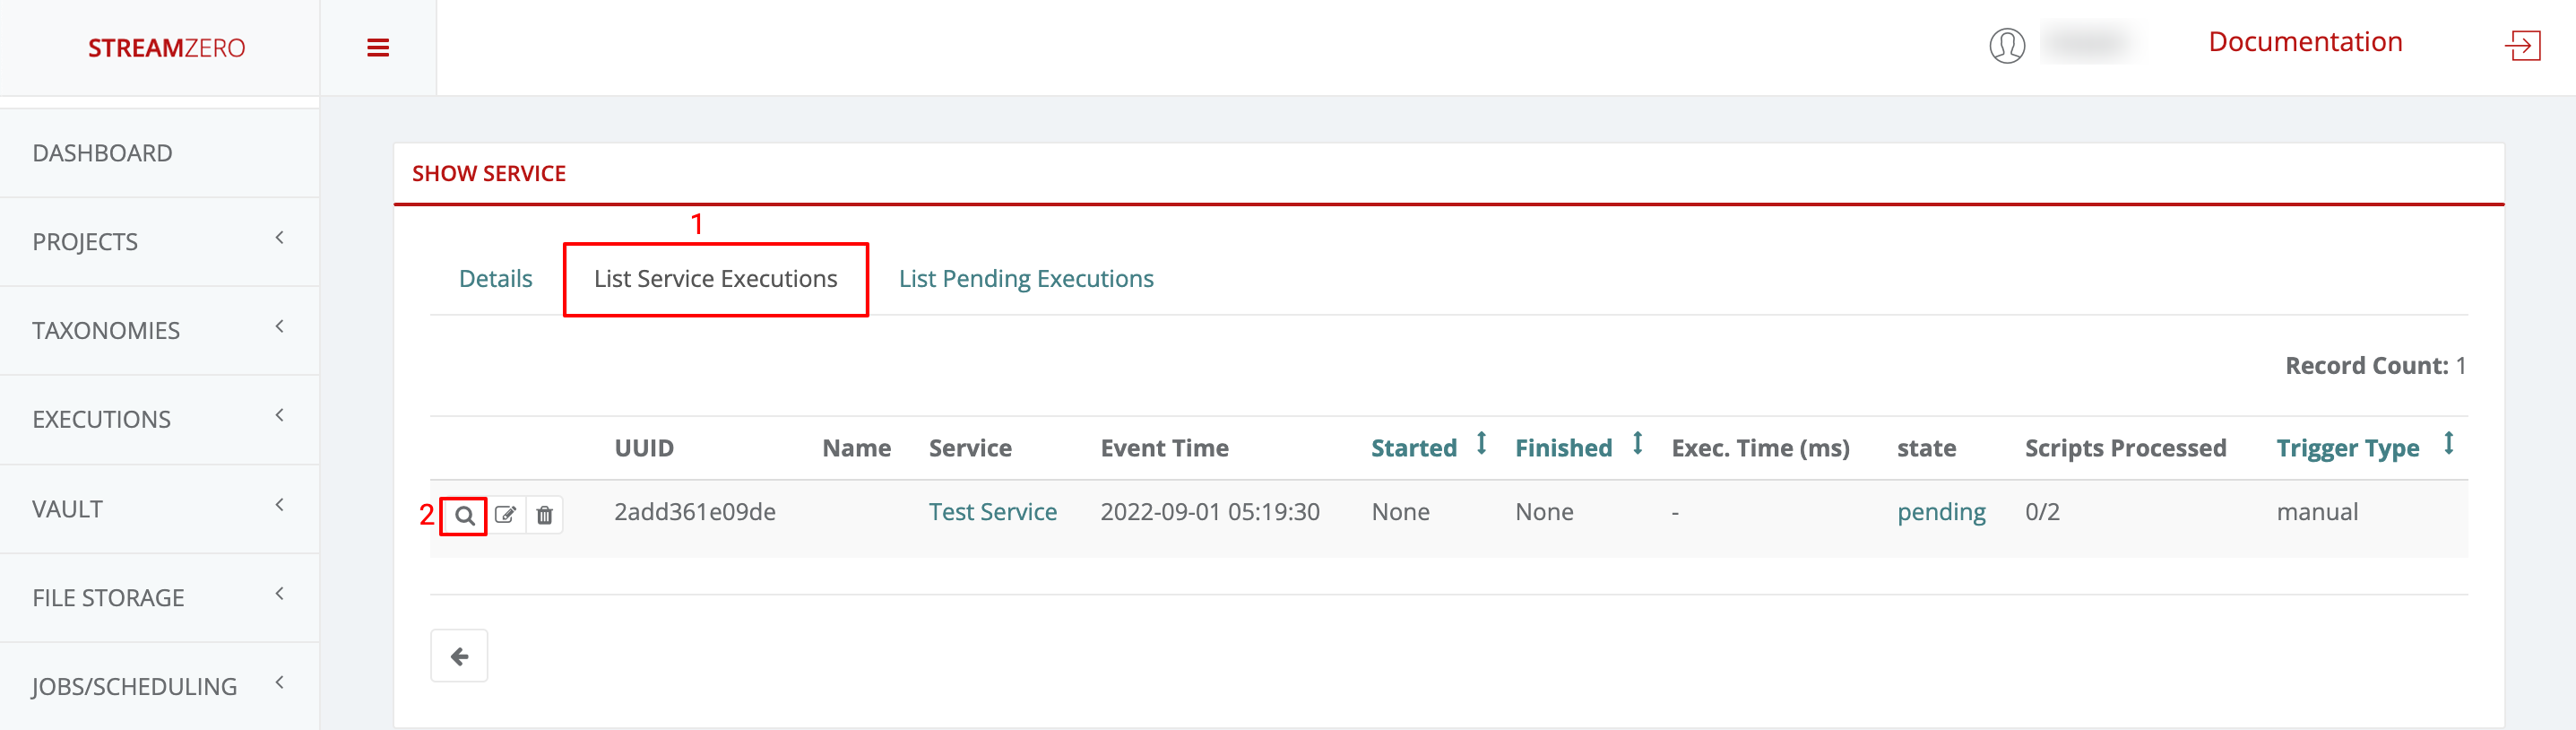
- Check the details “Show Package Execution” of the run/exection
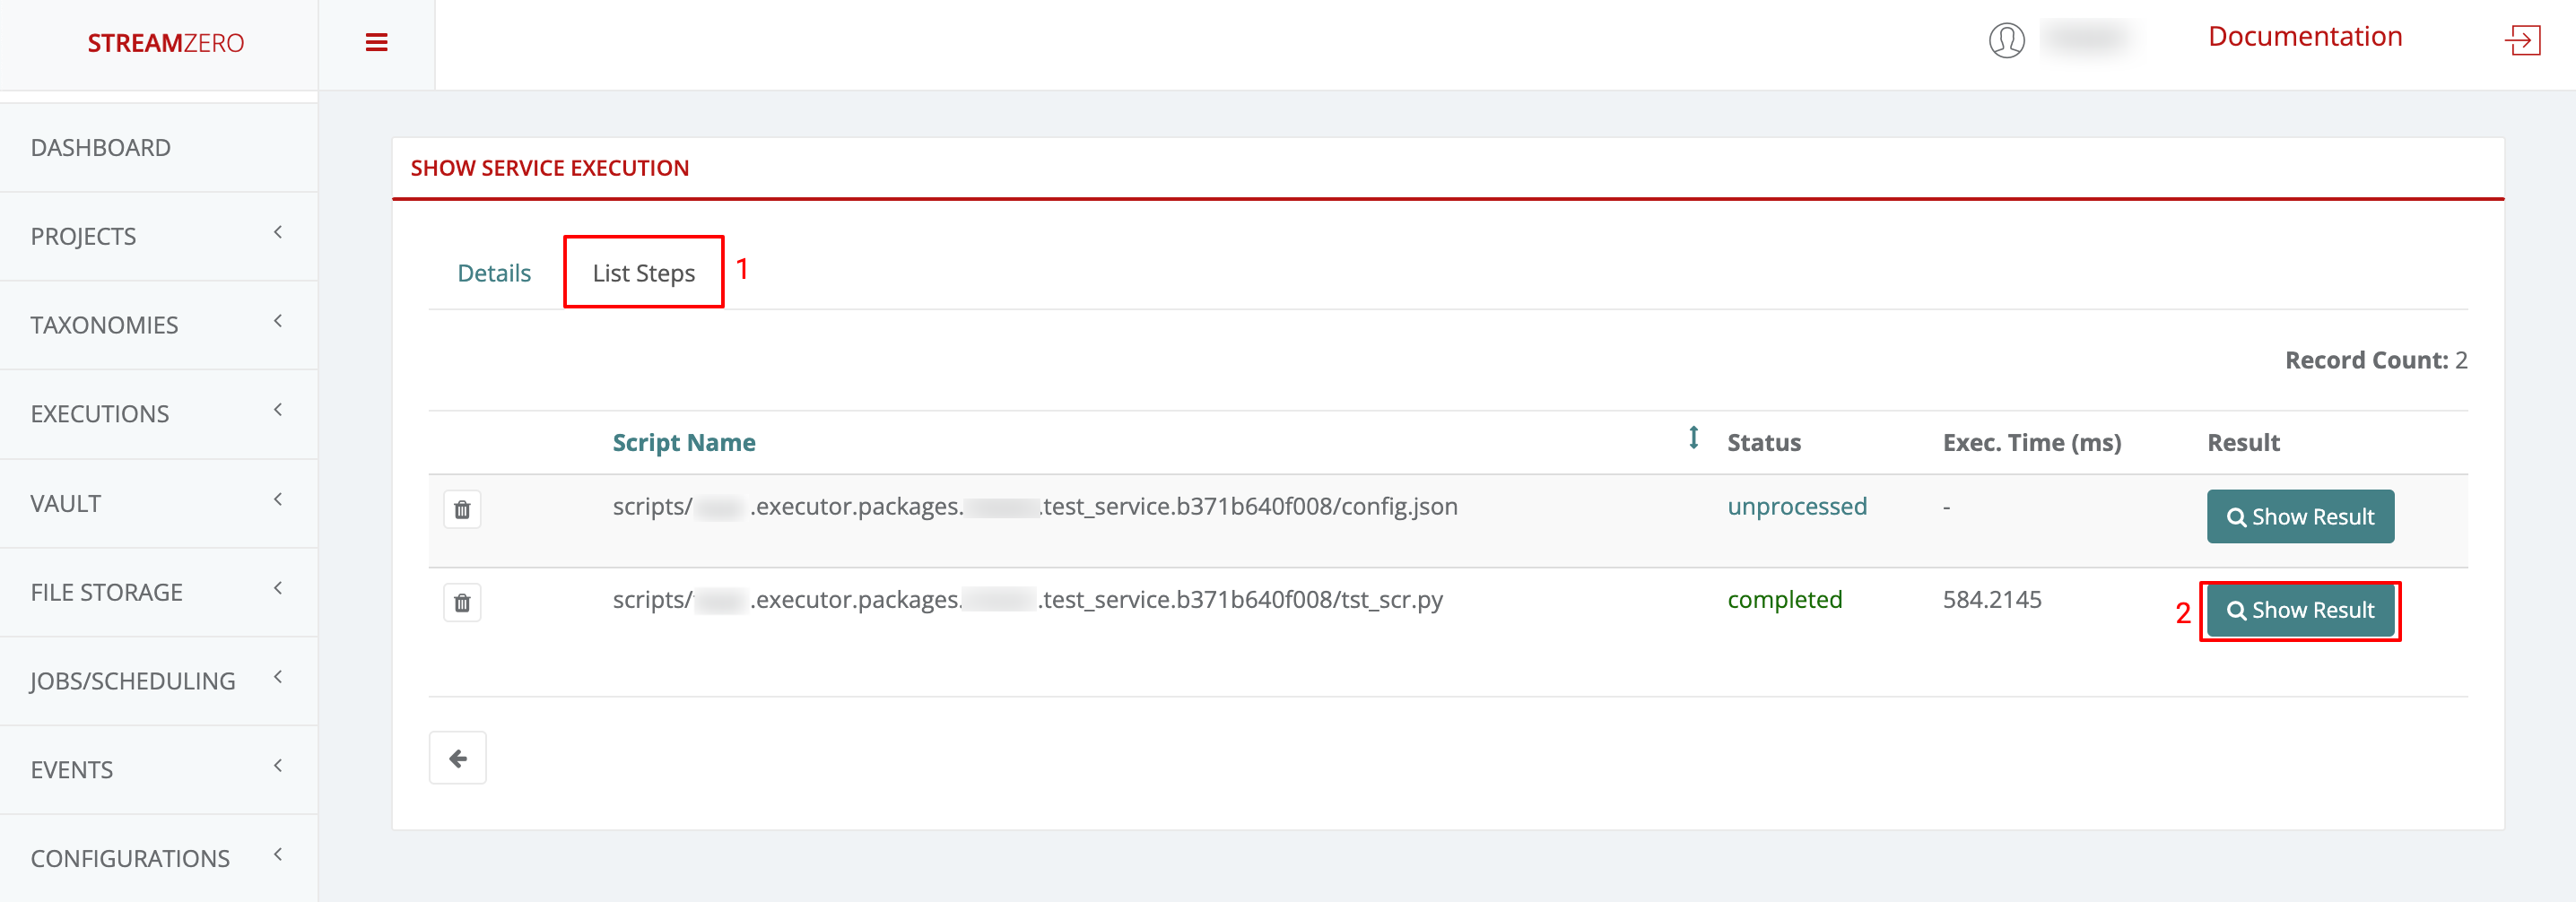
- Click on “List Steps” tab to see the steps of the execution
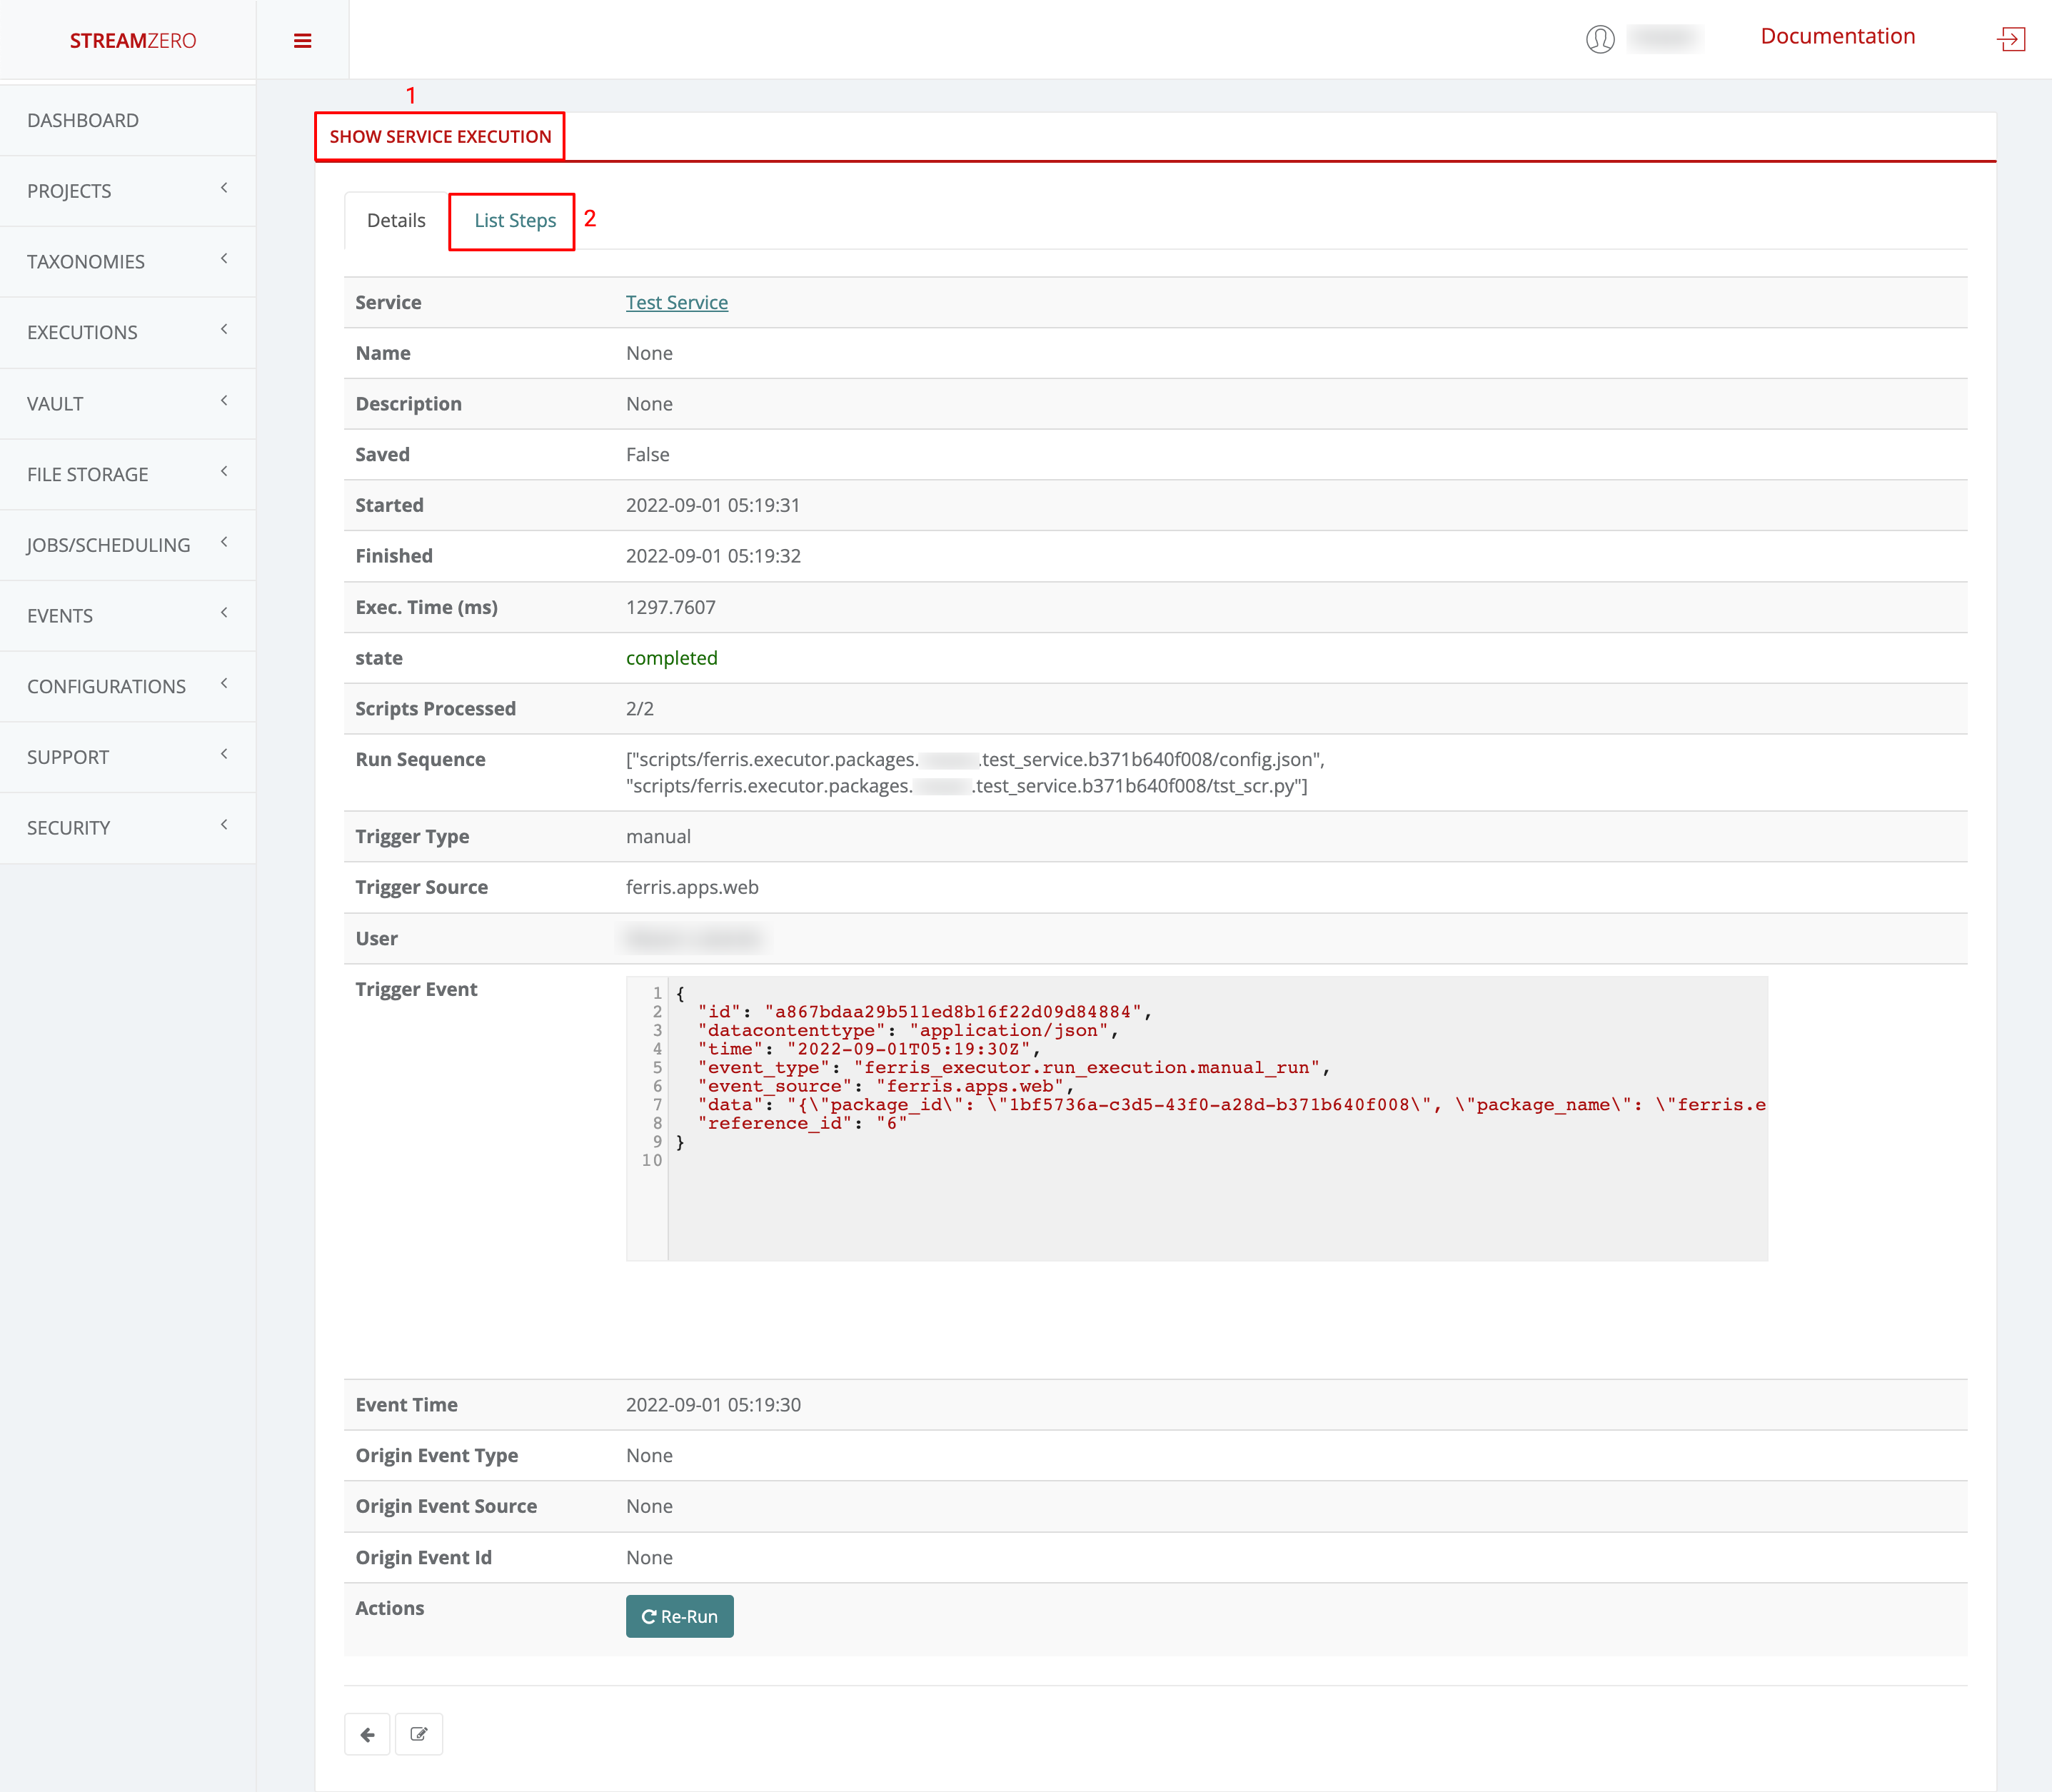
- Check the steps of the run and status (completed; pending; unprocessed; failed)
- Click on “Show Results” to verify the script for failed executions
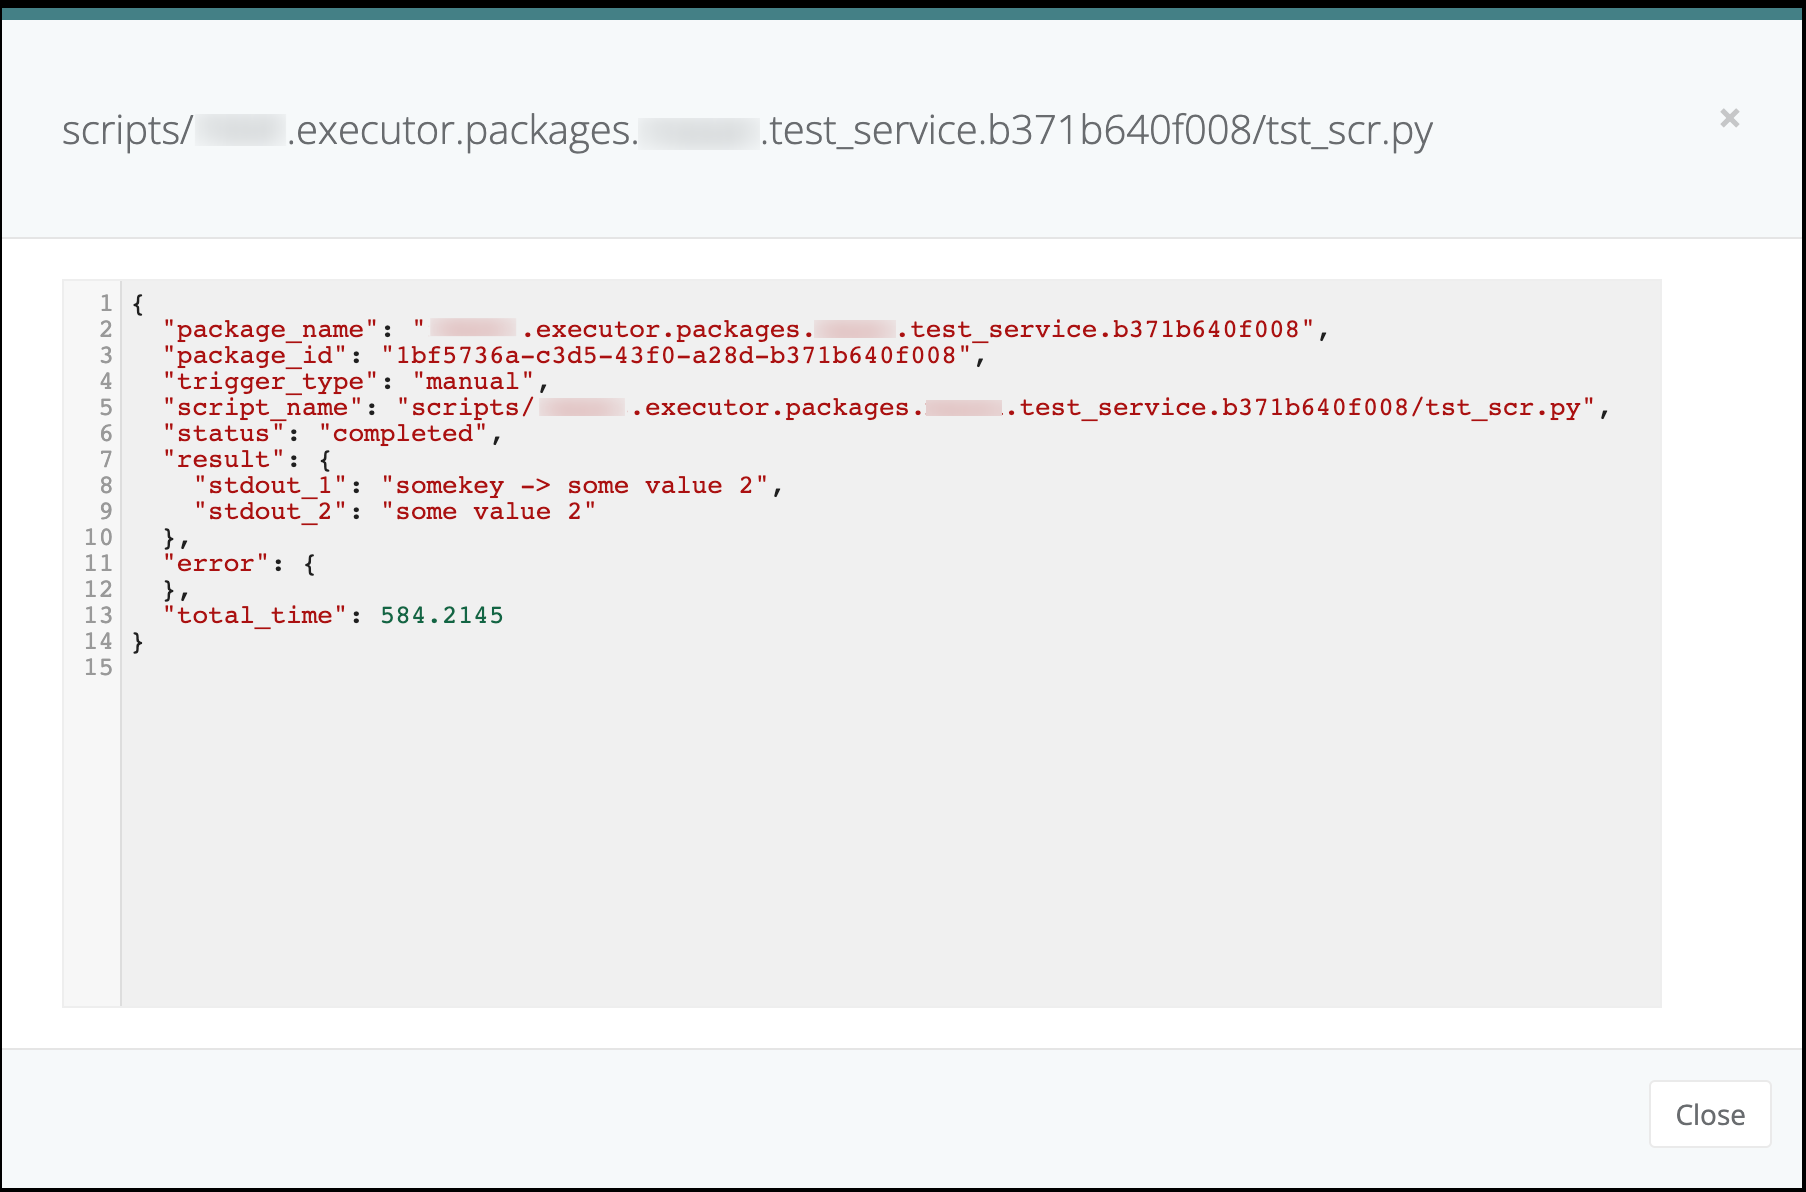
- Close window
Note that currently only python and sql handlers are available, files of different type will be unprocessed.
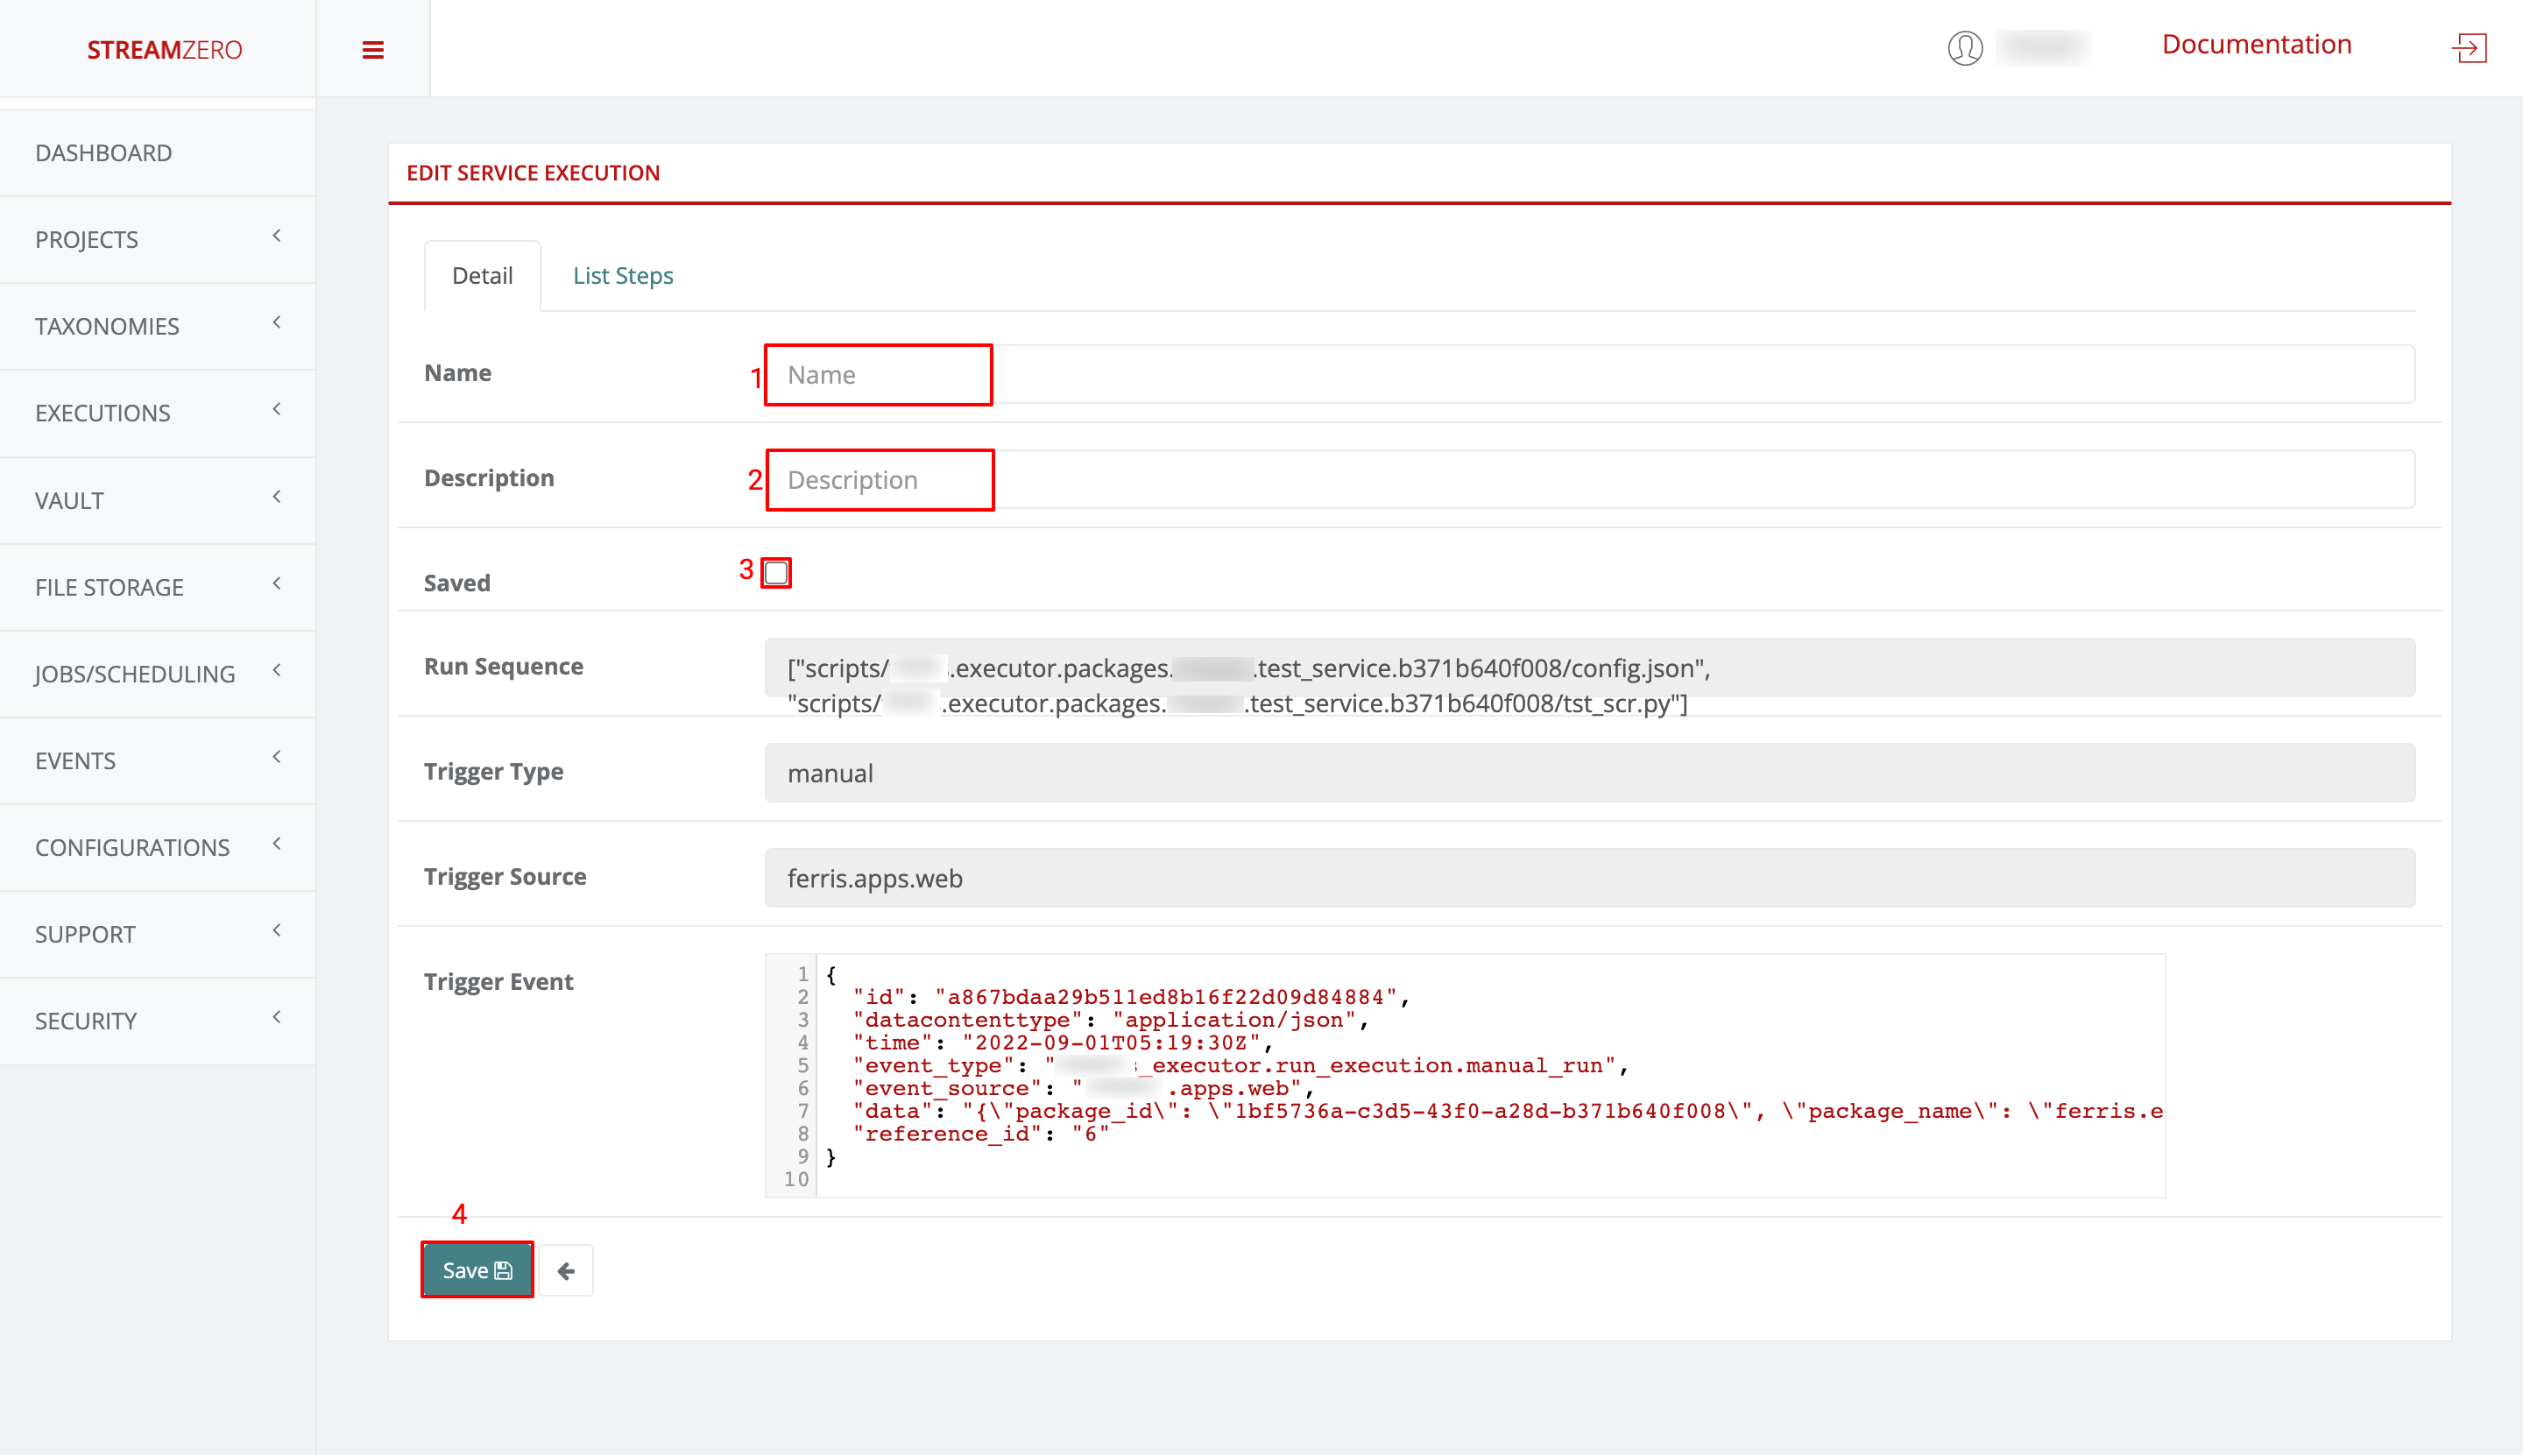
Save a Run/Execution
- Go back to the “List Package Executions” tab
- Click on the edit icon to open make the run/execution editable
- Name the execution/run
- Describe the execution/run
- Click “Saved” check box
- Save
- Click on Executions to open dropdown
- Click on Saved Executions to check the saved run
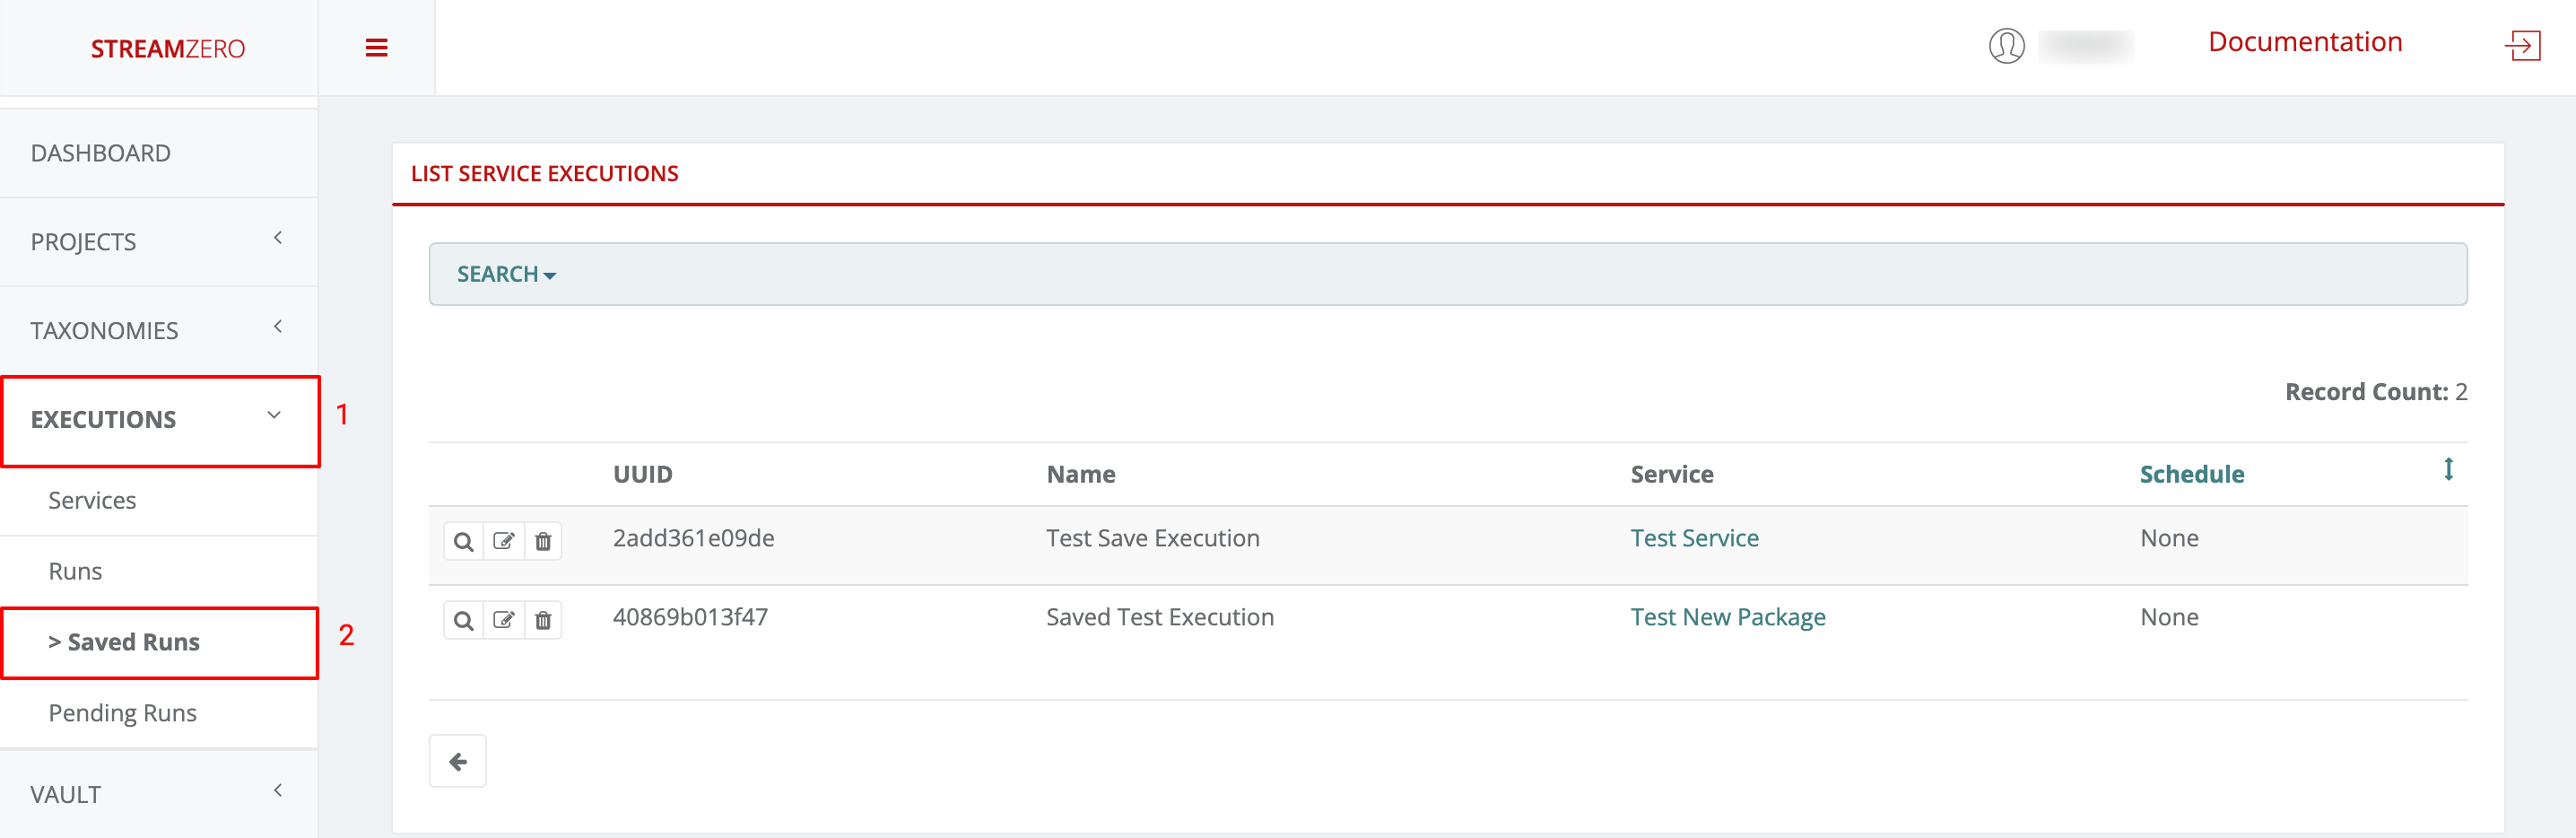
In the next section “UI Generator”, the importance of the saved run will be showcased.