StreamZero FX is a platform for building highly scalable, cross-network sync or async microservices and agents.
The unique low learning curve approach significantly reduces the cost of deploying enterprise wide process and integration pipelines across disparate systems at a speed. While at the same time creating a platform with practically unbound access and ease of integration.
FX is a ground-up rethink of how both sync and async microservices are built in multi-cloud, highly volatile and fragmented software environments.
On FX you are effectively writing large applications by connecting “blocks” of code (Services) through Events. An approach that is highly intuitive and in line with iterative agile practices.
The following is a brief review of some of the benefits and features of StreamZero FX. Upcoming features are shown in italics.
Quality
Description
Low Learning Curve
Developers can practically learn within an hour how to work with FX.
Highly Scalable
Built from ground-up for scalability. The event messaging core is based on an Apache Kafka backbone we can transmit MILLIONs of jobs per day to any number of Services without break.
Resource Efficient
FX Microservices are deployed in real time as Events comes in. There are not 100s of microservice containers running on your platform. Just 3 components. The StreamZero Management UI, The Event Router and any number Executors.
Plug into anything. Practically Limitless Integrations
Leverage the whole universe of Library capabilites of Python ( Java, DOTNET or GoLang coming soon) , no need to depend solely on paid pre-packaged modules based on a strict structure and complicated build procedures and vendor lock-in. No-Code or Low-Code take your pick.
Combined Support for Sync and Async Microservices
Manage both your Async and Sync Service Mesh in a single interface without any expensive and cumbersome 3rd party system. Reduce the complexity of your infrastructure and the number of components.
Fully Containerised and Easy to Deploy
Pre-packaged Kubernetes Templates with minimal customisation requirements fit straight into your enterprise Kubernetes(and if you dont have one we will build you one). Run in 1 command and Scale as you wish.
All Ops Data in 1 Secure place
We record all events, logs, alerts in Kafka and store them in daily index within Elasticsearch for easy search and loading it into other systems such as Splunk, DataDog, LogTrail etc. A single scalable fault tolerant system to transport events and operational data.
Monitor Performance
All Service Executions are continuously tracked and recorded by FX allowing you to easily identify bottlenecks in your processing. Execution details can be viewed on the UI or within Kibana/Elasticsearch.
Enterprise Friendly User and Project Management
FX can be easily plugged into your identity infrastructure whether OIDC or AD or SAML we support them all. Packages are organised by Projects enabling users to have specific roles and simplify oversight and governance of your platform. Further enhanced by tagging support promoting an enterprise wide shared semantics and Taxonomy of packages.
Structured Service Documentation
Provide a readme.md file with your package to document it for users. Provide an OpenAPI document to automatically expose the end point and document it for users.Provide a manifest JSON file for describing package.
Developer Friendly GIT integration
Fits just straight into existing flow. Push to git to activate code. No more, No Less.
Simple Standard and Powerful Event Format
Based on Cloud Events our event format is Simple JSON which developer already know how to work with. If you know how to read JSON you can build a Microservice.
Simple Easy to understand and use conventions
A Microservice consists of a set of scripts run in sequence, receives events as JSON and sends events as JSON. Use a config.json to store configs, use a secrets.json to store secrets. Store files in /tmp. You can use any Python libraries and also deploy your won packages with each service.
Selective Feature Support
Our ‘Everything is Optional’ approach to the convetions support by services means that developers can incrementally improve the quality of their code as they get more familiar with the system. A base service is just a single script and then they can build up to support configurations, UI, reusable packages, published interface packages or custom image execution.
Support for Enterprise Specific Library Distributions
Package Enterprise Specific Libraries into the base executor for use by all executors within the enterprise. Saving Huge amounts of development time.
Real Time Code Updates
Our near real time deploy means code changes are immediately active.
Run AB Testing with Ease
Plug different code versions to same event to measure differences.
RUN Anything
Our unique RUN ANYTHING architecture furthers breaks boundaries of running polyglot container systems. Simply tell the system on which image a code is to execute.
Activate or Deactivate Services in Realtime
Services can be activated when you need them.
Instant Scaling
Just increase the number of Router or Executor replicas to process faster (provided your underlying services can support it)
View Logs in Realtime
View the Logs of any executor in Realtime directly on the Management UI.
View Event Dependencies Easily
Have an error? Trace easily the events which led to the Error with all the parameters used to run the event flow.
UI Support for Microservices
Drop in a metadata.json file to auto generate UIs for entering parameters for a specific package.
Easy Aggregated Logging
All services logs are aggregated and searchable and viewable in realtime. Developers can log easily.
Adaptive Event Schema
FX is continuously scanning the incoming events to populate the event catalog and their schema. Making it easier for developers to write services which react to the platform events. Continuously updating you on the Events within your platform.
Parallel Event Processing and Flows
The same Event can be sent to multiple services for processing. Enabling multiple flows to be triggered.
Anonymous and Published Interfaces
Services can easily standardise and publish their interfaces making them available in the ‘No-Code’ flows.
Event Mapping
Easily map parameters of one event to another event. Allowing you to easily link event flows together.
Event Tagging
Tag events. Enabling you to organise event groups by domain.
Execution Prioritisation and Cancellation
Granular queue management to prioritise or cancel specific executions if there is a backlog.
Modular Easily Extendible UI
Add modular custom UIs to the management interface using FX extensions to the Flask App Builder for creating a custom Management UI.
1 - Architecture Overview
An overview of the architecture of StreamZero FX.
Concepts
StreamZero FX is based on 2 simple concepts - Services and Events
On FX you are effectively writing large applications by connecting “blocks” of code through Events.
Each Service is a self contained piece of functionality such as loading a file, running a database view rebuild or launching a container. You can link and re-link the blocks of code at anytime you like. The source code can be as big or as tiny as you like.
Each Service is triggered by an Event. Each Service also emits Events thereby allowing other Services to be triggered following (or during) the execution of a Service.
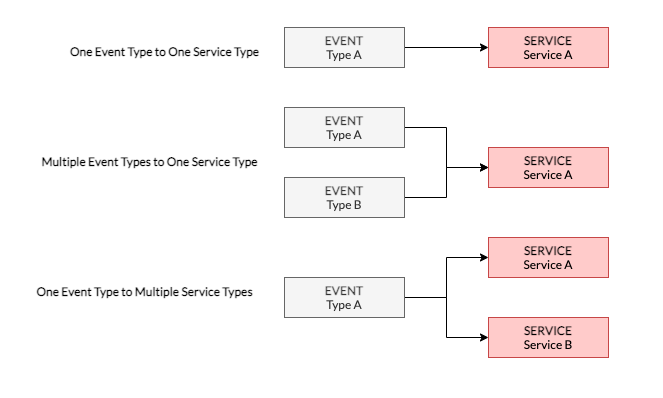
A Service can respond to multiple Event types, and a single Event Type may trigger multiple Services - Thereby allowing you to also extend your Application(s) on the fly with ease.
You are not required to think in terms of pre-defined DAGS and can rapidly and iteratively build, test and deploy your applications.
Services
SERVICES are collections of scripts and modules which are executed in sequence by the FX Executor.
Services are triggered by EVENTS, which are JSON messages which carry a header and payload. A Service can be Linked to one or more events.
Each script is provided with the Payload of the Event that triggered it. It is the job of the FX Router to send Events to the appropriate Service.
The following is a basic Service which parses the event sent to it and prints the payload.
 1
 2
 3
 4
 5
 6
 7
 8
 9
10
from fx_ef import context
# The context.params object carries the payload of the incoming eventparam_value = context.params.get('param_name')
# And this is how a service sends an eventmy_event_type ="com.test.my_event_type"data = {"my attribute": "my_value"}
context.events.send(my_event_type, data)
Events
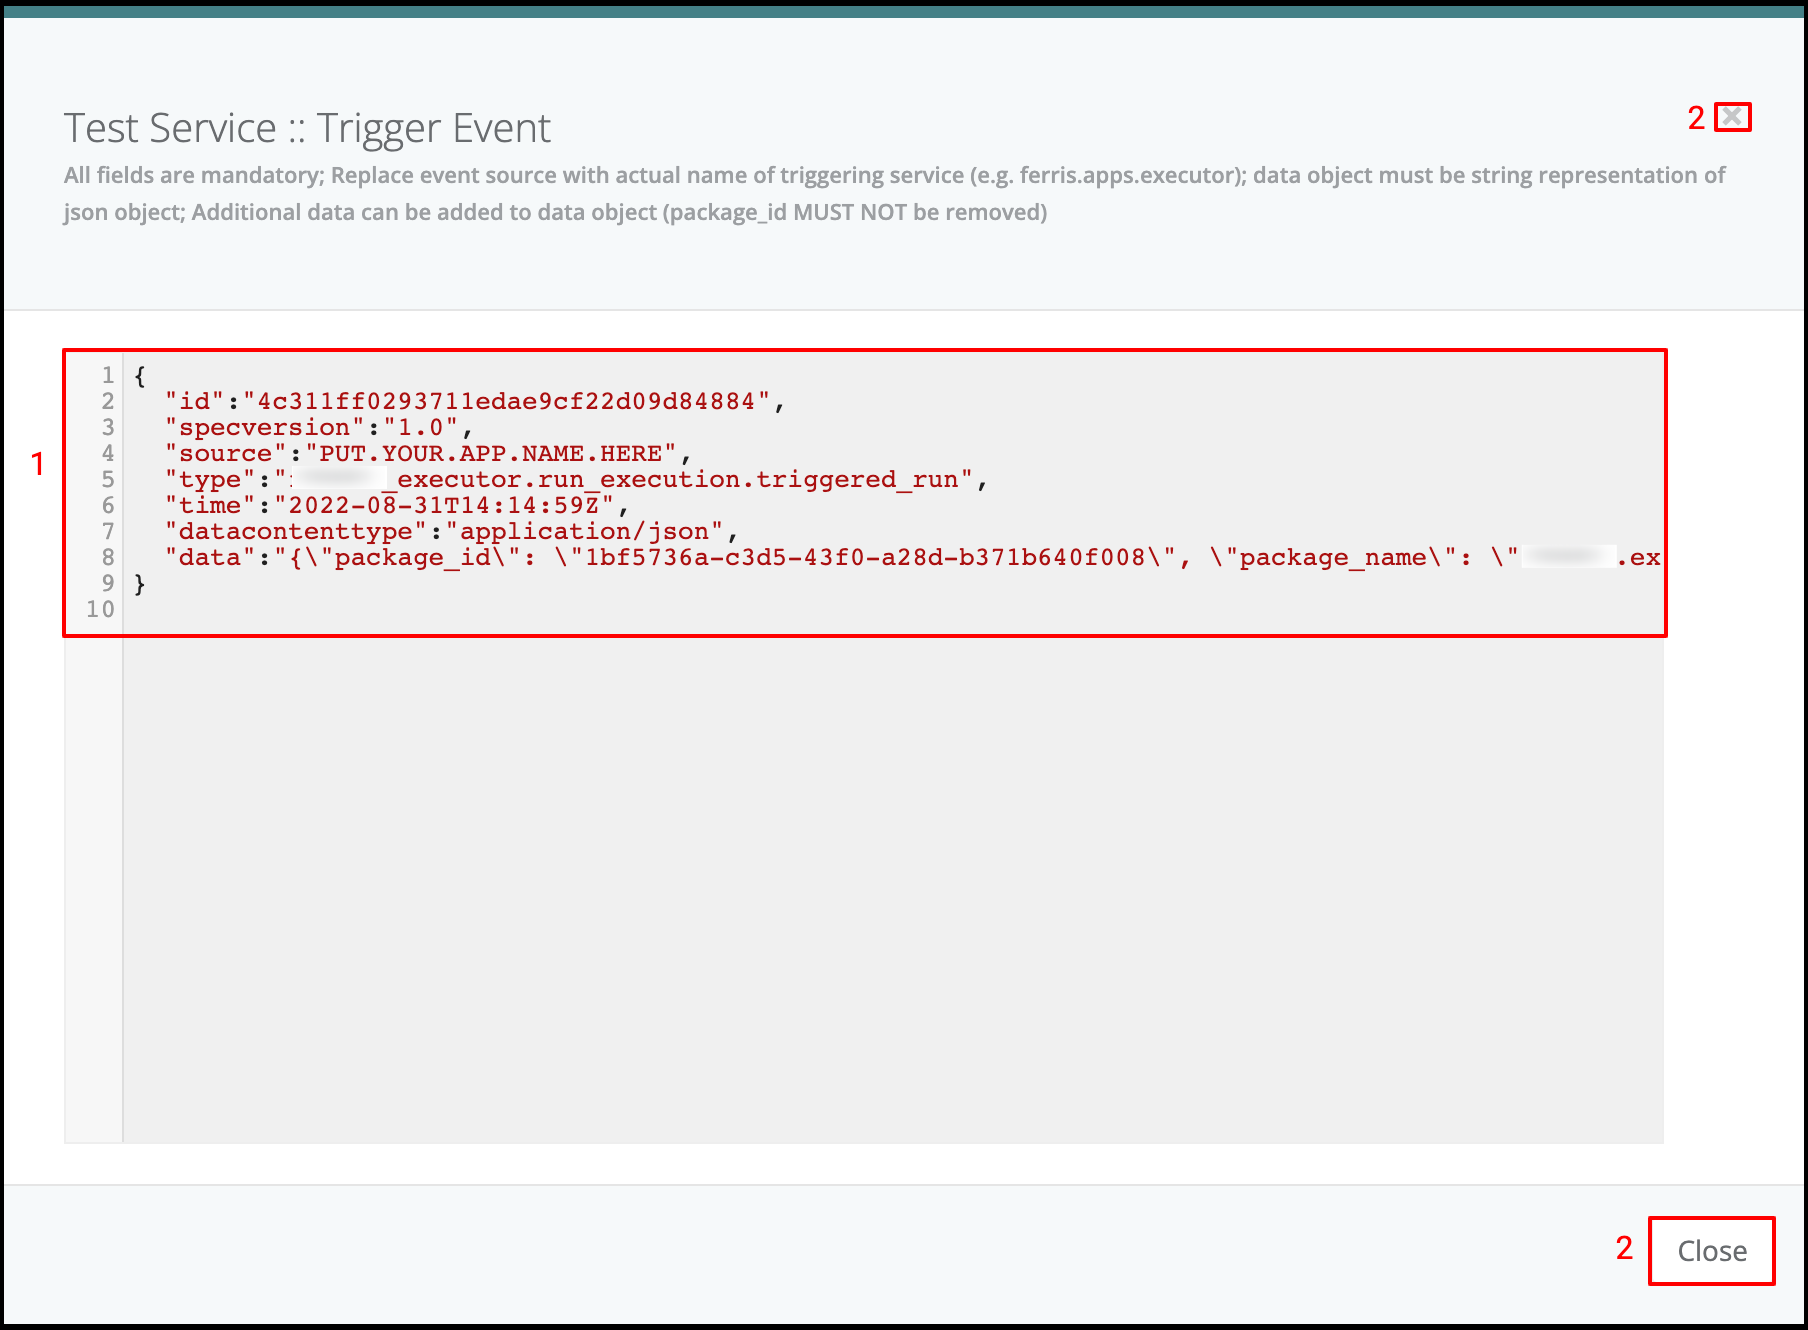
Events are messages passed through the platform which are generated either by Services or by the StreamZero Manager(in the case of manually triggered runs and scheduled runs).
Events are in the form of JSON formatted messages which adhere to the CloudEvents format.
Events carry a Header which indicates the event type and a Payload (or Data section) which contain information about the event.
Manually: By clicking the ‘Run’ button on the StreamZero FX Management UI.
On Schedule: As a cron job whereas the Cron expression is in the service manifest.
On Event: Where a package is configured to be triggered by the FX Router when a specific type of event(s) is encountered on the platform - also configured in the service manifest.
Irrespective of how a Service is triggered it is always triggered by an Event. In the case of Manual and Scheduled triggering it is the FX platform that generates the trigger event.
Late Linking
One of the most important features of the FX Platform is that you are not required to link the Service to an Event during the course of development. And you can also change the Trigger Event(s) post-deployment.
This approach gives you a great flexibility to:
not having to think of pre-defined flows but to build the Flow as well as the Services iteratively.
maintain and test multiple versions of the same Service in parallel.
The StreamZero FX Flow
At the core of the FX Platform messages (Events) are passed through Apache Kafka. These ’events’ are JSON formatted messages which adhere to the CloudEvents format.
Each Event consists of what may be simplified as Headers and Payload. The headers indicate the type of event and other attributes. Whereas the payload are the attributes or parameters that are sent out by Services in order to either provide information about their state or for usage by downstream Services.
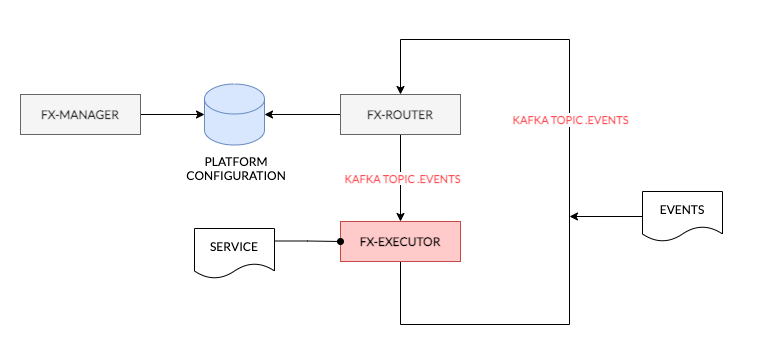
The FX Router(s) is listening on the stream of Events passing through Kafka. Based on the configuration of the platform which is managed in the StreamZero Management UI the Router decides if a Service requires to be executed based on the Event contents. On finding a configured Handler the gateway sends a message to the Executor and informs it of which packages or scripts are required to be run.
The FX Executor(s) executes the Service. The Service may use any Python module that is embedded in the Executor and also uses the platform internal configuration management database(at present Consul) for storing its configurations. The Executor sends a series of Events on Service execution. These are once again processed by the FX Router.
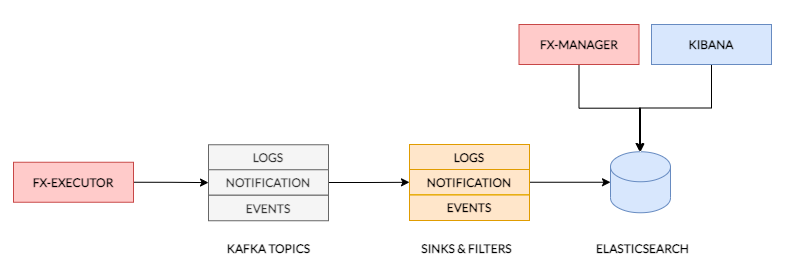
The FX Executor provides infrastructure which tracks logs, maintains record of service metrics and operational data. The Operational information is first sent to appropriate Kafka Topics from where they are picked up by Ops-Data Sinks whose role it is to store data within Elasticsearch and in some cases also filter the data for the purpose of alerting or anomaly tracking. All operational data may be viewed and queried through tools such as Kibana and is also viewable on the FX Management UI.
Required Infrastructure
The following are the infrastructure components required for a StreamZero FX installation
Component
Description
Apache Kafka
Apache Kafka serves as the backbone to pass events and operational data within a StreamZero FX Installation.
PostgreSQL
Postgres is used as the database for the StreamZero FX Manager Application.
Consul
Consul is the configuration store used by the StreamZero FX platform. It is also used by the services to store their configurations.
MinIO
Minio provides the platform internal storage for scripts and assets used by the Services.
Elasticsearch
Elasticsearch is used as a central store for all operational data. Thereby making the data easiliy searchable.
Kibana
Kibana is used to view and query the data stored in Elasticsearch.
StreamZero FX-Management UI
StreamZero FX Management UI is the main UI used for all activities on the StreamZero FX platform.
StreamZero FX-Router
The Route container is responsible for listenting to events flowing through the system and forwarding the events to the appropriate micro-services that you create.
StreamZero FX-Executor
The executor container(s) is where the code gets executed.
2 - Developer Guide
The Developer Guide provides a step by step guide to building services and code snippets for specific scenarios.
2.1 - Creating and Configuring Your First FX Service
Creating and Configuring Your First FX Service
Creating and Configuring Your First FX Service in a Local Environment
No Infrastructure Required!
When it comes to developing FX services, there’s no need for complex infrastructure setups. Nearly all of the platform’s essential features can be replicated in your local development environment.
This guide provides a clear walkthrough of the process for creating and simulating services, all within the comfort of your desktop IDE. By following these steps, you’ll be able to seamlessly generate and define services, and then simulate their behavior before taking them live.
Step 1: Create a Virtual Environment
Before you start working on your FX service, it’s a good practice to create a virtual environment to isolate your project’s dependencies. A virtual environment ensures that the packages you install for this project won’t conflict with packages from other projects. You can create a virtual environment using a tool like virtualenv:
1
2
# Replace "my_fx_project" with your desired project namevirtualenv my_fx_project-env
Activate the virtual environment:
1
source my_fx_project-env/bin/activate
Step 2: Set Environment Variable
Set the EF_ENV environment variable to “local” to indicate that you’re working in a local development environment:
1
export EF_ENV=local
Step 3: Project Directory Setup
Create a directory that will serve as the main project directory. Inside this directory, you will organize multiple services. For example:
1
2
mkdir my_fx_project
cd my_fx_project
Step 4: Create Service Directory
Within the project directory, create a subdirectory for your specific service. This directory should have a name that consists of alphanumeric characters in lowercase, along with underscores (_) and hyphens (-) – no spaces allowed:
1
2
mkdir my-service-name
cd my-service-name
Step 5: Create app.py
Inside the service directory, create an app.py file. This file will serve as the entry point for your FX service. In this file, import the necessary context from the fx_ef (core library) for your service:
1
2
3
4
# app.pyfrom ferris_ef import context
# Your service code starts here
Step 6: Run app.py
Run the app.py file. This step generates two JSON files:
ef_env.json: Simulates the parameters, secrets, and configurations of the service.
ef_package_state.json: Holds the execution state of the service.
The above 2 files are used to simulate the service environment and are not used at runtime. They should not be checked in to git. A sample .gitignore for FX projects is provided here The GitIgnore File
1
python app.py
Step 7: Expand Your Service
With the initial setup done, you can now expand the app.py file with your actual service logic. Build and implement your FX service within this file.
Step 8: Module Placement
It’s important to note that any modules (additional Python files) your service relies on should be placed within the same directory as the app.py file. FX does not support nested directories for modules.
By following these steps, you’ll be able to create your first FX service in a local environment, set up the necessary configurations, and start building your service logic. Remember to activate your virtual environment whenever you work on this project and customize the app.py file to match the functionality you want your FX service to provide.
Adding a manifest.json file to describe your FX service to the platform is an essential step for proper integration and communication. Here’s how you can create and structure the manifest.json file:
Step 9: Create manifest.json
Inside your service directory, create a manifest.json file. This JSON file will contain metadata about your service, allowing the FX platform to understand and interact with it.
 1
 2
 3
 4
 5
 6
 7
 8
 9
10
11
12
{
  "name": "My FX Service",
  "version": "1.0.0",
  "description": "A brief description of my FX service.",
  "author": "Your Name",
  "entry": "app.py",
  "configuration": "ef_env.json",
  "executionState": "ef_package_state.json",
  "modules": [
    "app.py"
  ]
}
"name": Provide a name for your FX service.
"version": Specify the version of your FX service (e.g., “1.0.0”).
"description": Add a brief description of what your service does.
"author": Add your name or the author’s name.
"entry": Point to the entry point of your service (usually app.py).
"configuration": Reference the ef_env.json file that holds service parameters, secrets, and configurations.
"executionState": Reference the ef_package_state.json file that holds the execution state of the service.
"modules": List the modules that your service relies on. In this case, it’s just "app.py".
Step 10: Manifest Structure
The manifest.json file provides vital information about your FX service, making it easier for the platform to understand and manage your service’s behavior and dependencies.
By including this file and its necessary attributes, your service can be properly registered, tracked, and executed within the FX platform. This manifest file essentially acts as a contract between your service and the platform, enabling seamless integration.
Understanding manifest.json: Defining Your Service
The manifest.json file plays a crucial role in describing your application to the DX Platform, as well as to fellow users and developers. Below is a sample manifest.json file along with an explanation of its parameters:
The script that will be executed when the service is triggered.
execution_order
An array indicating the sequence of scripts to be executed. If both entrypoint and execution_order are defined, entrypoint will be used.
tags
An array of tags that categorize the service.
trigger_events
An array of events that will trigger the service’s execution.
schedule
Optional. A cron-like definition for scheduling service executions.
allow_manual_triggering
Indicates whether the service can be triggered manually.
active
Indicates whether the service is active or inactive.
This manifest.json file provides essential metadata about your service, making it easier for both the platform and other users to understand its purpose, behavior, and triggers. By customizing these parameters, you tailor the service’s behavior to your specific requirements.
Feel free to integrate this explanation into your documentation. Adapt the content to match your documentation’s style and format. This section aims to provide users with a comprehensive understanding of the manifest.json file and its significance in defining FX services.
Step 11: Expand ef_env.json
The ef_env.json file plays a crucial role in simulating your service’s environment during development. While on the FX platform, parameters, configs, and secrets are managed differently, in the local environment, you can define these elements within this JSON file for simulation purposes.
"parameters": In the local environment, you can define parameters directly within this dictionary. These parameters are typically accessed within your service code using the fx_ef library.
"secrets": Similarly, you can define secret values in this section. While on the platform, secrets will be managed through the UI and loaded into your service securely. During local simulation, you can include sample secret values for testing.
"configs": For configuration values, you can specify them in this dictionary. However, on the FX platform, configuration values are usually managed through an external config.json file. This is done to keep sensitive configuration data separate from your codebase.
Important Note: Keep in mind that the ef_env.json file is only for simulation purposes. On the FX platform, parameters are passed through trigger event payloads, configurations come from the config.json file, and secrets are managed through the platform’s UI.
By expanding your ef_env.json file with the appropriate parameters, secrets, and sample configuration values, you’ll be able to effectively simulate your service’s behavior in a local environment. This allows you to test and refine your service logic before deploying it on the FX platform, where parameters, secrets, and configurations are handled differently.
Step 12: Exploring the fx_ef Library
In the following section, we’ll delve into the capabilities of the ferris_ef library. This library serves as a bridge between your FX service and the platform, allowing you to seamlessly implement various platform features within your service’s logic.
The fx_ef library encapsulates essential functionalities that enable your service to interact with the FX platform, handling triggers, events, and more. By leveraging these features, you can create robust and responsive FX services that seamlessly integrate with the platform’s ecosystem.
Here’s a sneak peek at some of the functionalities offered by the fx_ef library:
Event Handling: The library facilitates event-driven architecture, allowing your service to react to various triggers from the platform. Whether it’s an incoming data event or an external signal, the library provides the tools to manage and respond to events effectively.
Parameter Access: While on the FX platform, parameters are passed through trigger event payloads. The library offers methods to access these parameters effortlessly, enabling your service to make decisions and take actions based on the provided inputs.
Configuration Management: Although configuration values are typically managed through a separate config.json file on the platform, the fx_ef library simplifies the process of accessing these configurations from within your service code.
Secrets Handling: On the platform, secrets are managed securely through the UI. The library ensures that your service can access these secrets securely when running on the platform.
Service State Tracking: The library also assists in managing your service’s execution state, tracking its progress and ensuring smooth operation.
By tapping into the capabilities of the fx_ef library, you can build powerful and versatile FX services that seamlessly integrate with the FX platform’s functionalities. In the next section, we’ll dive deeper into the specifics of how to utilize these features in your service logic.
Stay tuned as we explore the fx_ef library in depth, unraveling the tools at your disposal for creating impactful and responsive FX services.
Feel free to adapt this content to your documentation’s style and structure. It’s designed to introduce users to the significance of the fx_ef library and prepare them for a deeper dive into its features and usage.
2.2 - FX Core Lib: Simplifying FX Service Development
FX Core Lib: Simplifying FX Service Development
FX Core Lib: Simplifying FX Service Development
The FX Helper package, available through the fx_ef library, offers an array of convenient functions that streamline the development of FX services. This guide walks you through the different ways you can leverage this package to access service configurations, parameters, secrets, and state within your service logic.
Accessing Package Configuration
Retrieve configuration values that influence your service’s behavior by using the context.config.get() method:
1
2
3
from fx_ef import context
value = context.config.get('some_configuration_key')
Accessing Execution Parameters
Access parameters that affect your service’s execution using the context.params.get() method:
1
2
3
from fx_ef import context
param_value = context.params.get('param_name')
Accessing Secrets
Easily access secrets stored on platform, project, or package levels with the context.secrets.get() method:
1
2
3
from fx_ef import context
secret_value = context.secrets.get('secret_name')
Setting Secrets
Set secrets on project and platform levels using the context.secrets.set() method:
1
2
3
from fx_ef import context
context.secrets.set(name="platform_secret", value={"somekey": "someval"}, context="platform")
Accessing Package ID and Name
Retrieve your package’s ID and name using the context.package.id and context.package.name attributes:
1
2
3
4
from fx_ef import context
package_id = context.package.id
package_name = context.package.name
Accessing and Updating Package State
Manage your service’s execution state with context.state.get() and context.state.put():
1
2
3
4
from fx_ef import context
state_data = context.state.get()
context.state.put("some_key", "some_value")
Logging
Leverage logging capabilities at different levels - DEBUG, INFO (default), ERROR, WARNING, and CRITICAL:
Use the context.scheduler.retry() method to schedule the next execution of your service from within your script:
 1
 2
 3
 4
 5
 6
 7
 8
 9
10
11
12
13
from fx_ef import context
# Retry in 3 minutesjob_id = context.scheduler.retry(minutes=3)
# Retry in 3 hoursjob_id = context.scheduler.retry(hours=3)
# Retry in 3 daysjob_id = context.scheduler.retry(days=3)
# Retry on the 56th minute of the next hourjob_id = context.scheduler.retry(cron_expression="56 * * * *")
This guide provides insight into the powerful functionalities offered by the fx_ef library, making FX service development more efficient and intuitive. These tools empower you to create responsive and feature-rich FX services with ease.
2.3 - Deploy a Service
Deploy a Service.
Deploying Services: A Step-by-Step Overview
In this section, we provide you with a concise yet comprehensive overview of the steps required to deploy a service or a collection of services onto the FX platform. Following these steps ensures a smooth transition from development to deployment.
Step 1: Check Services into Git
Before anything else, ensure your collection of services is properly versioned and checked into a Git repository. This guarantees version control and a reliable source of truth for your services.
Step 2: Create a Project in the UI
In the FX platform UI, initiate the process by creating a project. Projects serve as containers for your services, aiding in organization and management.
Step 3: Add Git Repository to the Project
Once your project is in place, seamlessly integrate your Git repository with it. This connection allows the platform to access and manage your services’ source code.
Step 4: Sync the Repository to the Platform
The final step involves syncing the repository you’ve connected to your project with the FX platform. This synchronization imports the services’ code, configurations, and other relevant assets into the platform environment.
By following these four fundamental steps, you’re well on your way to deploying your services onto the FX platform. Each of these steps plays a vital role in ensuring that your services are seamlessly integrated, accessible, and ready for execution within the FX ecosystem.
Detailed Deployment Process: From Git to FX Platform
This section breaks down the steps outlined earlier for deploying services onto the FX platform in detail, starting with checking services into Git.
Check Services into Git
Since familiarity with Git is assumed, we’ll briefly touch on this step. Within the FX platform, each directory within a Git Repository represents a distinct service. Files placed directly in the root directory of a Repository are not considered part of any service.
Create a Project in the UI
Creating Projects and Linking with Git Repository:
Create a New Project:
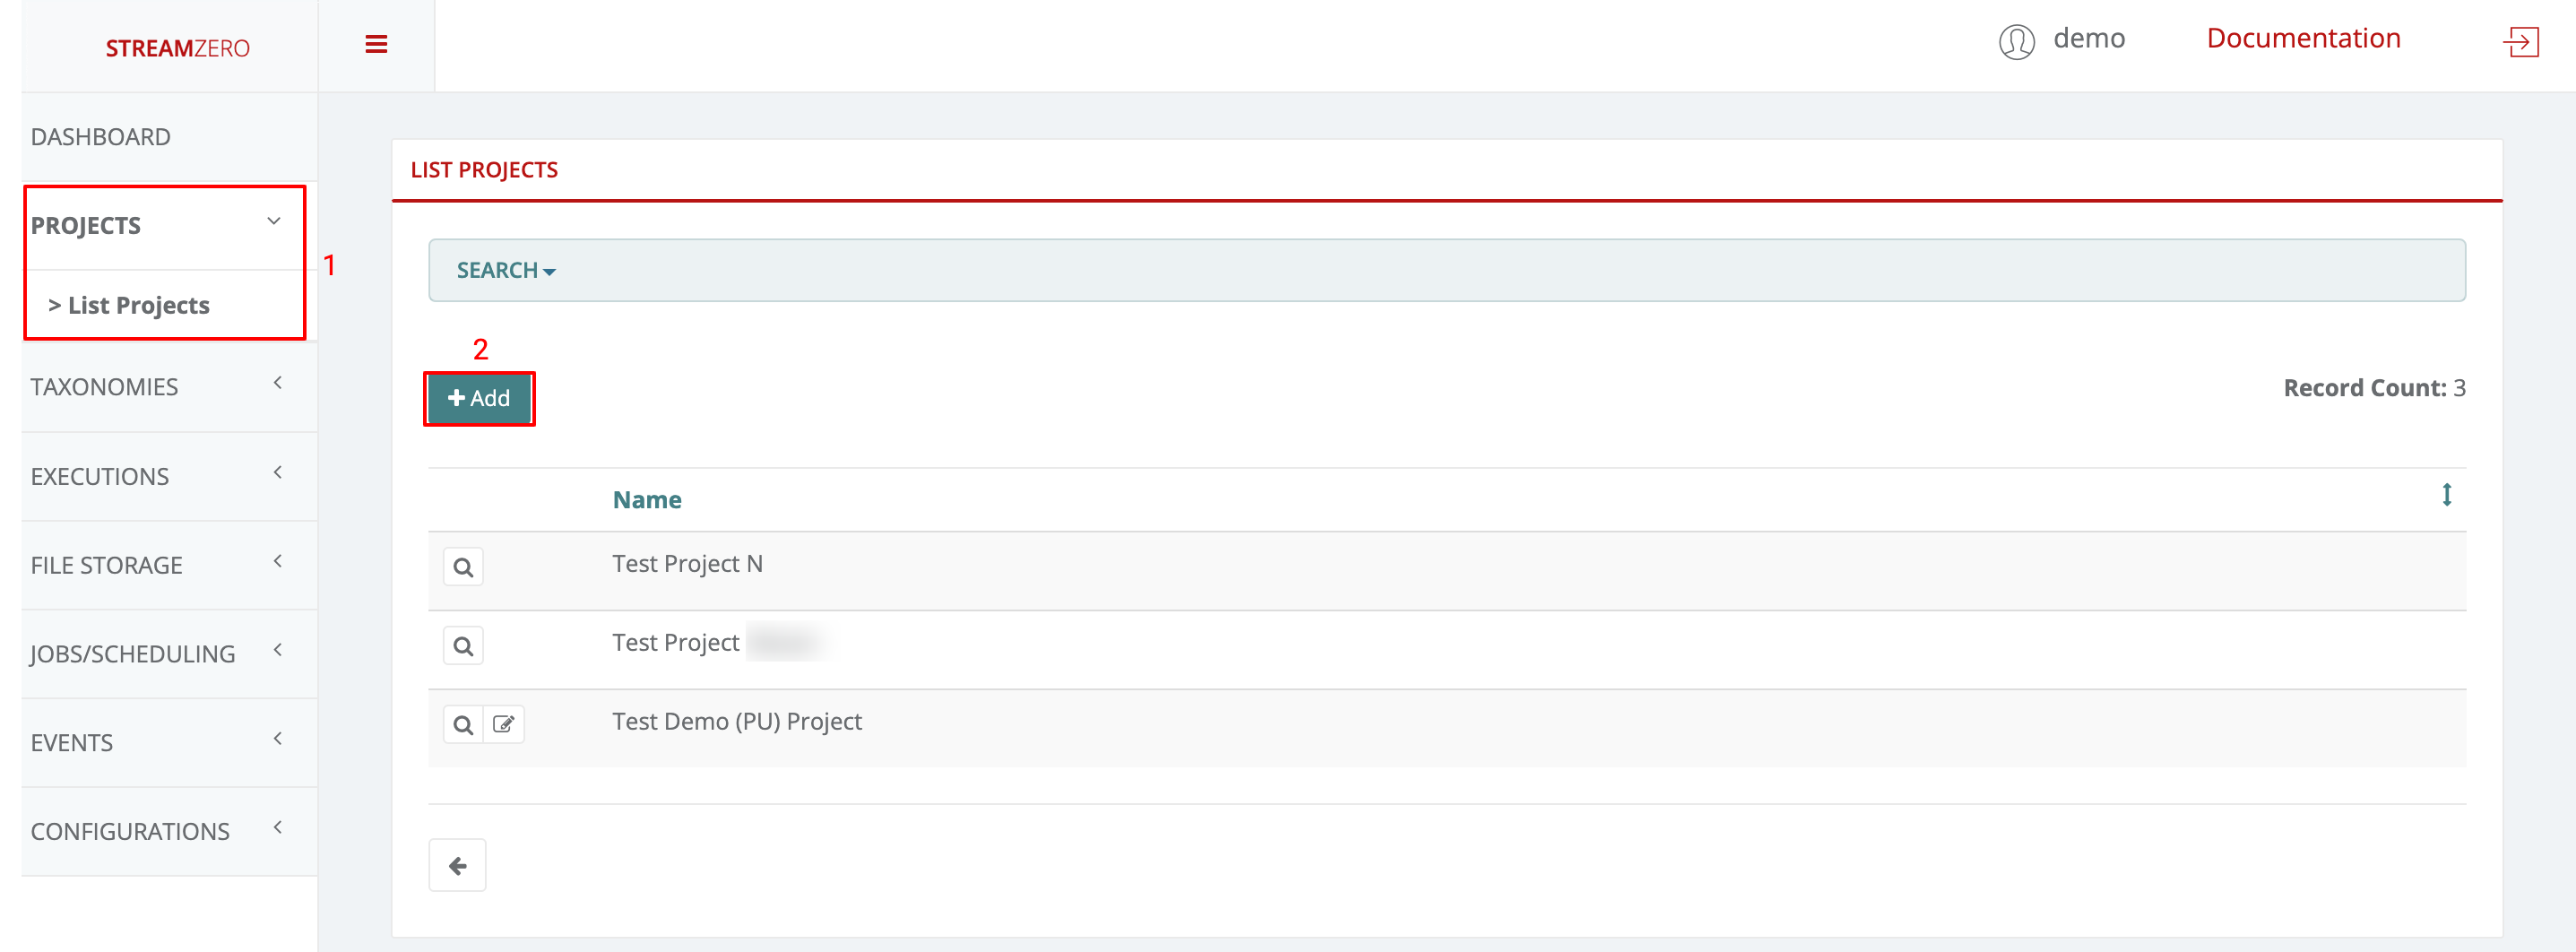
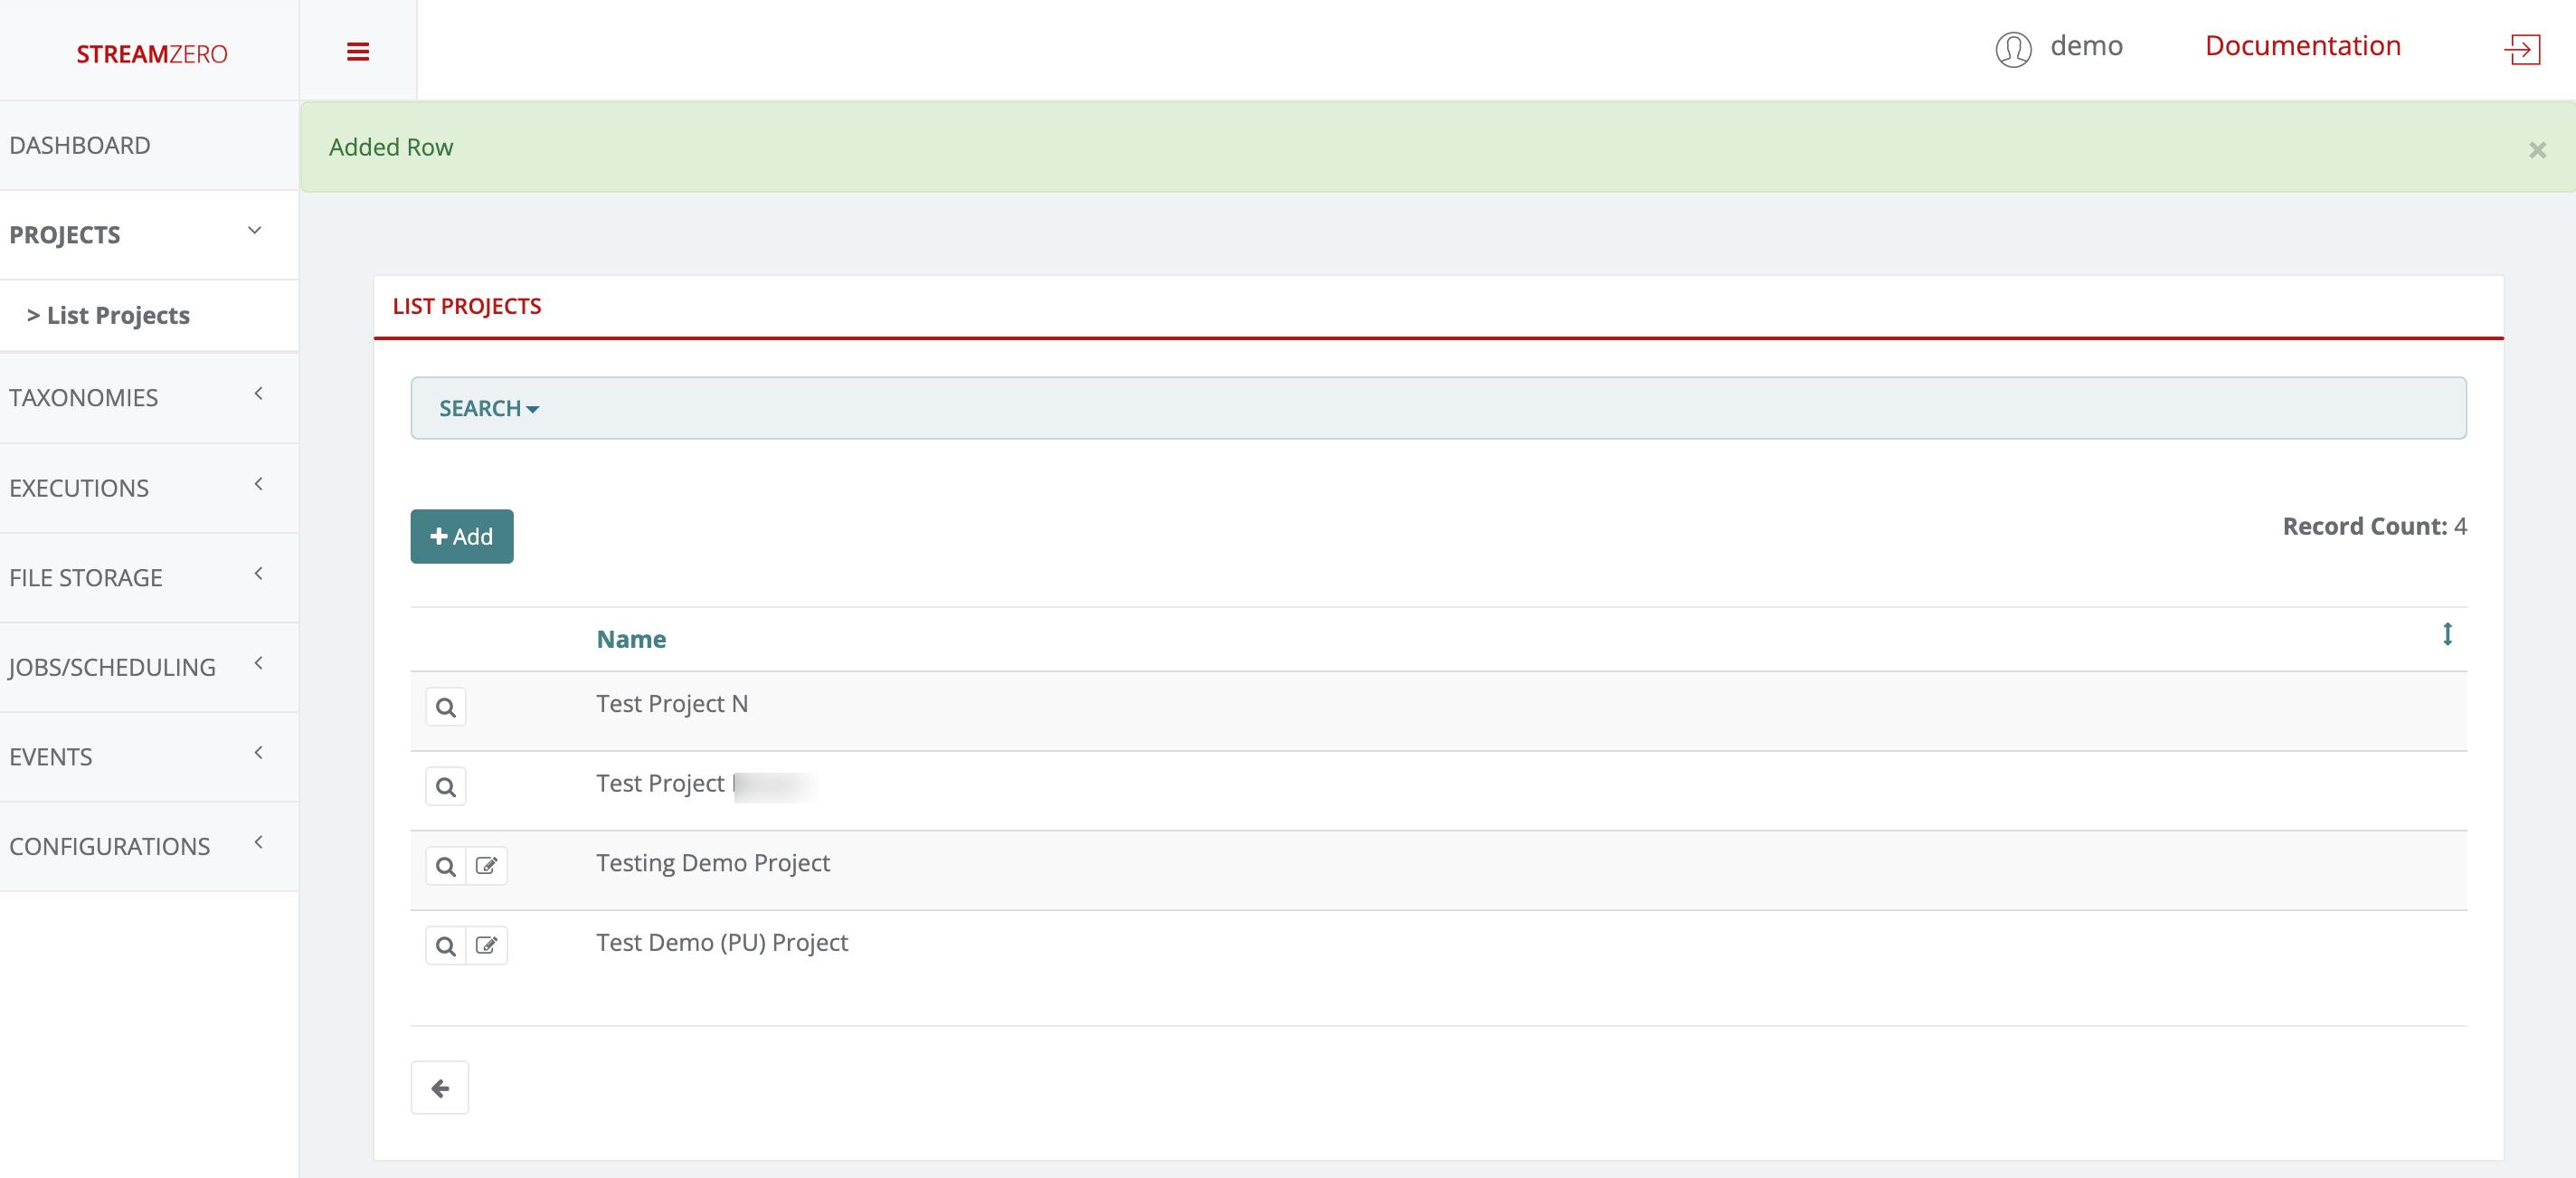
Navigate to the “Projects” section on the left menu, then select “List Projects.”
Click “+Add” to create a new project.
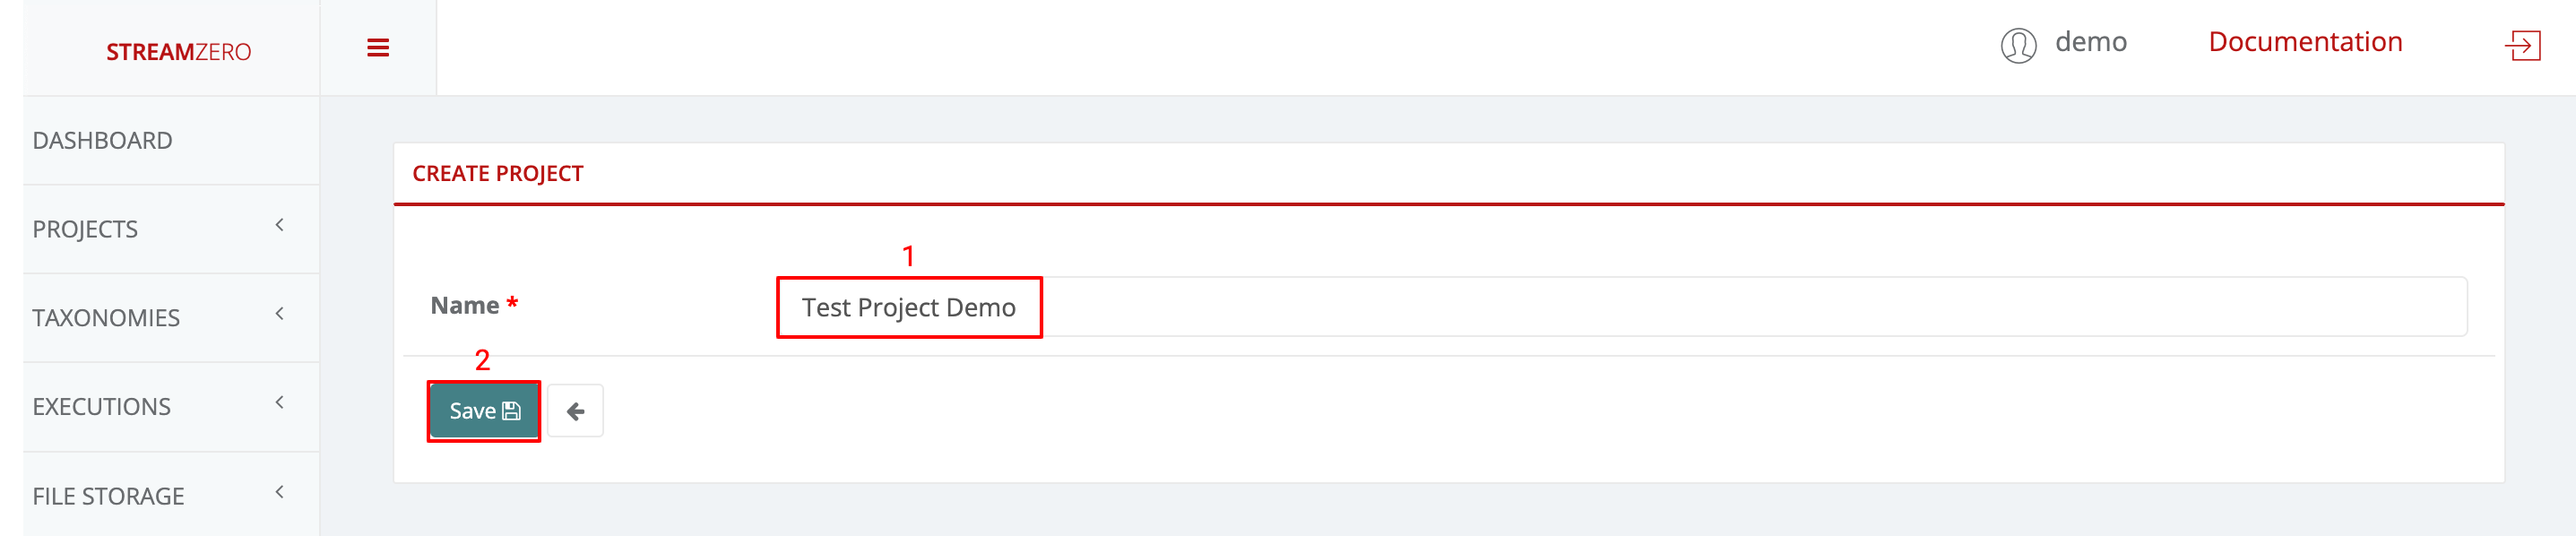
Name the Project:
Provide a name for the project.
Save the project.
View Project Details:
Click the magnifying glass icon to access the project’s details page.
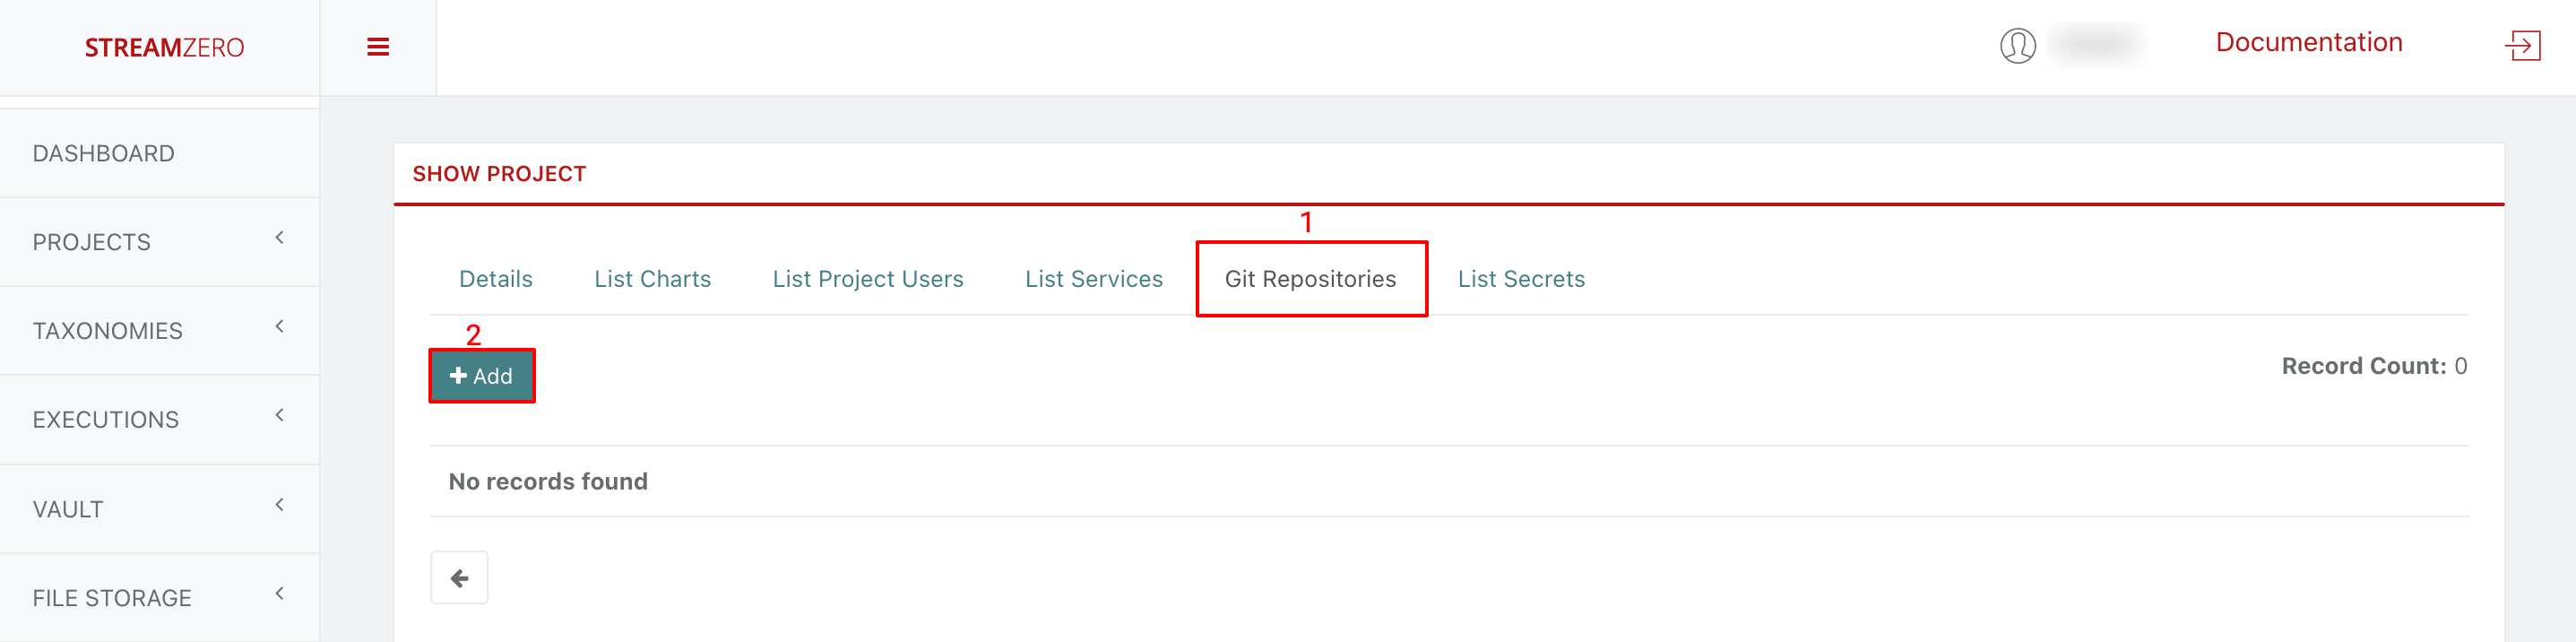
Add a GitHub Repository:
Access the “Git Repositories” tab.
Click “+Add” to add an SSH repository URL.
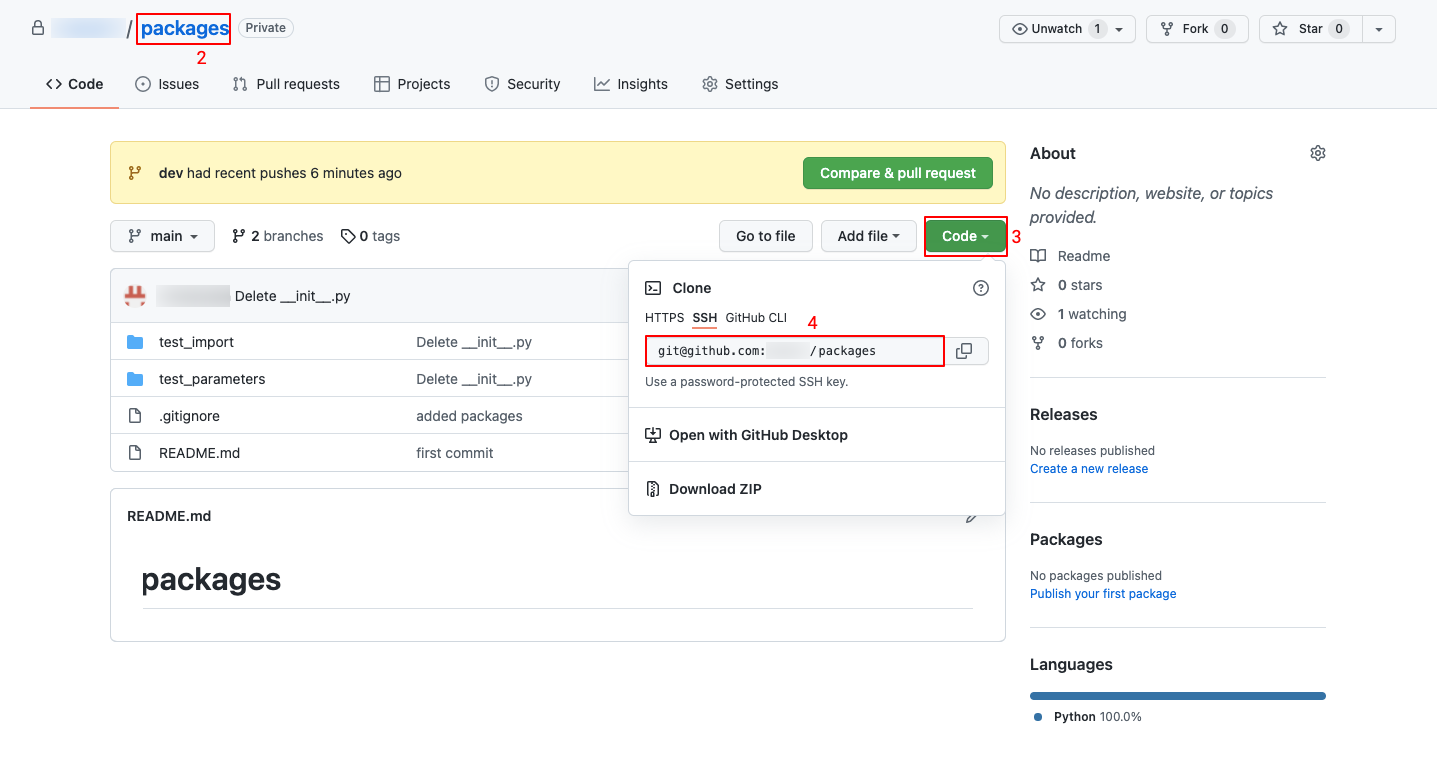
Copy GitHub Repo:
Generate a public SSH key (if not done previously).
Login to your GitHub account.
Go to the repository you want to link.
Click the green “Code” button to reveal repository URLs.
Copy the SSH URL.
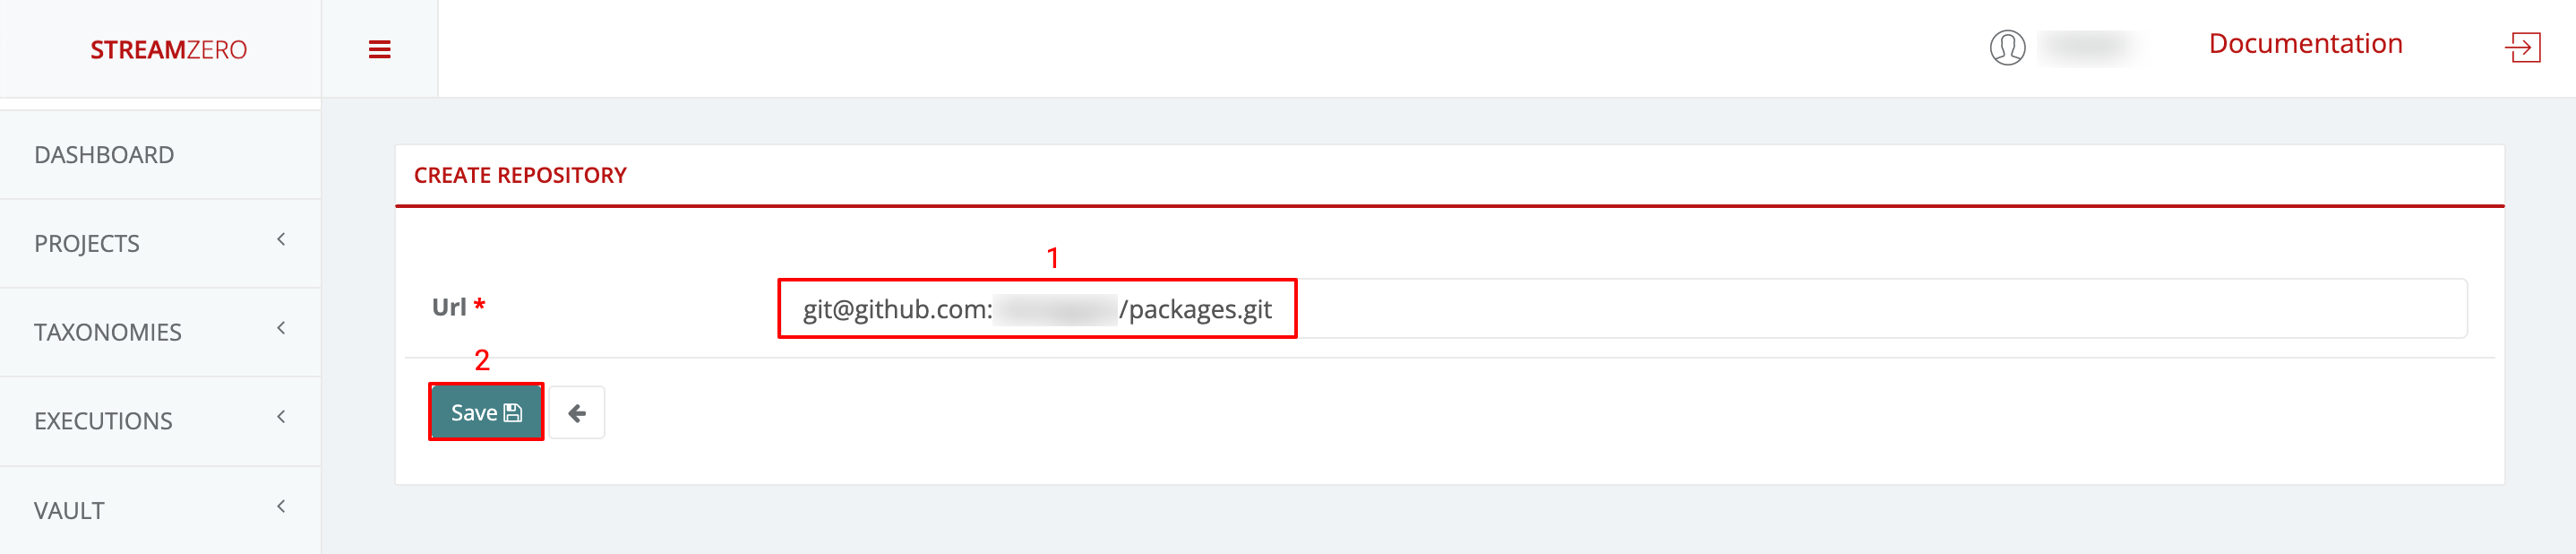
Paste SSH URL:
Paste the copied SSH URL into the platform.
Save to set up the repository.
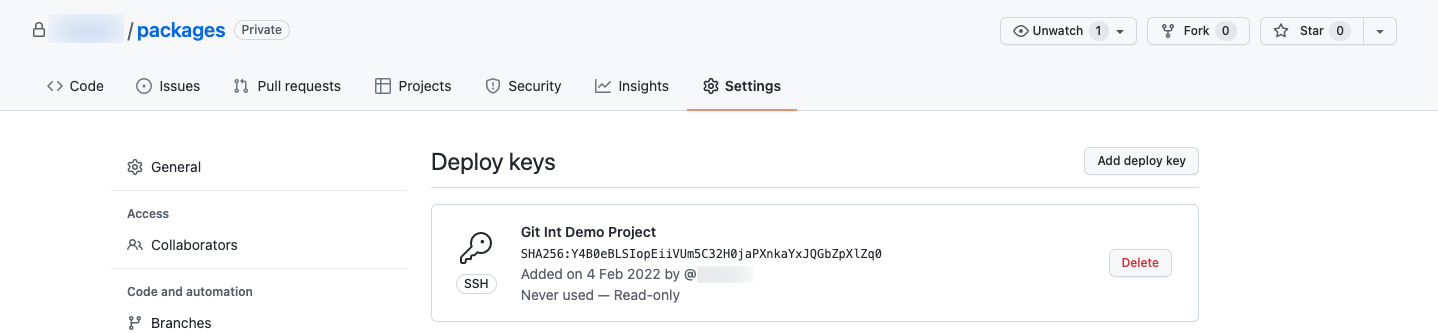
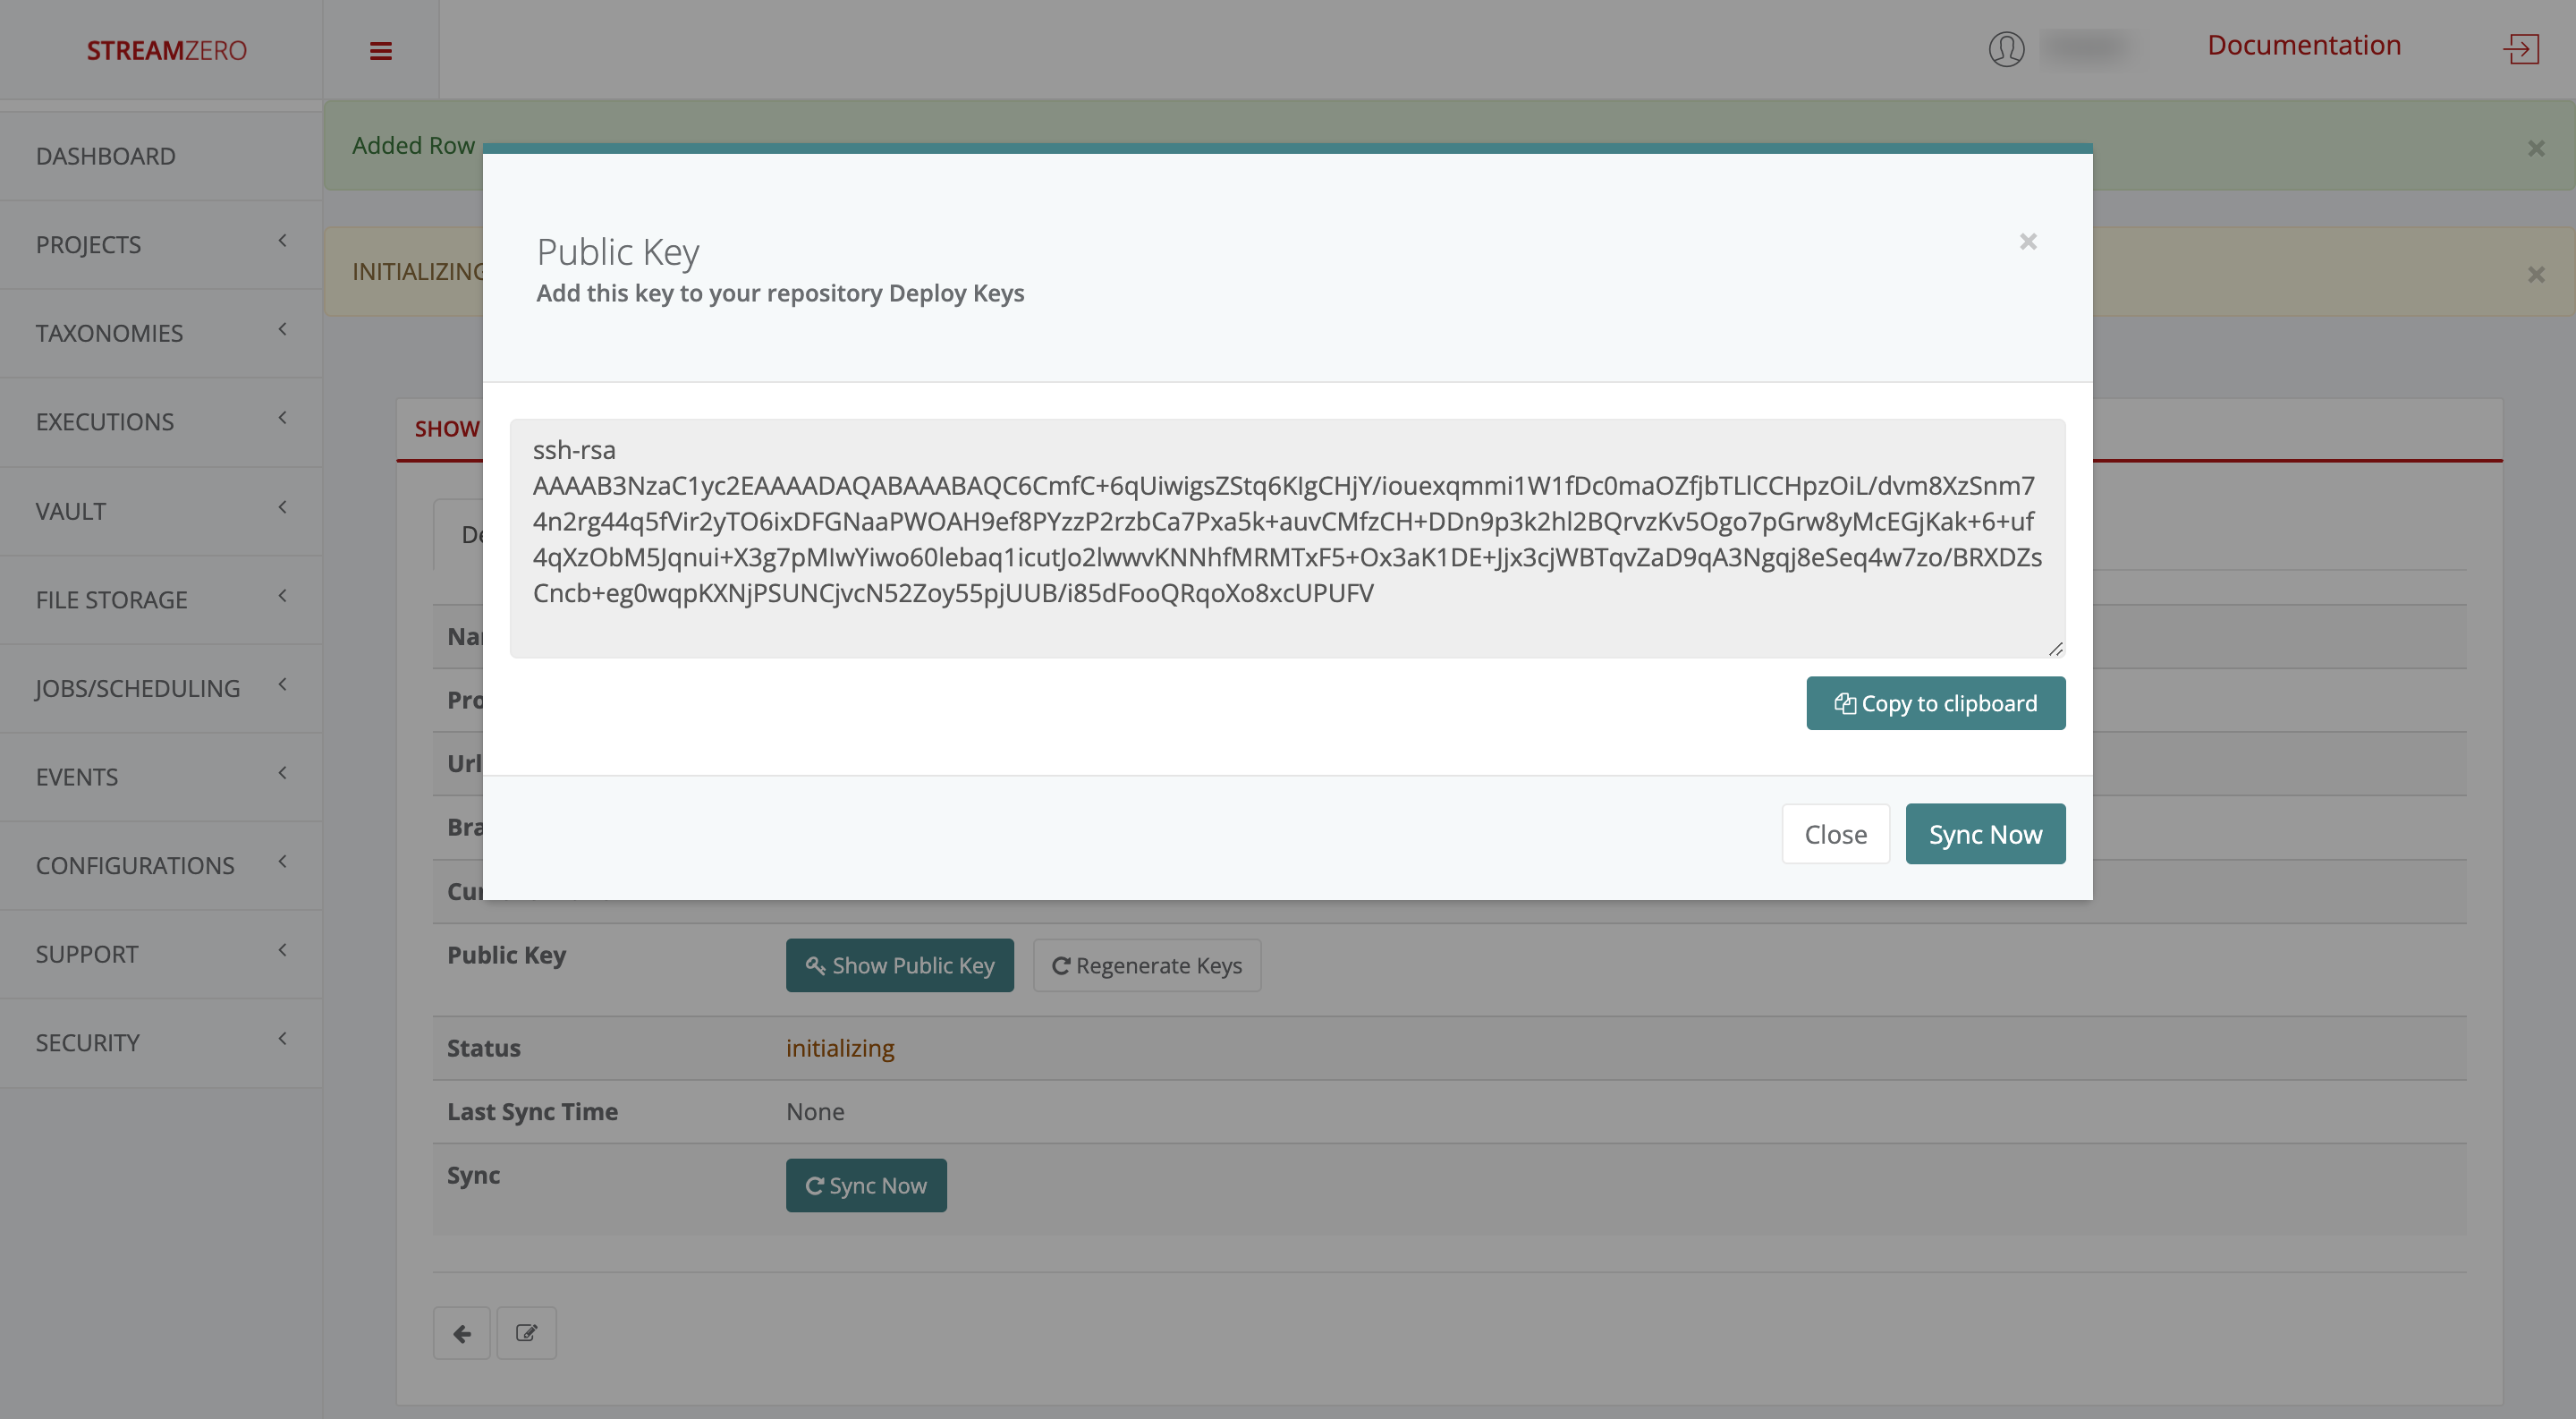
A pop-up will display a platform-generated public key. This key should be added to the GitHub Repo’s Deploy Keys to enable syncing.
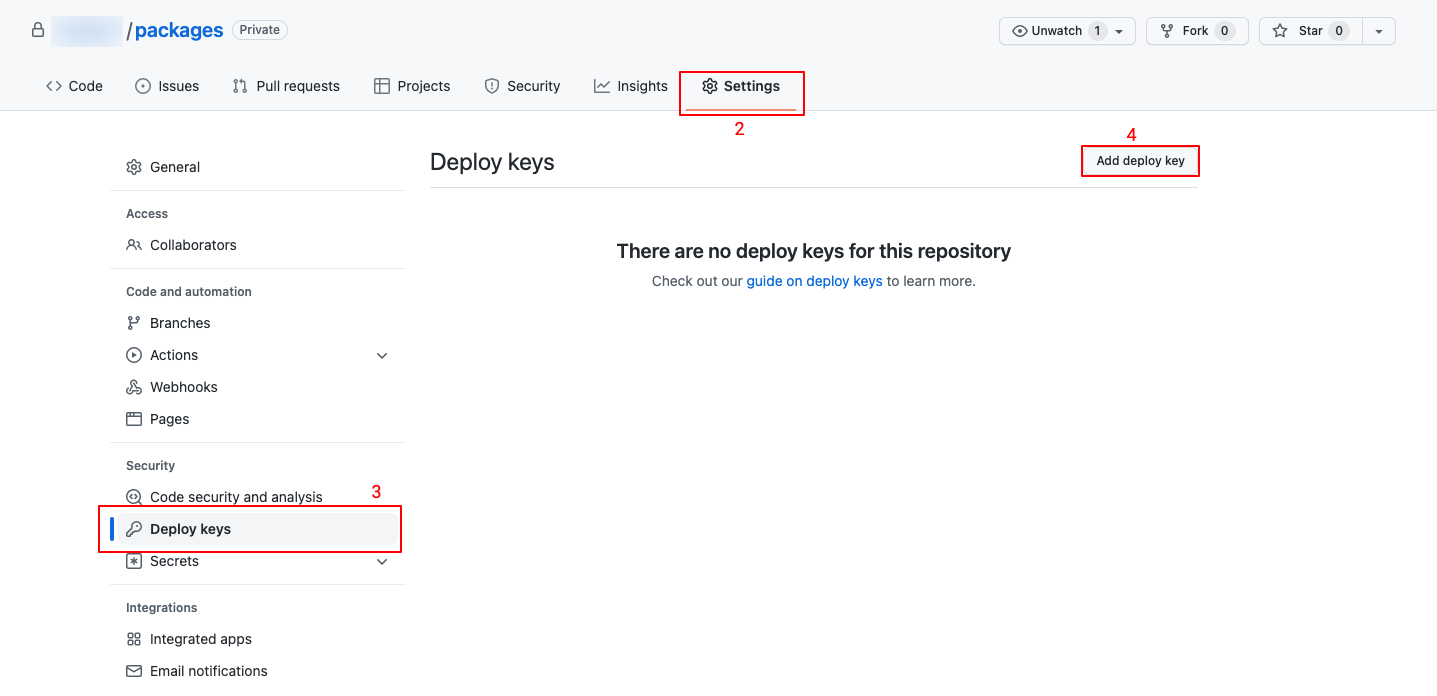
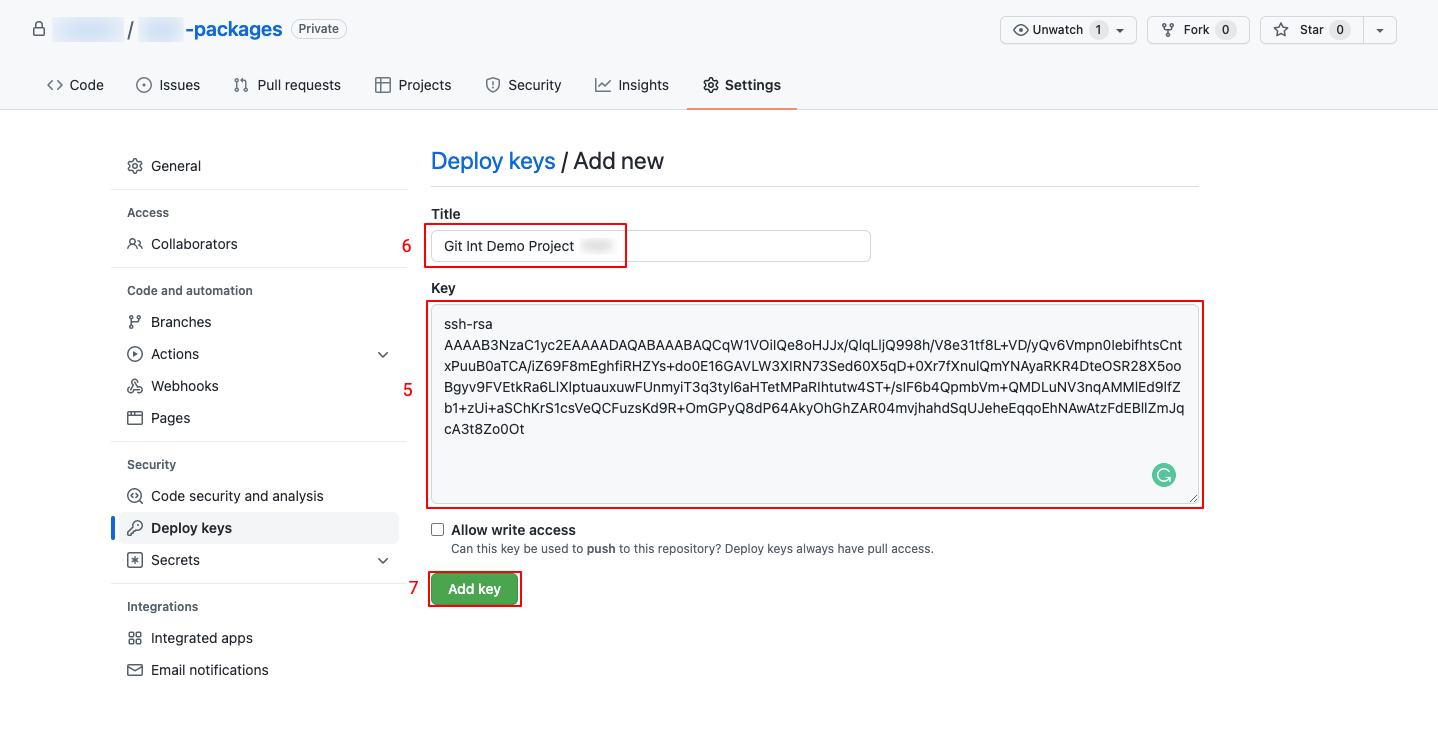
Add Public Key to GitHub:
Return to GitHub.
Go to Settings > Deploy Keys.
Click “Add Deploy Key.”
Paste the generated public key, name it, and add the key.
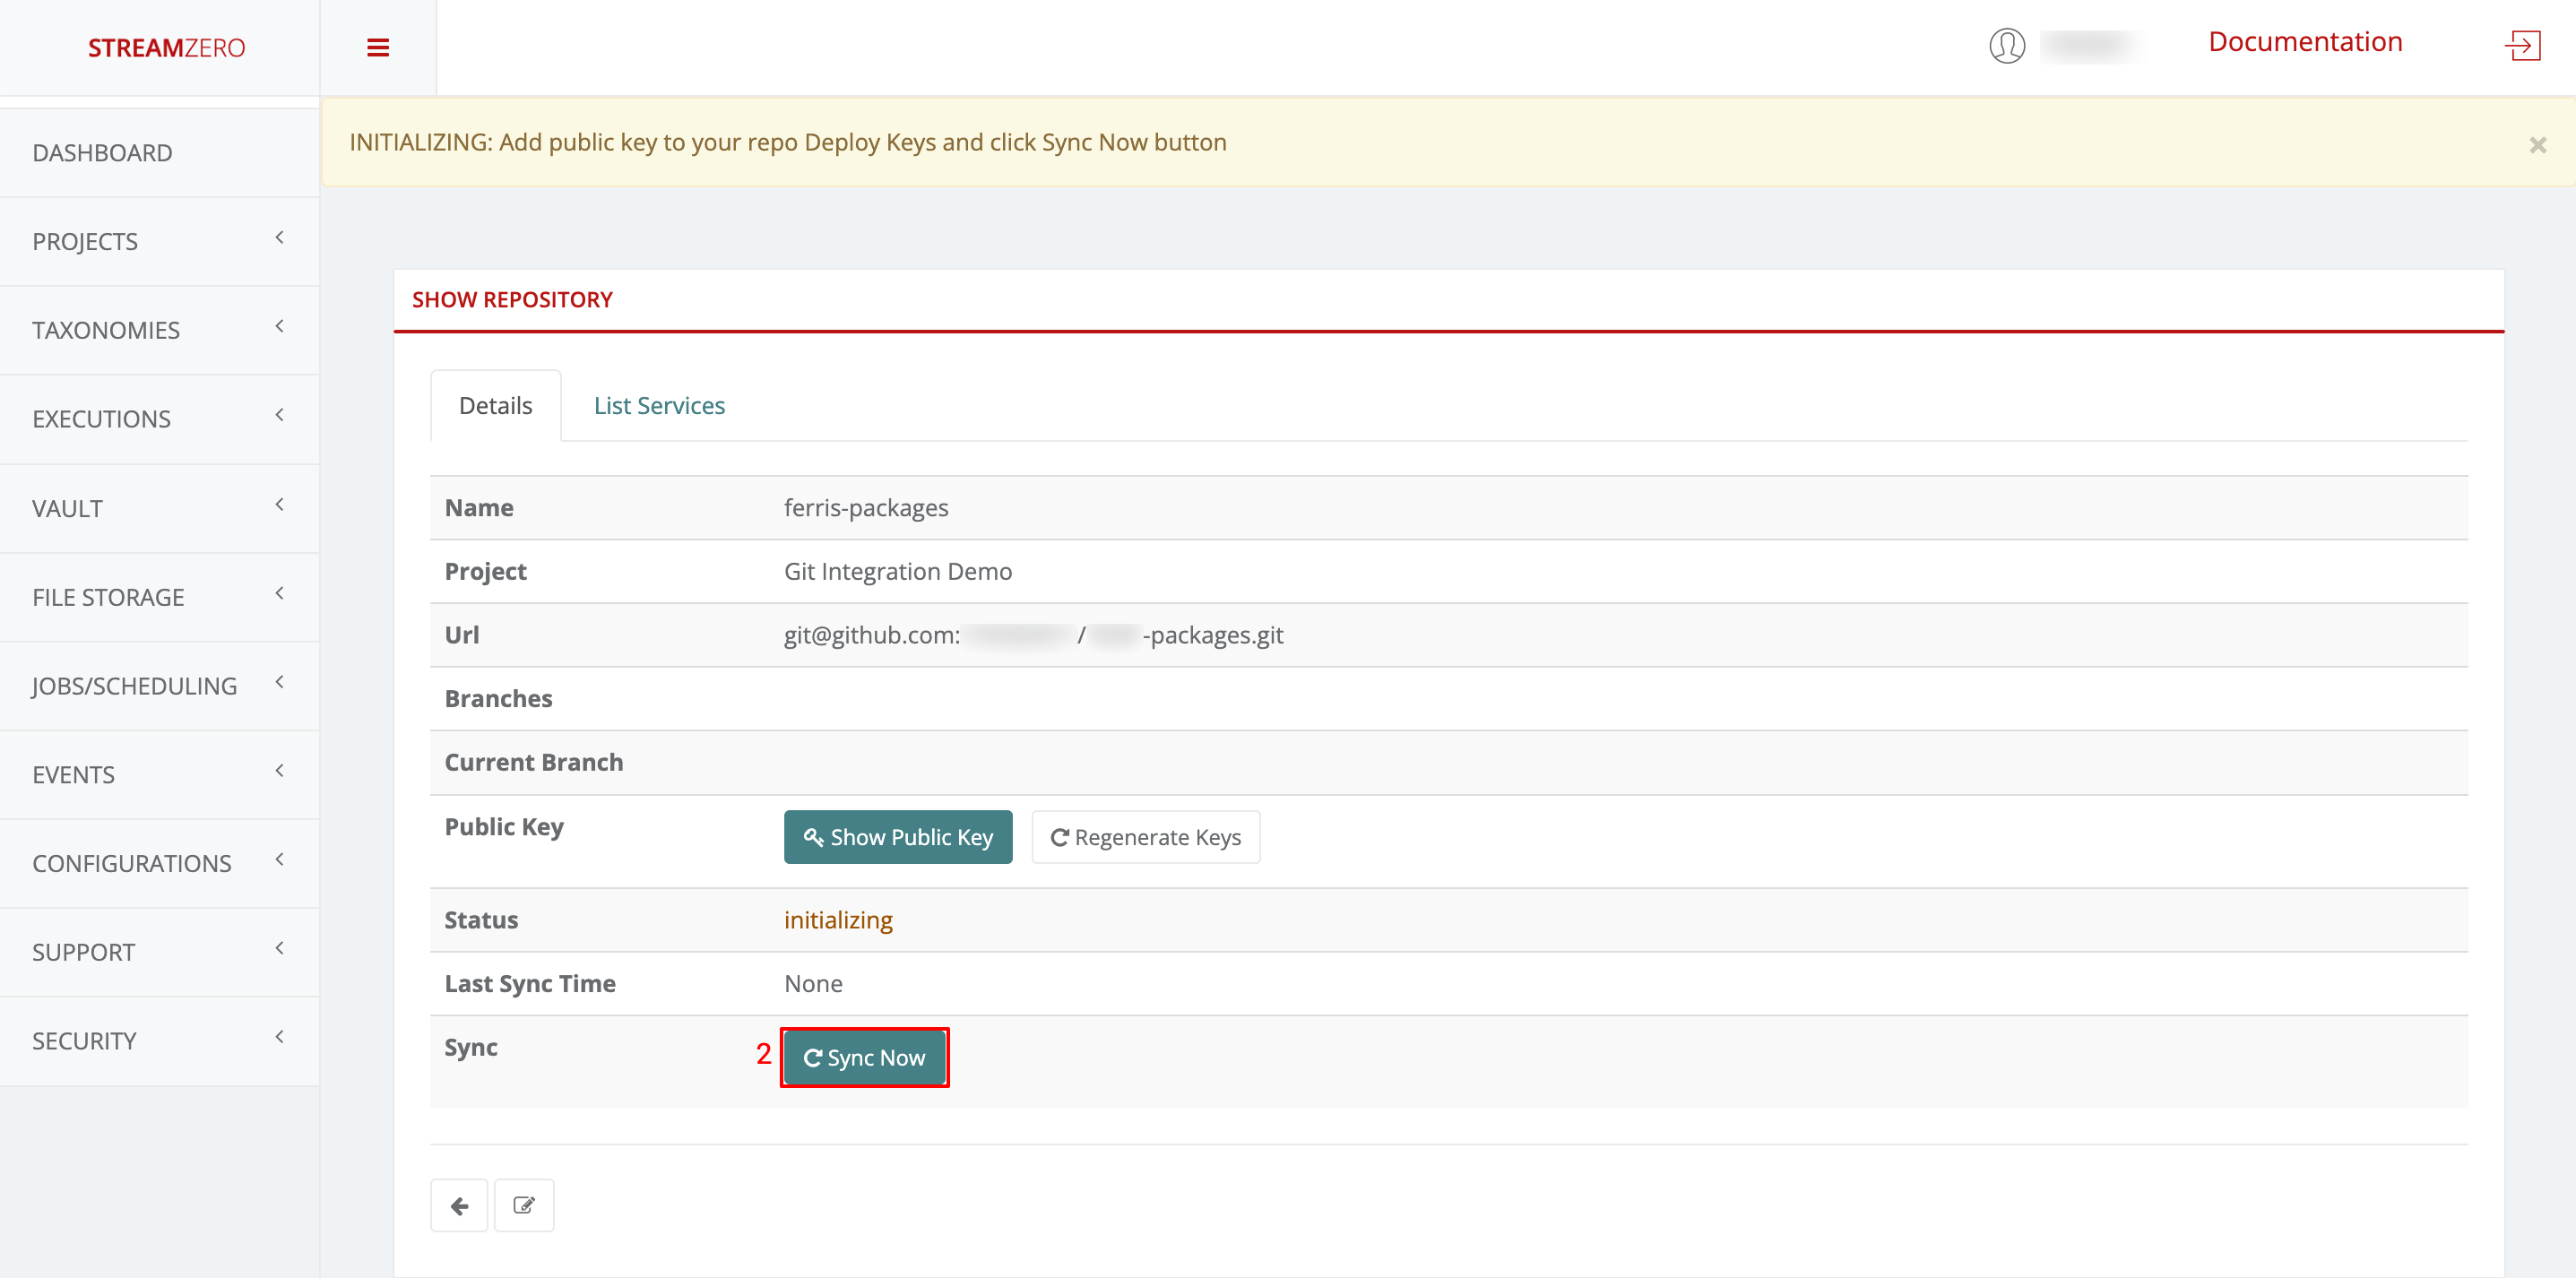
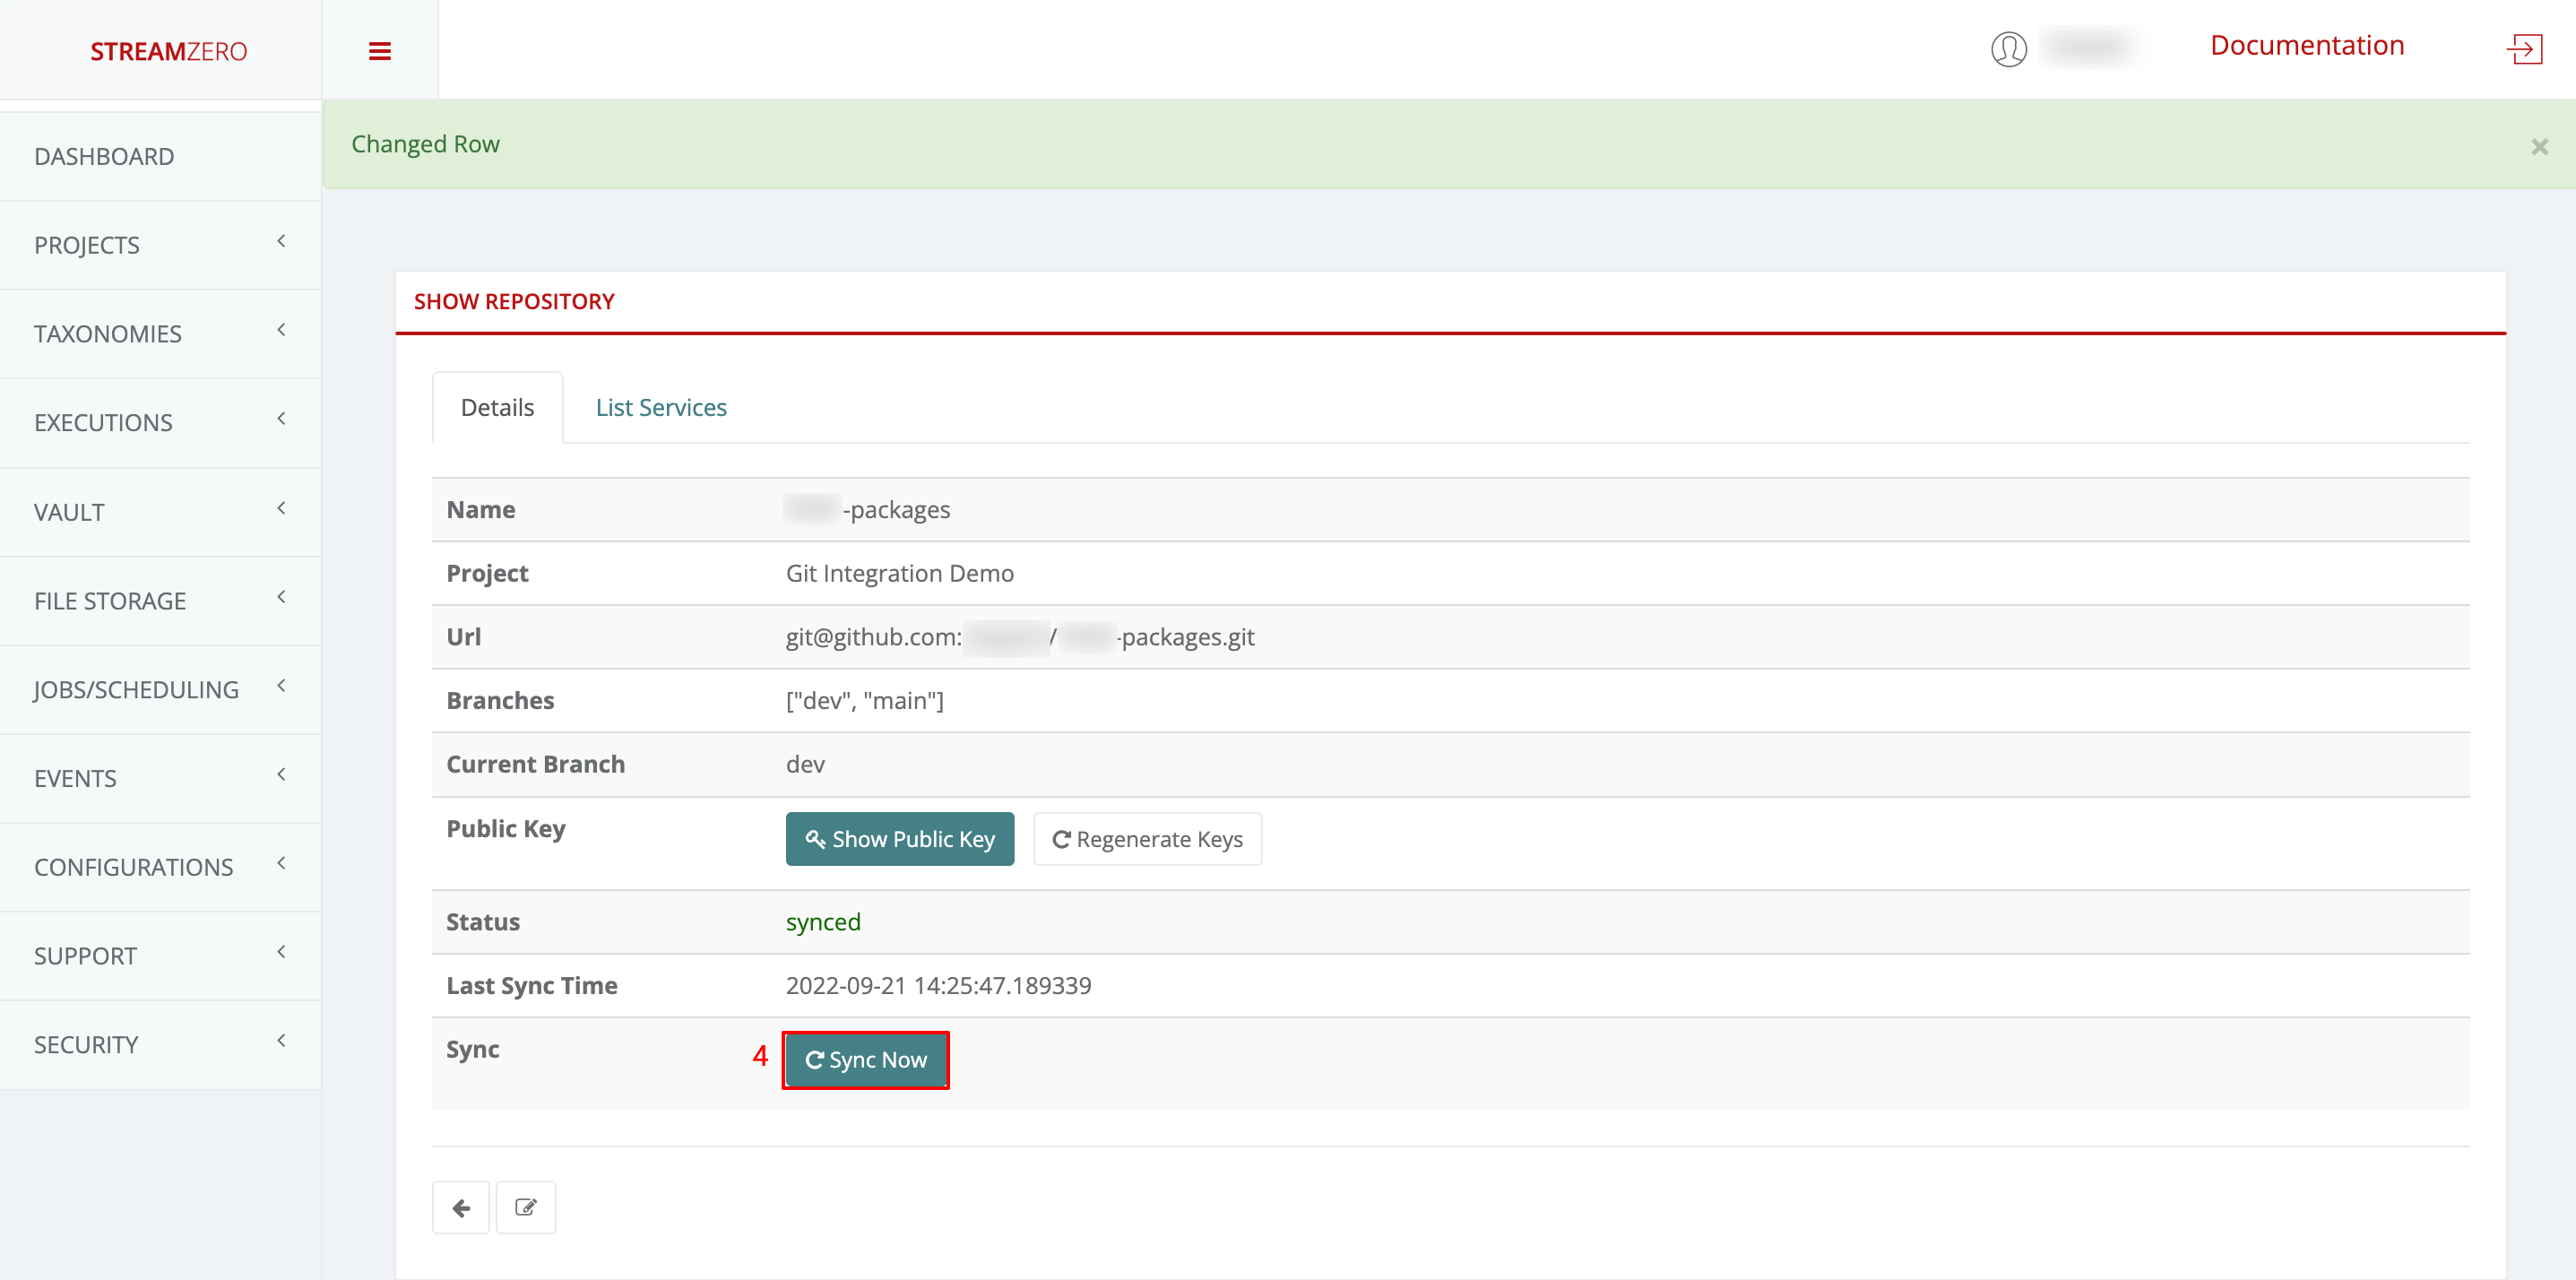
Synchronize the Repository:
Return to the FX platform.
Click “Sync Now” to sync the platform with the Git Repository.
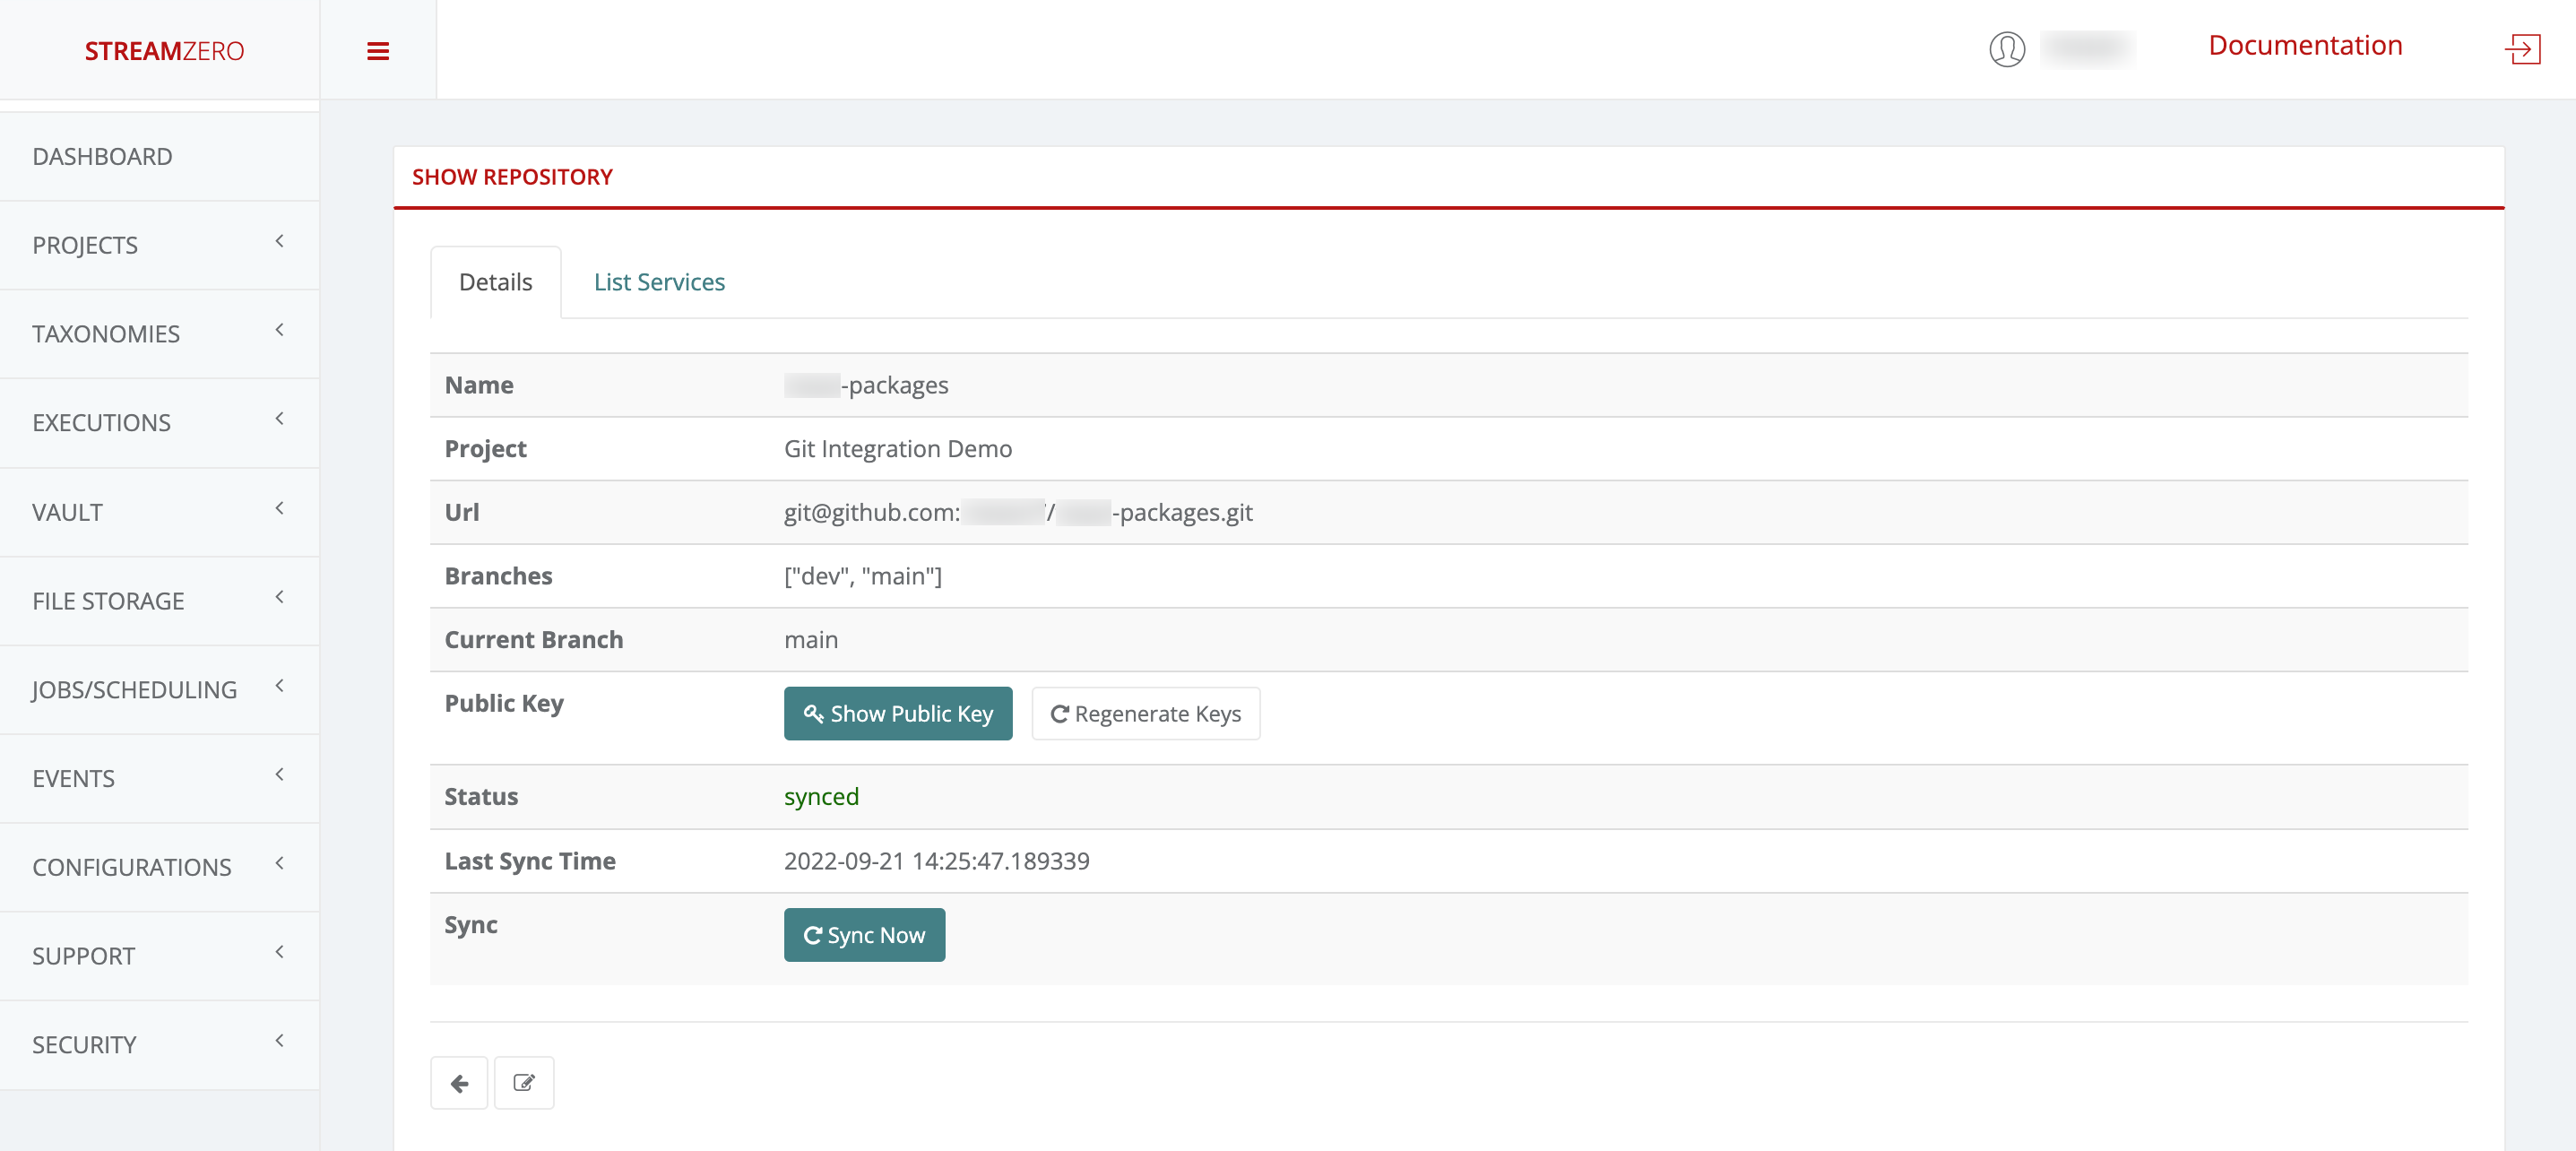
Check the synchronized details page; branches will be added, and status changes.
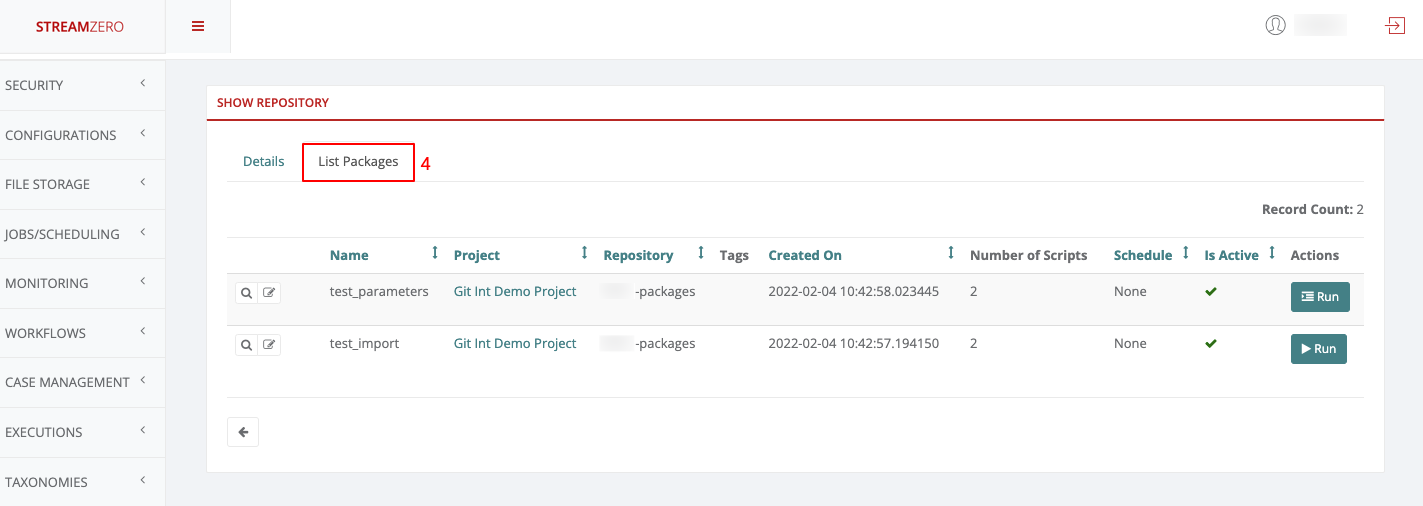
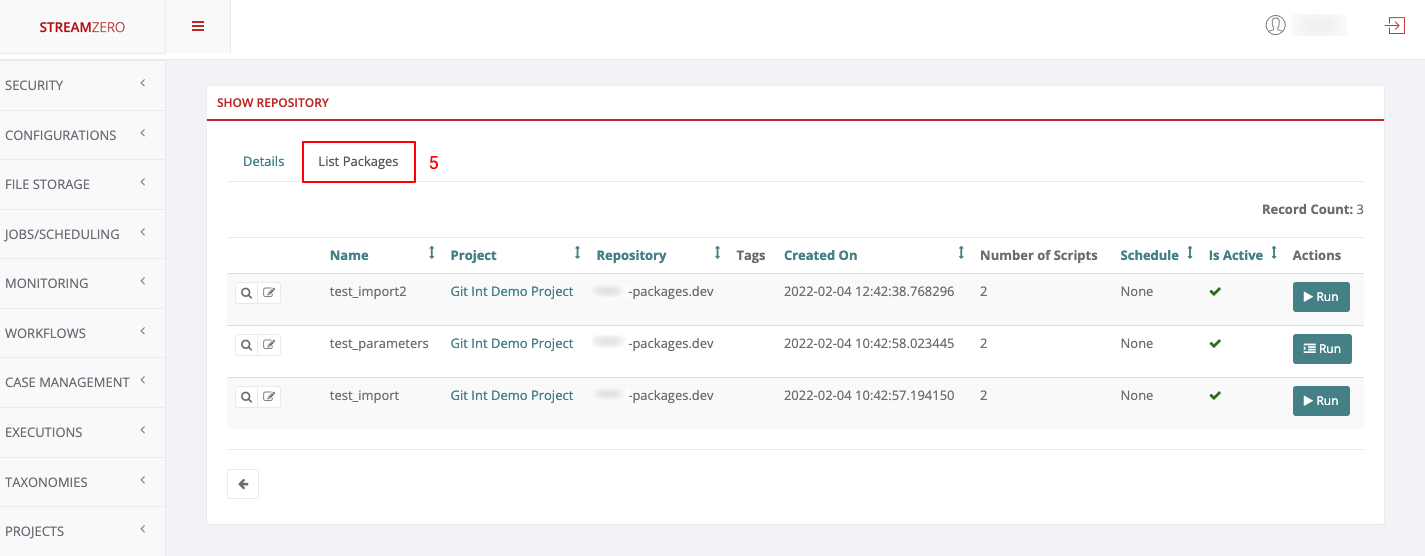
Check the Synced Packages:
Verify imported packages by clicking the “List Packages” tab.
Note that the main branch is automatically synchronized. As development continues and multiple branches are used, they can also be synced individually.
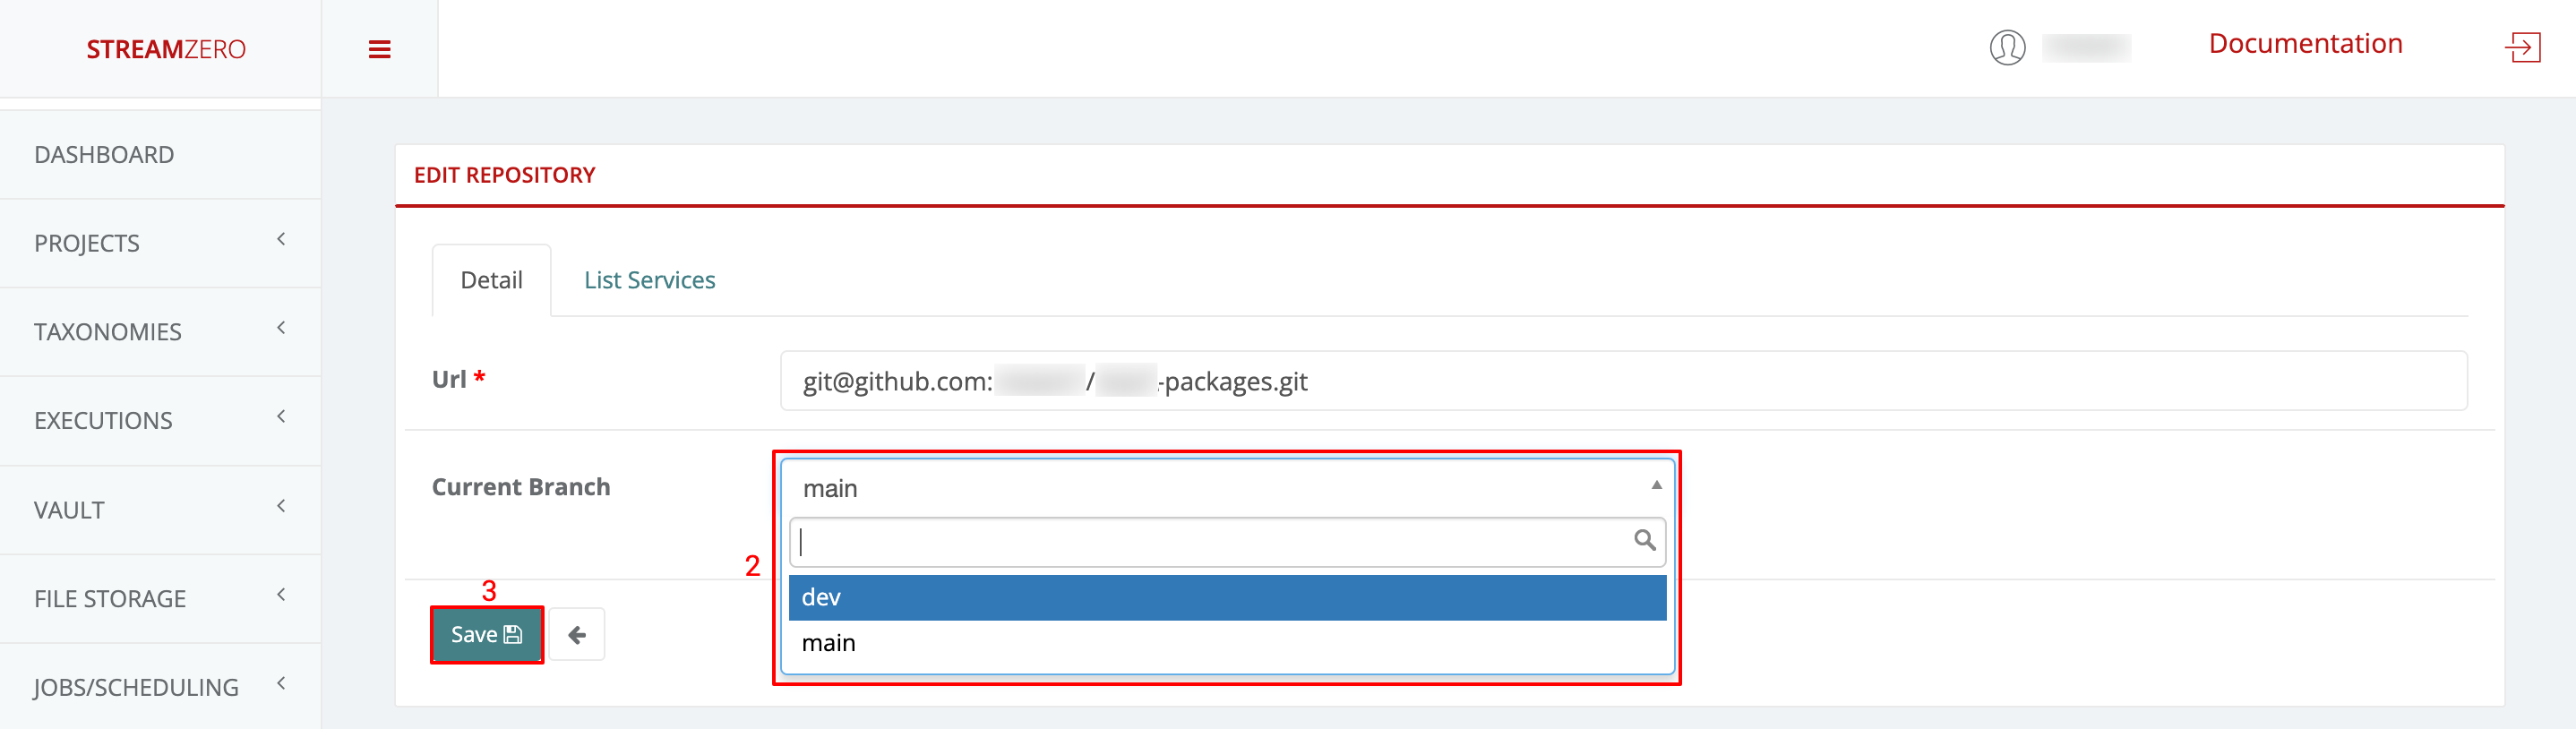
Change Git Branch on the Platform:
Users can choose a specific branch to work on or test.
Access the Edit Repository details page.
Select the desired branch from the dropdown (e.g., “dev”).
Save the selection and synchronize packages.
Verify Synced Packages on Dev Branch:
Check the “List Packages” tab to confirm successful synchronization from the dev branch.
Managing Public Keys for Security and Access
It’s important to understand the dynamics of managing public keys to ensure security and controlled access within the FX platform environment. Here’s a breakdown of key considerations:
Regenerating Public Keys:
You can regenerate a public key at any time if there’s a concern that unauthorized access might have occurred.
Regenerated keys must be added to GitHub again and synchronized on the platform afterward.
Ensuring Synchronization:
Whenever a new public key is generated, it must be added to the respective GitHub repository.
Failure to complete this step will result in synchronization issues on the platform.
Synchronization and Key Addition:
When generating a new key, add it to GitHub’s Deploy Keys.
Afterward, ensure the key is synchronized on the platform to maintain access.
Revoking Access:
If a situation arises where platform access should be revoked, keys can be deleted directly on GitHub.
The meticulous management of public keys is essential for maintaining the security and integrity of your FX services. By being proactive in regenerating keys, properly adding them to GitHub, and ensuring synchronization on the platform, you’re taking steps to uphold a secure development and deployment environment.
Integrate these insights into your documentation, adapting the content to match your documentation’s tone and style. This note aims to provide users with a clear understanding of how to manage public keys effectively within the FX platform ecosystem.
2.4 - Project and Code Structure
Project and Code Structure
In this section, we’ll delve into the structure and components that make up an FX service. Understanding the organization of services, repositories, and the various artefacts involved is pivotal for efficient development within the FX platform.
Understanding Projects
Within the FX Platform, a Project serves as a container for multiple Services. Projects don’t play a functional role; they primarily aid in organizing services based on functional relationships, solution domains, or user access groups.
A project can be associated with multiple git repositories, each containing a collection of services.
Repository Structure
In the DX platform, every directory within a Repository represents a distinct service. Files located in the root directory of a Repository are disregarded.
Service Artefacts
A service encompasses an assortment of scripts, modules, and assets, including configuration files. The following are the supported types of artefacts along with their respective roles:
Artefact Type
Description
*.py
Python scripts form the core of a service. You can include multiple python scripts, and they are executed in the order defined in the manifest.json file. These scripts can define classes, static methods, and more.
*.sql
SQL files containing SQL statements. They are executed against the default database defined in the platform. These files support a ‘jinja’ like notation for parameter extraction and embedding program logic within the SQL.
manifest.json
The manifest.json file serves to describe the service to the platform and other users. It adheres to a predefined structure and is detailed further in the ‘Manifest File’ section.
config.json
This JSON file defines the service’s configuration. These values are stored in Consul once imported into the platform. Configuration values can be accessed using the service’s ‘context’ with the ferris_ef module.
secrets.json
This file outlines the secrets accessible within a specific service. The secrets.json file is uploaded via the UI and should not be committed to Git.
*.txt, *.json, *.jinja, etc.
Various assets utilized by the service.
parameters.json
Optional. This file defines MicroUIs, which generate forms to trigger a service.
Understanding the components that constitute a service, repository, and project sets the foundation for effective FX service development. With this knowledge, you can seamlessly create, organize, and manage your services within the DX platform.
How to integrate Secrets(sensitive configurations) within your services
Secrets are sensitive configuration information which you wish to use within your service. These may be a single attribute(such as a password) structures with multiple attributes.
Secrets are the ability to deal with sensitive data through scripts (secrets.json) needed for package execution, such as:
Database Passwords
Secret Keys
API Keys
any other sensitive data
Secrets aren’t visible to any users and are passed encrypted to the actual script at the predefined package execution time. Once the script (secrets.json) is uploaded to the platform, the data is read and securely (double encryption) stored in the database.
Secret Scopes
The DX platform supports the following scopes for a secret.
Scope
Description
Service secrets
Service Scope secrets are only available to the specific service within which the secret was defined. They are managed by uploading a secrets.json file on the service management UI. While they can also by synced from GIT, this is not a preferred approach in order to avoid having secrets in git.
Project Secrets
Secrets that are accessible to any service within a specific project. These are created by uploading a JSON file on the project secrets tab on the UI.
Platform Secrets
Secrets that are accessible to any service running on the platform. These are created by uploading JSON file on the Vault->Secrets page.
When accessing secrets using fx_ef.context.secrets.get('secret_name') it will first lookup for secret_name within service secrets, then project and finally platform
The secrets.json File
To add service scope secrets you can upload a secrets.json file.
Those values are stored double encrypted in database and can be only accessed within the executing script. A sample secrets.json
With fx_ef.context.secrets you can access secrets stored on at the platform, project or service scope.
1
2
from fx_ef import context
context.secrets.get('secret_name')
This command will first lookup for secret named secret_name within package secrets (defined in secrets.json file of the package). If such key doesn’t exist it will lookup for it within project secrets, and finally within platform’s secrets. If secret with such name doesn’t exist None will be returned.
Can be accessed using fx_ef.context.secrets.get('secret_name'). Can be set using context.secrets.set(“secret_name”, {“somekey”:“someval”}, “project”)`
Can be accessed using fx_ef.context.secrets.get('secret_name'). Can be set using context.secrets.set("secret_name", {"somekey":"someval"}, "platform")
Setting secrets
Using fx_ef.context.secrets.set(name, value, context) method you can set secrets on project and platform level.
1
2
3
from fx_ef import context
context.secrets.set(name="platform_secret", value={"somekey":"someval"}, context="platform")
Parameter
Description
name
Name of the secret to be set. If secret with the same name already exist it will be updated
value
Value of the secret that should be set
context
Context of the secret. Possible values are platform and project
Create a new package
Note that the package creation was presented in another submenu of the User Guide, so only the needed parameters will be filled in the package to showcase the Secrets functionality.
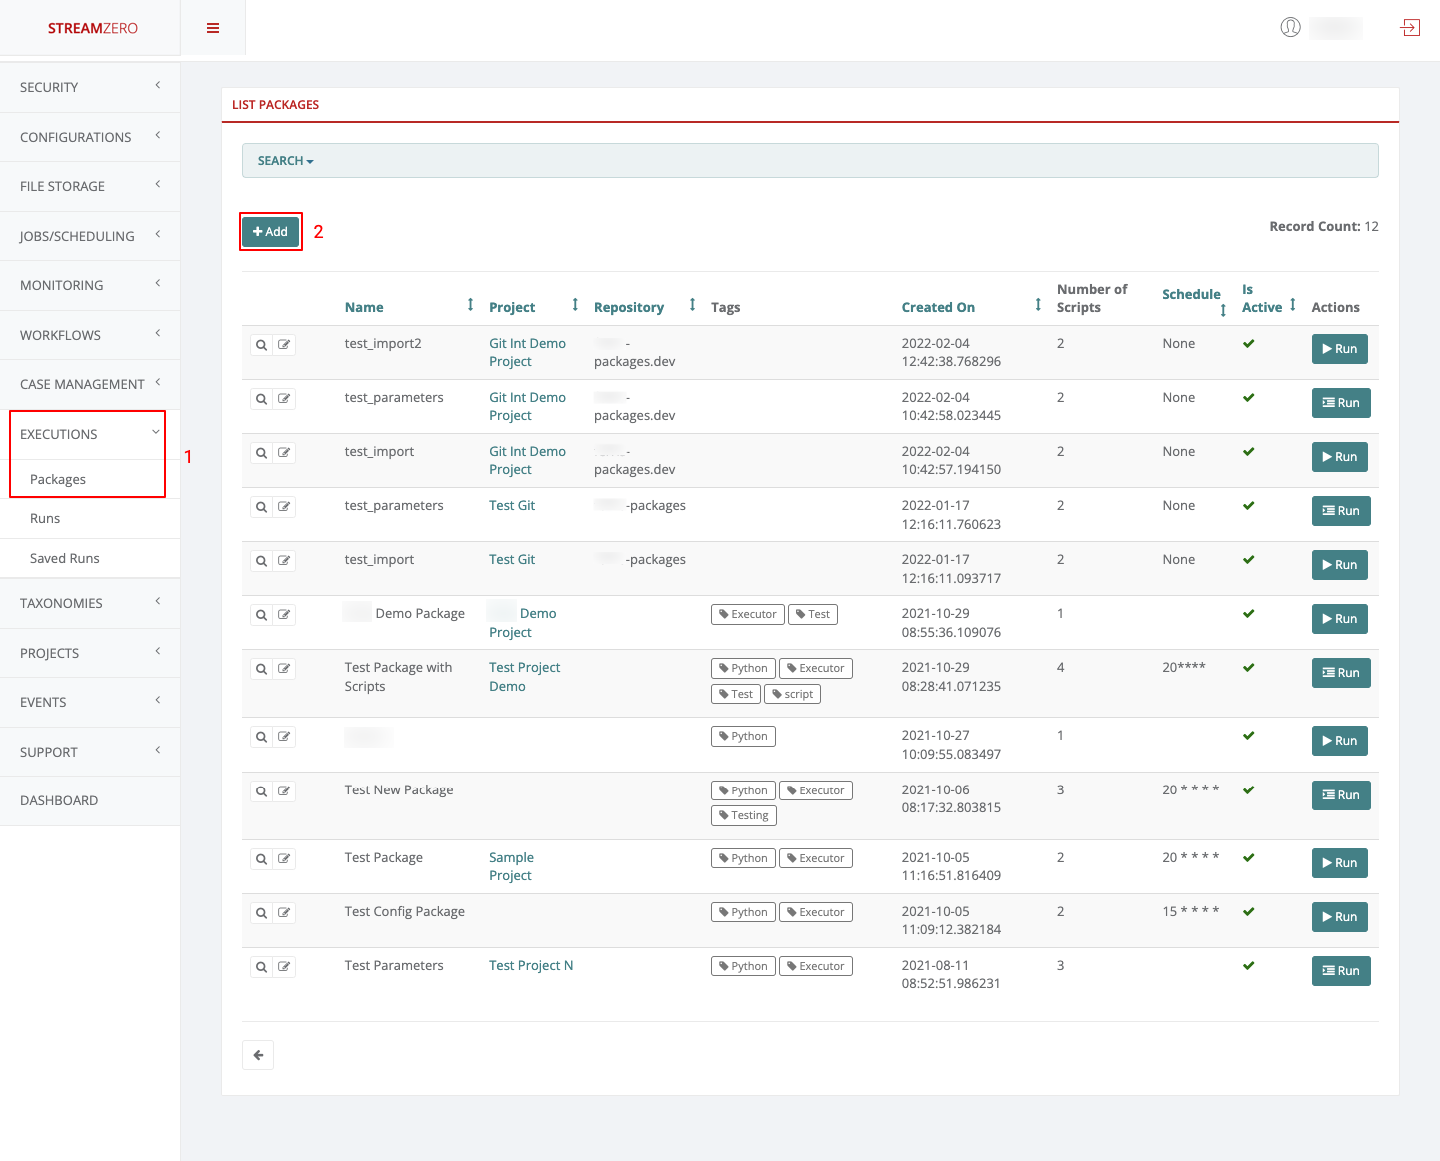
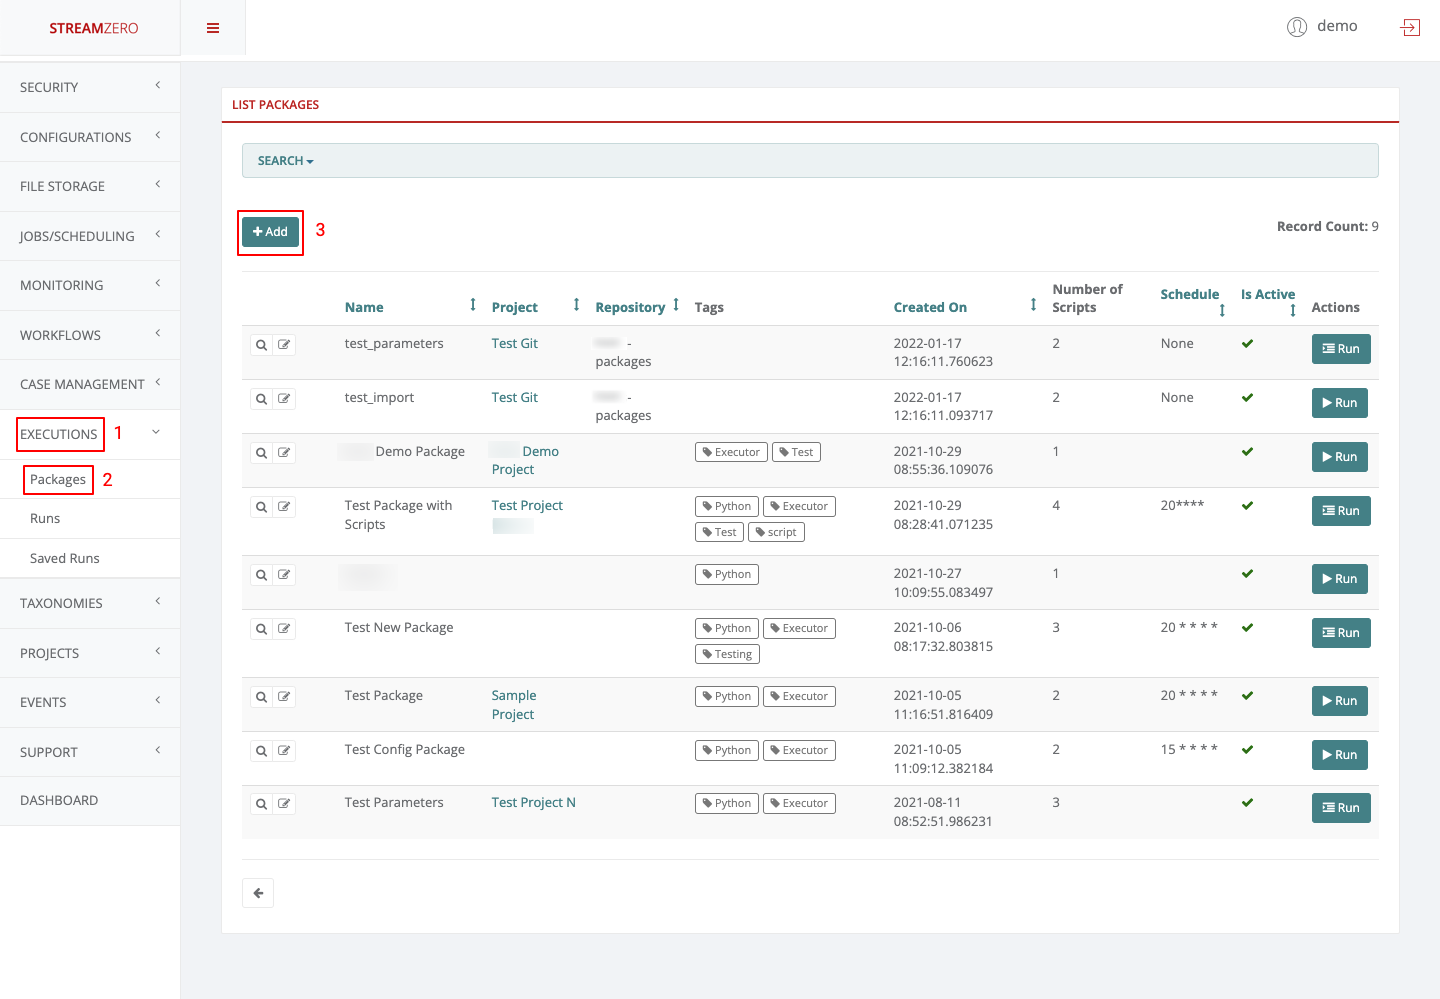
Click on Executions in the left side menu and on Packages
Click on Add to create a new package
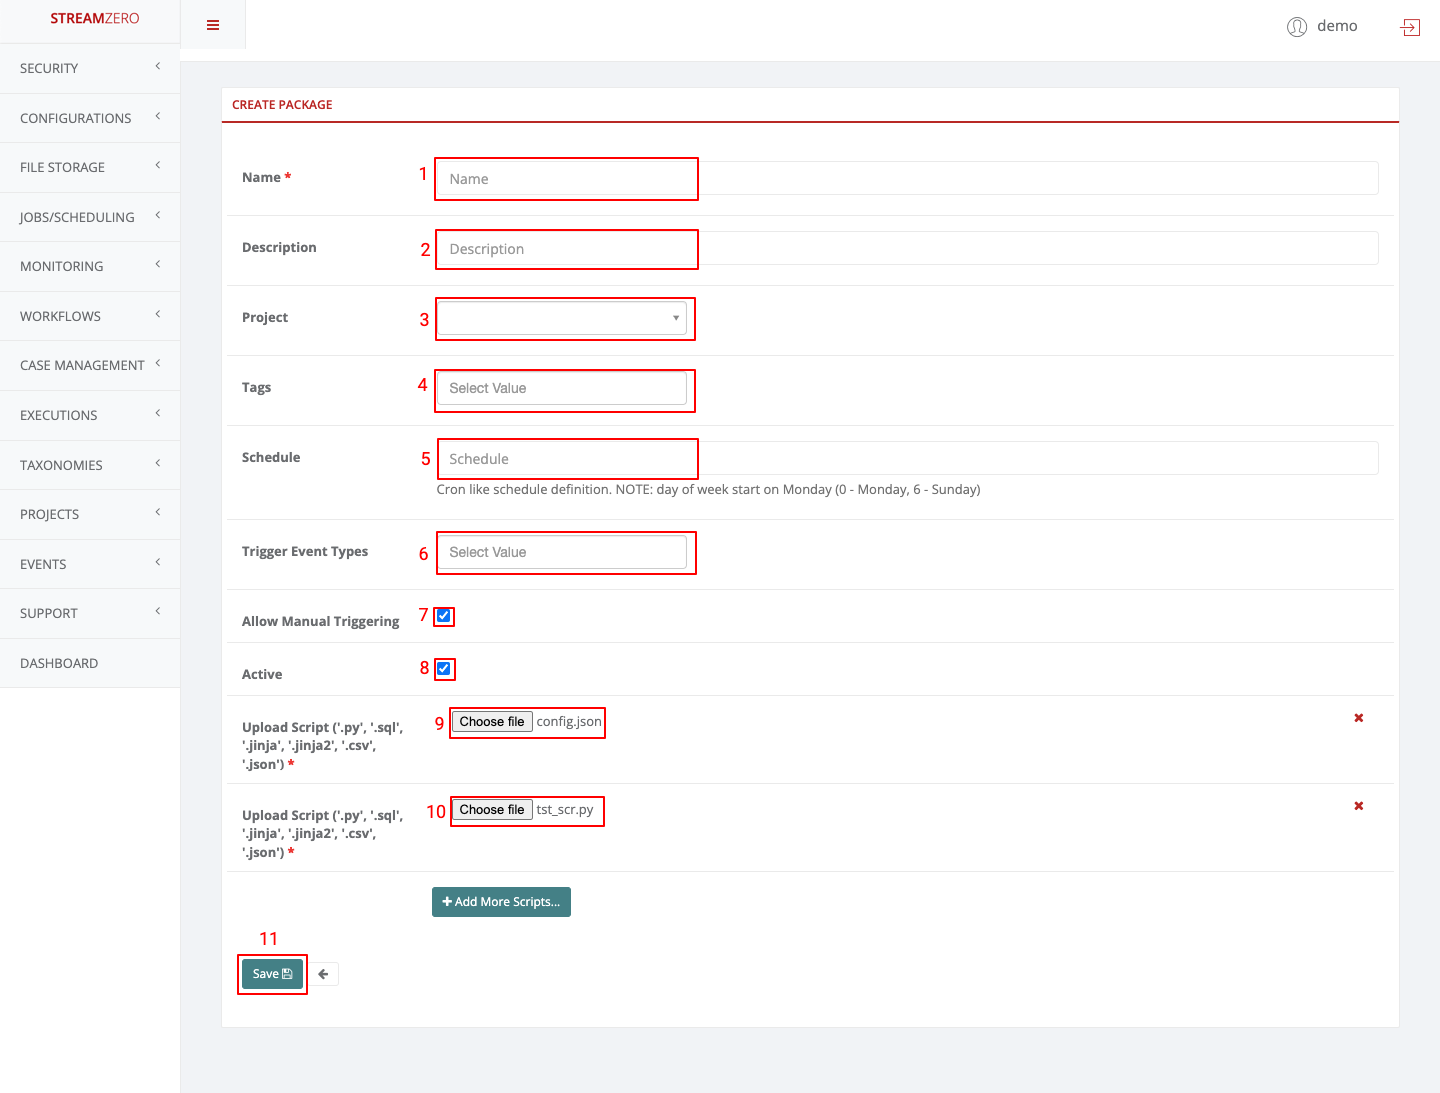
Name the package
Click on choose file and add the python scrypt (test_secrets.py)
Click on Add more scripts and click on choose file to add the JSON script (secrets.json)
Click on Save to save the package
test_secrets.py script
This is an example script that shows how secrets from the secrets.json file can be accessed from a script at execution time using the get_secret() helper function from the fx_ef package.
One key aspect in reactive applications is how to manage state between runs.
With StreamZero FX this is simple. Each Service has a state object available at run time. All you need to do is the following.
1
2
3
4
5
from ferris_cli import context
my_state = context.state.get() # returns a state previously setsome_value = my_last_state.get('key')
context.state.put('Key','Value')
The state is stored across Service runs. A state log is also maintained and stored for reference and reload.
How it works
When a Service is started the state is loaded from the consul key store.
When a state is stored it is placed in Consul as well as sent to Kafka. The Kafka stream maintains an audit log of the state. And also serves to retreive state after a system shut down.
2.7 - Form Generator
How to generate Forms that trigger services.
Occasionally you will come across use cases where you are required to provide a frontend for trigerring a service - usually by a non-technical person. FX and K8X both provide the ability to define Forms using a simple JSON structure.
The Forms are generated automatically by the StreamZero Management UI based on the ‘parameters.json’ file.
When a service directory contains a parameters.json file the ‘Run’ Button on th Management UI will automatically change the icon to a ‘Form’ icon.
The parameters.json file can be added to an existing service directory. When doing so you need to ensure that within the manifest.json file the ‘allow_manual_trigerring’ is set to ’true’
The following is a template for a parameters.json file.
The parameters.json file
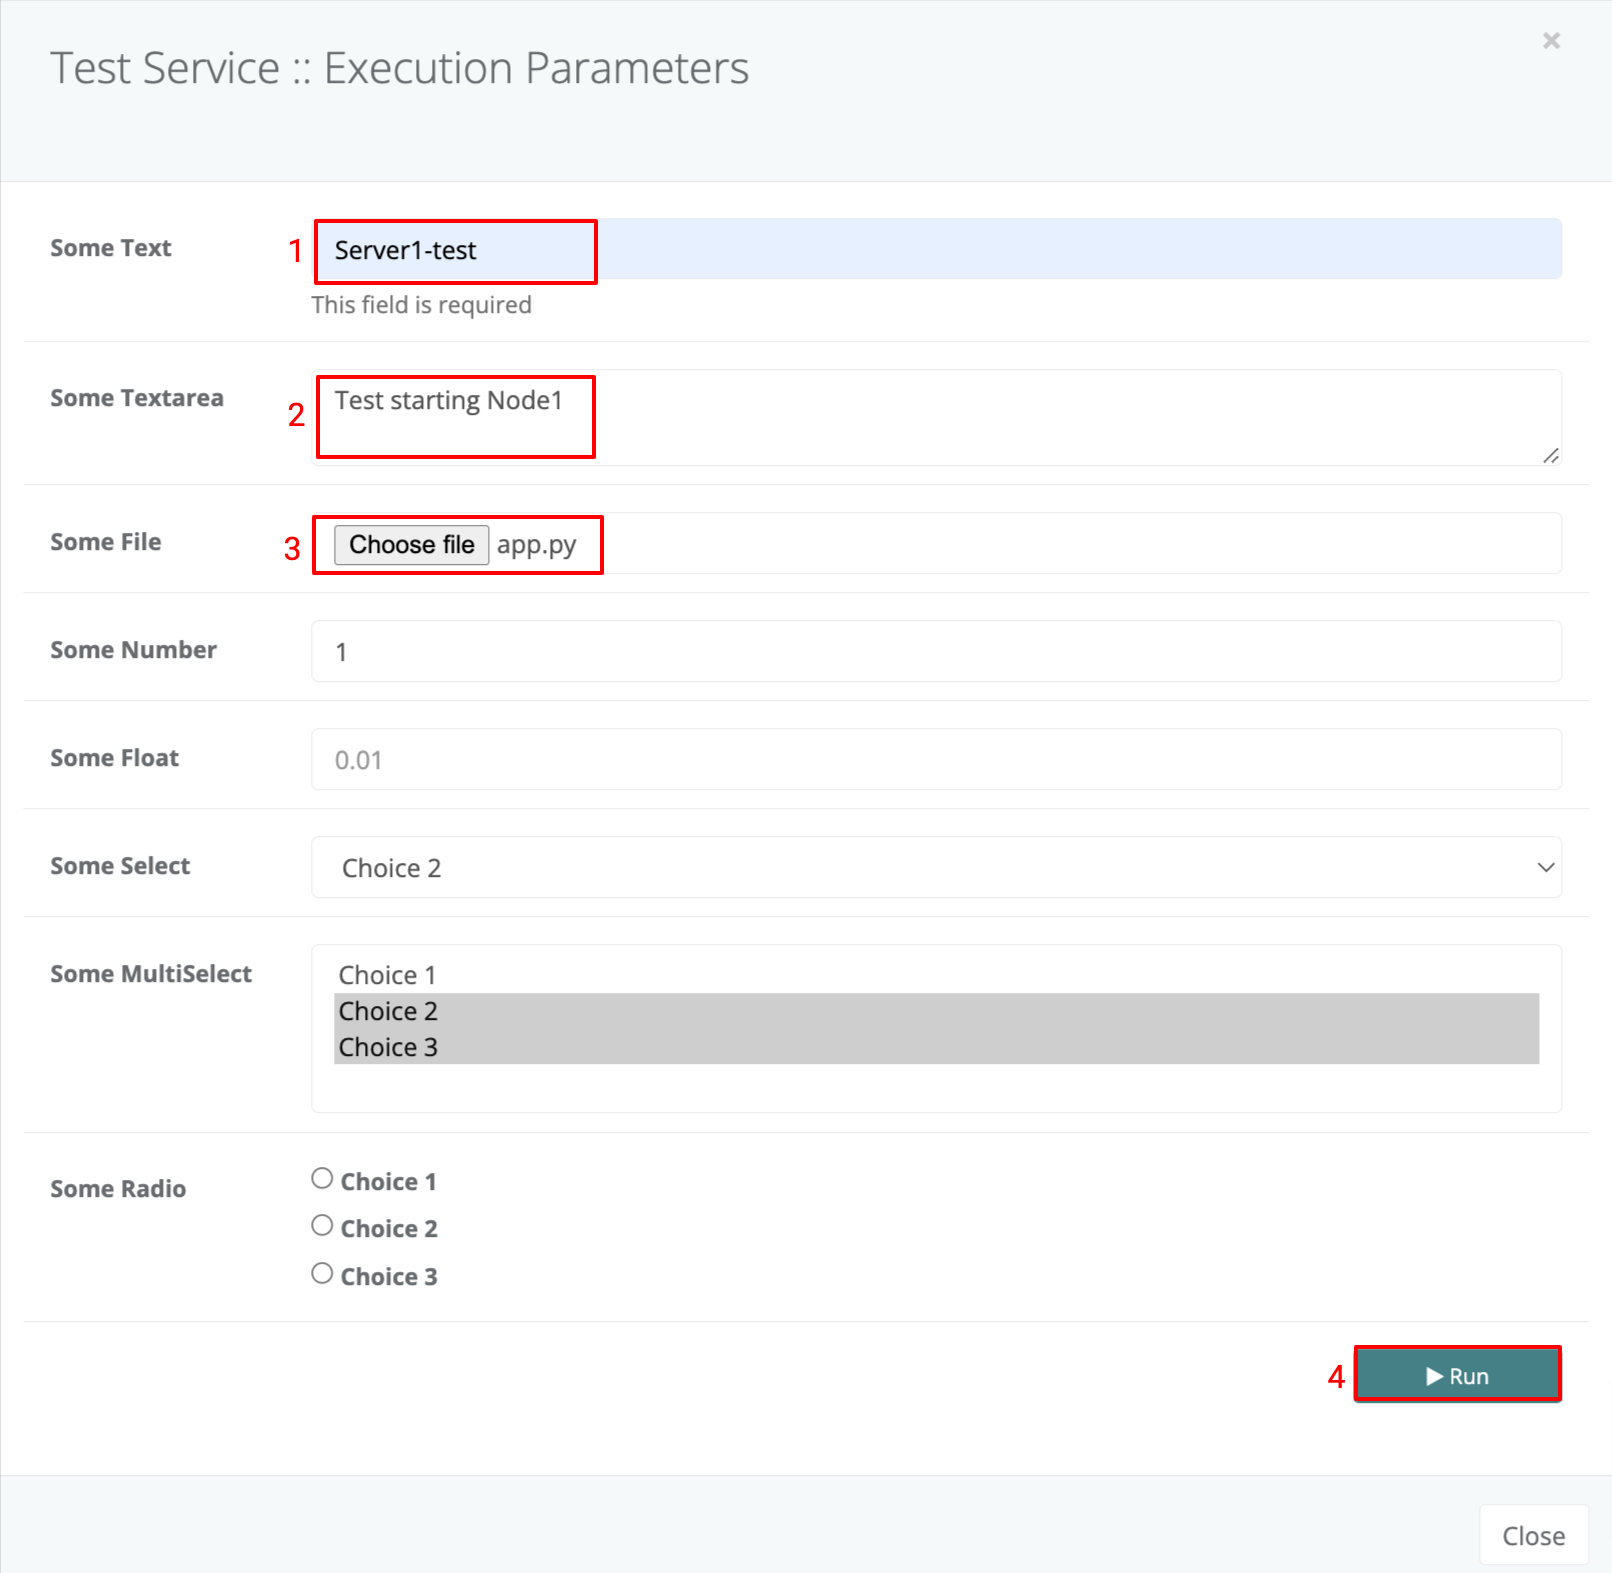
The parameters.json file contains a JSON definition of fields that will be rendered and presented to user upon manually triggering a package execution in order to gather the parameter values for running the package. This way, same package can be easily adapted and reused by different scenarios or environments simply by sending different parameter values to the same package.
The above template will display a form which looks as below.
When the form values and entered and the ‘Run’ Button is clicked the form parameters and values will be sent to the service on trigger and these will be available to the service just as if it were trigerred by an event with the same payload as the form values.
The following is a sample script that extracts the parameters (you will notice it is no different from an event trigerred script). The only exception are the text areas which are dealt with as String data type and therefore should be converted using the relevant JSON library.
1
2
3
4
5
6
7
8
9
from fx_ef import context
import json
event_type = context.params.get("sample_event_type")
event_source = context.package.name
data = json.loads(context.params.get("sample_payload"))
context.events.send(event_type, event_source, data=data)
2.8 - Database Integration
How to integrate a Database with the StreamZero Platform.
Install Database Drivers
StreamZero DX requires a Python DB-API database driver and a SQLAlchemy dialect to be installed for each datastore you want to connect to within the executor image.
Configuring Database Connections
StreamZero can manage preset connection configurations. This enables a platform wide set up for both confidential as well as general access databases.
StreamZero uses the SQL Alchemy Engine along with the URL template based approach to connection management. The connection configurations are maintained as secrets within the platform and are therefore not publicly accessible i.e. access is provided for administrators only.
Retrieving DB Connections
The following is how to retrieve a named connection. The following sample assumes that the connection identifier key is uploaded to the package as a secrets.json.
1
2
3
4
5
6
7
8
from fx_ef import context
import sqlalchemy as db
db_url = context.secrets.get('my_connection')
engine = db.create_engine(db_url)
connection = engine.connect()
metadata = db.MetaData()
In the above example the db_url is set up as a secret with name 'my_connection'.
Depending on whether this is a service, project or platform level secret there are different approaches to set up the secret. For service level secret the following is a sample set up for a secrets.json file of the package.
For Project scope use the 'secrets' tab of the Project Management UI.
For Platform scope secrets use the Vault UI in the DX Manager Application.
Database Drivers
The following table provides a guide on the python libs to be installed within the Executor docker image. For instructions on how to extend the Executor docker image please check this page: /docs/extending_executor_image
You can read more here about how to install new database drivers and libraries into your StreamZero DX executor image.
Note that many other databases are supported, the main criteria being the existence of a functional SQLAlchemy dialect and Python driver. Searching for the keyword “sqlalchemy + (database name)” should help get you to the right place.
If your database or data engine isn’t on the list but a SQL interface exists, please file an issue so we can work on documenting and supporting it.
A Guide to Integrations Using the StreamZero Edge Adapter.
The Event Source Adapter enables easy integration of external event streams to Ferris.
The role of the Event Source Adapter is to receive events from external streams, convert them into Cloud Events and push them to the ferris.events Kafka Topic. The Cloud Events that are generated will contain an indicator of the source, one or more specific event types (depending on the type of source and the use case) and the content of the source event in the payload of the output Cloud Event.
Example Event Source Adapters
The following are a couple of examples of source adapters
Generic Webhook Adapter : Exposes a webhook end point outside the cluster which may be used to submit events as webhook requets. The generic adapter may source multiple event types and does not filter the content. It may be used for example to simultaneously accept AWS EventBrige CouldEvents and GitHub Webhooks. It is the role of a package to filter or split events as is suited for the use case.
Twitter Adapter: Streams twitter based on configured hash tags and converts them to cloud events.
IBM MQ Adapter
Kafka Adapter: Sources data from JSON streams within kafka and converts them to Cloud Events.
Azure MessageBus Adapter:
Amazon SQS Adapter
MQTT Adapter
Redis Queue Adapter
ActiveMQ Source
Amazon CloudWatch Logs Source
Amazon CloudWatch Metrics Sink
Amazon DynamoDB Sink
Amazon Kinesis Source
Amazon Redshift Sink
Amazon SQS Source
Amazon S3 Sink
AWS Lambda Sink
Azure Blob Storage Sink
Azure Cognitive Search Sink
Azure Cosmos DB Sink
Azure Data Lake Storage Gen2 Sink
Azure Event Hubs Source
Azure Functions Sink
Azure Service Bus Source
Azure Synapse Analytics Sink
Databricks Delta Lake Sink
Datadog Metrics Sink
Datagen Source (development and testing)
Elasticsearch Service Sink
GitHub Source
Google BigQuery Sink
Google Cloud BigTable Sink
Google Cloud Functions Sink
Google Cloud Spanner Sink
Google Cloud Storage Sink
Google Pub/Sub Source
HTTP Sink
IBM MQ Source
Microsoft SQL Server CDC Source (Debezium)
Microsoft SQL Server Sink (JDBC)
Microsoft SQL Server Source (JDBC)
MongoDB Atlas Sink
MongoDB Atlas Source
MQTT Sink
MQTT Source
MySQL CDC Source (Debezium)
MySQL Sink (JDBC)
MySQL Source (JDBC)
Oracle Database Sink
Oracle Database Source
PagerDuty Sink
PostgreSQL CDC Source (Debezium)
PostgreSQL Sink (JDBC)
PostgreSQL Source (JDBC)
RabbitMQ Sink
RabbitMQ Source Connector
Redis Sink
Salesforce Bulk API Source
Salesforce CDC Source
Salesforce Platform Event Sink
Salesforce Platform Event Source
Salesforce PushTopic Source
Salesforce SObject Sink
ServiceNow Sink
ServiceNow Source
SFTP Sink
SFTP Source
Snowflake Sink
Solace Sink
Splunk Sink
Zendesk Source
Generic Webhook Adapter
The Edge Adapter exposes a single endpoint for Webhooks. The webhook may be used for a large number of incoming integrations. Some examples are provided below.
To see the API please visit webhook.edge.YOURDOMAIN.COM/ui . For example webhook.edge.ferris.ai .
In order to use the end point you must first generate a token to be used when submitting to the endpoint. To generate a token please follow instructions here ….
How it Works
The StreamZero Edge Adapter is an edge service which is exposed to services outside the network for incoming integrations with external services. It exposes a single token protected endpoint which accepts a JSON payload within a POST request.
The payload encapsulated within the POST is forwarded to the ferris.events topic with the data encapsulated in the Cloud Events ‘data’ section. The event type is ‘ferris.events.webhook.incoming’ .
The platform may host any number of packages which then process the webhooks based on parsing the data section.
The StreamZero Edge Adapter is one of the few services exposed to the Internet.
Integrations
The following sections document details on some of the possible integrations.
AWS EventBridge
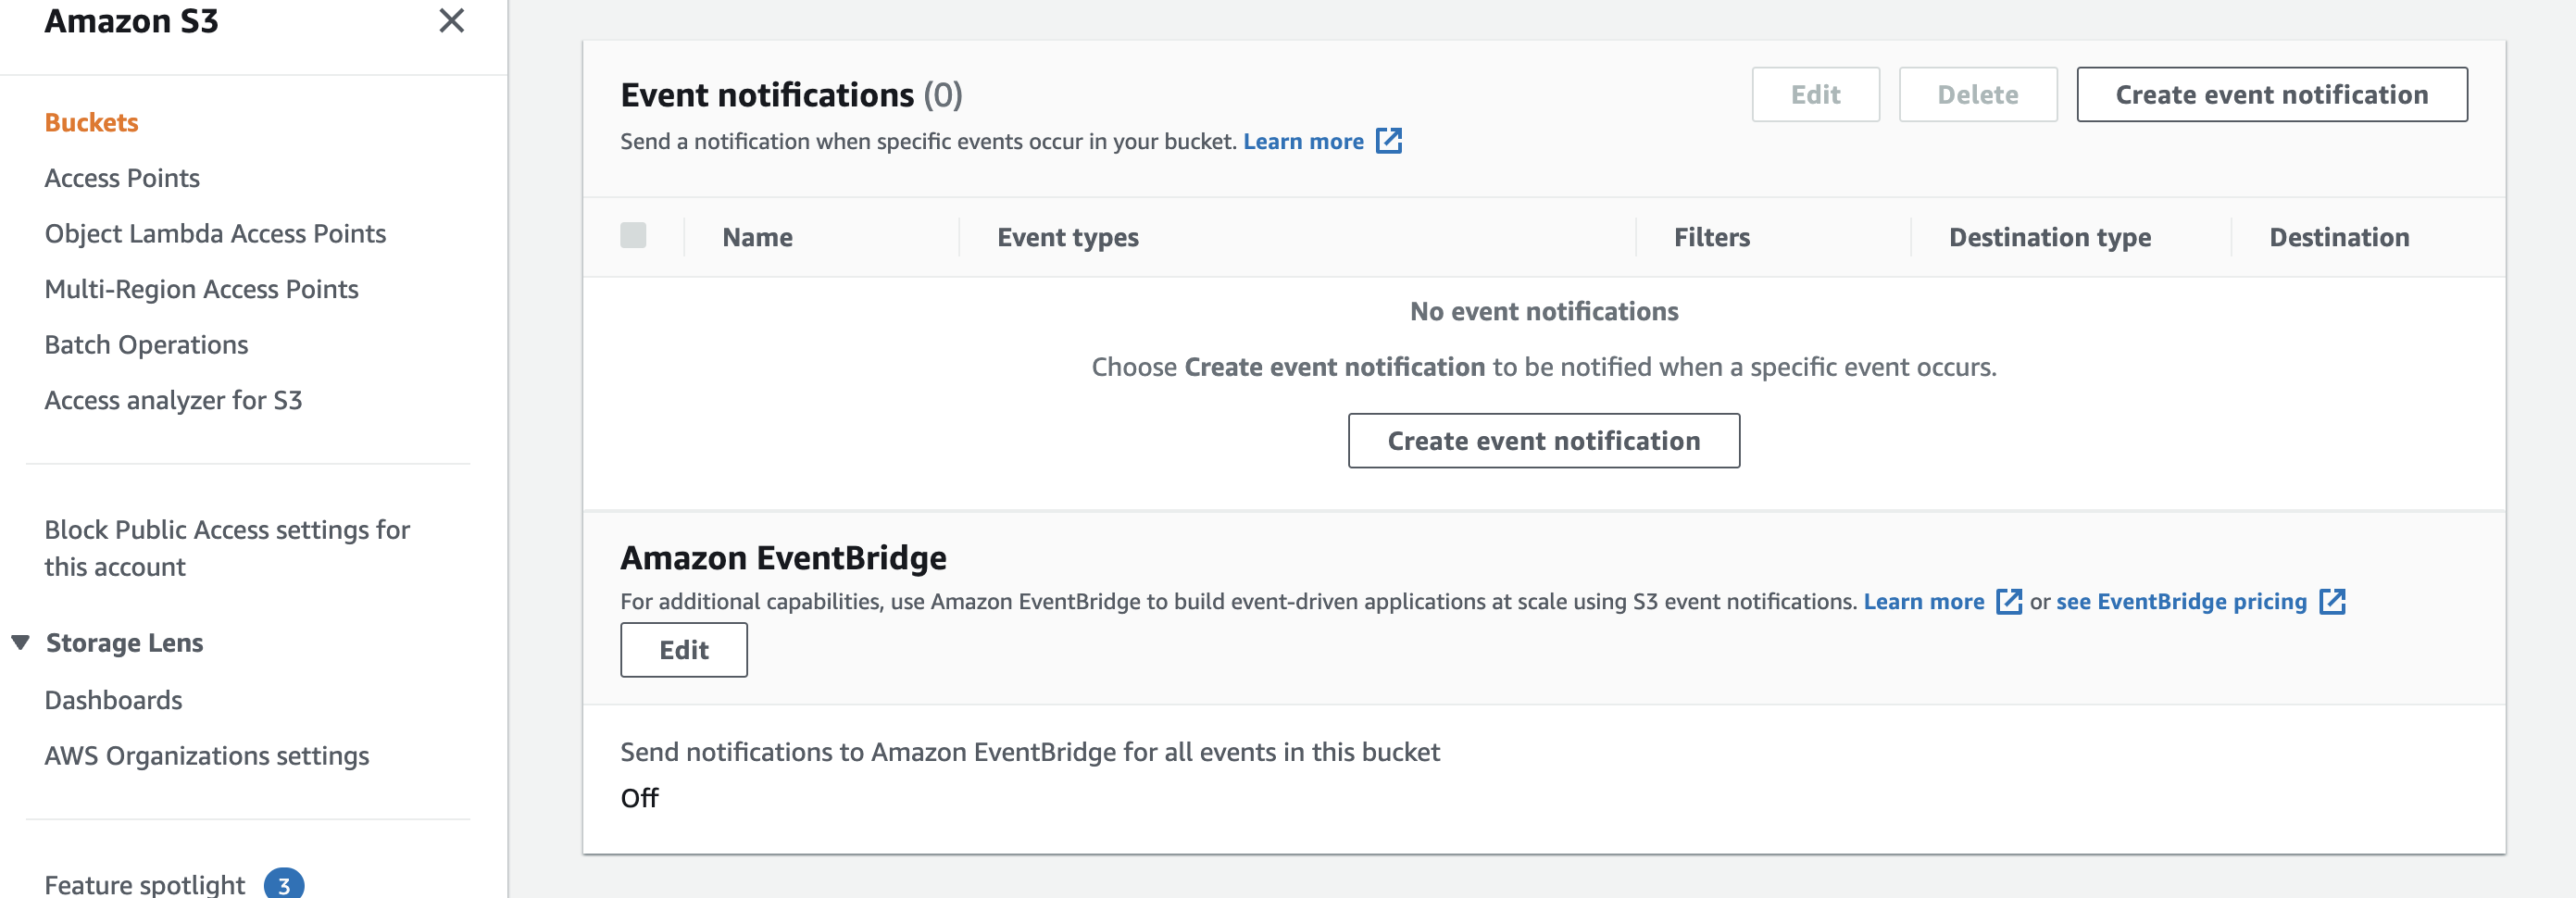
AWS S3 ( please switch images)
A pre-requisite is to ensure that EventBridge is sending Events to Ferris. Please see this section on how to set it up.
Create a bucket and switch to the Properties Tab of the UI
Scroll to the bottom and turn on Event Bridge Notfications by clicking on the Edit button below the section Amazon EventBridge
GitHub Integration
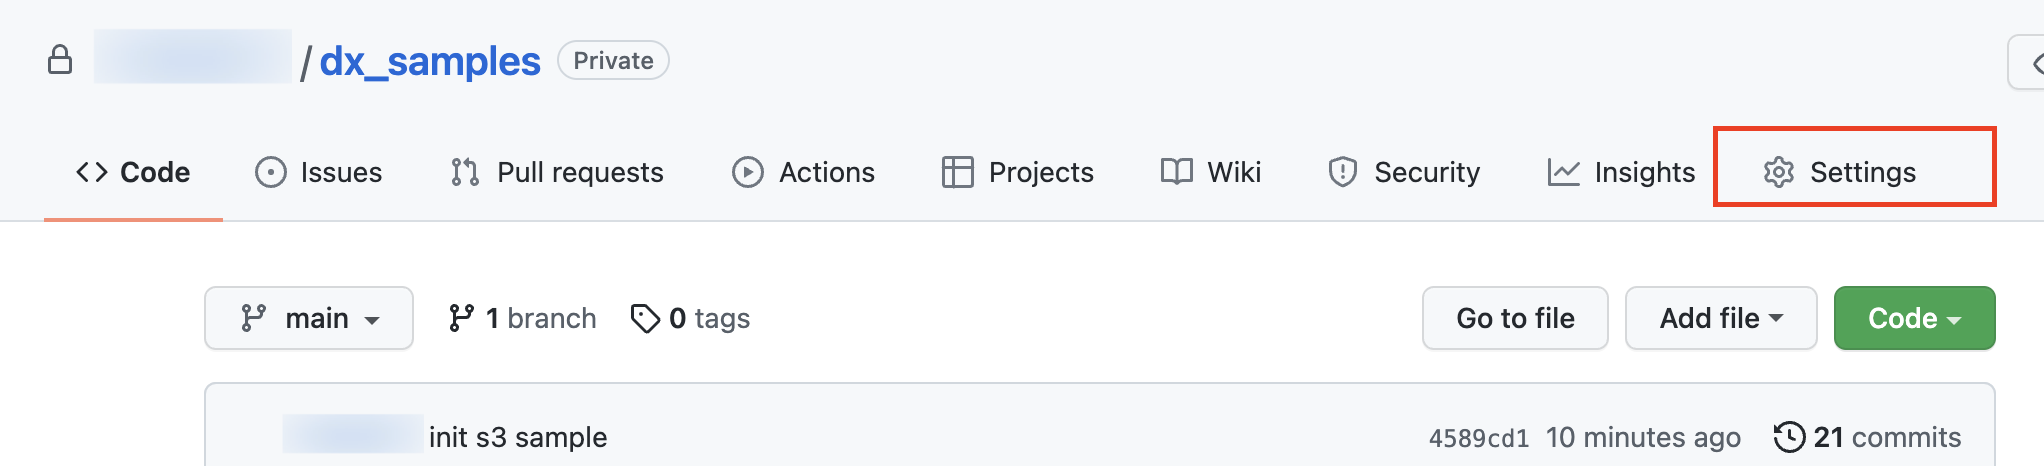
To be notified on changes to a Git Hub Repo please follow the steps below.
Click on the ‘Settings’ icon for the repo
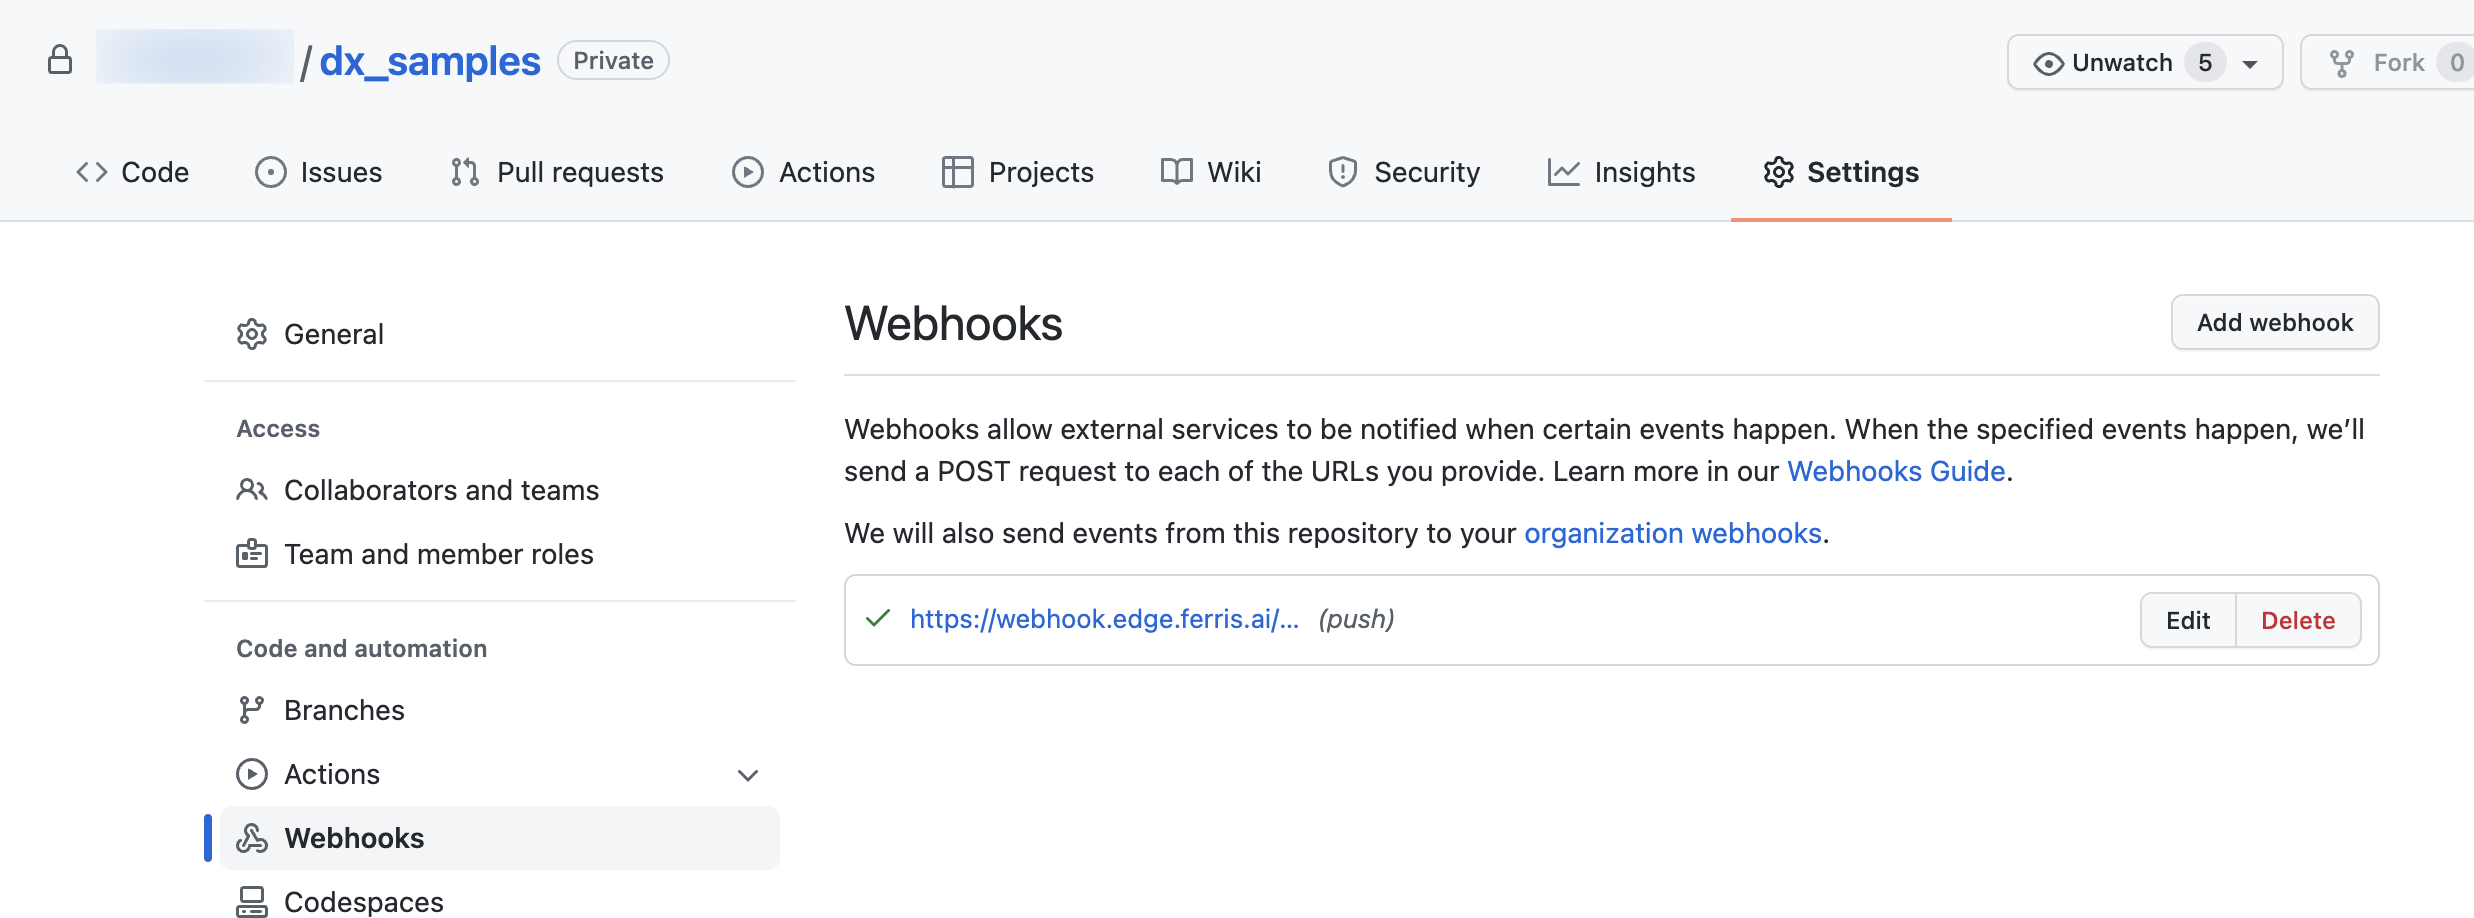
Select the Webhooks menu on the left of the ‘Settings’ page. Then click on the ‘Add webhook’ button.
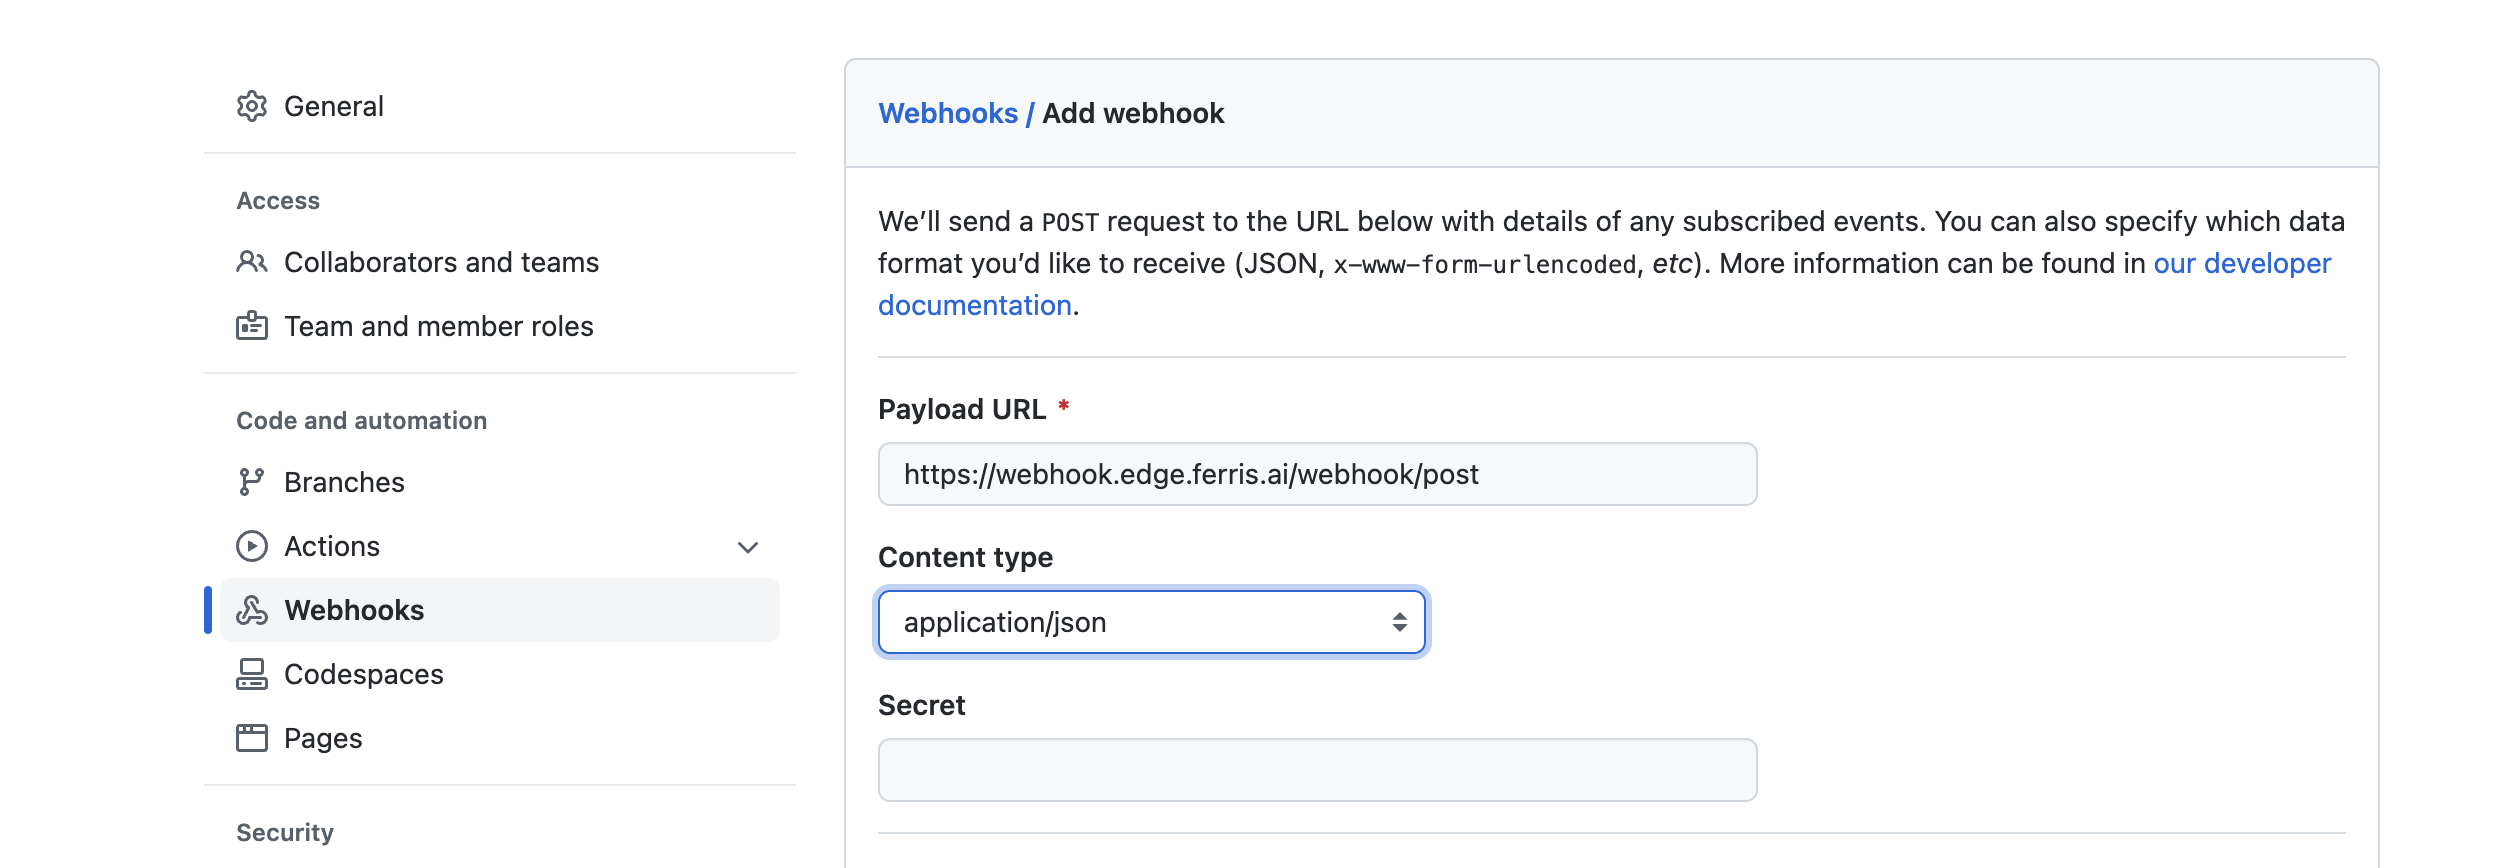
Add the URL of your edge adapter end point. And ensure the content type is application/json. Finally add the api token generated on the StreamZero Management UI. Further in the page you may select what event types should be sent. If unsure please maintain the default settings.
Test your integration by pushing an update to the repository.
2.10 - Extending the Platform
Extending the Platform.
Extending the Platform
The platform may be extended at 3 logical points within the event life cycle.
At Entry Point:
They are respnsible for injecting external event streams into the platform. Primarily they mediate betweeen the exrernal event stream and the internal CloudEvents based Kafka Topics. These run on separate containers within the platform. The following are the typical examples.
Event Gateway: are the primary mechanism. To build event gateways we provide templates. Please check this document on extension.
At Processing
These are extensions that operate on internal event streams or are required by services that are created on the platform. The following are the types thereof.
Configuration Adapters and UIs. These are primarily used for connection setups and configurations which are applicable across the platform. Examples are the variety of connection set up UIs we provide. They are very easy to create. Use the the followinng guide to build your own.
Python Libraries and Modules: These are attached to the executor. It primarily involves extending the executor image with the required library. In order to add them to the platform use this guide.
Event Processing Packages: These are services that only modify event attributes normally convert one type of event to another. These can be implemented as services within the platform. Please see following guide to see how they are used and some typical scenarios.
No Code Generators: Generators combine UI based with templated code to allow No Code based approach to creating services. Please check this guide on how that works.
At Exit Point
These are primarily modules that interact with external systems but operate across the example. The primarily operate on streams that originate from the platform and mediate with the outside. These run on separate containers within the platform. The following are typical implementaions. Examples are
Protocol Adapters They adapt between the internal kafka even streams and external protocols for example webhook adapter, Kafka to imbm mq adapter etc. Their primary purpose is to offload activity from the platform which may cause bottle necks or require long running services.
Splitters and Filters: These may operate on strams to split content or event infromation into derivative streams. Or feed data into supporting infrastructure. The elastissearch and Splunk adapters are typical examples. In order to build these use the following guide and related templates.
2.11 - Git Integration
How to integrate a Git Repository with the StreamZero Platform.
The Git Integration is the capability to generate a connection from a git repository with projects and synchronise the Packages from the Executor with the git repository, with the goal to execute it through the StreamZero FX Platform. It provides another, more fluent way for connecting scripts with the StreamZero FX Platform without the necessity to upload files directly to the platform.
A new Project will be created to showcase the capabilty of the git integration:
Create a new project
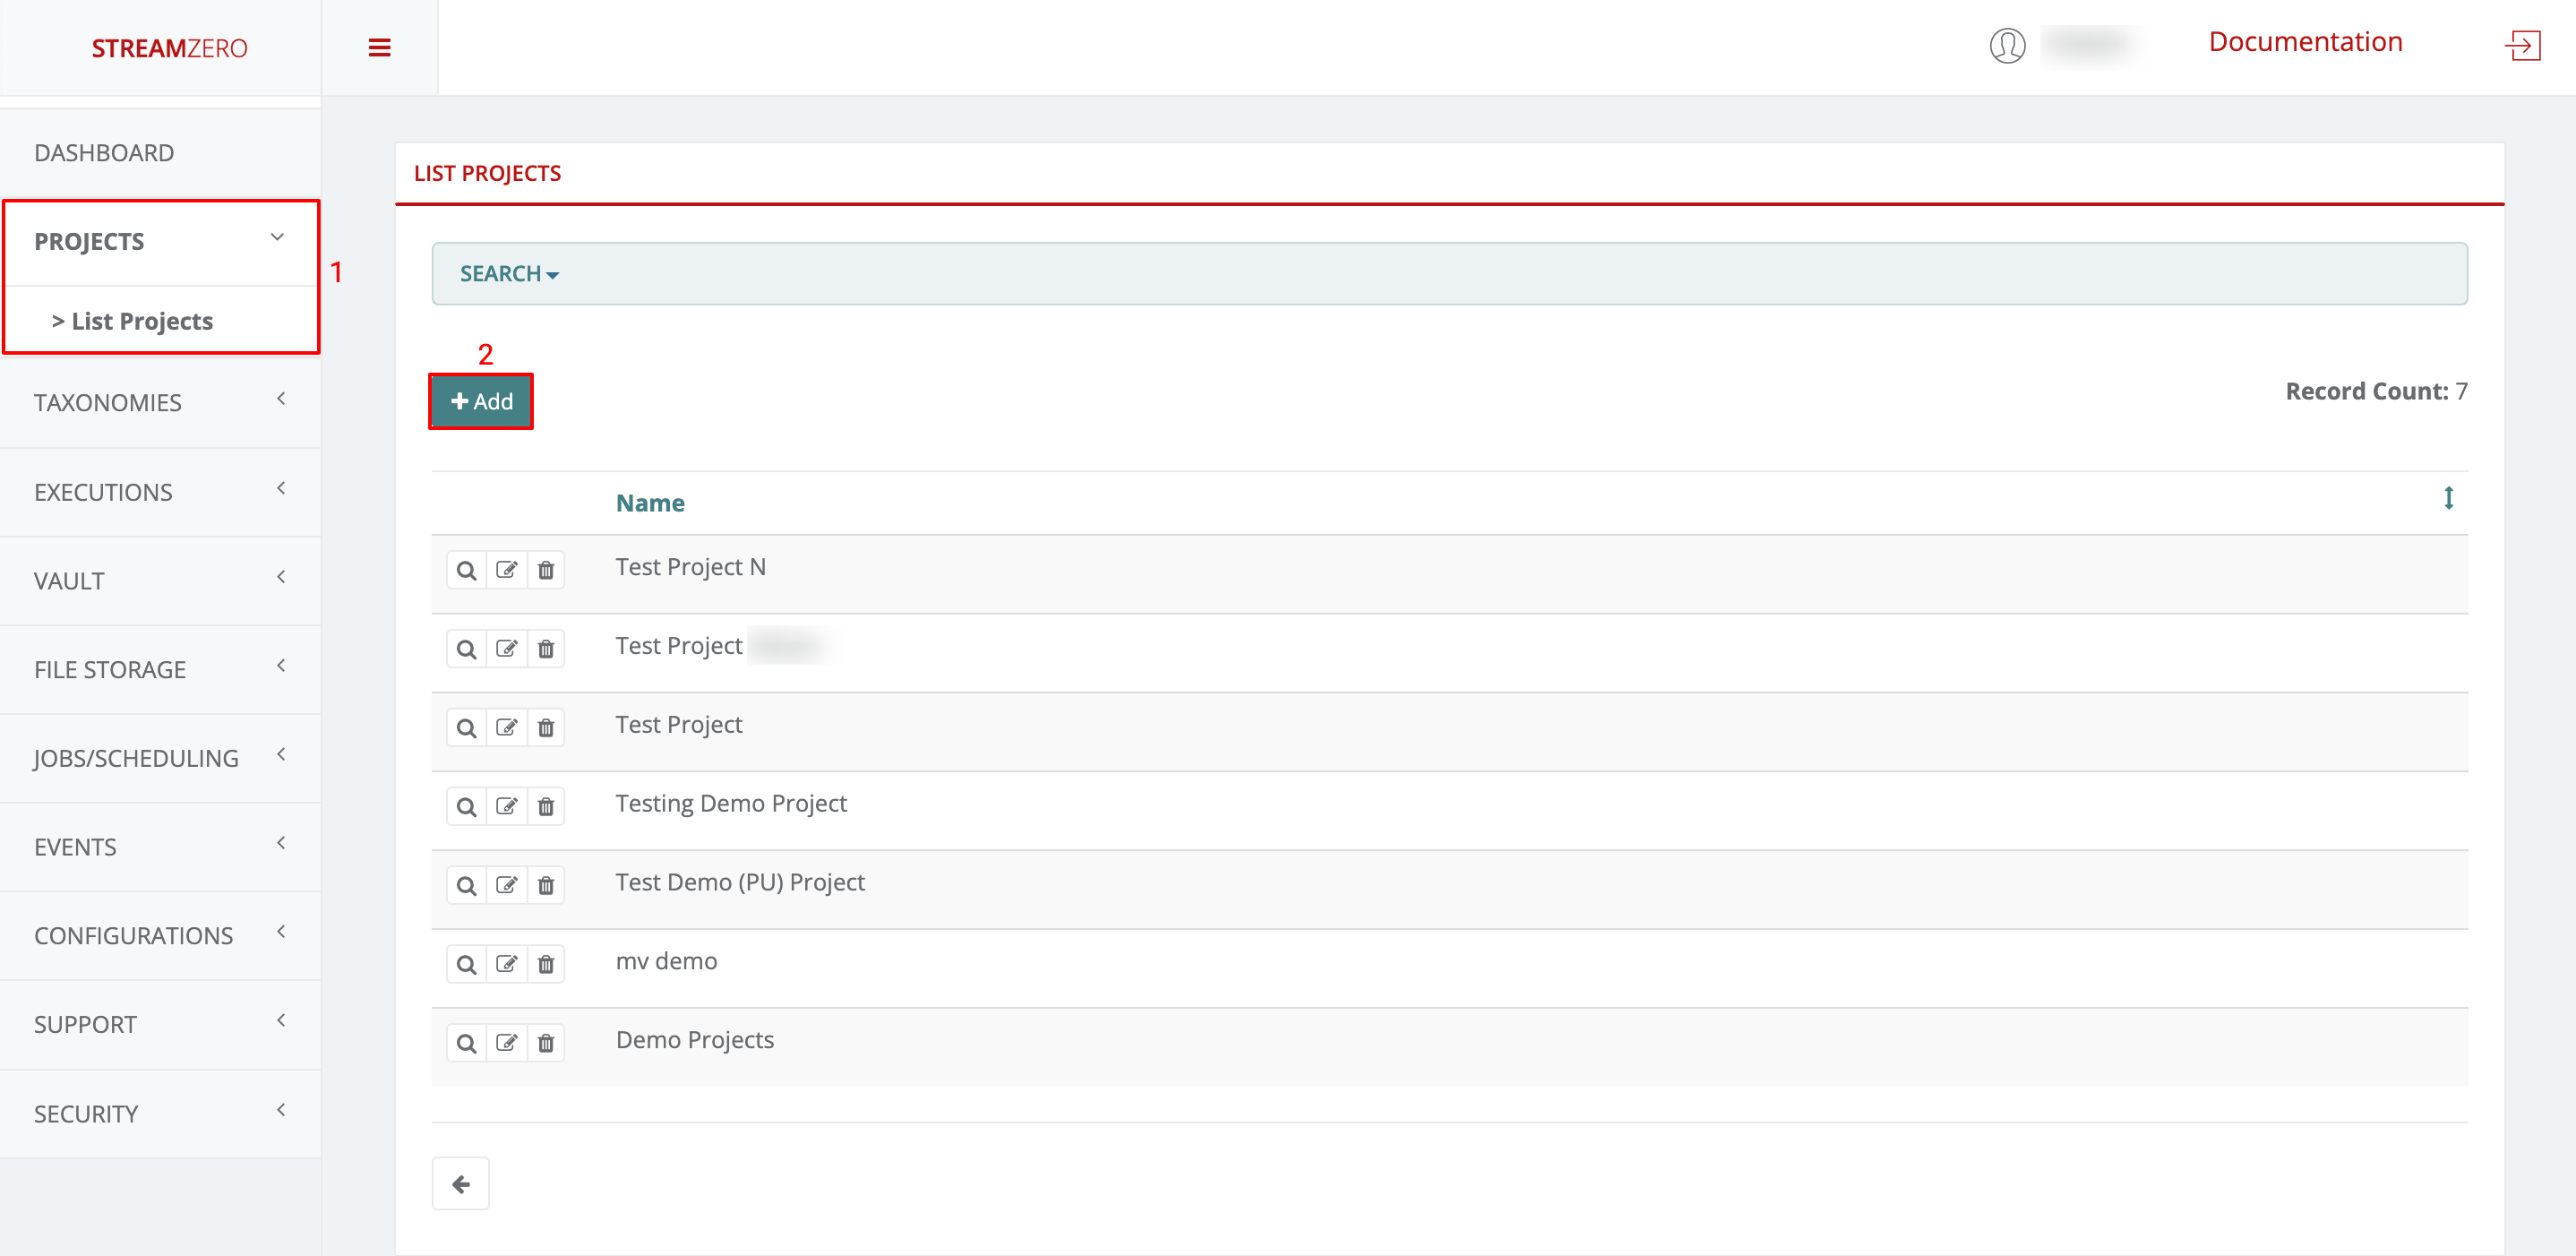
Click on Projects in the left side menu to open drop-down and then on List Projects
Click on +Add to create a new project
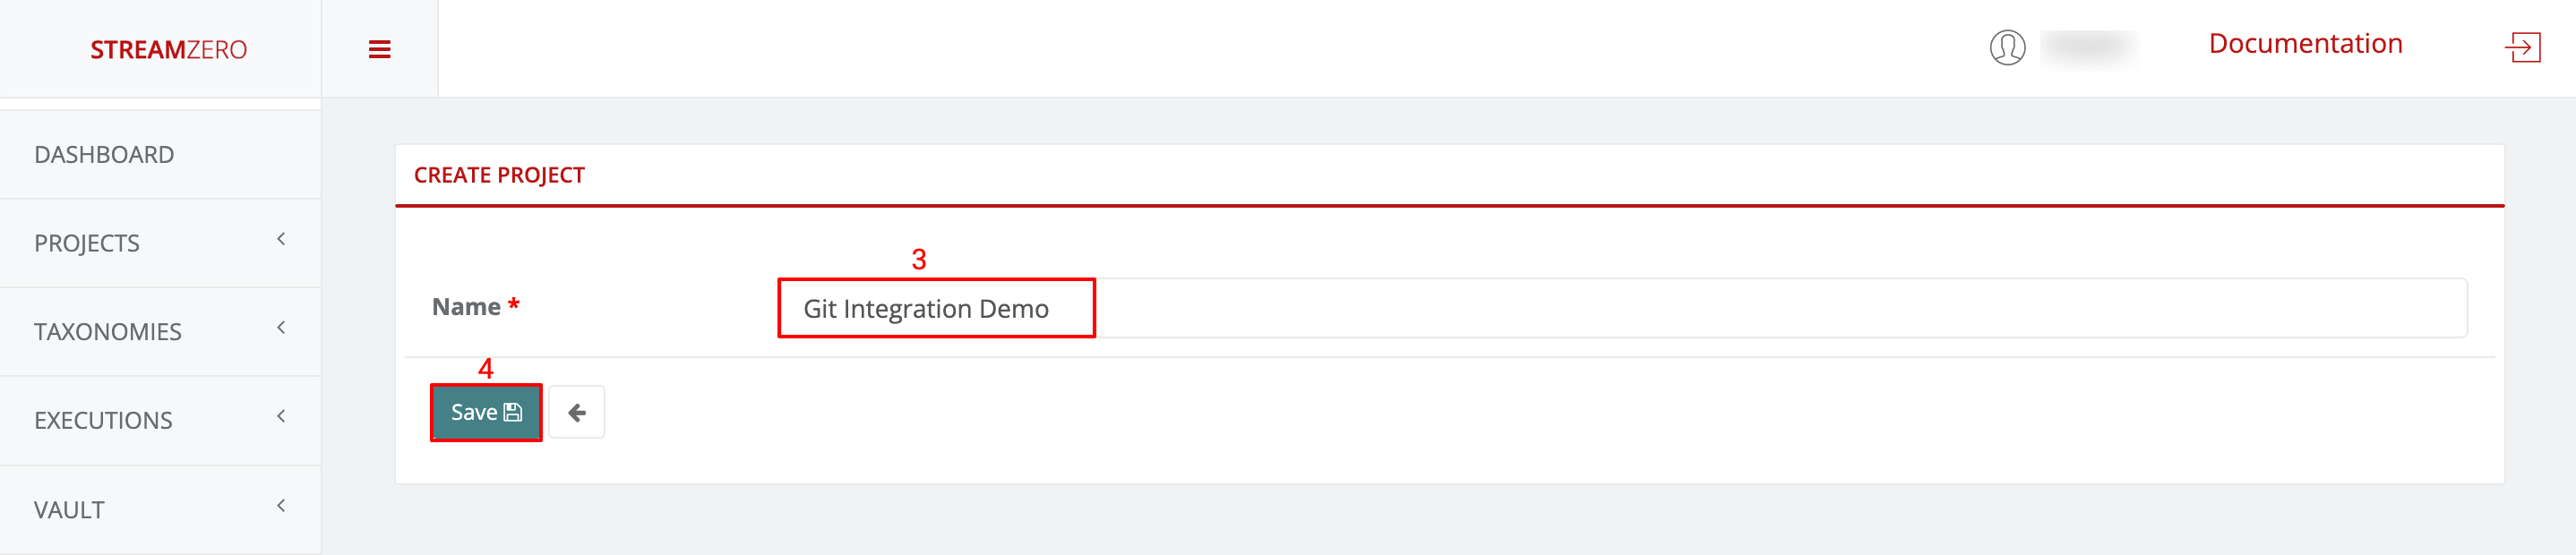
Name the project
Save the new project
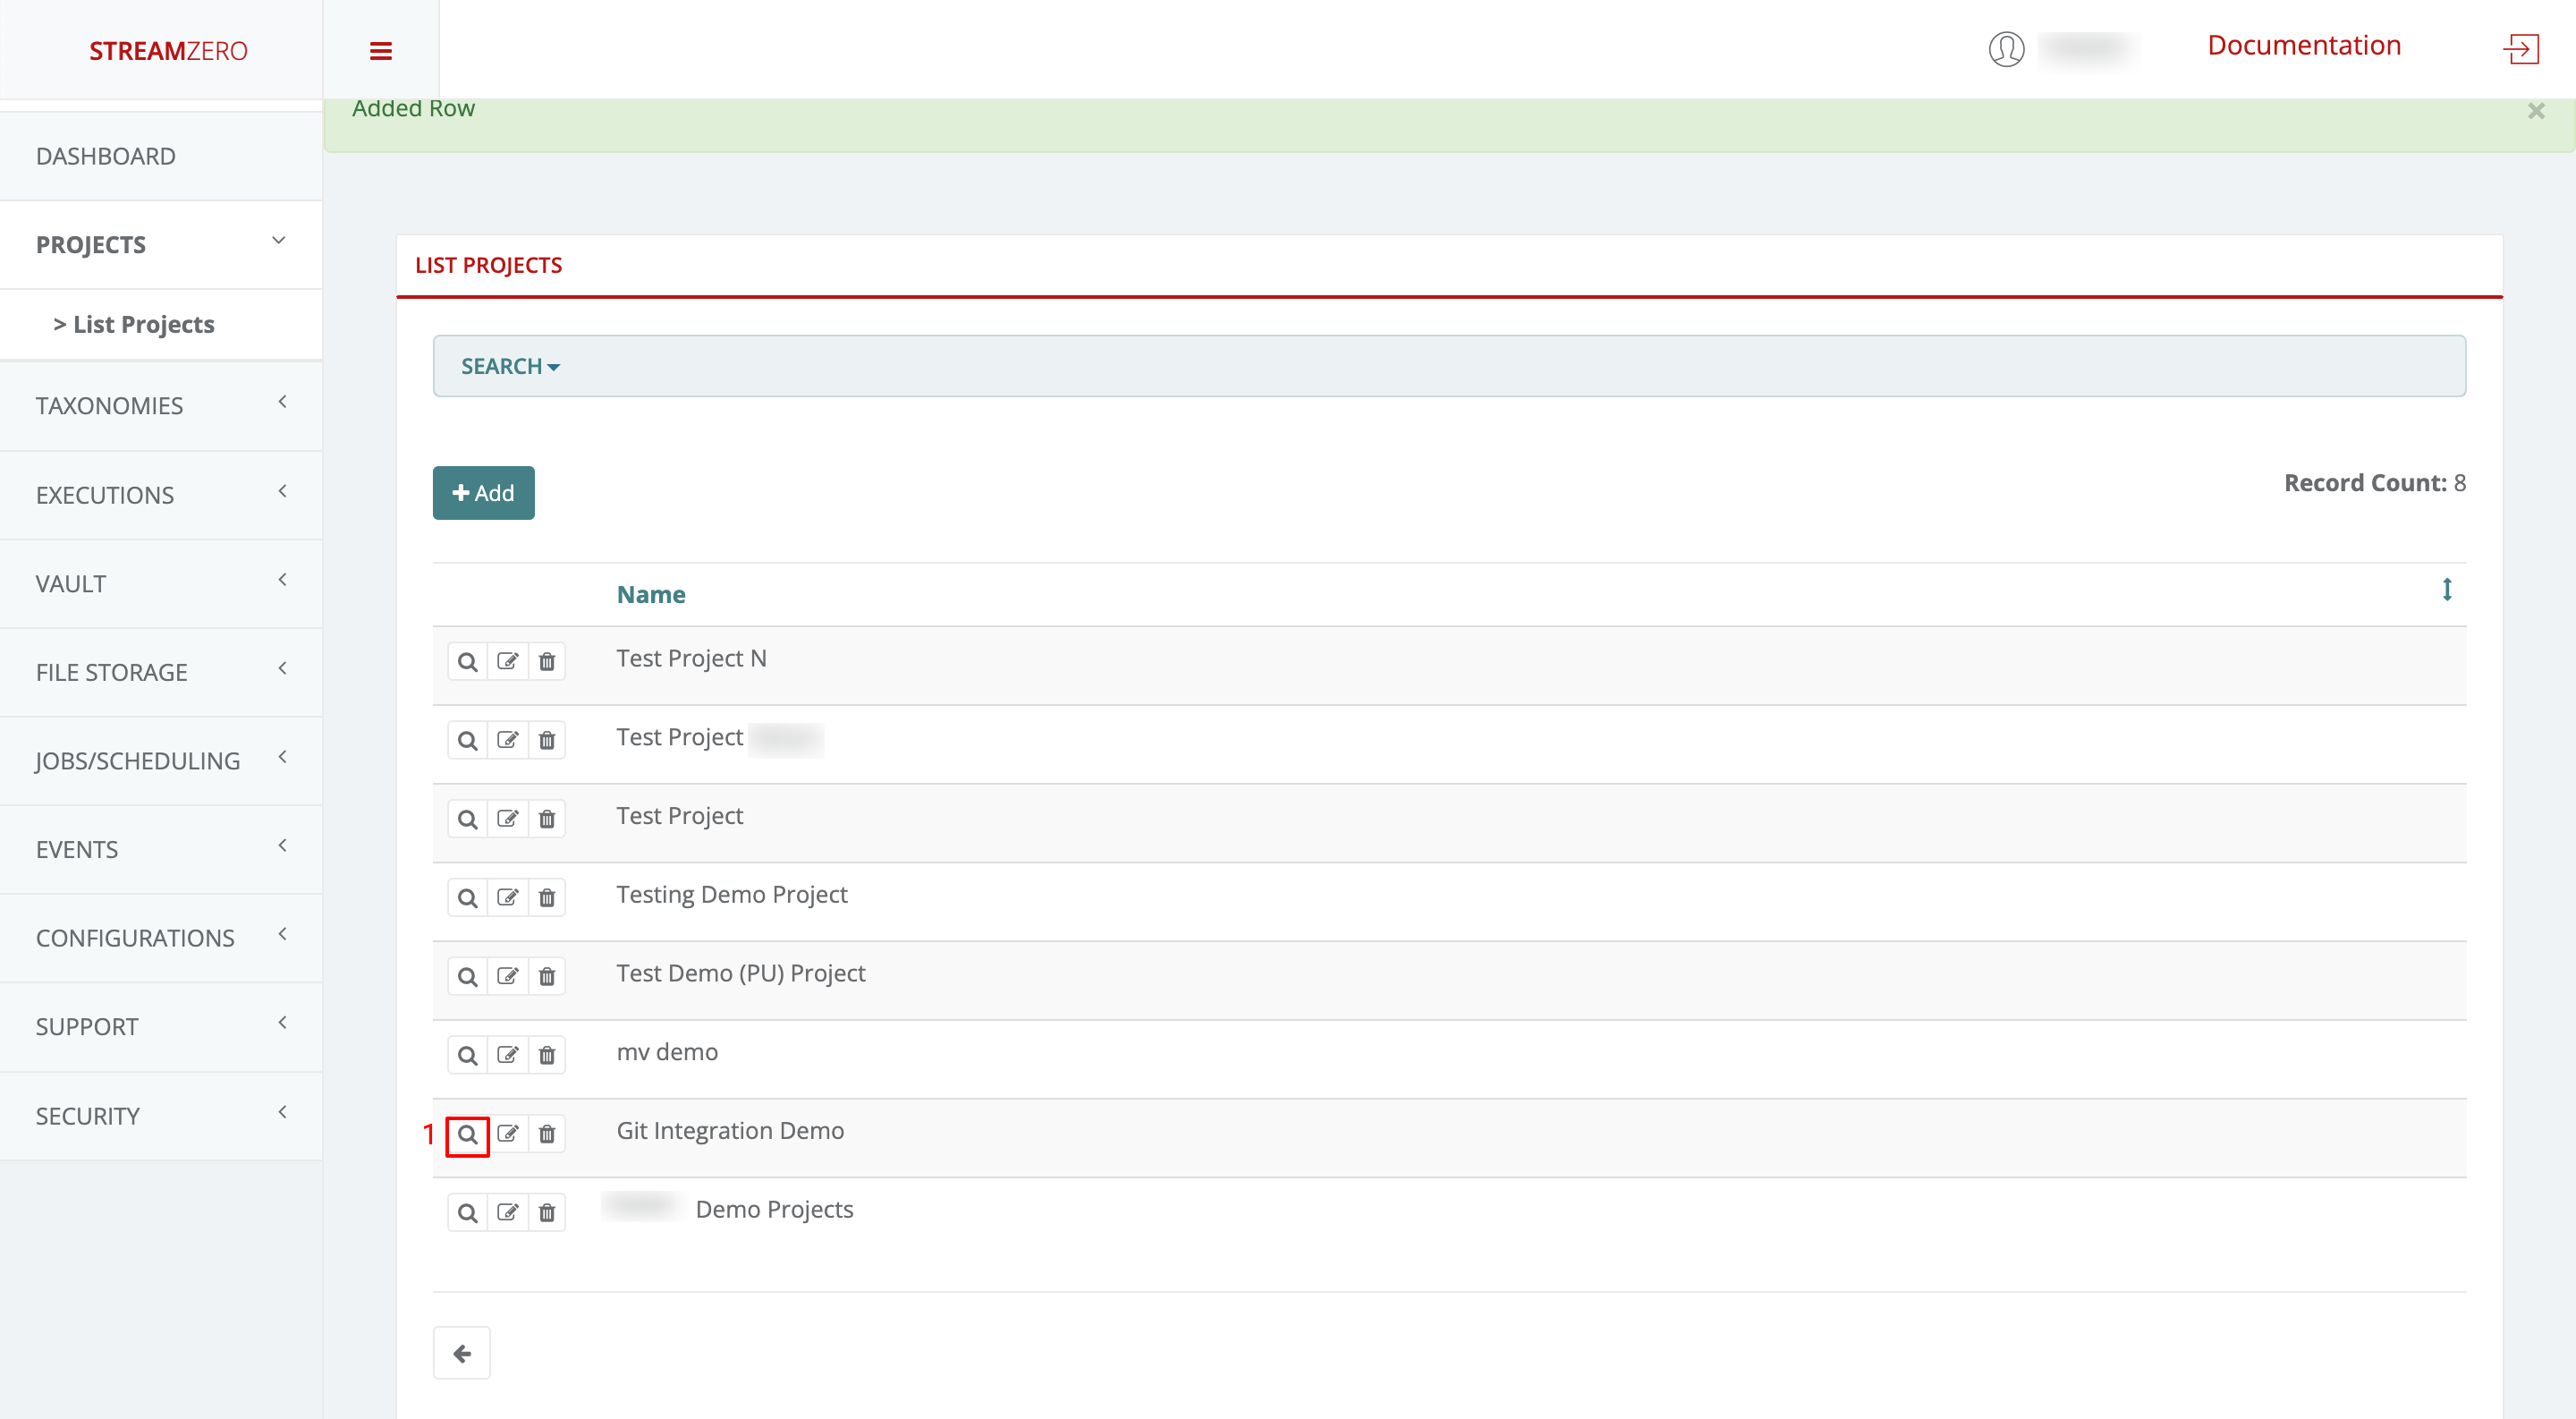
Check the created project
Click on the magnifying glass to open the details page of the project
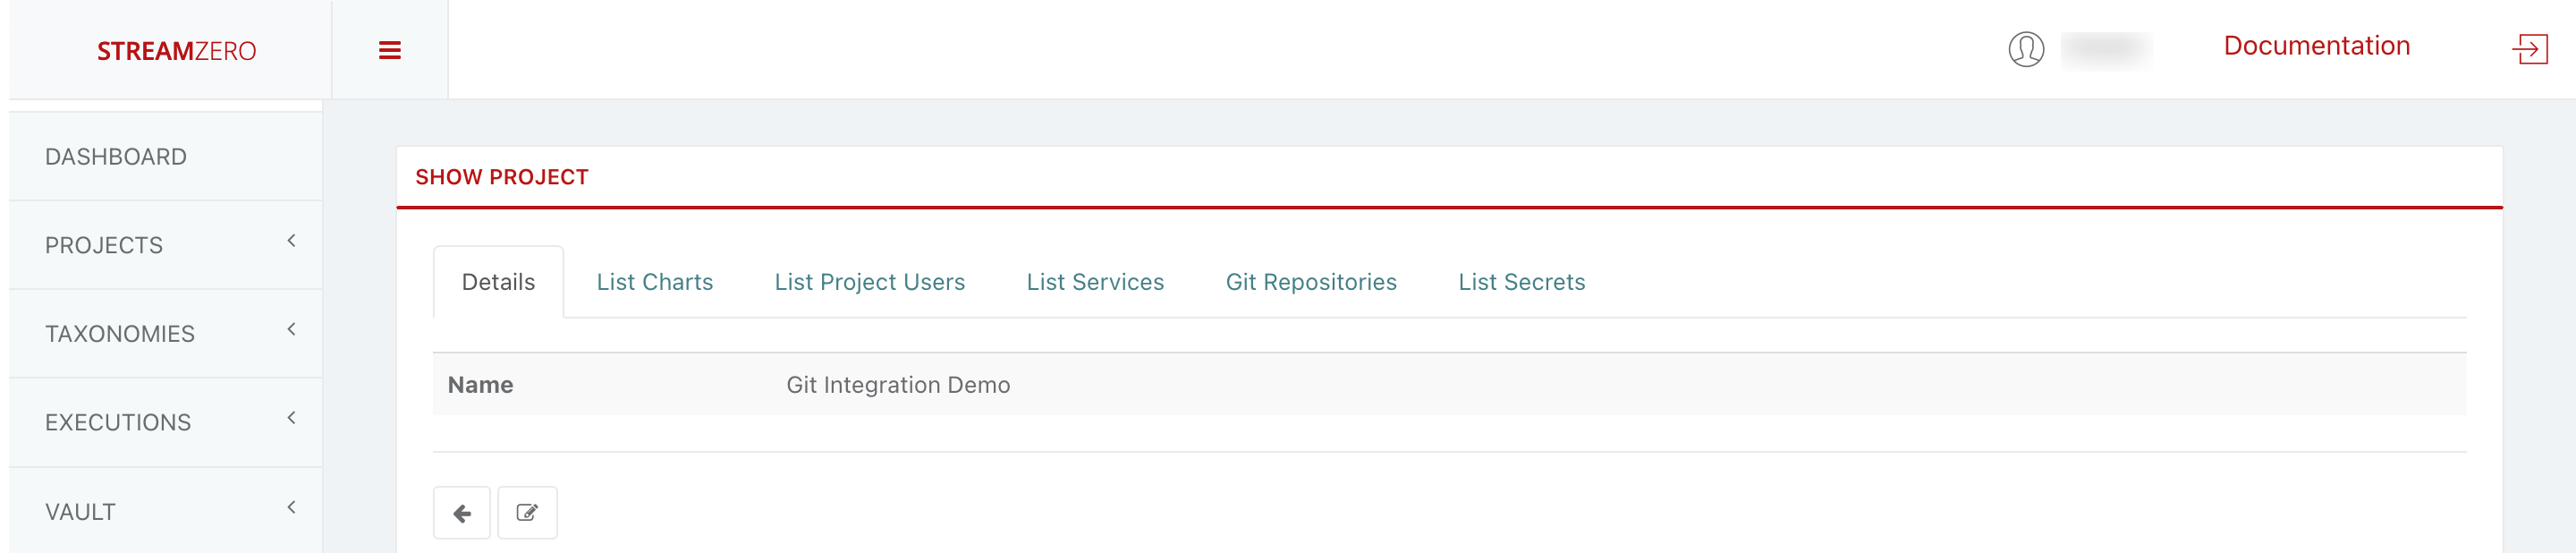
Add a GitHub Repository to the created project
Click on the Git Repositories tab
Click on +Add to add a SSH repository URL
Copy GitHub Repo
Note that before adding your GitHub Repository to the platform, a public SSH key needs to be generated.
Login to your GitHub account
Go to the Repository you want to add to the project, in this use case “ferris-packages”
Click on the the green Code button to showcase the repository URLs
Copy the SSH URL
Paste SSH URL
Paste the copied SSH URL from your repo
Click save to create the repository on the platform
Note that a pair of public and private keys are generated for each repository which is safed on the StreamZero FX platform. The private key is encrypted and stored safely in the database and will never be presented to anyone, whereas the public key should be copied and added to the git repository in order to provide the StreamZero FX access to the repository and the possibility to clone packages.
Add the public key to GitHub
Return to your GitHub account
Click on Settings in the top menu bar
Click on deploy keys
Click on Add deploy key
Paste the generated public key
Name the public key
Click on Add key
Check the saved public key
Synchronise the repository
Return to the StreamZero FX platform
Click the Sync Now button to synchronise the platform with the GitHub
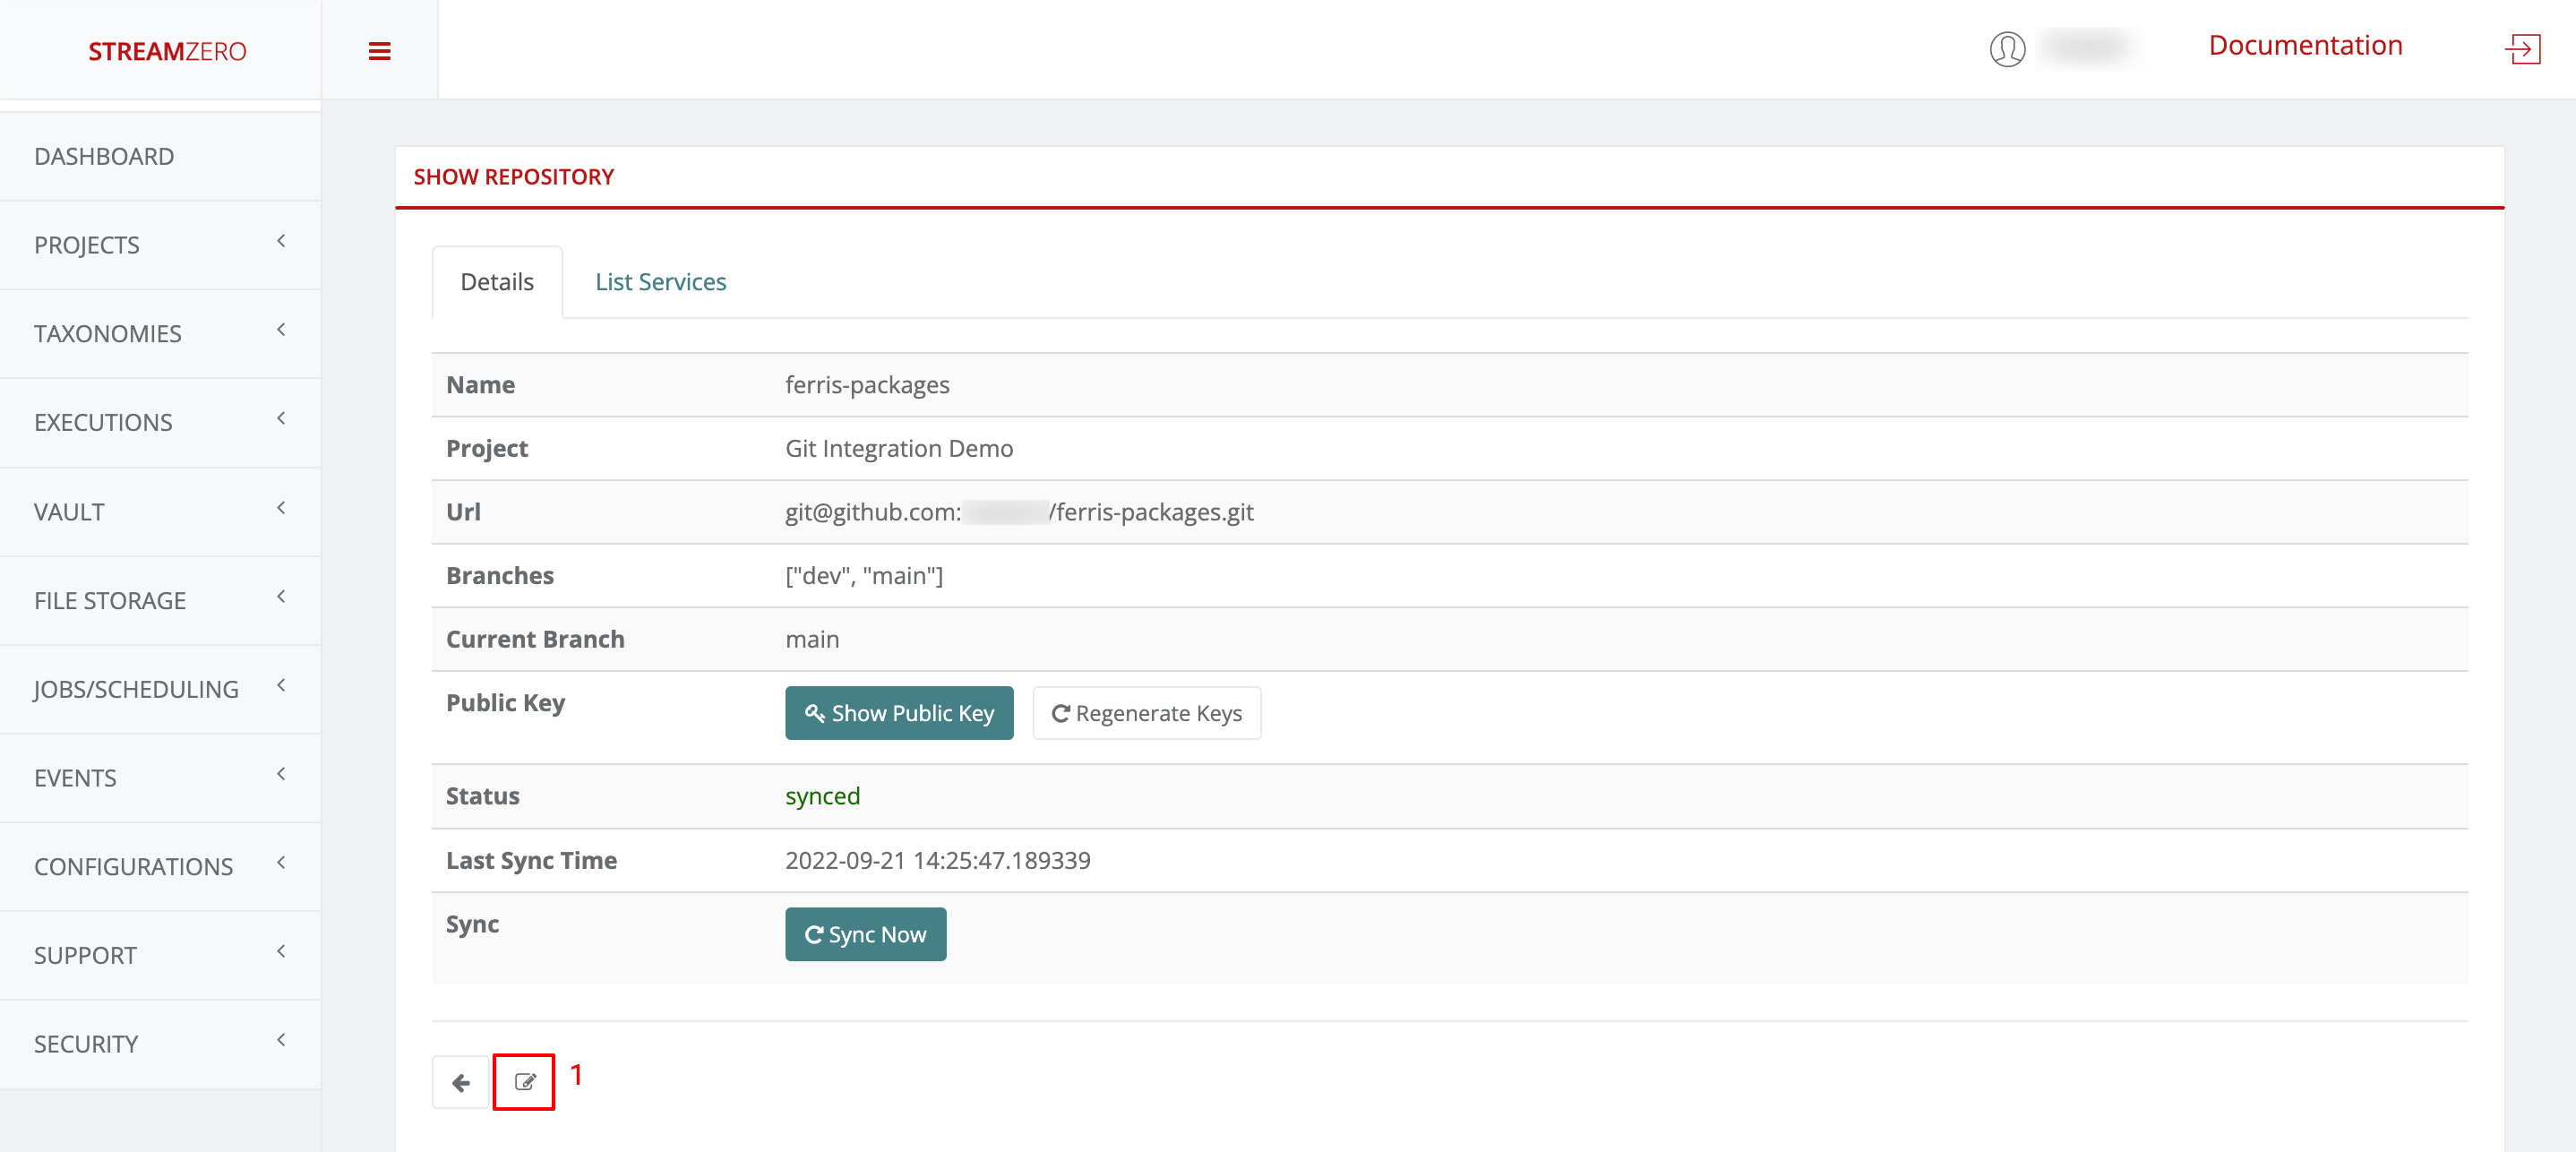
Check the synchronised details page
Note that the branches (main; dev) were added and the status has changed (synced).
Click on the List Packages tab to verify that the packages were imported
Change Git Branch on the platform
If a user wants to test or work on a specific branch, he can select the branch required to do so. The main branch is selected by default.
Click on the edit button to open the Edit Repository details page
Click in the drop-down to select the branch, in thise case “dev”
Click on Save to save the selected branch
Click on Sync to synchronise the packages from the dev branch
Click on the List Packages tab to verify the packages have been synced from the dev branch
Note that a public key can be regenerated at any moment if in doubt that someone has access to it. If a new key gets generated, it needs to get added to GitHub again and synced on the platform afterwards. If the step of adding the key is missed, the synchronisation will fail. Keys can also be deleted directly on GitHub if the platform access shouldn’t be granted anymore.
2.12 - Event Manipulation Strategies
Leveraging Event Manipulation.
Events are the powerful concept at the center of the DX Platform. There are a number of strategies for using event structures. The following are a few important related topics.
Correlation IDs
Event Mappings
Understand the Structure
The StreamZero FX events are based on CloudEvents …
Understanding Correlation IDs
Correlation IDs are a time tested approach within the Enterprise Software Landscape. A correlation ID allows one to correlate 2 steps in a flow with eachother and identify their location in the flow sequence.
When a package receives and event the platform also passes a CorrelationID. The correlation ID is usually generated by the platform at the start of the event or assigned by the event originator. If a correlation ID does not exist then a package may create a correlation id using the library provided. The correlation id consists of 2 parts
1
FLOWID_SEQUENCEID
The first part is the identifier of the unique originator id. The second part is a sequence ID which is incrementally assigned by subsequent processors. This allows the processor to indicate which the next stage of the processing is. It is left to packages to determine whether they wish to pass through the correlation ID or not. Usually it is preferable to apss the correlation ID with any event that is generated from within a package.
The following is a sample output
ABCDEF1234_01 -> ABCDEF1234_02 -> ABCDEF1234_03
Searching for a correlation ID will result in a time sorted list of runs which were triggered. By steppoing through the rsults of each stage you can easily identify the outgoing events and the results at each stage.
Leverage Event Mapping
Event mapping is the mechanism of converting from one event type to the other.
This is useful for converting from one type of even to another to trigger crossflows without altering the code of the target service.
Event mapping is done within the platform by using a configuration of event maps. Event maps describe the mapping of the attributes between the source and the target event. The also must chose between 1 of 2 strategies
Map ONLY Mapped Fields
Map ALL Fieds
Strategy Map only Mapped Fields
When this strategy is applied only the attributes present in the mapping file will be available in the output event.
Please note that you cannot map events to the same event type to avoid loopbacks.
When the above map is combined with the event it will result in the name and role attributes being available as first_name and designation in the output event. But the mobile number will be stripped.
When the above map is combined with the event it will result in the name and role attributes being available as first_name and designation in the output event. But the mobile number will be stripped.
StreamZero FX aggregates all operational data into Elasticsearch. Most operational data and events are transported through Kafka from which it is placed in Elasticsearch by Elasticsearch Sink containers.
The following are the Kex Data and The matching Elasticsearch Indexes
Logs
Contains Logs from all applications. Elasticsearch index is XYZ
Events
All events that are transported through the ferris.events Topic are loaded into Elasticsearch Index.
Checking Logs
StreamZero Logs are in logstash format. The logs can be aggregated from the application by using the ferris_cli library.
The following is a sample log entry with extended descriptions below.
Logs are identified by the app_name attribute which provides you with an indication of the application from which it was generated.
To Filter Application Logs use the following
App_name:
Checking Events
Events are in form of cloud events. The data section of an event is schema less i.e. the data provided in the attributes may vara from event type to event type. If you require custom extractions for specific event types the best is to tap into the
Event Name Spaces
3 - User Guide
This User Guide showcases a complete overview of the StreamZero FX Executions/Packages Framework. Working along typical patterns for engineers working with the StreamZero Data Platform.
3.1 - Landing Page (Dashboard)
Overview of the StreamZero FX Dashboard.
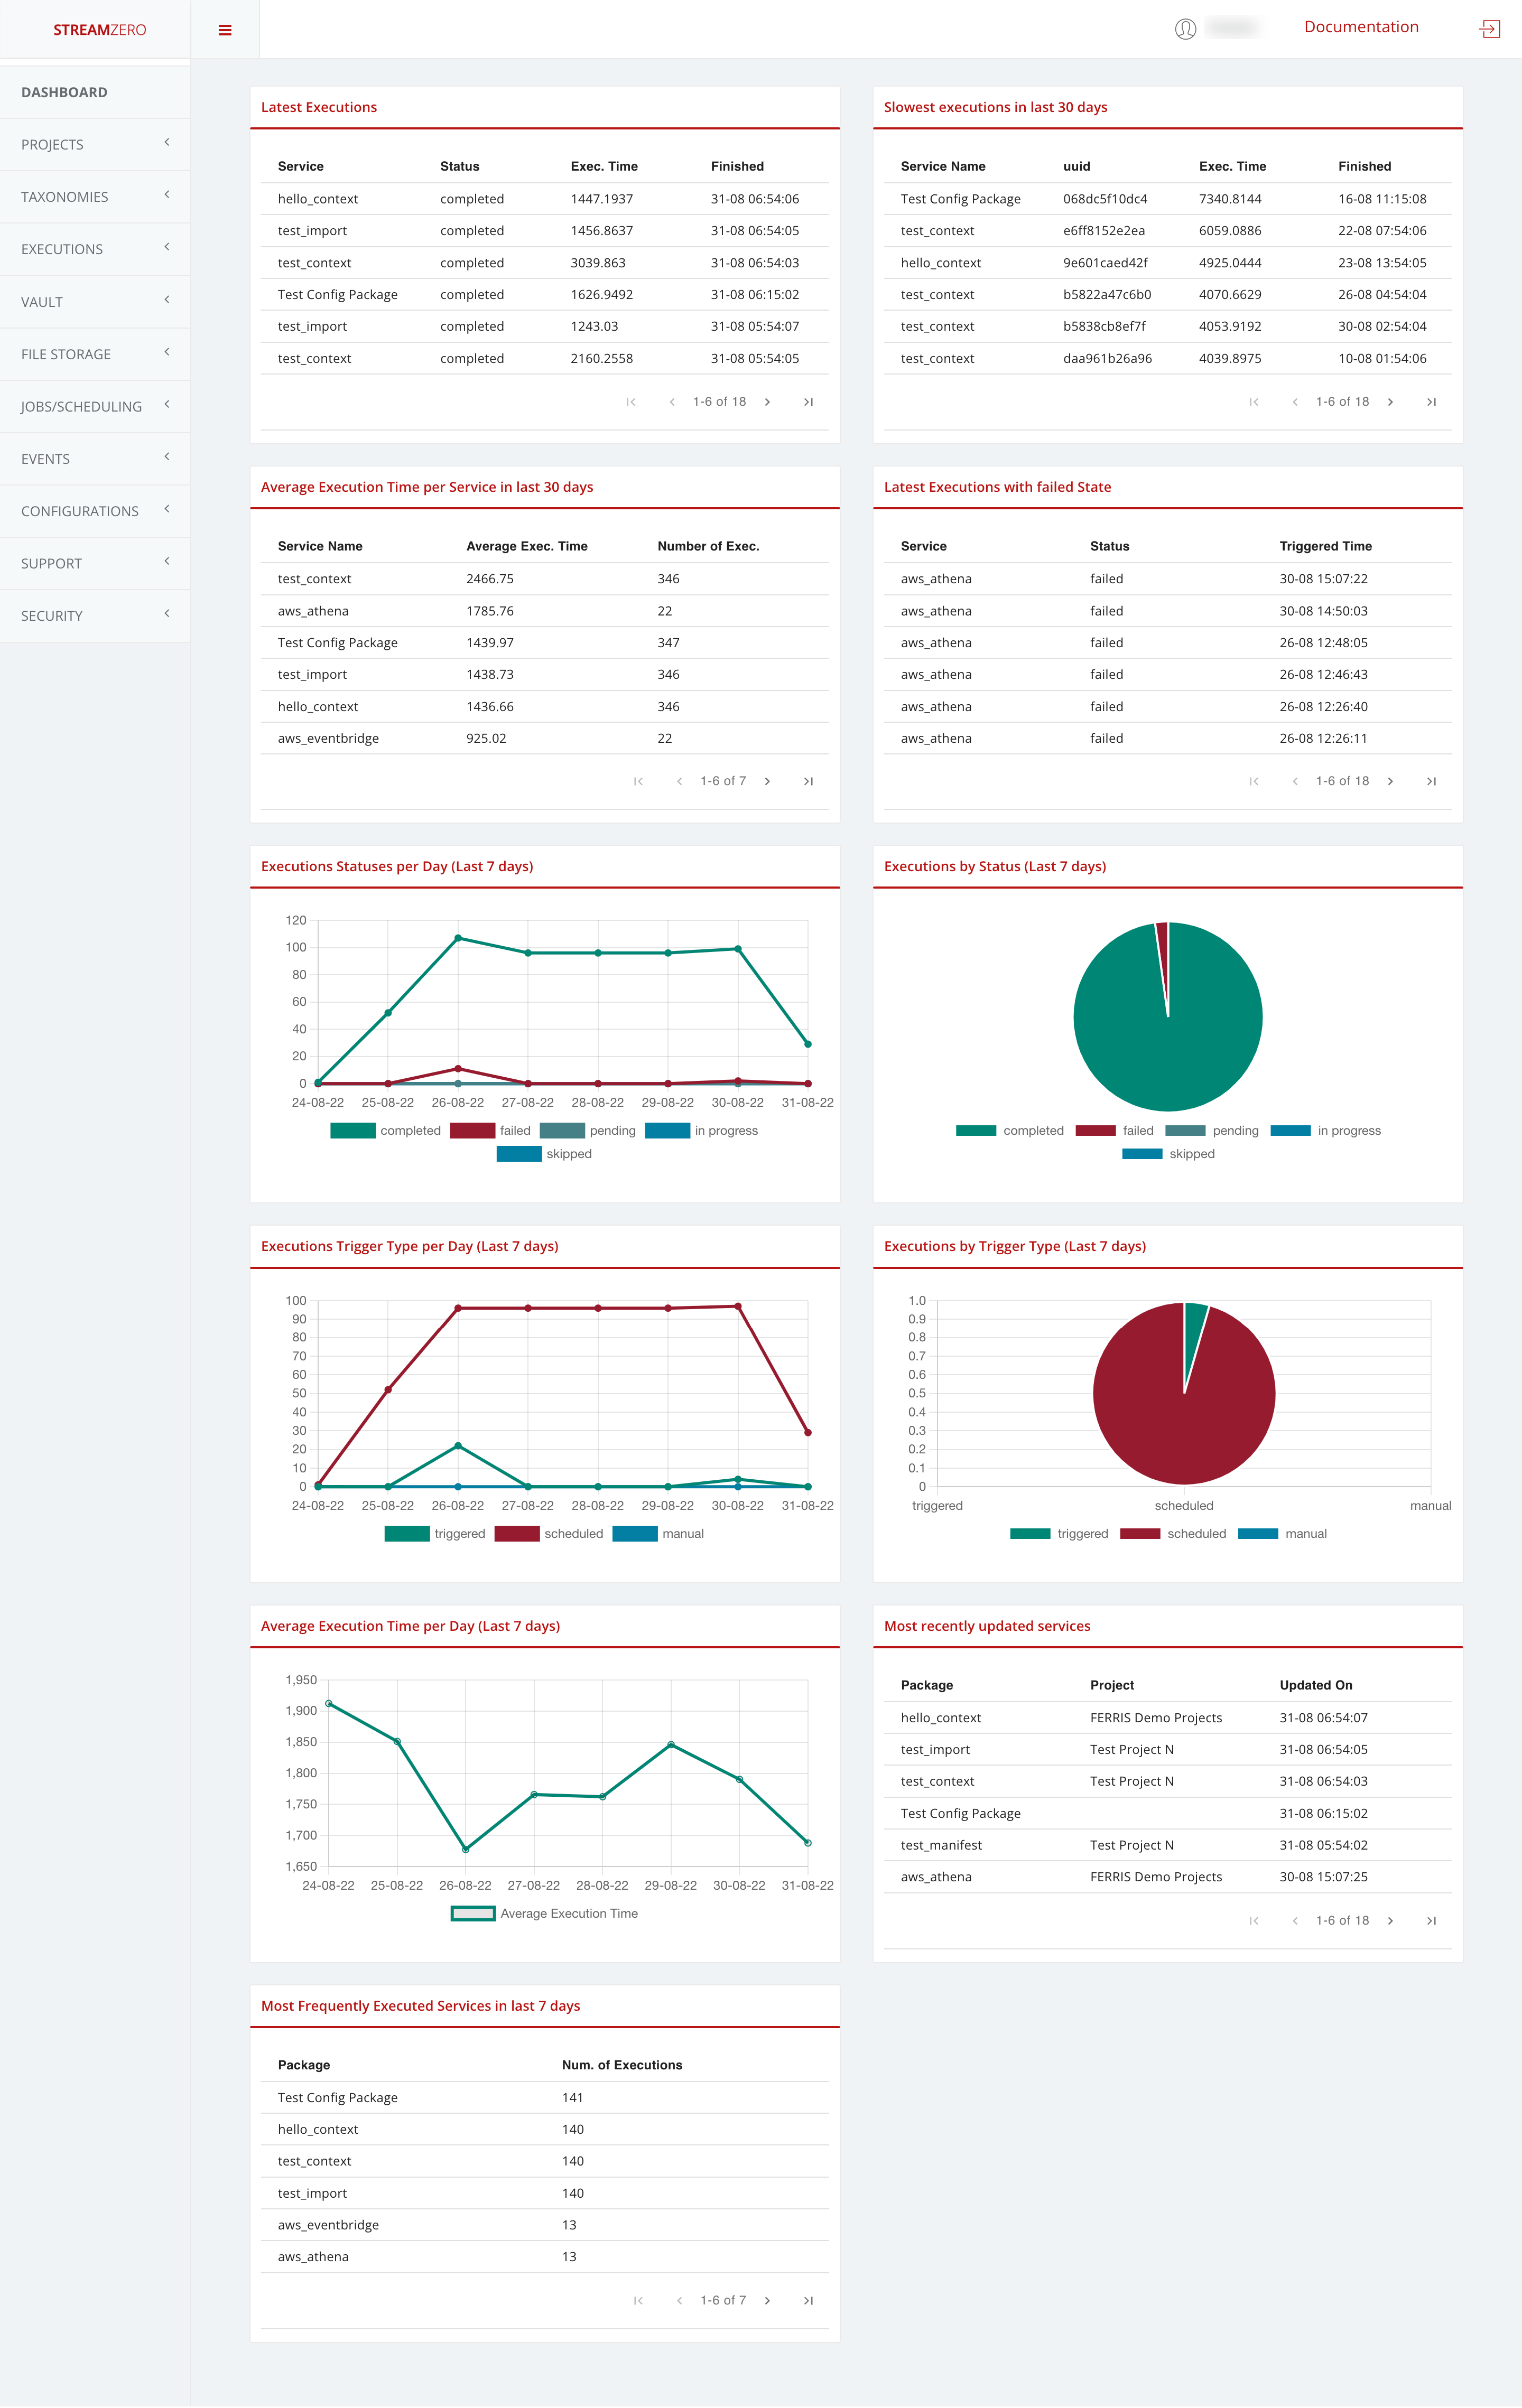
The StreamZero FX Landing page provides insights and analytics around typical platform related metrics mostly related to Data Ops and detailed event handling. It can be finetuned and tailored to customer specific needs.
In this specific use case the insights and analytics of the StreamZero FX Data Platform are highlighted as follows:
In the first row, the last 18 executions and the last 18 executions with failed state
the last 18 executions showcase the following details:
Package (name)
Status
Execution time
Finished
the last 18 executions with failed state showcase the following details:
Package (name)
Status failed
Triggered time
It allows users of the platform to verify why the triggered package has failed executing.
In the second row, the executions statuses per day (last 7 days) and the executions by status (last 7 days)
Completed
Failed
Pending
In_progress
In the third row, the exectuions trigger type per day (last 7 days) and the exectuions by trigger type (last 7 days)
triggered
scheduled
manual
In the 4th row, the average execution time per day (last 7 days) and the most recently updated packages
the details of the most recently updated packages are divided as follows:
Package
Project
Updated on (date and time)
In the 5th row, the most frequently executed packages in the last 7 days with the following details:
Package (name)
Number of exections
3.2 - Projects
How to create Projects and Users for new projects.
This subcategory explains the creation of new projects and users withtin these projects.
Project
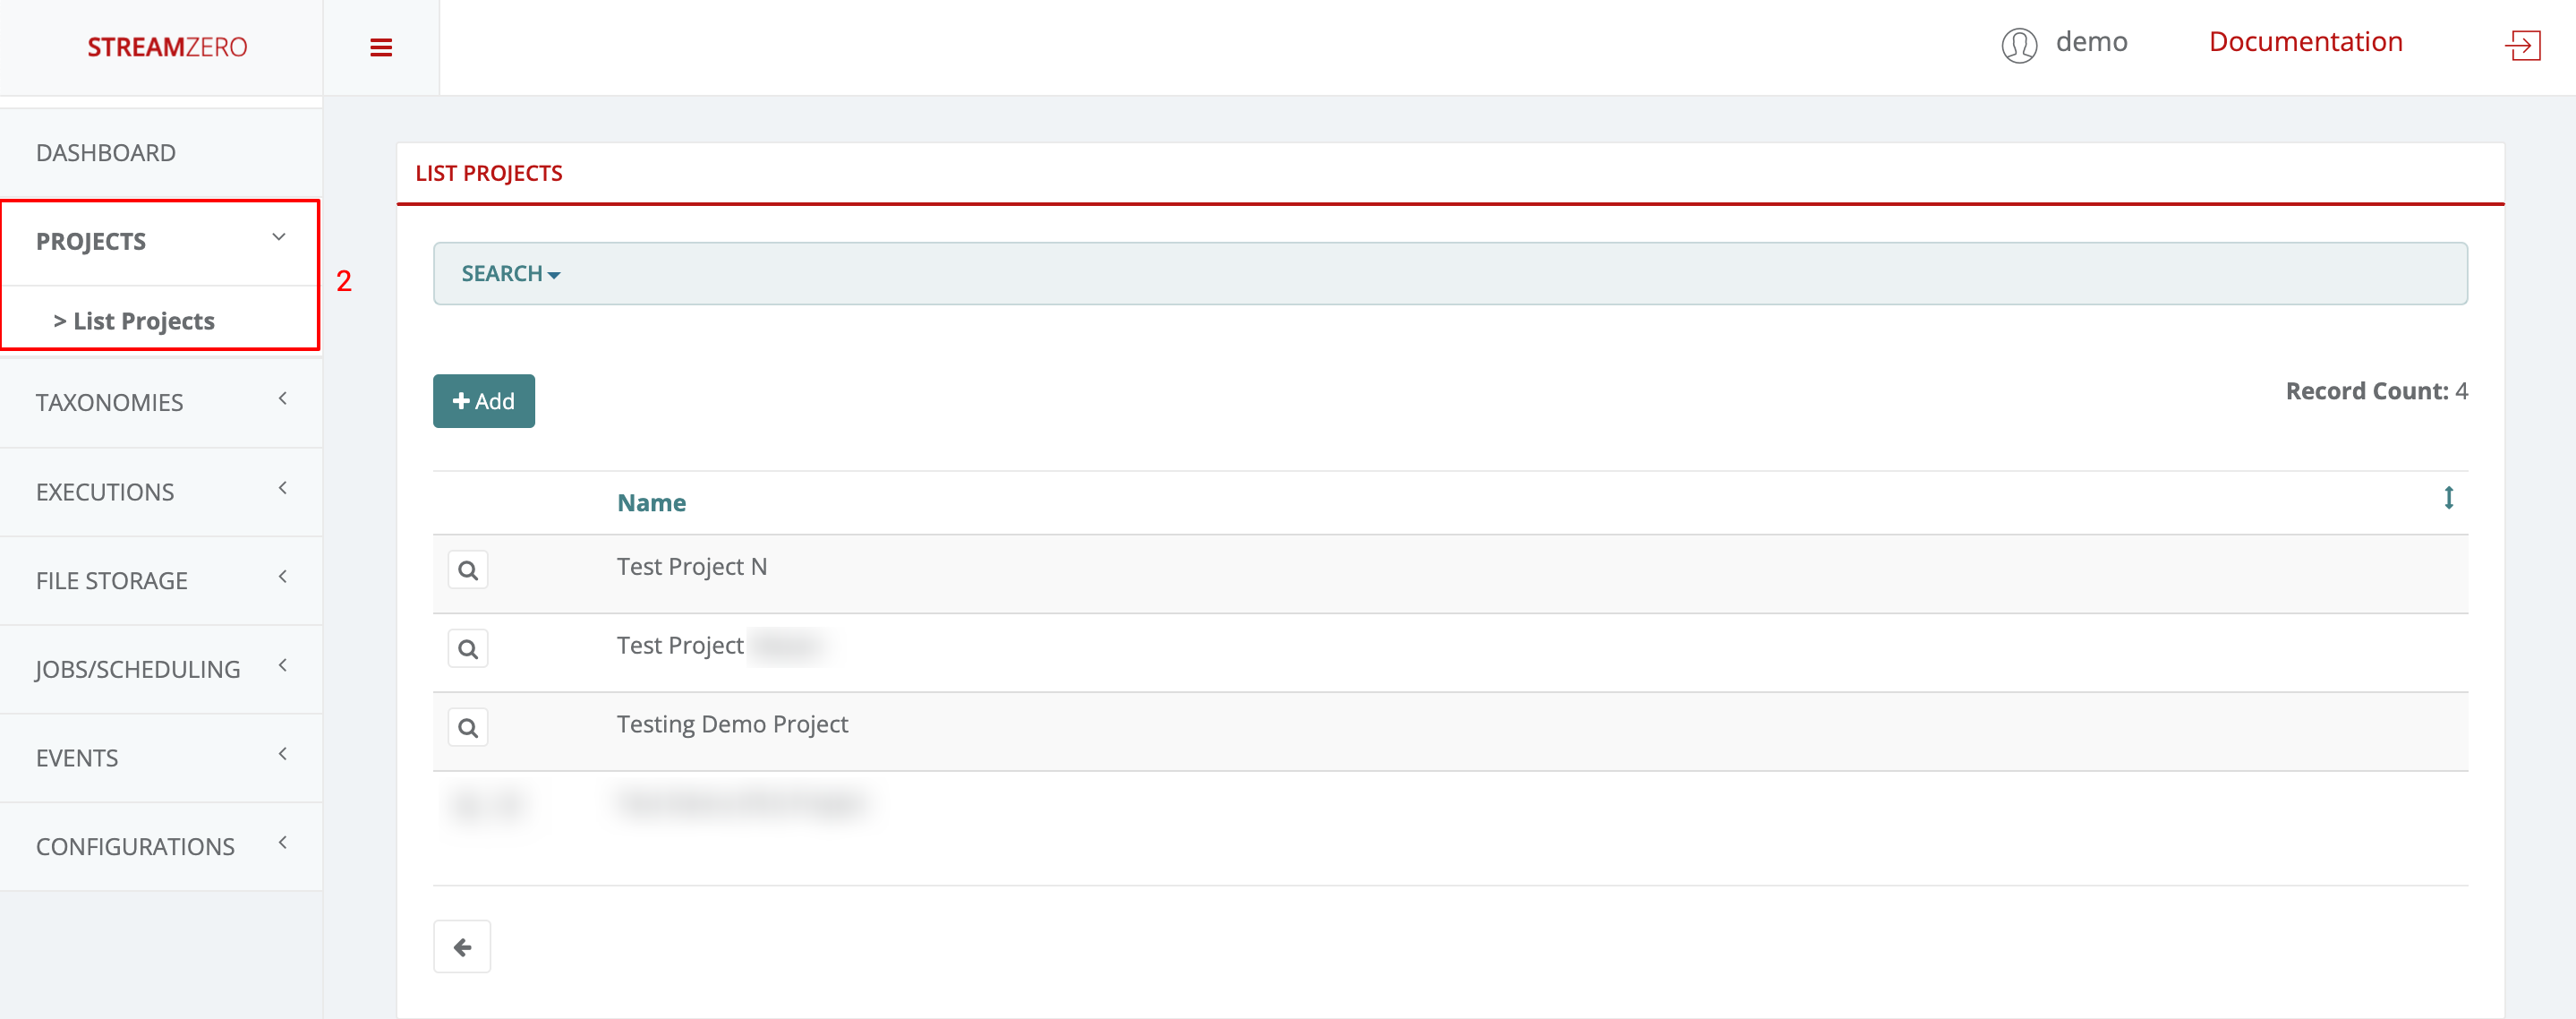
Click on Projects in the menu on the left side to open dropdown and then on List Projects
Click on "+Add"
Name the new project
Save
Project on the StreamZero Platform form the overarching organizational bracket for different types of objects. All users, packages, scripts, parameters, secrets and other elements are organized into projects to ease enterprise data management. The default owner for new projects is the Platform Admin (PA).
User creation within the project
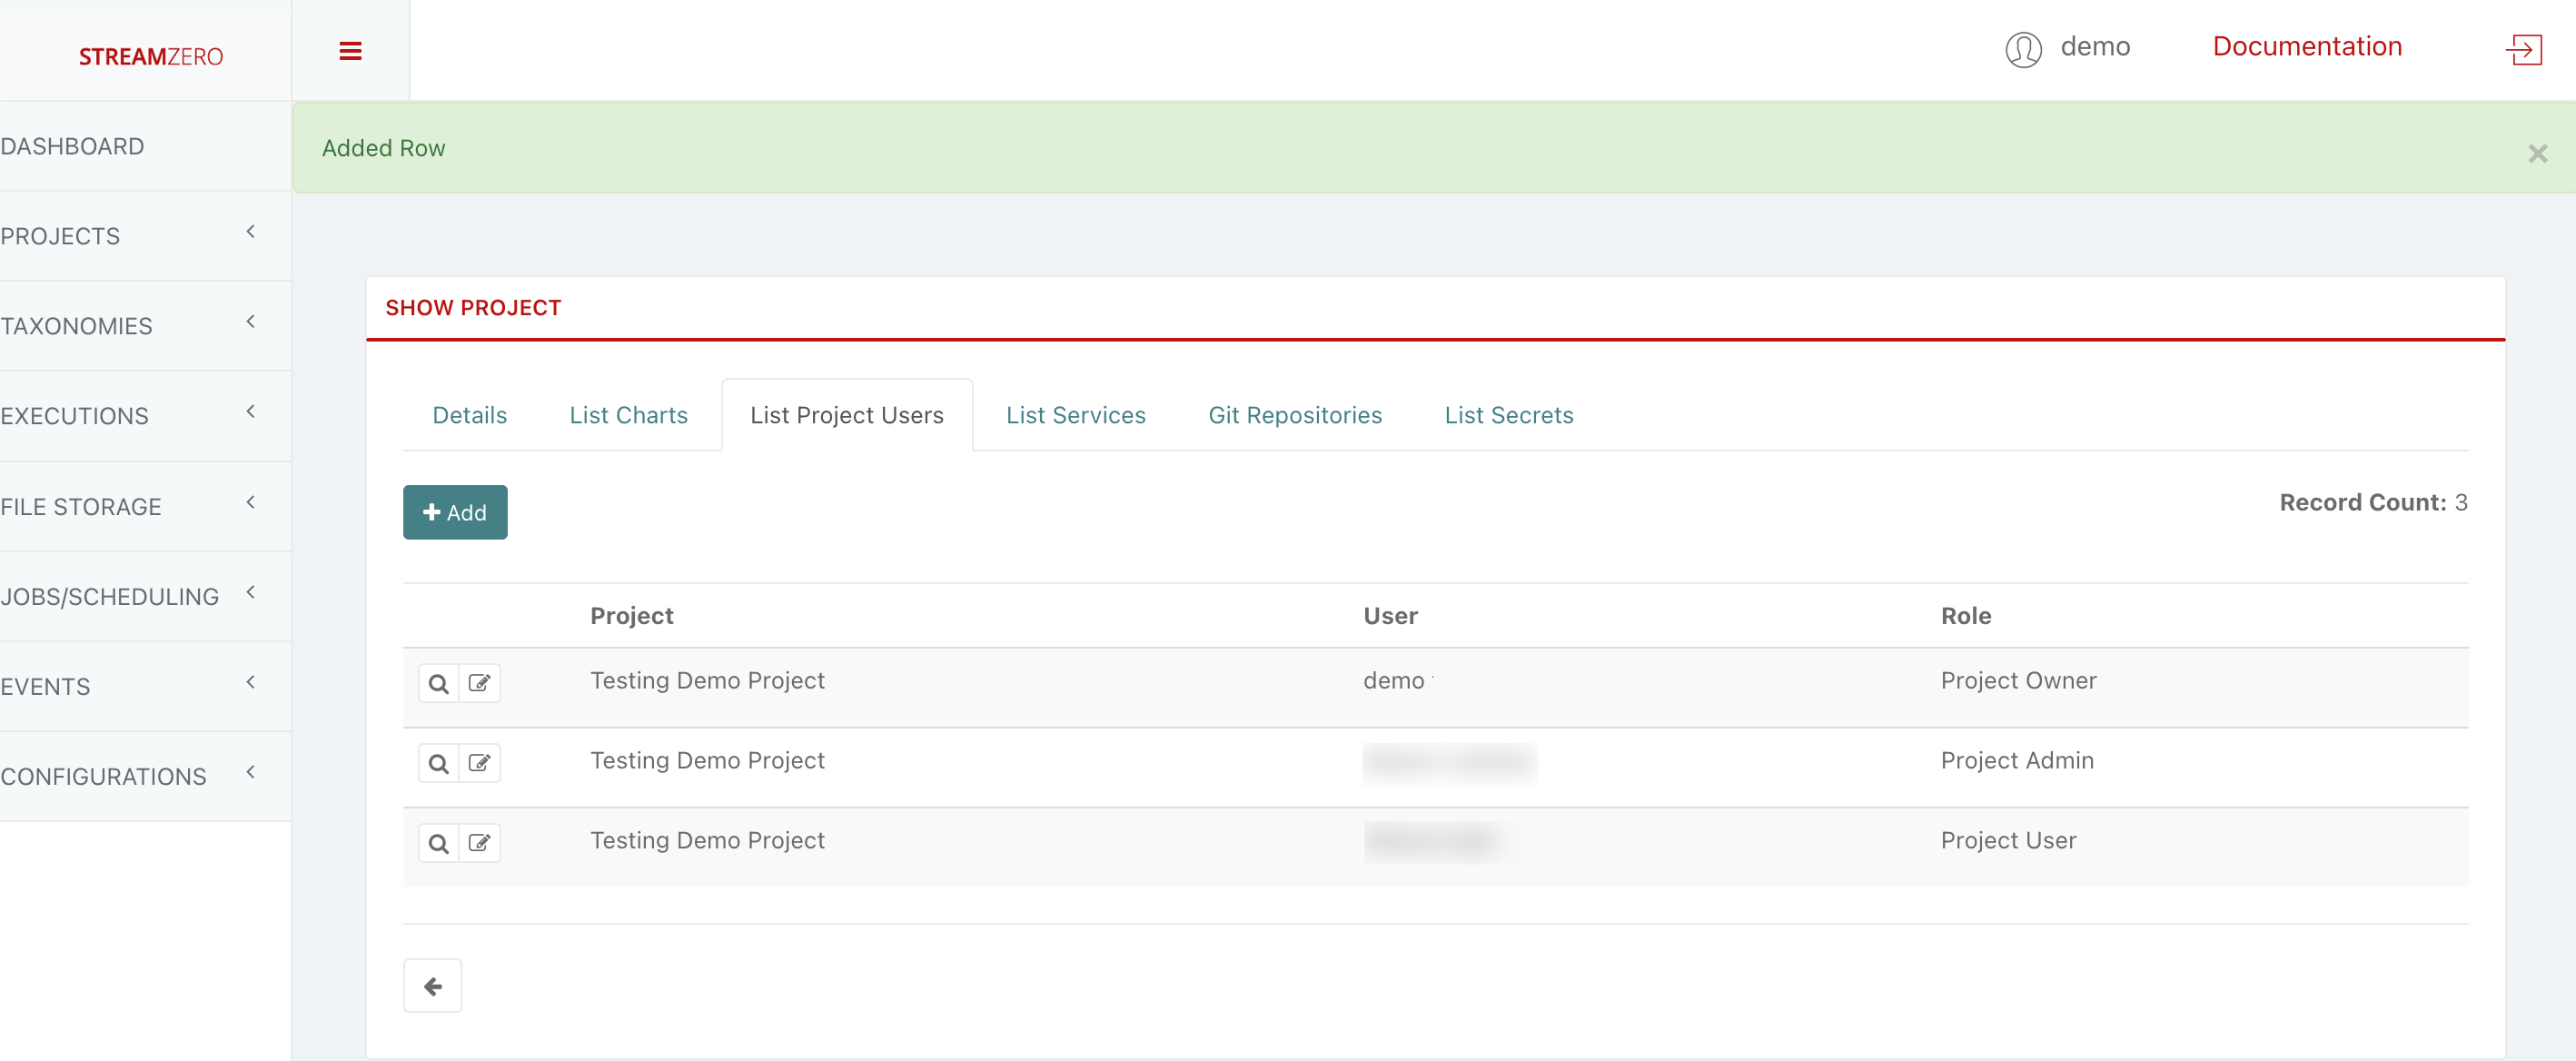
Since the Platform Administrator created the Project, he is automatically assigned as the Project Owner. All user roles on the project level are defined in detail as follows:
Project Owner - has all permissions on project and related entities (packages, users) including deletion of project(s) (and users) created by the PO. By default it is the user that created project
Project Admin - has all permissions as Owner except deletion
Project User - has only list / view permissions
Please note that users without Platform Administrator role, do not see any projects and packages they are not assigned to. All project role rights are translated to package level also, eg. a user with Project User role will not be able to edit packages of that project, only to list/view them and run a (manual) execution
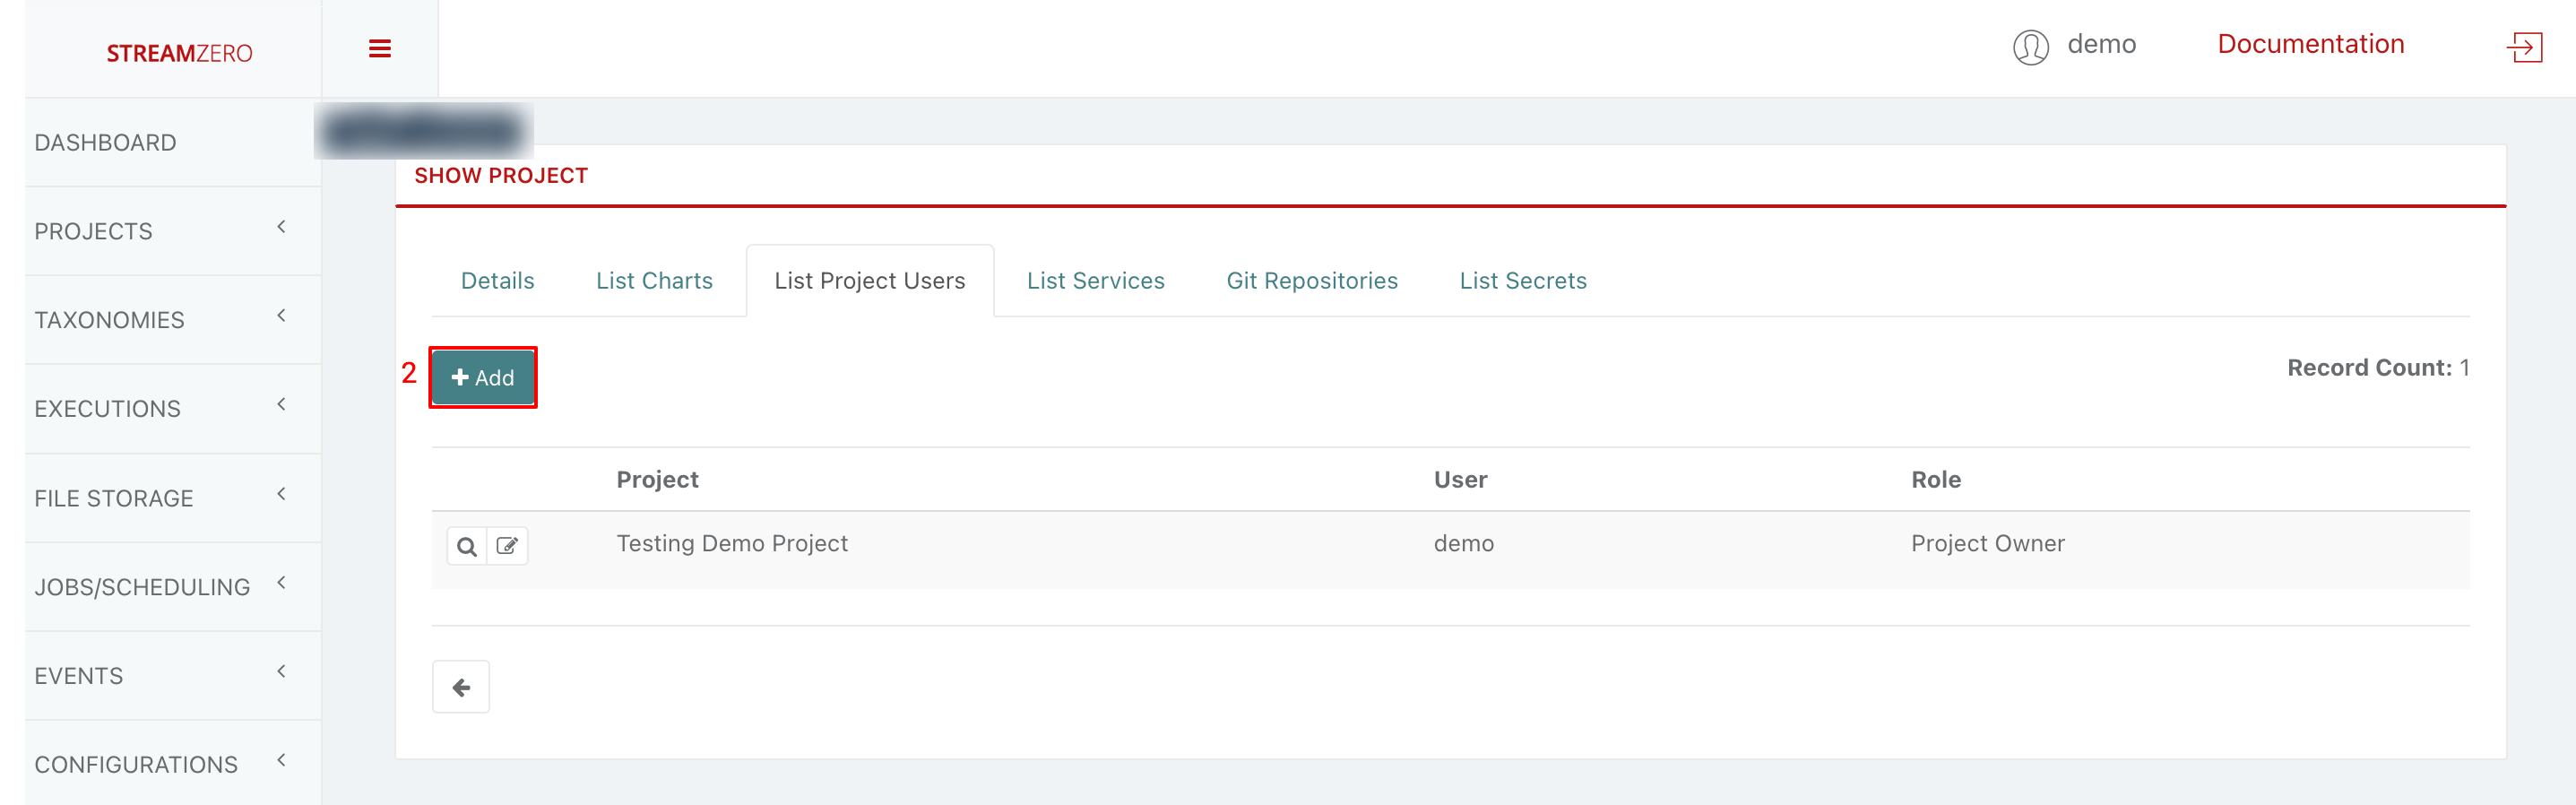
Click on the magnifying glass to open Project details page
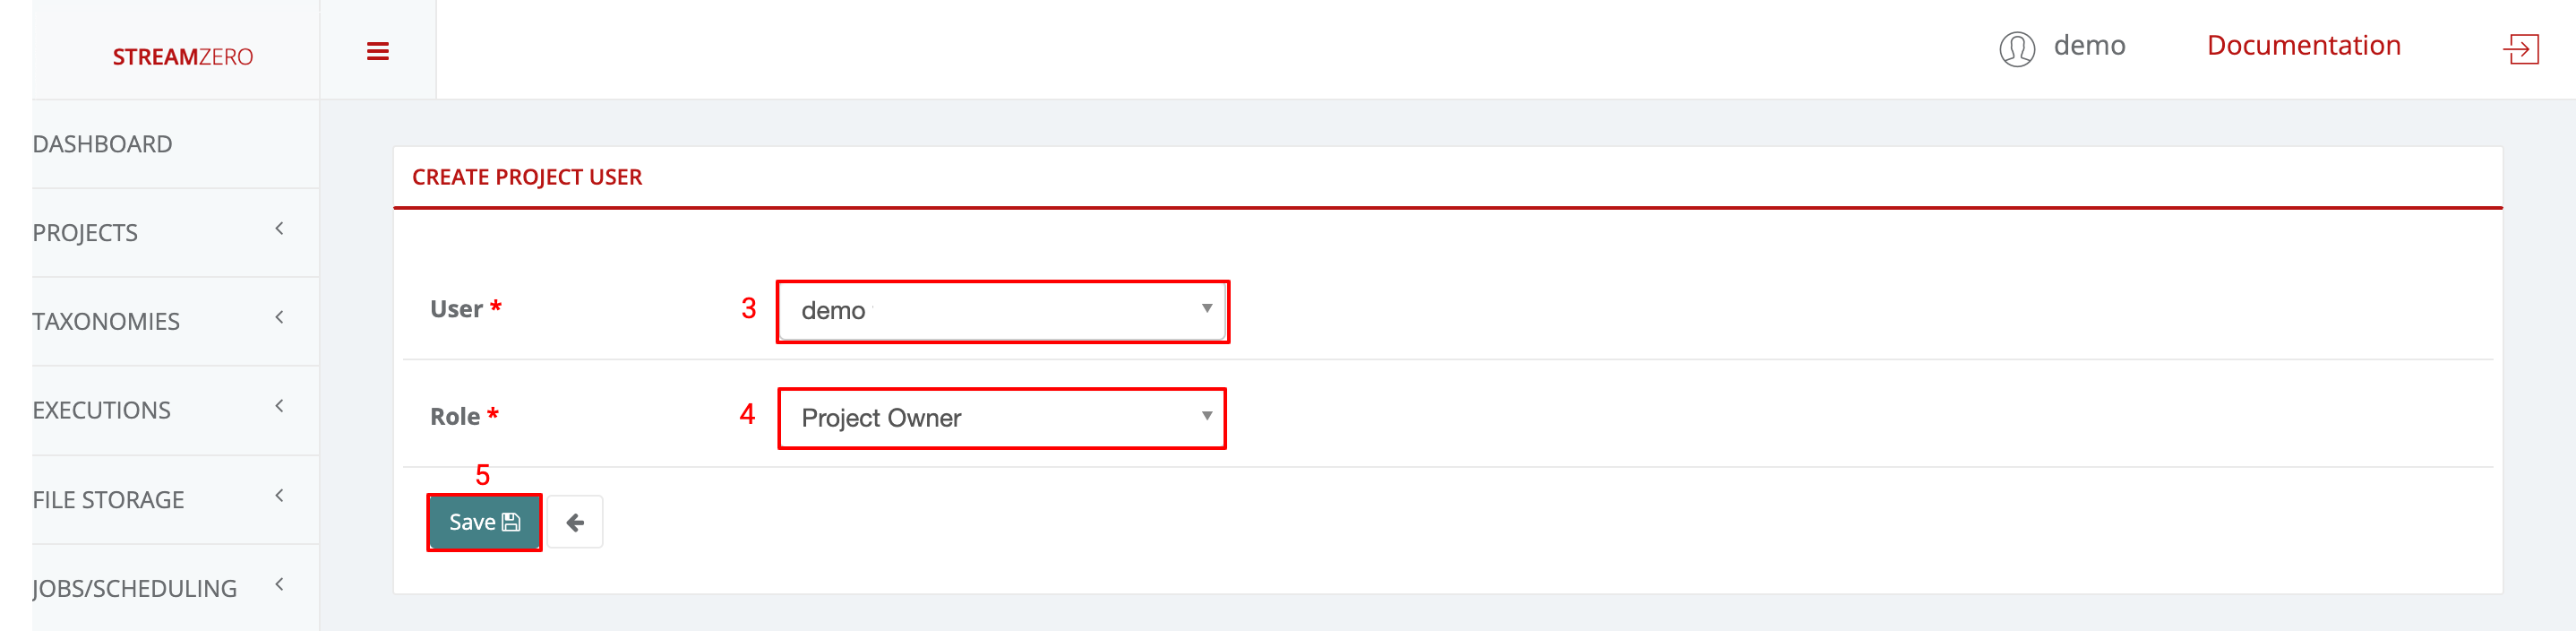
Click on "+Add" to add a new user to the project
Choose a user from the drowdown
Choose a user role from dropdown (Owner; Admin; User)
Click Save
Check the user has been created
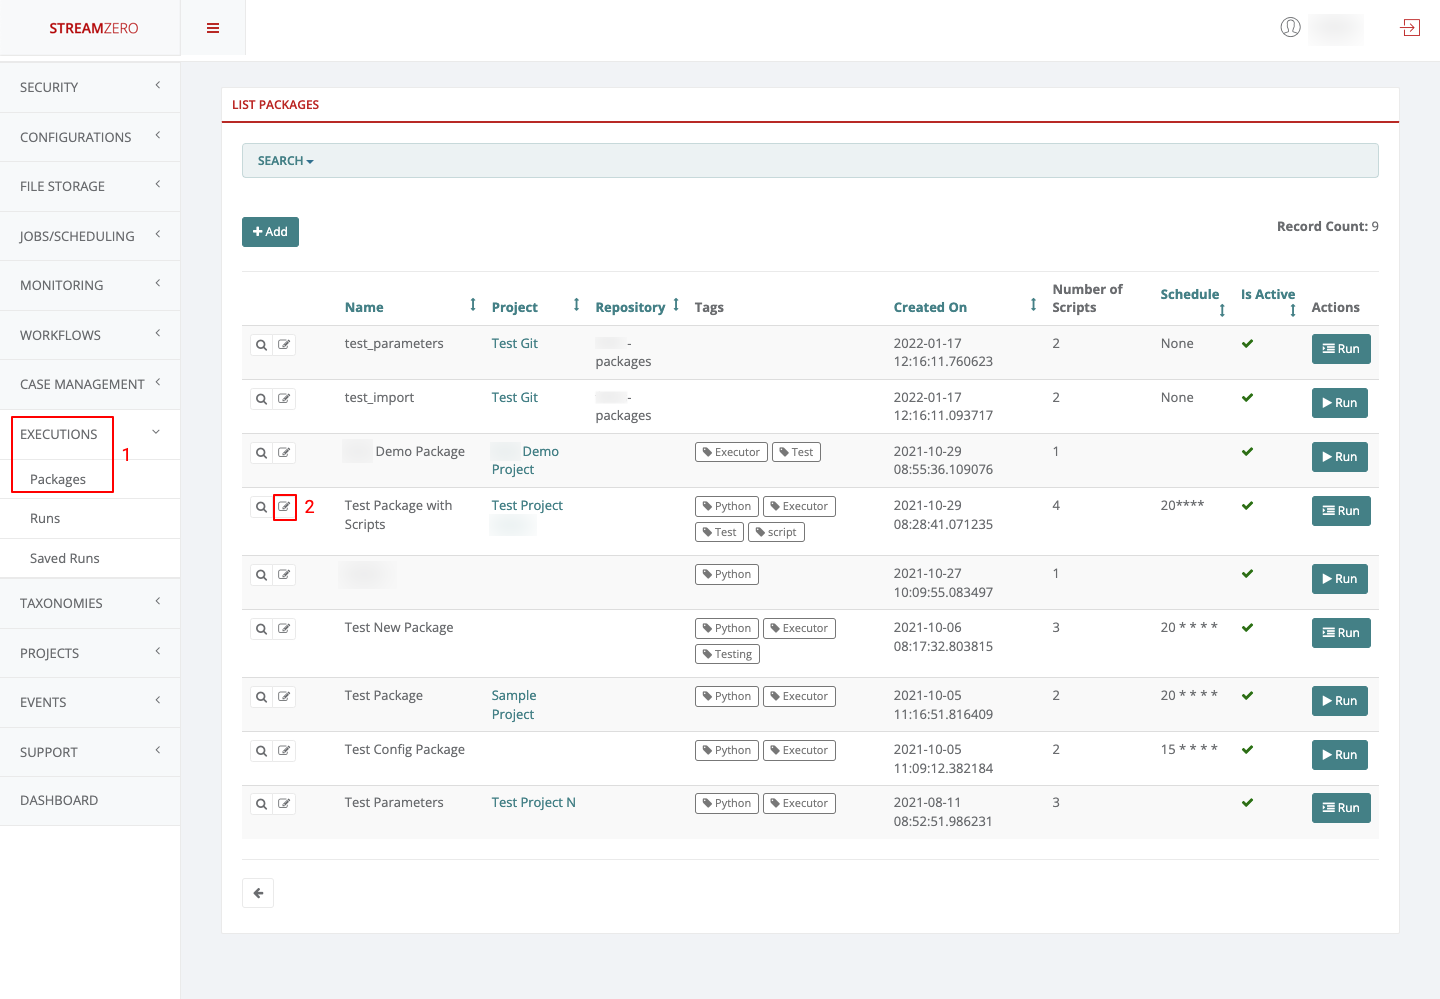
Since new users were created, no package(s) are yet assigned to the project. A project needs to be assigned to an existing package as follows:
Click on Executions to open dropdown and then Packages in the menu on the left
Click on edit
Choose a project from dropdown
Click Save
Once that a project was assigned to a package, the users created within that project will be able to perform their chores.
Project Owner
Log in as “Project Owner”
Click on Projects to open dropdown and then List Projects
As defined above, a Project Owner can add new projects, view, edit and delete the projects he belongs to.
Click on Executions to open dropdown and then on Packages
As Project Owner, one can add new packages, view, edit, delete and trigger manual runs and delete the packages within the projects the user belongs to.
Project Admin
Log in as “Project Admin”
Click on Projects to open dropdown and then List Projects
As defined above, a Project Admin can add new projects, view and edit the projects he belongs to but can not delete anything.
Click on Executions to open dropdown and then on Packages
As Project Admin, one can add new packages, view, edit and trigger manually runs within the projects the user belongs to. The Project Admin can not delete the packages, runs or related elements.
Project User
Log in as “Project User”
Click on Projects to open dropdwon and then List Projects
As defined above, a Project User can only view the projects he belongs to. He can neither edit, nore delete anything.
Click on Executions to open dropdown and then on Packages.
As Project User, one can view packages and trigger manually runs within the projects the user belongs to. The Project User can not delete or edit packages, runs or related elements.
3.3 - Taxonomy/Tagging
How to add Tags and the importance of Taxonomy.
Taxonomies or Tags describe the ability to organize and structure types and classes of objects and their correlations within executions/packages, events (event types) and workflows across any given application, use case or project. Tags are searchable and makes it easy to group and relate objects across different components and lifecycle stages.
As a generic base module “taggability” can easily be included in any model, use case or application by the developers/users.
Note: As of the current release the Taxonomy is universal across all projects, use cases and cannot be segregated along different functional domains. It is thus essential to create a unified naming convention to be shared among the different projects & user groups.
Taxonomies / Tags
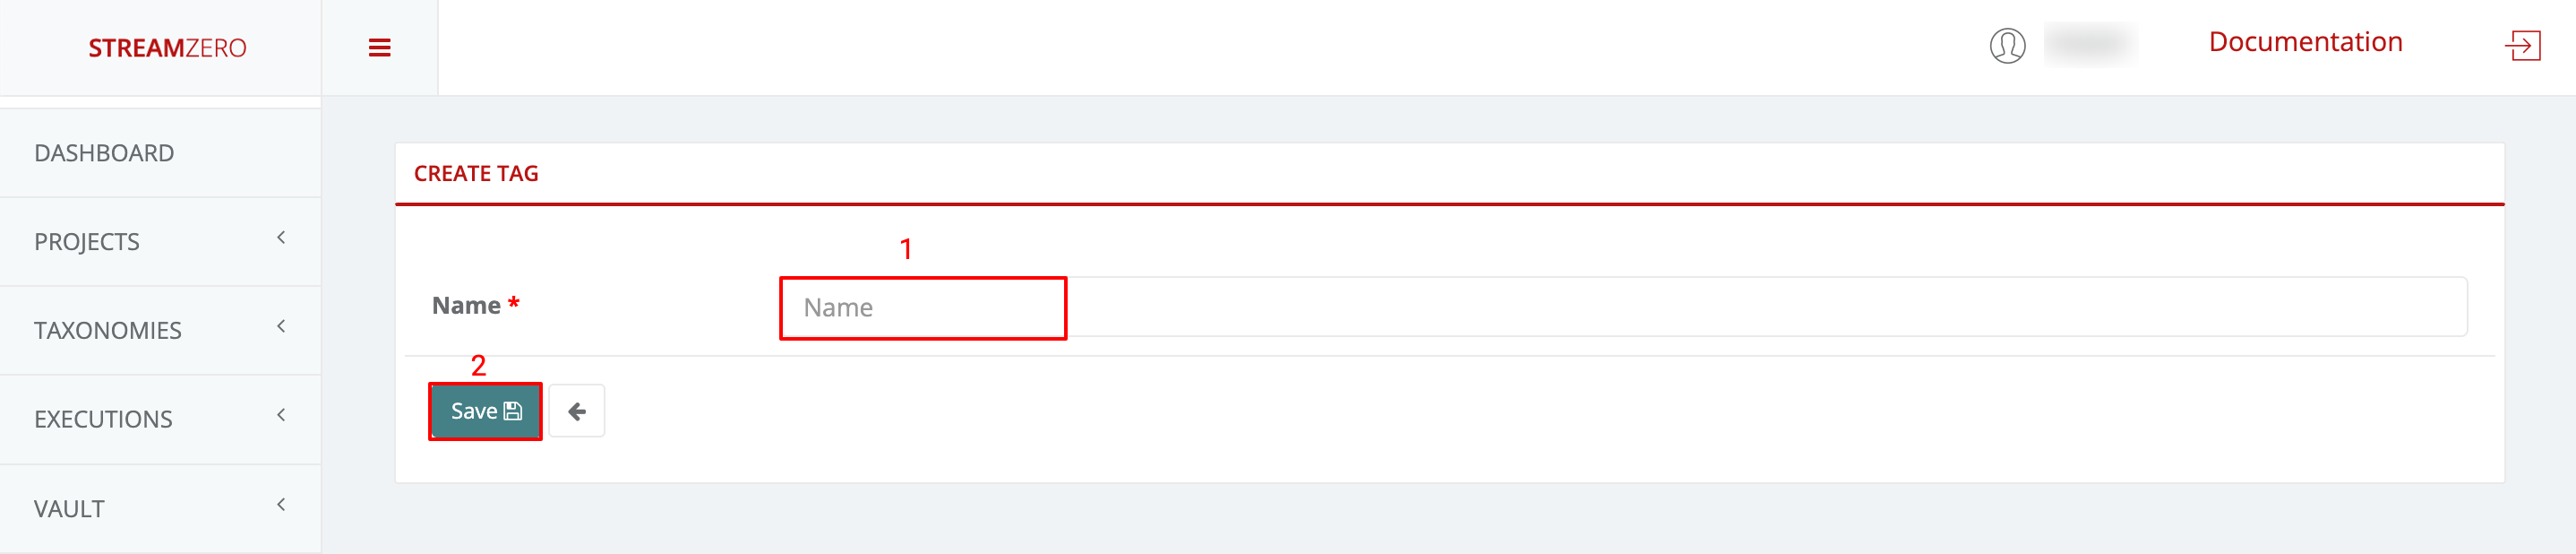
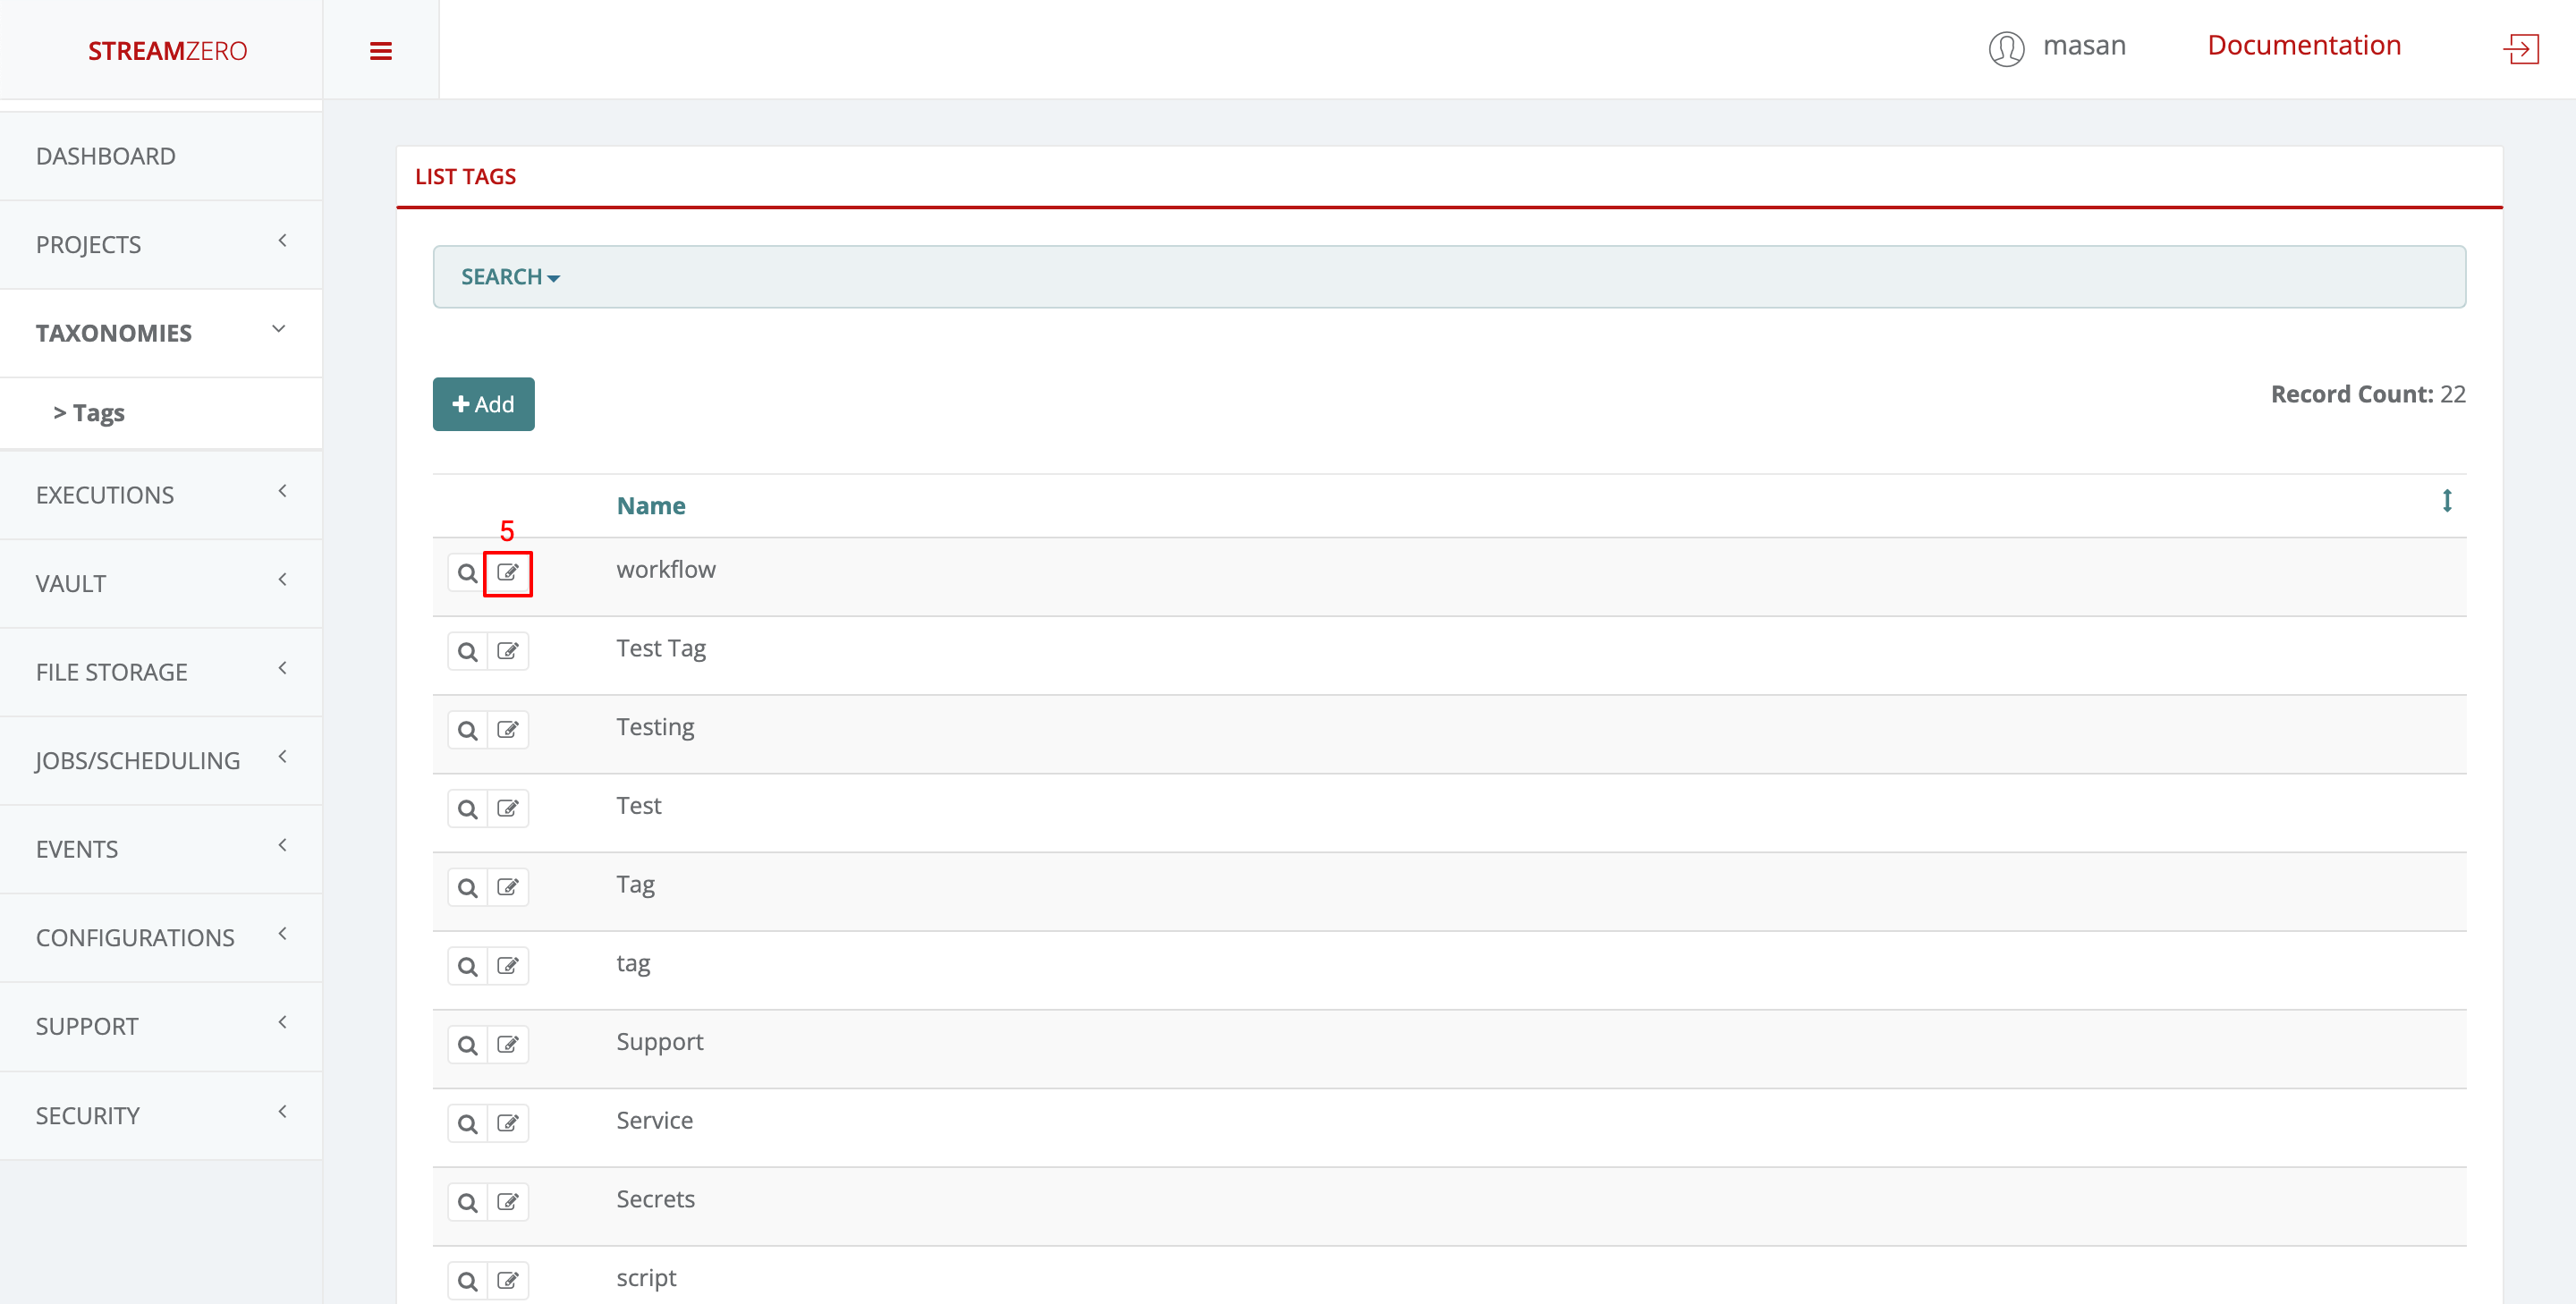
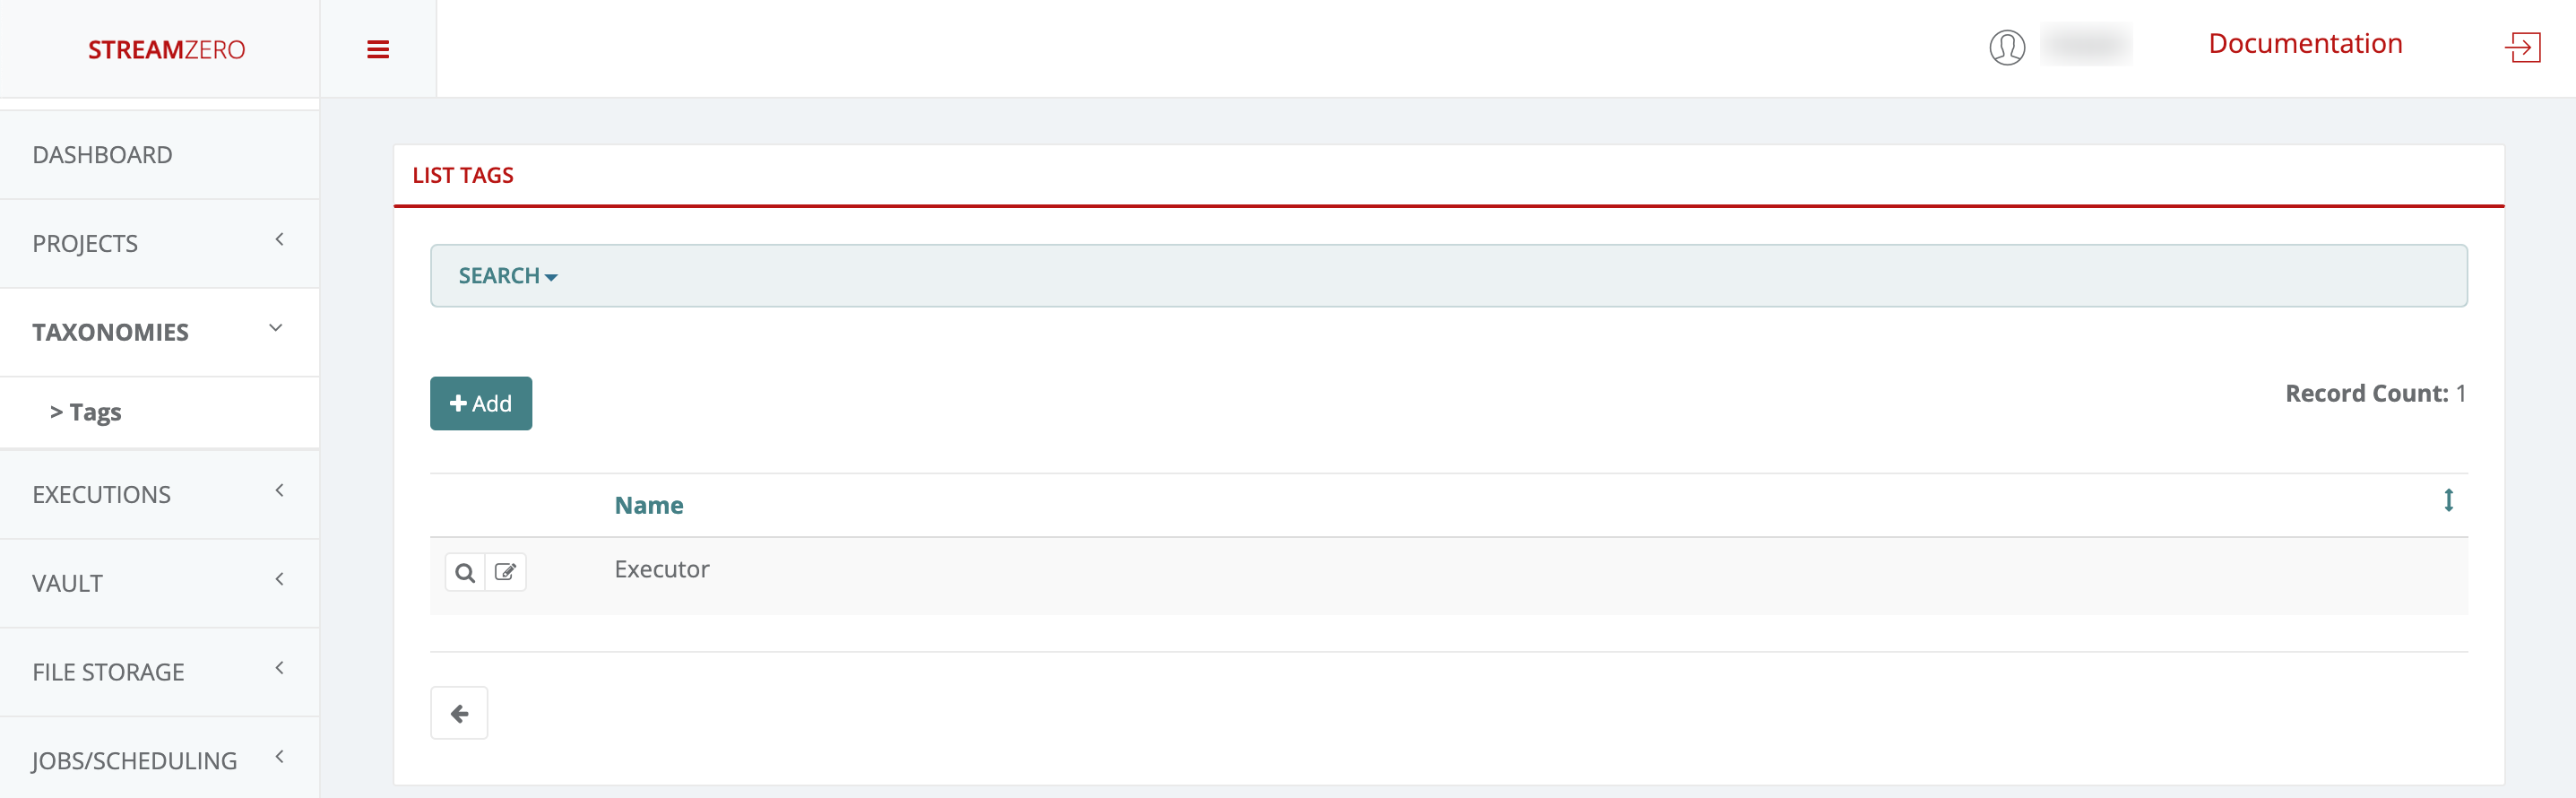
Click on Taxonomies in the left menu to open dropdown and then on Tags
Click Add to create a tag
Name Tag
Save
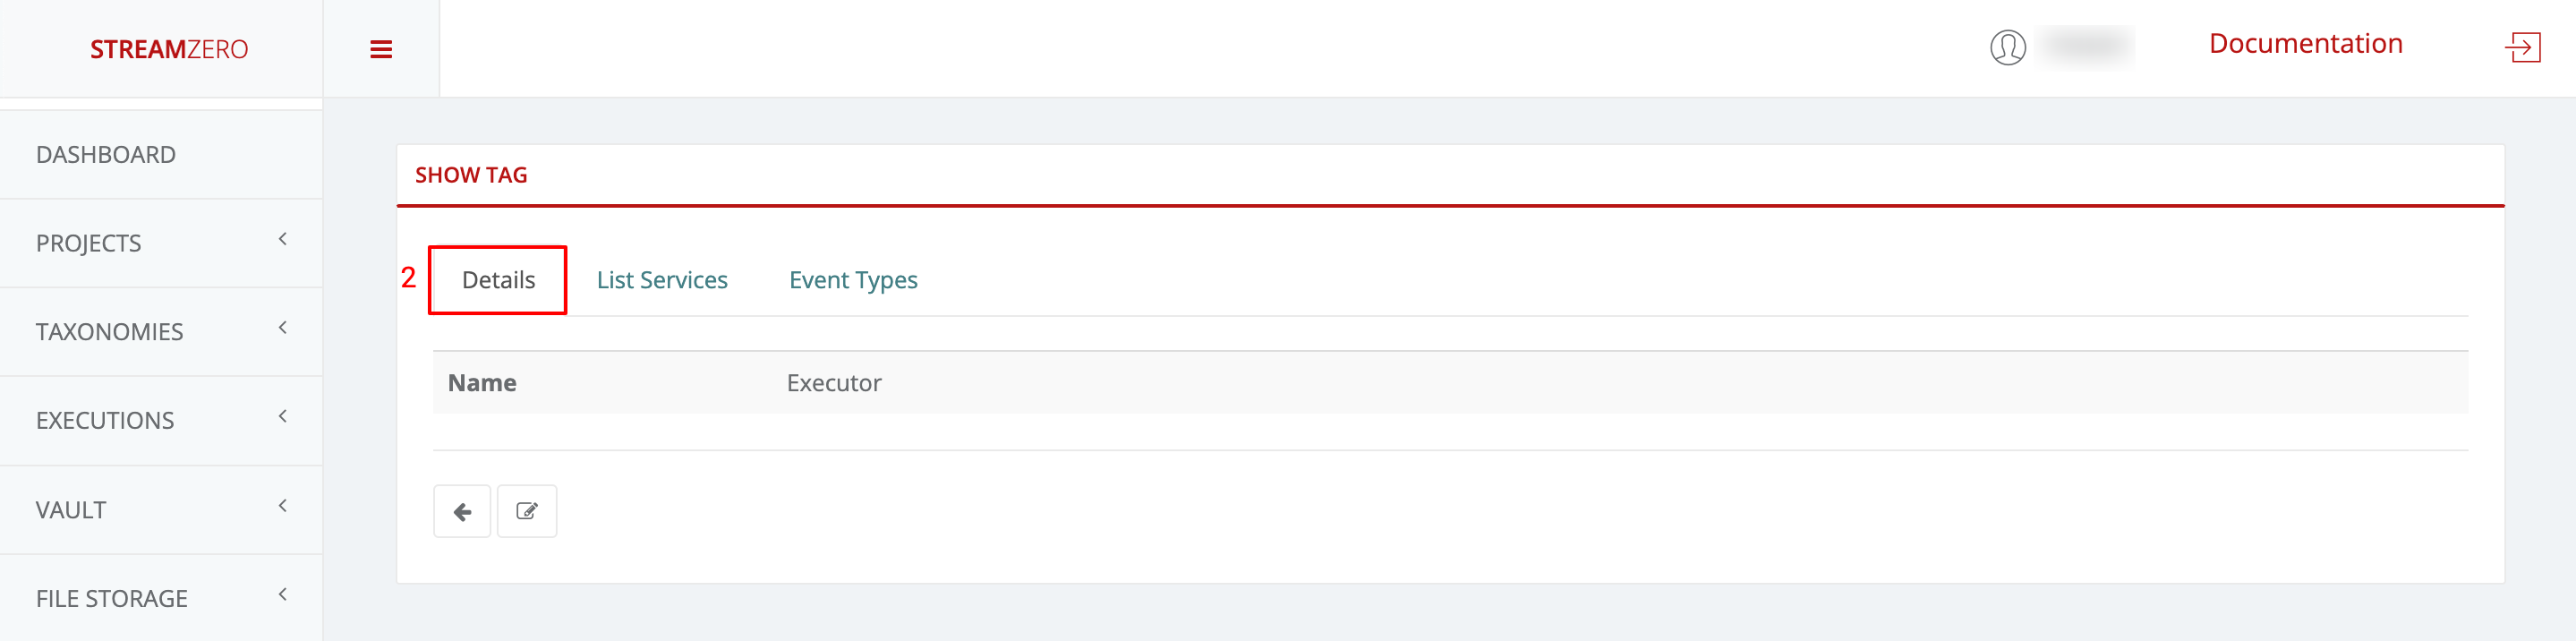
Check created Tag(s)
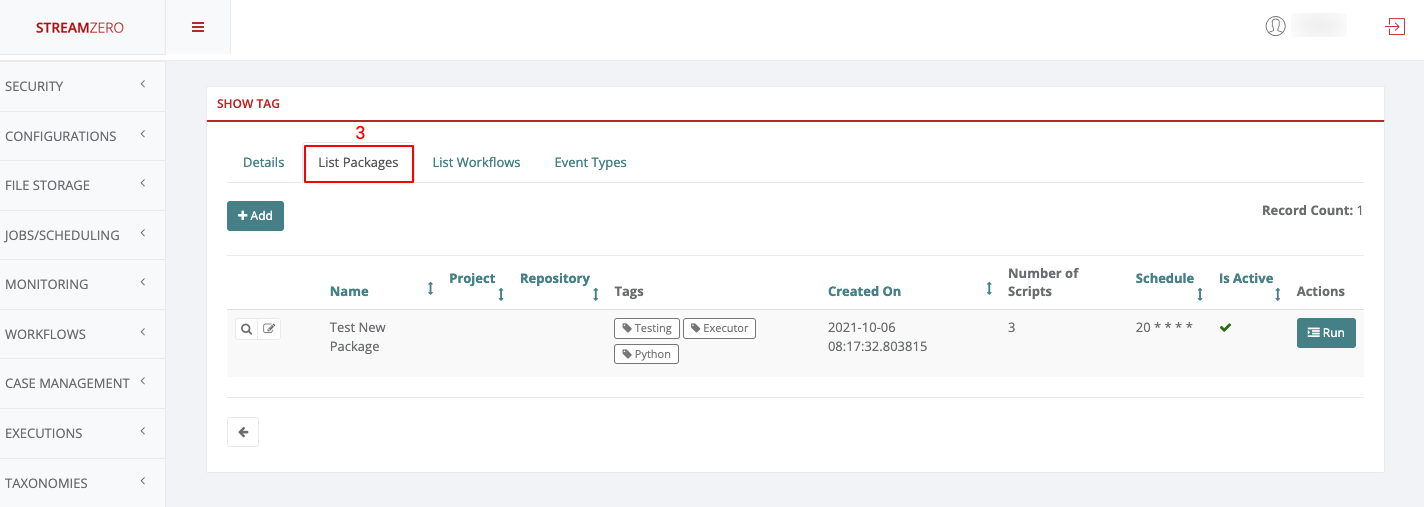
Click on the magnifying glass to open details (show tag) page
This will automatically transfer you to the tag details page
Click on List Packages to see in which packages the same tag is used
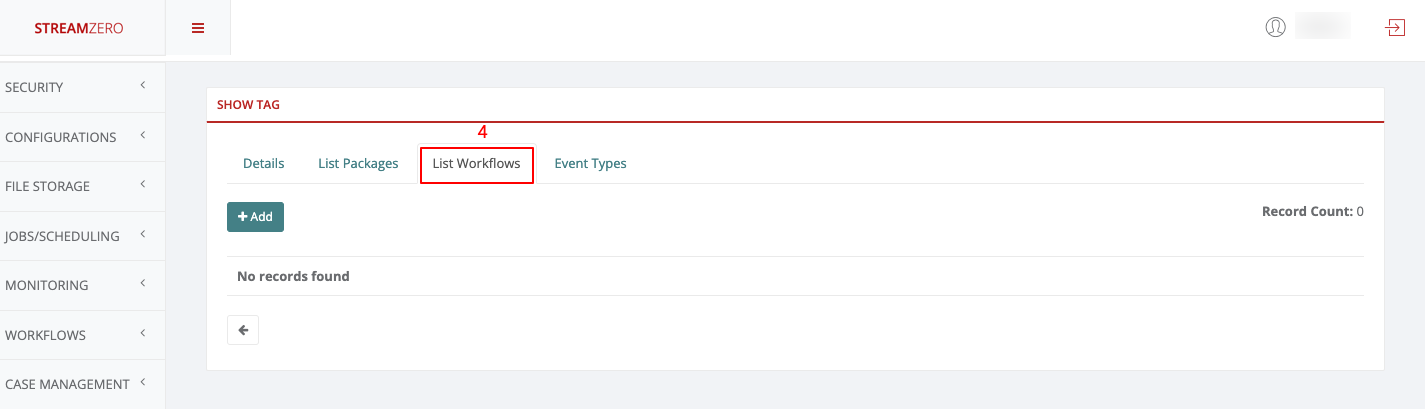
Click on List Workflows to see in which workflows the same tag is used (in this example no workflow is associated with the tag just created)
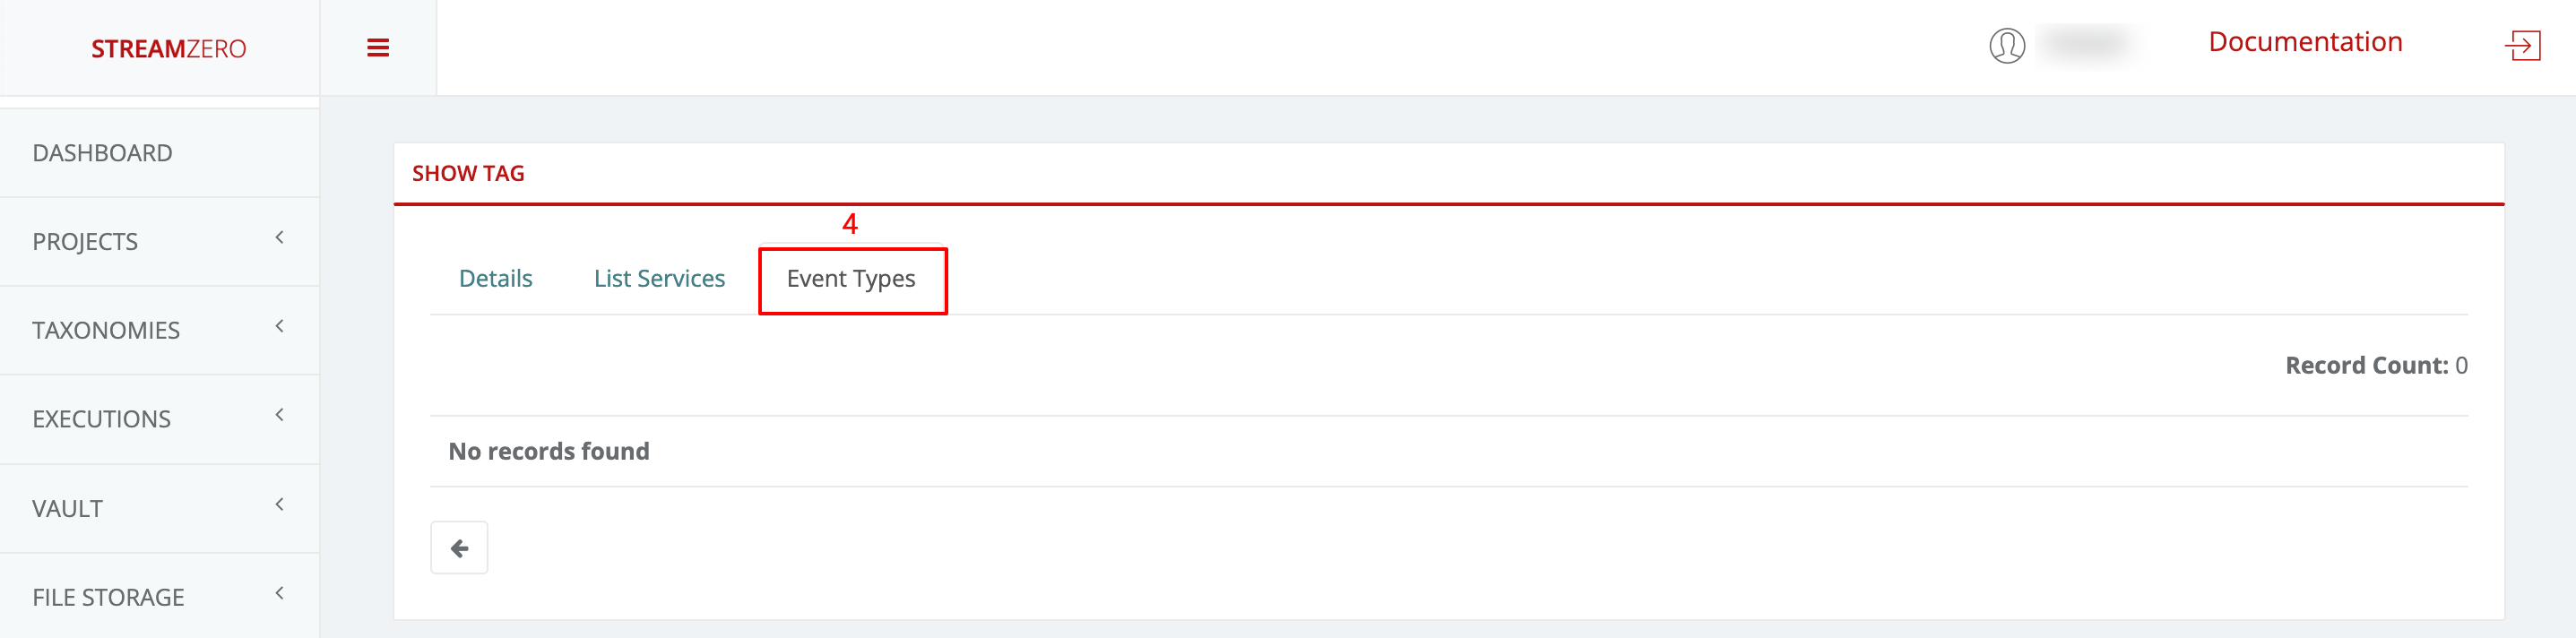
Click on Event Types to see in which event type the same tag is uses (in this example no event type is associated with the tag just created)
Click on the Edit icon (List tags page) to edit/rename a tag
Search Tag
Click Search on top of the List Tags / Details Page
Click Add Filter to choose a filter (currently only the “Name” filter is supported)
From the dropdown list choose the tag to be searched for
Starts with
Ends with
Contains
Equal to
Etc.
Insert tag “Name”
Hit the Search button
Check search results
3.4 - CronJob
How to use CronJob to schedule regularly recurring actions.
CronJobs are used to schedule regularly recurring actions such as backups, report generation and similar items. Each of those tasks should be configured to recur for an indefinite period into the future on a regular frequency (for example: once a day / week / month). The user also can define the point in time within that interval when the job should start.
Example:
This example CronJob manifest would execute and trigger an event every minute:
For example, the line below states that the task must be started every Friday at midnight, as well as on the 13th of each month at midnight:
0 0 13 * 5
To generate CronJob schedule expressions, you can also use web tools like crontab.guru.
Useful Cron Patterns
Entry
Description
Equivalent to
@yearly (or @annually)
Run once a year at midnight of 1 January
0 0 1 1 *
@monthly
Run once a month at midnight of the first day of the month
0 0 1 * *
@weekly
Run once a week at midnight on Sunday morning
0 0 * * 0
@daily (or @midnight)
Run once a day at midnight
0 0 * * *
@hourly
Run once an hour at the beginning of the hour
0 * * * *
20 Useful Crontab Examples
Here is the list of examples for scheduling cron jobs in a Linux system using crontab.
1. Schedule a cron to execute at 2am daily.
This will be useful for scheduling database backup on a daily basis.
1
02 * * *
Asterisk (*) is used for matching all the records.
2. Schedule a cron to execute twice a day.
Below example command will execute at 5 AM and 5 PM daily. You can specify multiple time stamps by comma-separated.
0 5,17 * * *
3. Schedule a cron to execute on every minutes.
Generally, we don’t require any script to execute on every minute but in some cases, you may need to configure it.
* * * * *
4. Schedule a cron to execute on every Sunday at 5 PM.
This type of cron is useful for doing weekly tasks, like log rotation, etc.
0 17 * * sun
5. Schedule a cron to execute on every 10 minutes.
If you want to run your script on 10 minutes interval, you can configure like below. These types of crons are useful for monitoring.
*/10 * * * *
*/10: means to run every 10 minutes. Same as if you want to execute on every 5 minutes use */5.
6. Schedule a cron to execute on selected months.
Sometimes we required scheduling a task to be executed for selected months only. Below example script will run in January, May and August months.
* * * jan,may,aug
7. Schedule a cron to execute on selected days.
If you required scheduling a task to be executed for selected days only. The below example will run on each Sunday and Friday at 5 PM.
0 17 * * sun,fri
8. Schedule a cron to execute on first sunday of every month.
To schedule a script to execute a script on the first Sunday only is not possible by time parameter, But we can use the condition in command fields to do it.
13. Schedule tasks to execute on yearly ( @yearly ).
@yearly timestamp is similar to “0 0 1 1 *“. It will execute a task on the first minute of every year, It may useful to send new year greetings 🙂
1
@yearly /scripts/script.sh
14. Schedule tasks to execute on monthly ( @monthly ).
@monthly timestamp is similar to “0 0 1 * *“. It will execute a task in the first minute of the month. It may useful to do monthly tasks like paying the bills and invoicing to customers.
1
@monthly /scripts/script.sh
15. Schedule tasks to execute on Weekly ( @weekly ).
@weekly timestamp is similar to “0 0 * * mon“. It will execute a task in the first minute of the week. It may useful to do weekly tasks like the cleanup of the system etc.
1
@weekly /bin/script.sh
16. Schedule tasks to execute on daily ( @daily ).
@daily timestamp is similar to “0 0 * * *“. It will execute a task in the first minute of every day, It may useful to do daily tasks.
1
@daily
17. Schedule tasks to execute on hourly ( @hourly ).
@hourly timestamp is similar to “0 * * * *“. It will execute a task in the first minute of every hour, It may useful to do hourly tasks.
1
@hourly
3.5 - Events
How to configure a package to be triggered bt the FX Router when a specific type of event is observed on the platform.
FX is an event driven platform wich means that each action generating an event can be reused for further triggering of executions. Also within an executing script, an event can be generated and sent as a message. Each event is defined at least by it’s source, type and payload (data). Event message format is following the cloudevents standard. A list of all event types is maintained so the user can bound package execution to certain event type, which means that each time such an event is received, the package execution will be triggered.
Events
Events are messages passed through the platform which are generated by Services.
Events are in the form of JSON formatted messages which adhere to the CloudEvents format. They carry a Header which indicates the event type and a Payload (or Data section) which contain information about the event.
To have a better detailed understanding of how Events are generated, please refer to the Architecture subcategory in the Overview category.
Events
This use case defines how to configure a package to be triggered bt the FX Router when a specific type of event is observed on the platform.
Click on Events on the left side of the dashboard menu to open drop-down
Events can be created within scripts during package execution by sending a message to the Kafka Topic using the ferris_cli python package. For example, a package can be bound to a file_upload event that is triggered every time a file gets uploaded to MinIO using FX file storage module. New event types will be registered as they are sent to the Kafka Topic using the ferris_cli python package.
Further details regarding ferris_cli can be found in the subcategory Development Lifecycle in the Developer Guide.
In this use case an existing package will be edited to define the file upload event type.
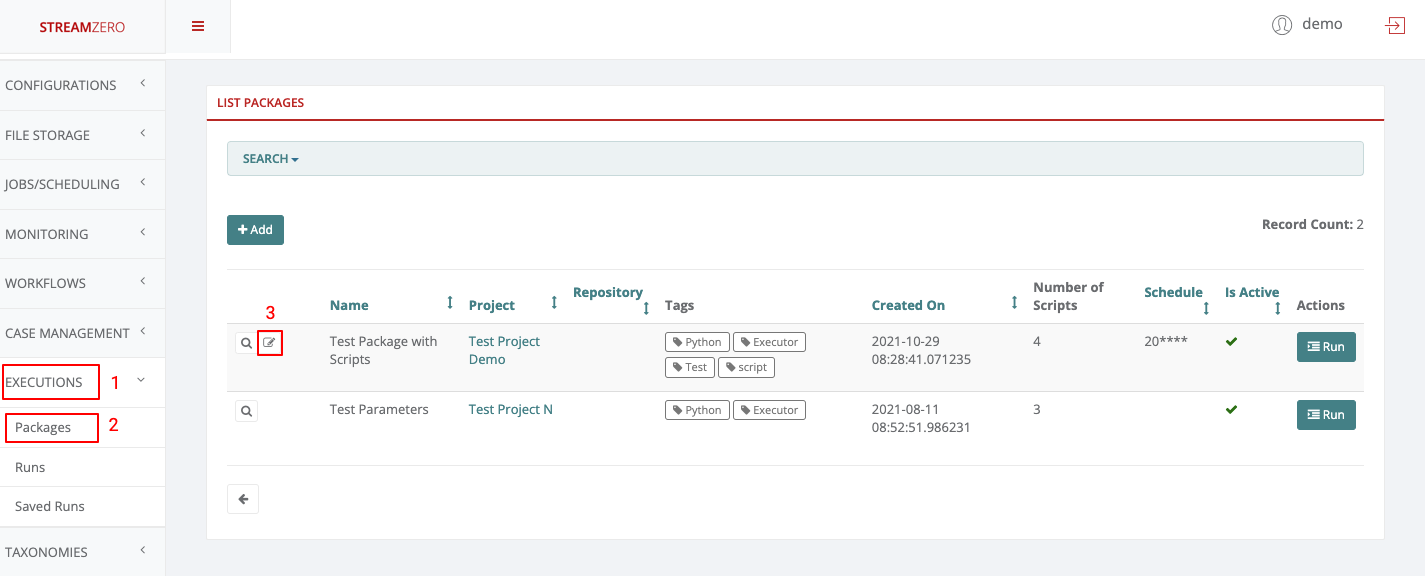
Click on Executions on the left side of the dashboard menu to open drop-down
Click on Packages
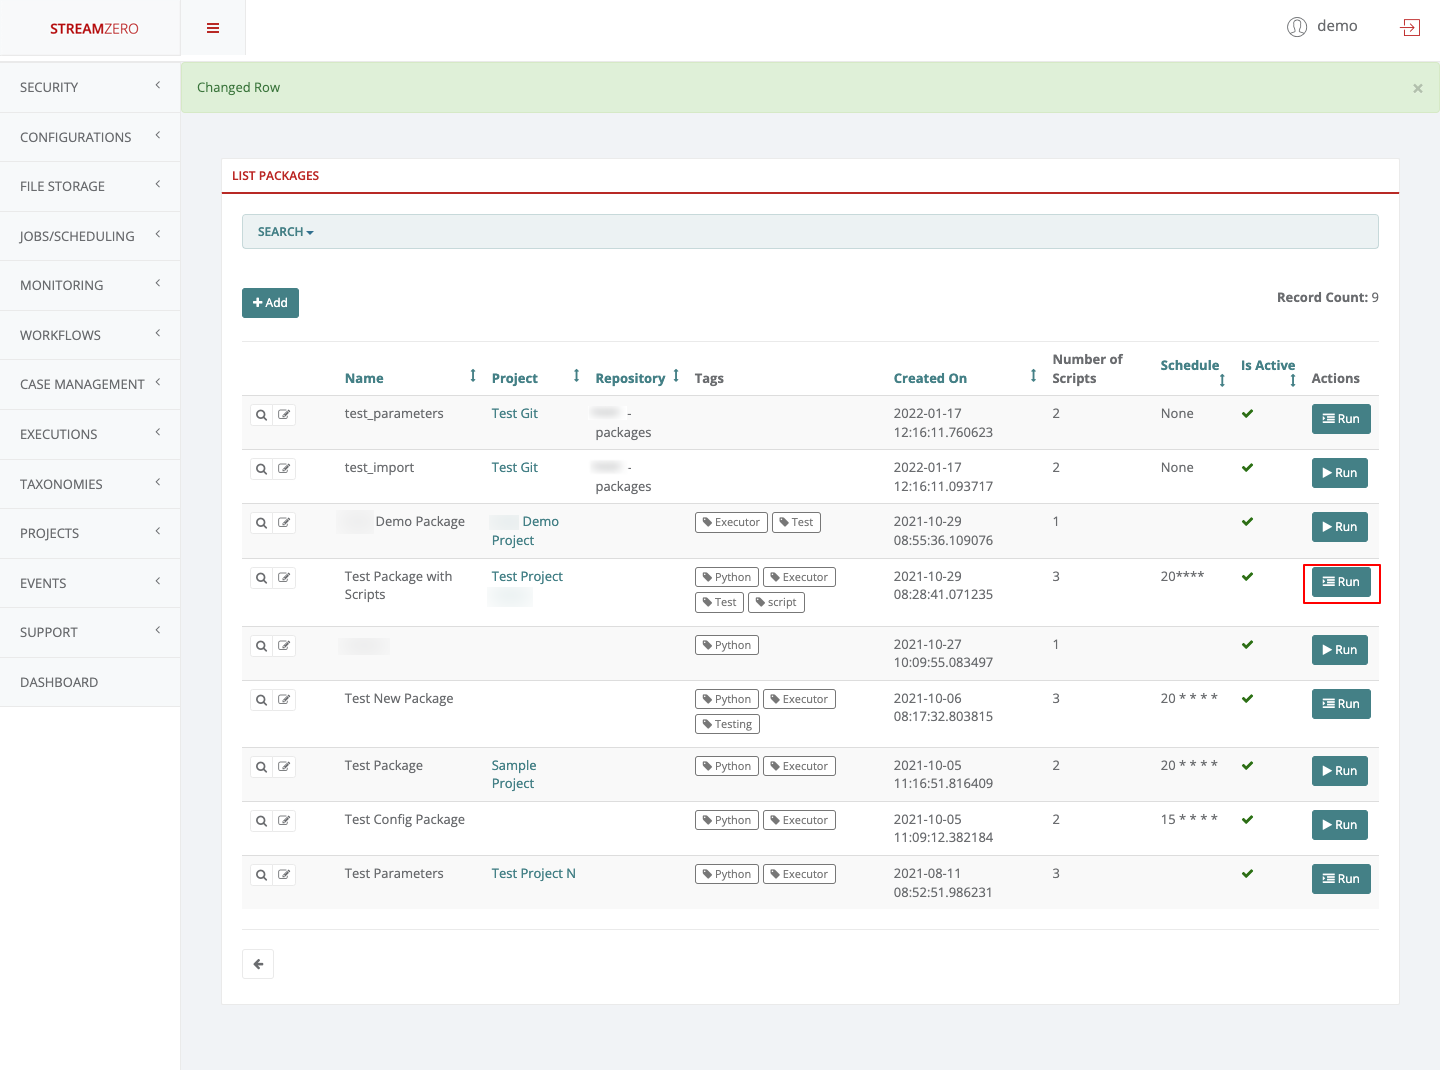
Click on the edit record button to edit the existing package Test Package with Scripts
Delete the CronJob Schedule to allow a Trigger Event Type
Select the Value of the event type (ferris.apps.modules.minio.file_uploaded)
Save the edited package.
File Storage
To finalize the process, a file needs to be uploaded to a MinIO bucket (file storage).
Click on File Storage on the left side of the dashboard menu to open drop-down
Click on List Files
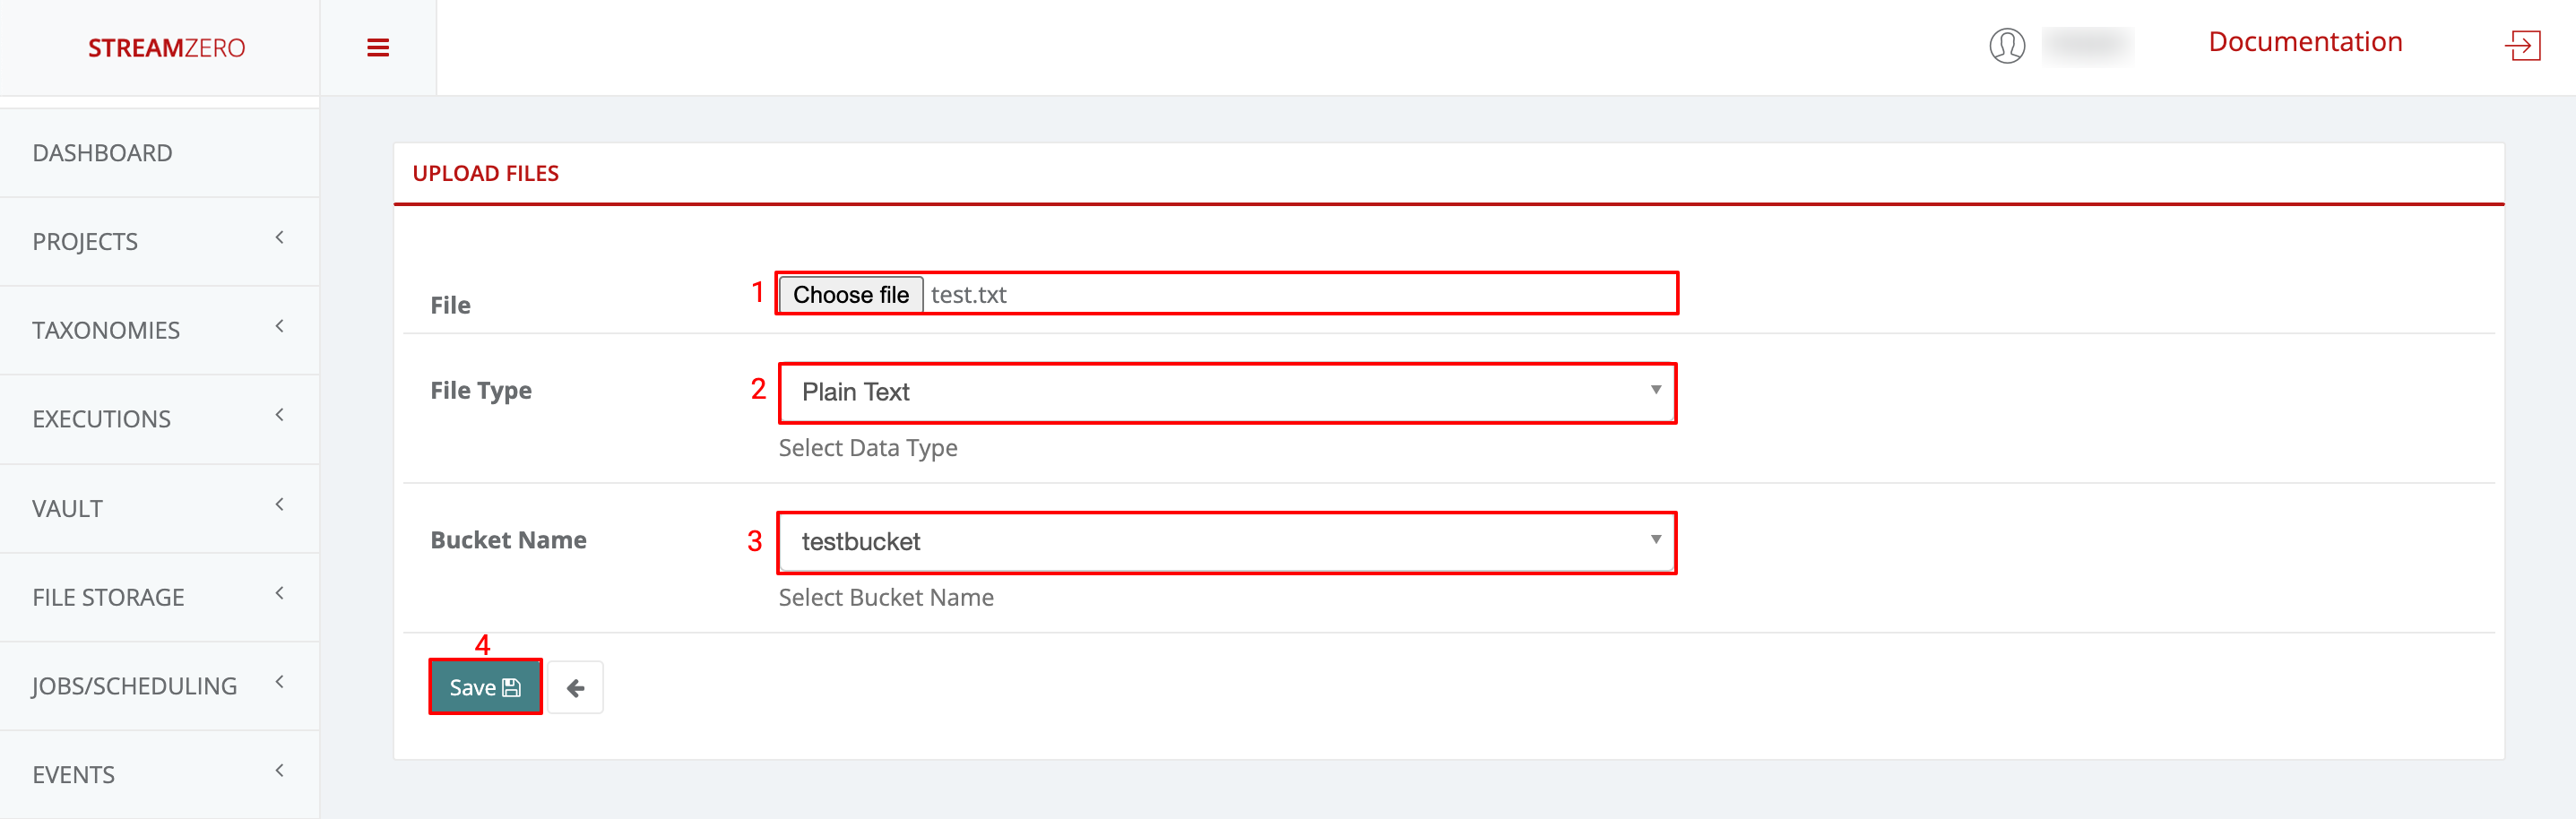
Click on +Add to upload a file to the bucket
Choose file to upload
Choose File Type (CSV Table; Plain Text; JSON)
Select the Bucket Name
Click on Save to save the file
To verify if the package execution has been triggered, go back to the initial, edited package.
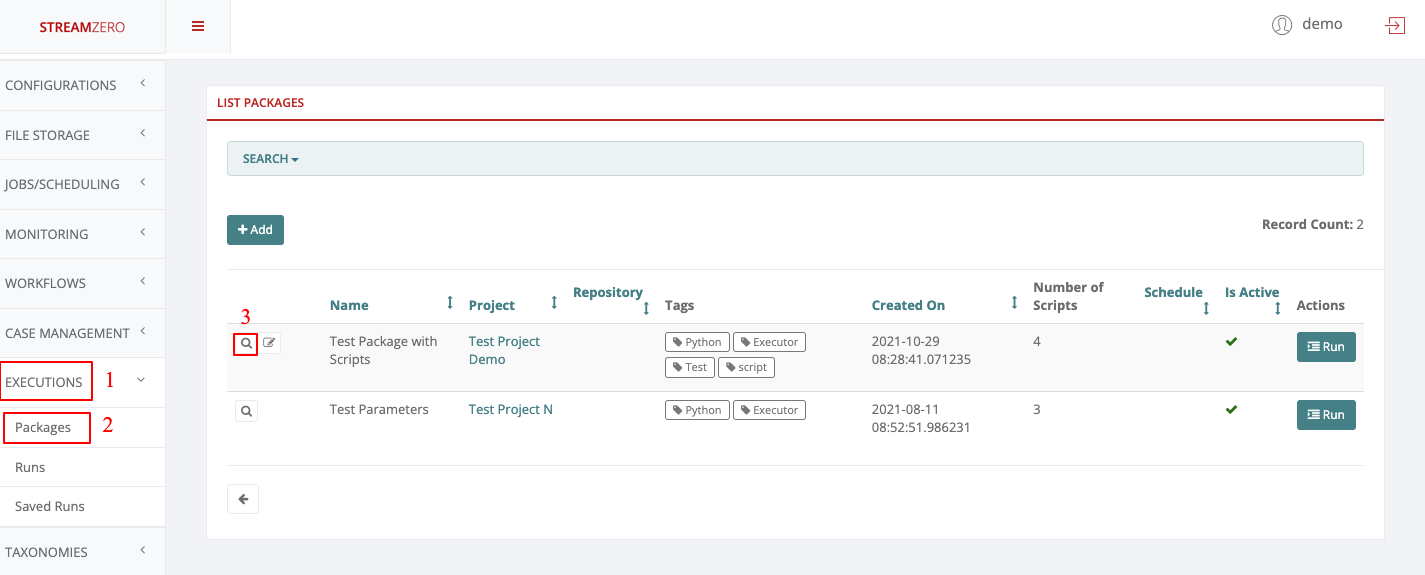
Click on Executions on the left side of the dashboard menu to open drop-down
Click on Packages
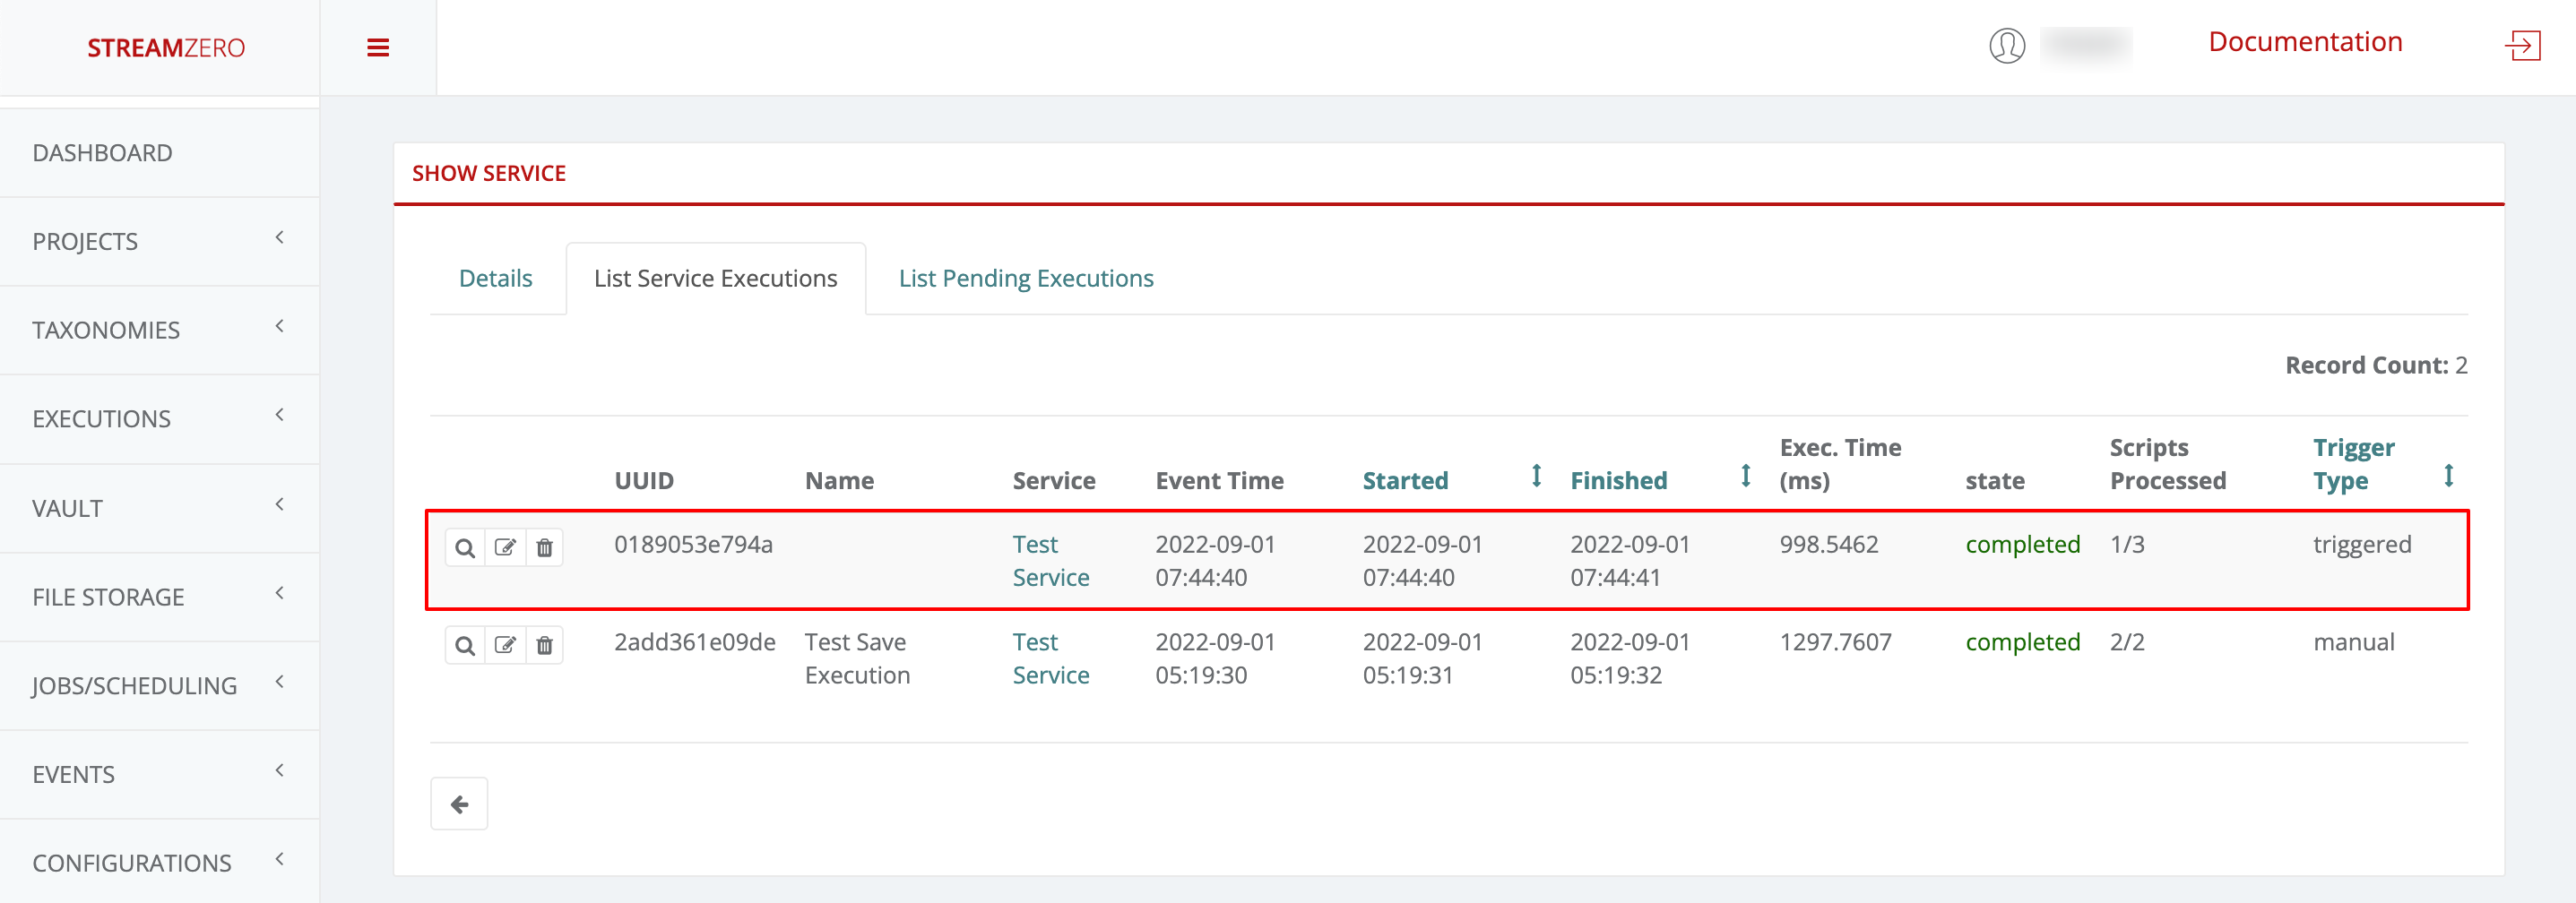
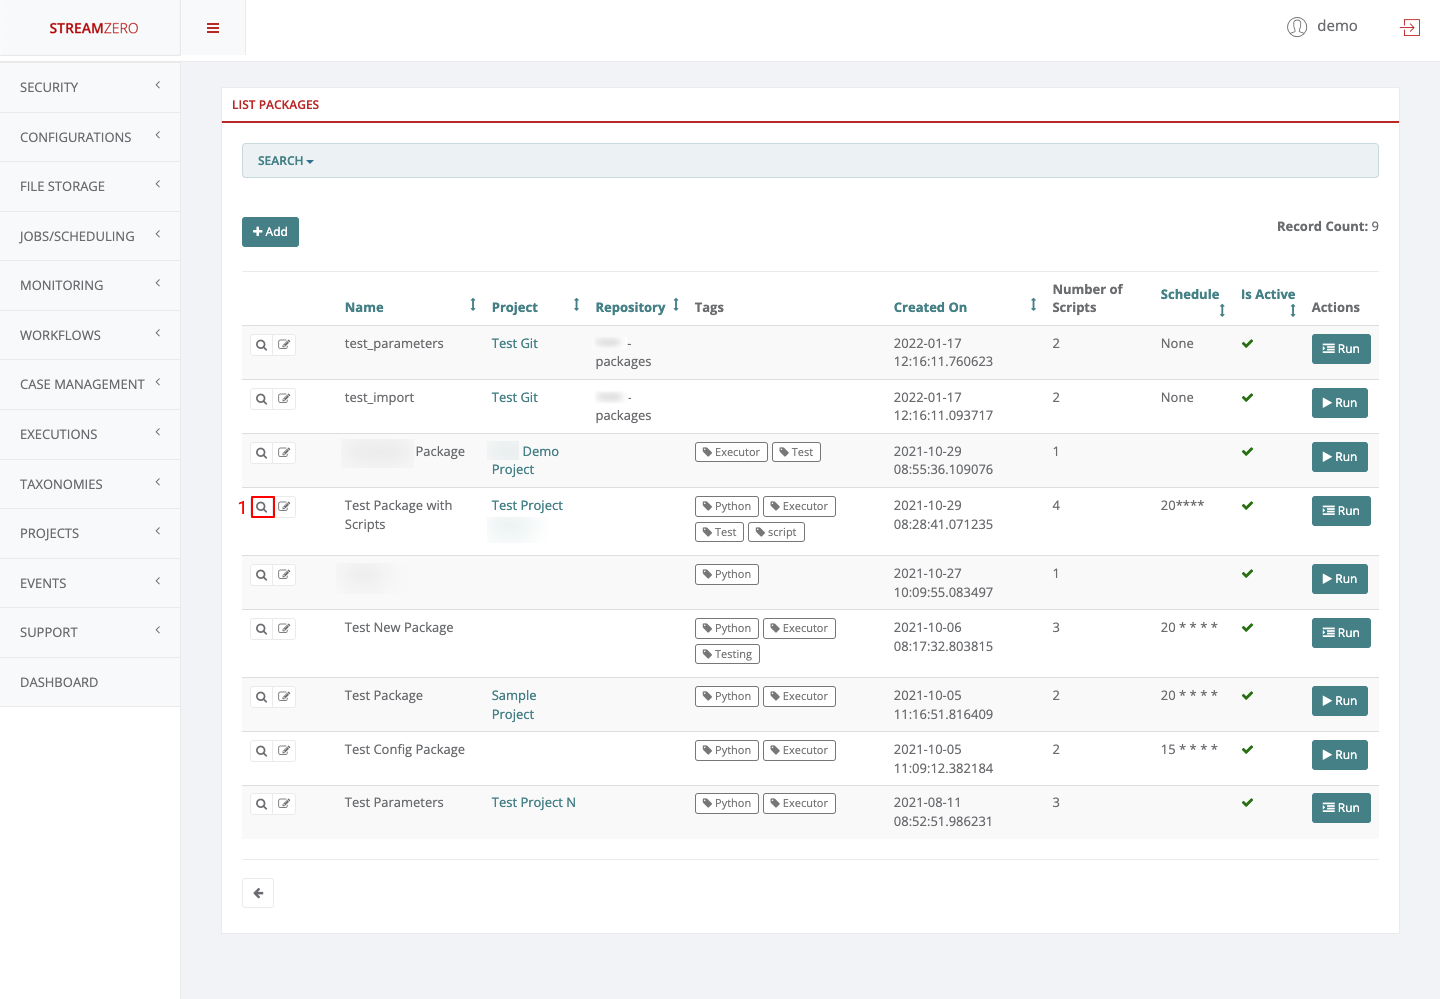
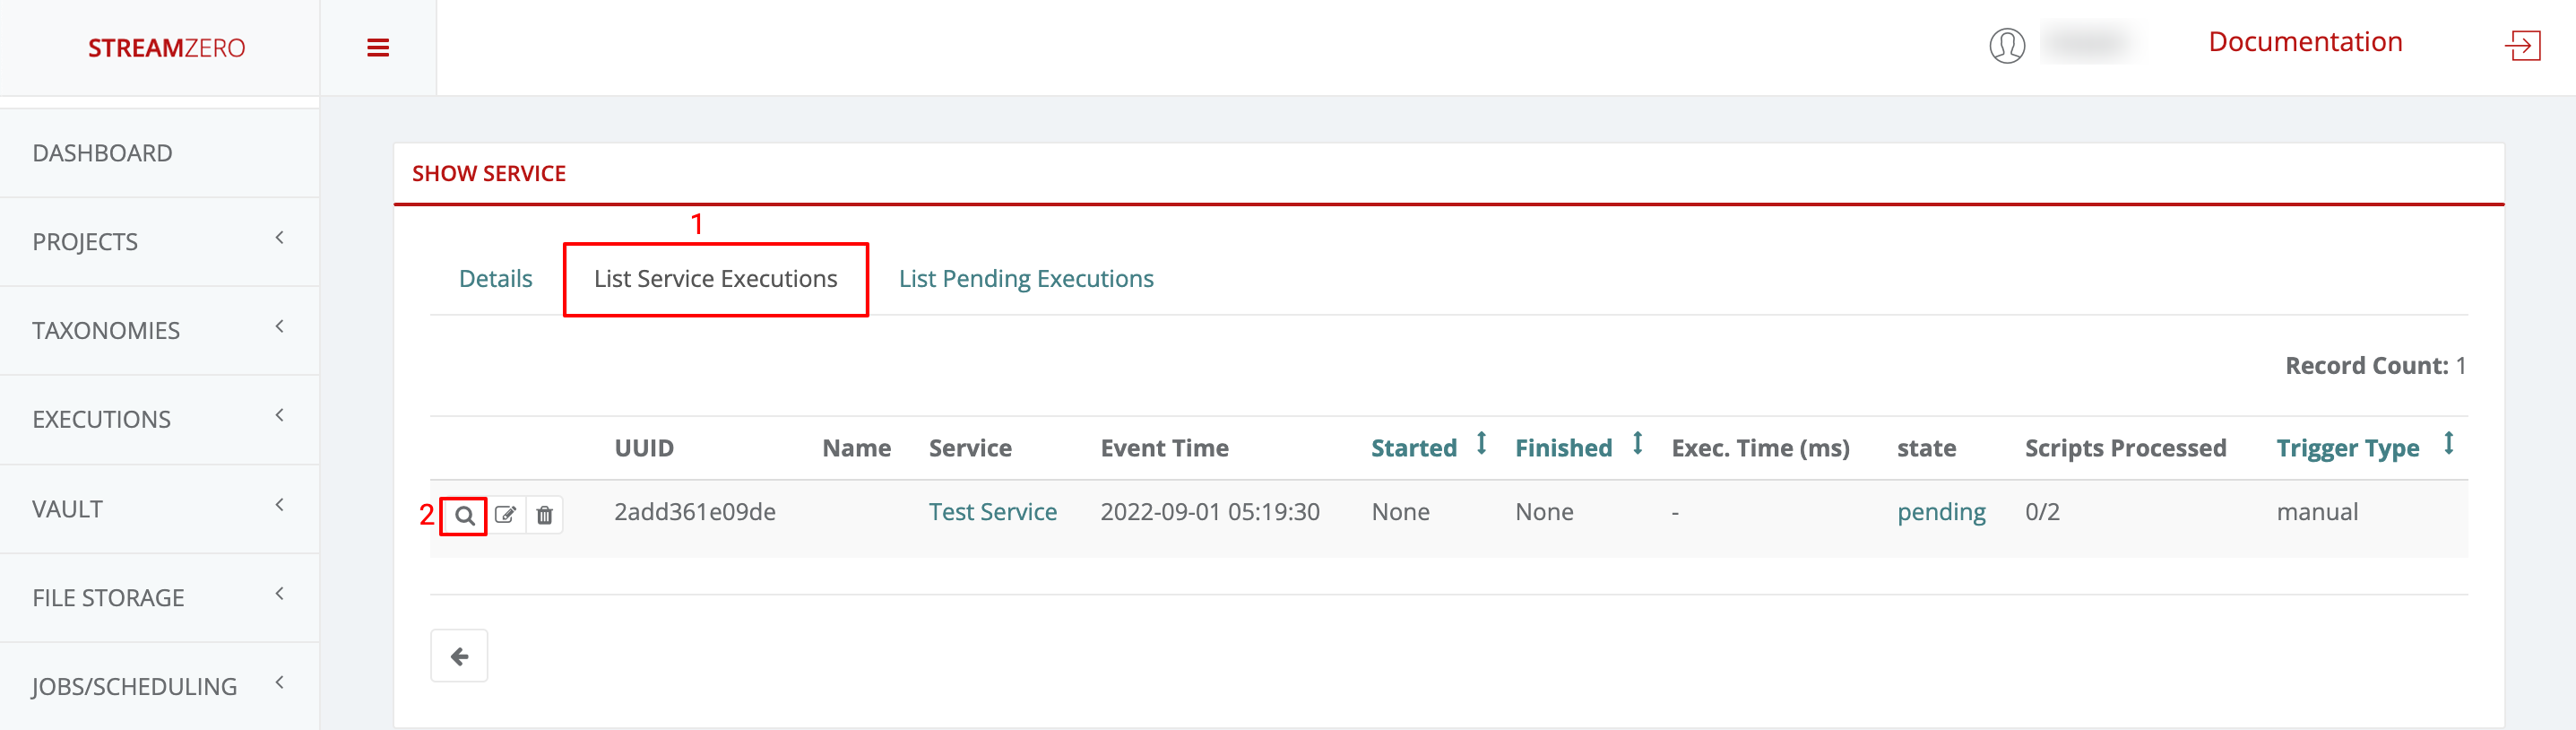
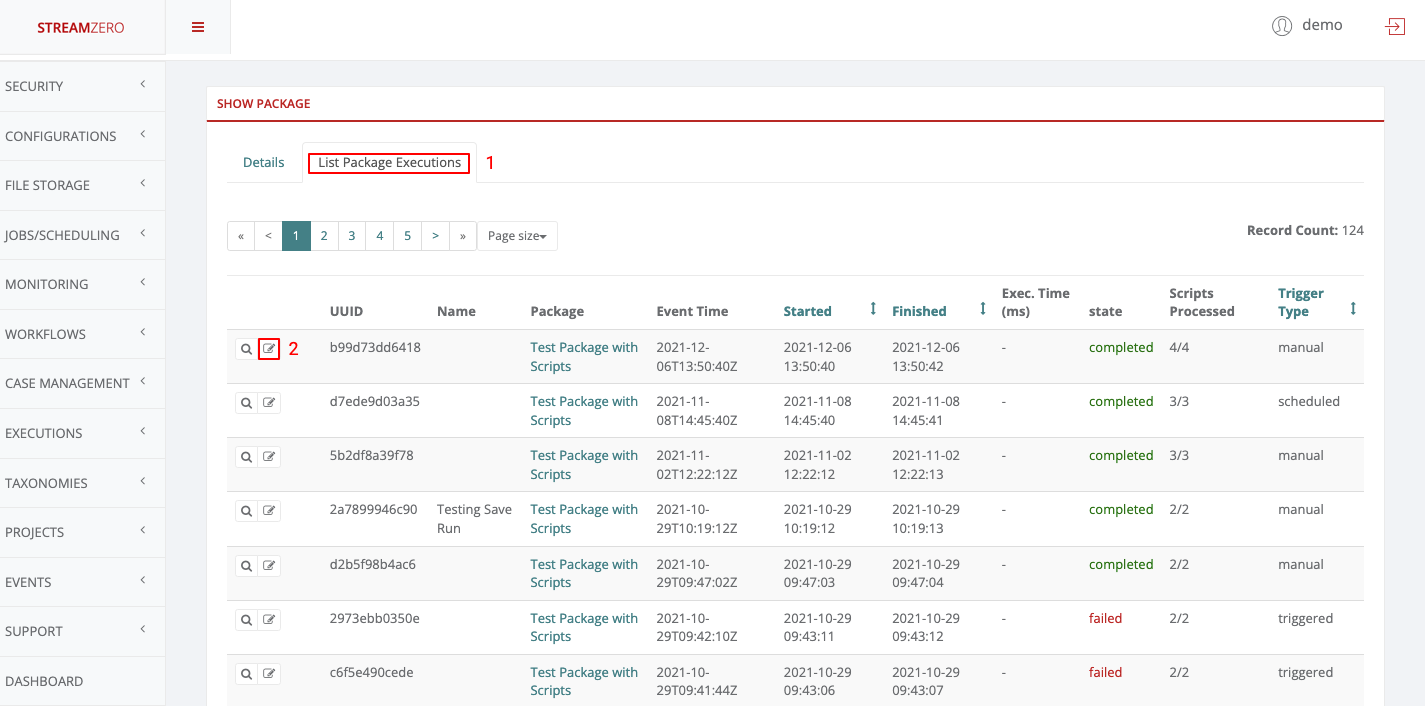
Click on the magnifying glass to open the details page of the package Test Package with Scripts
It will automatically open the List Package Executions tab.
Check the last Event, date and time to verify it corresponds to the time the file was uploaded
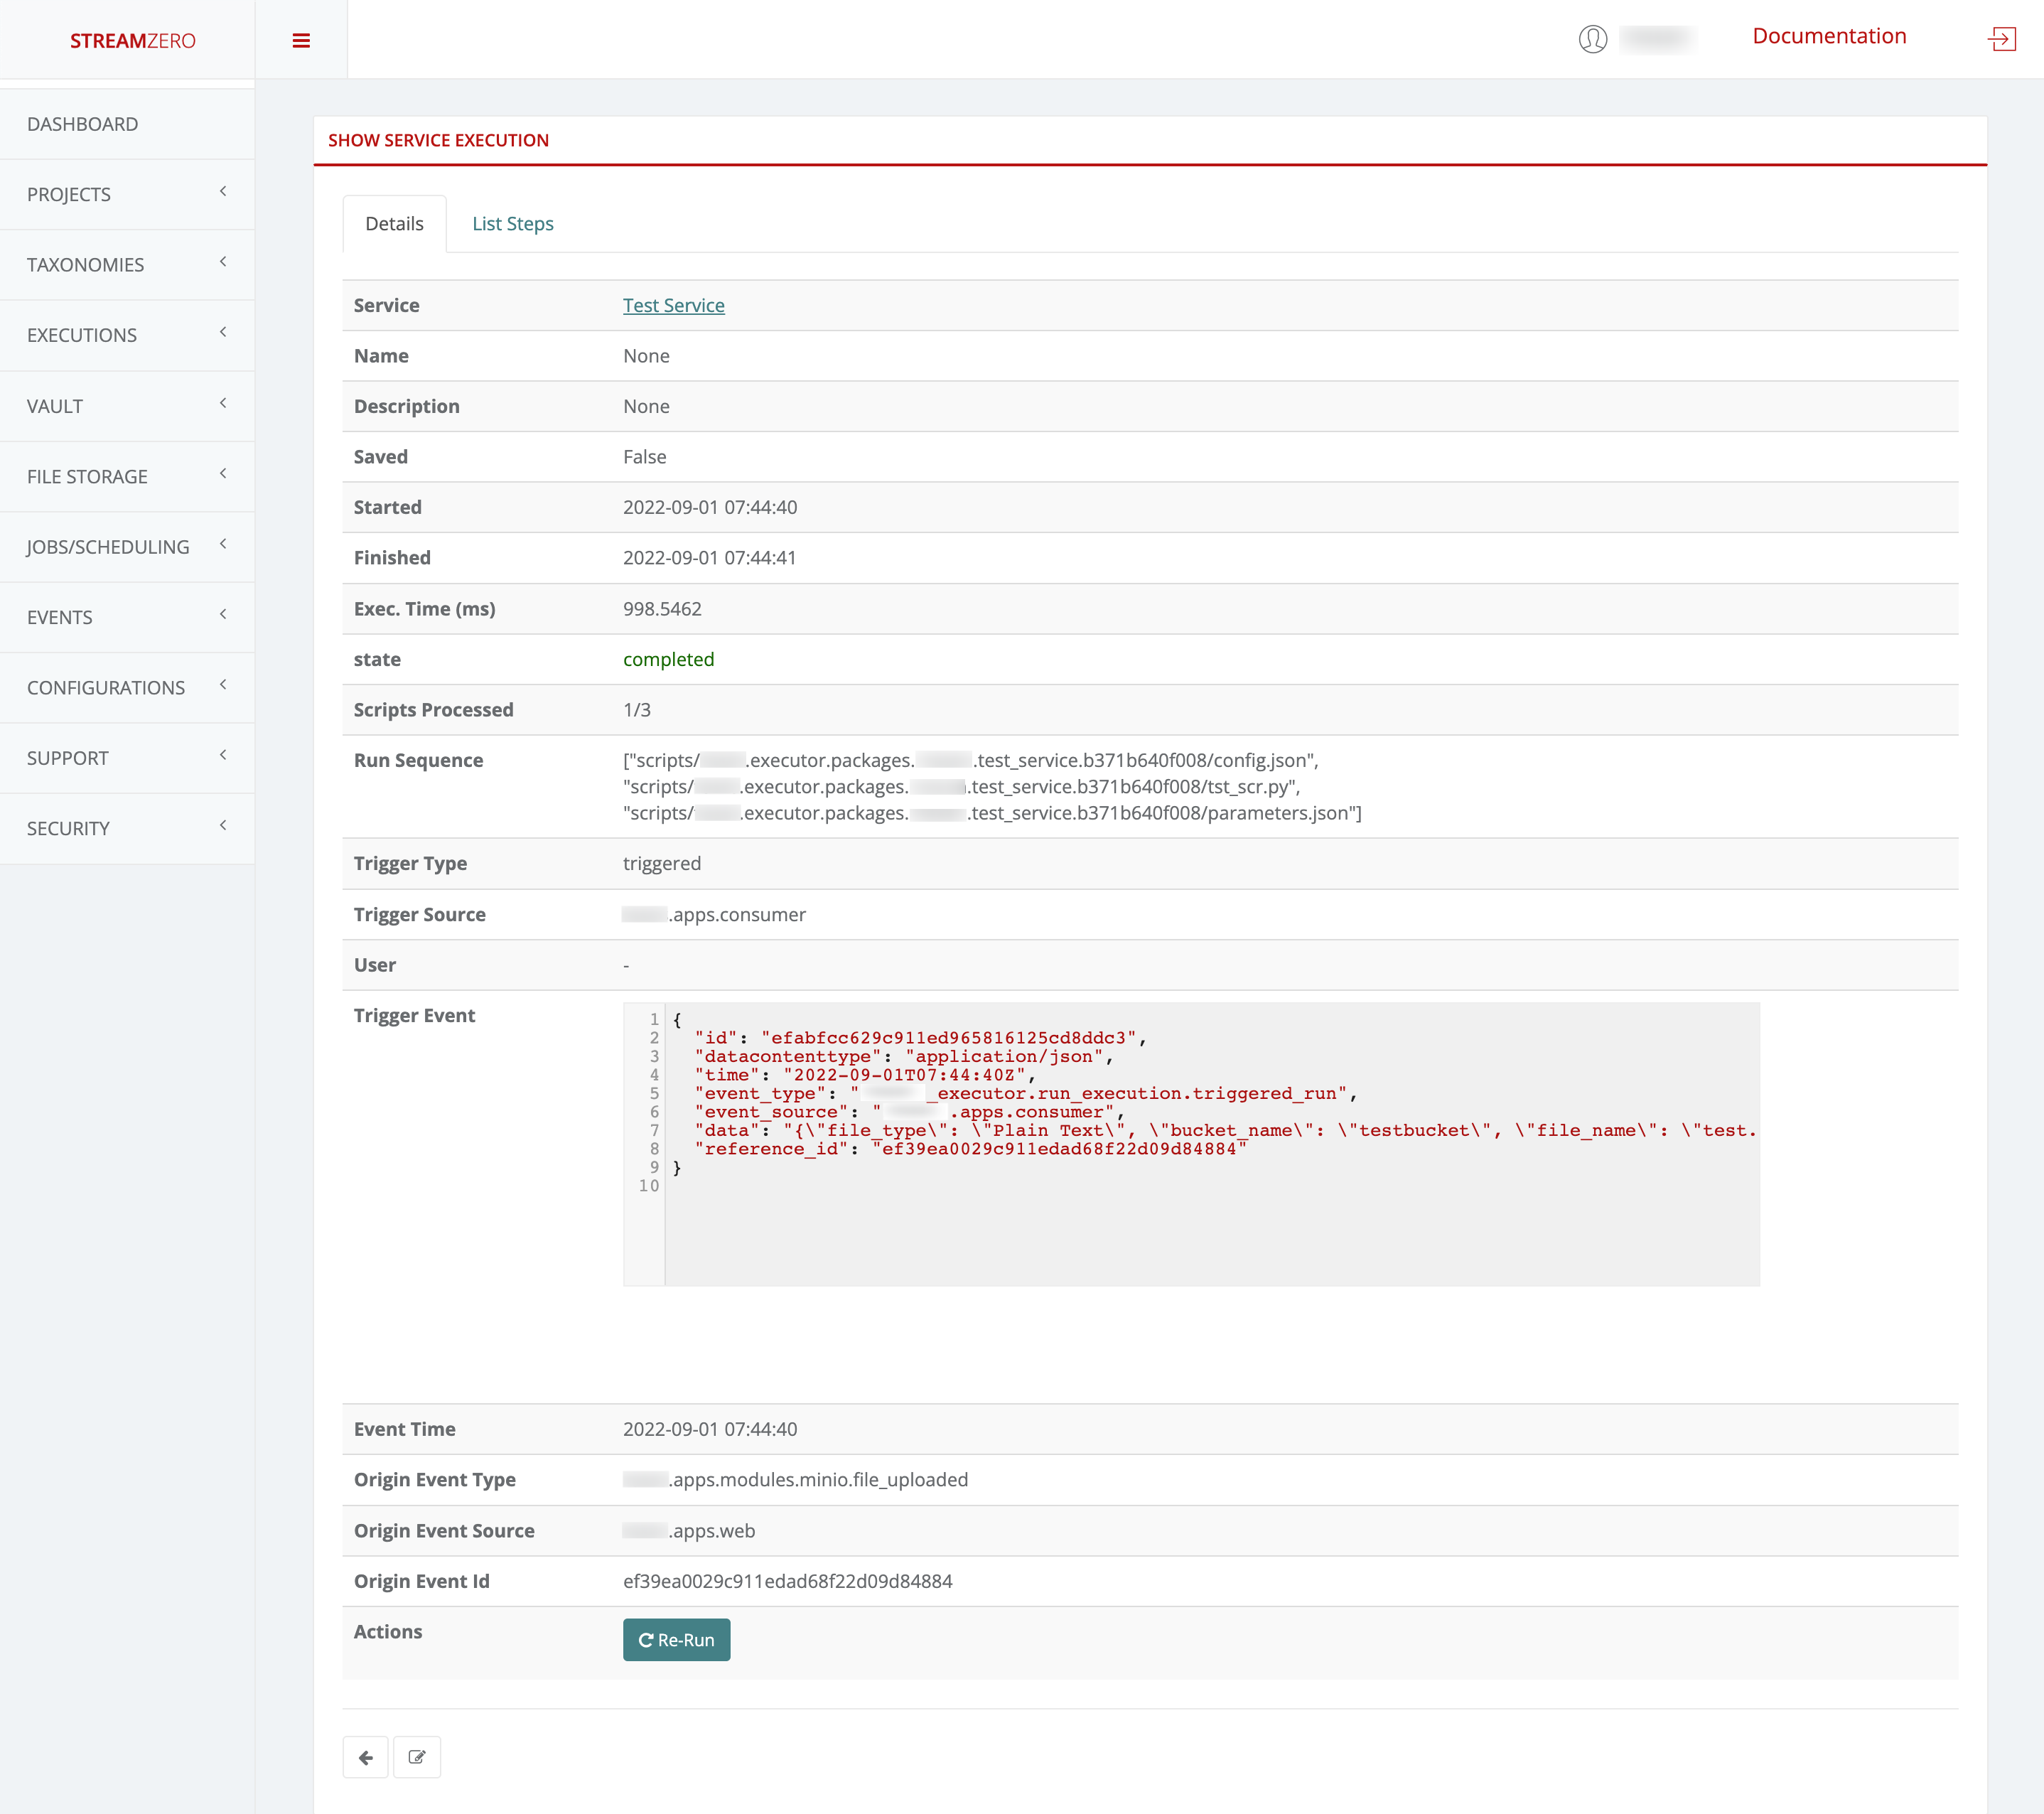
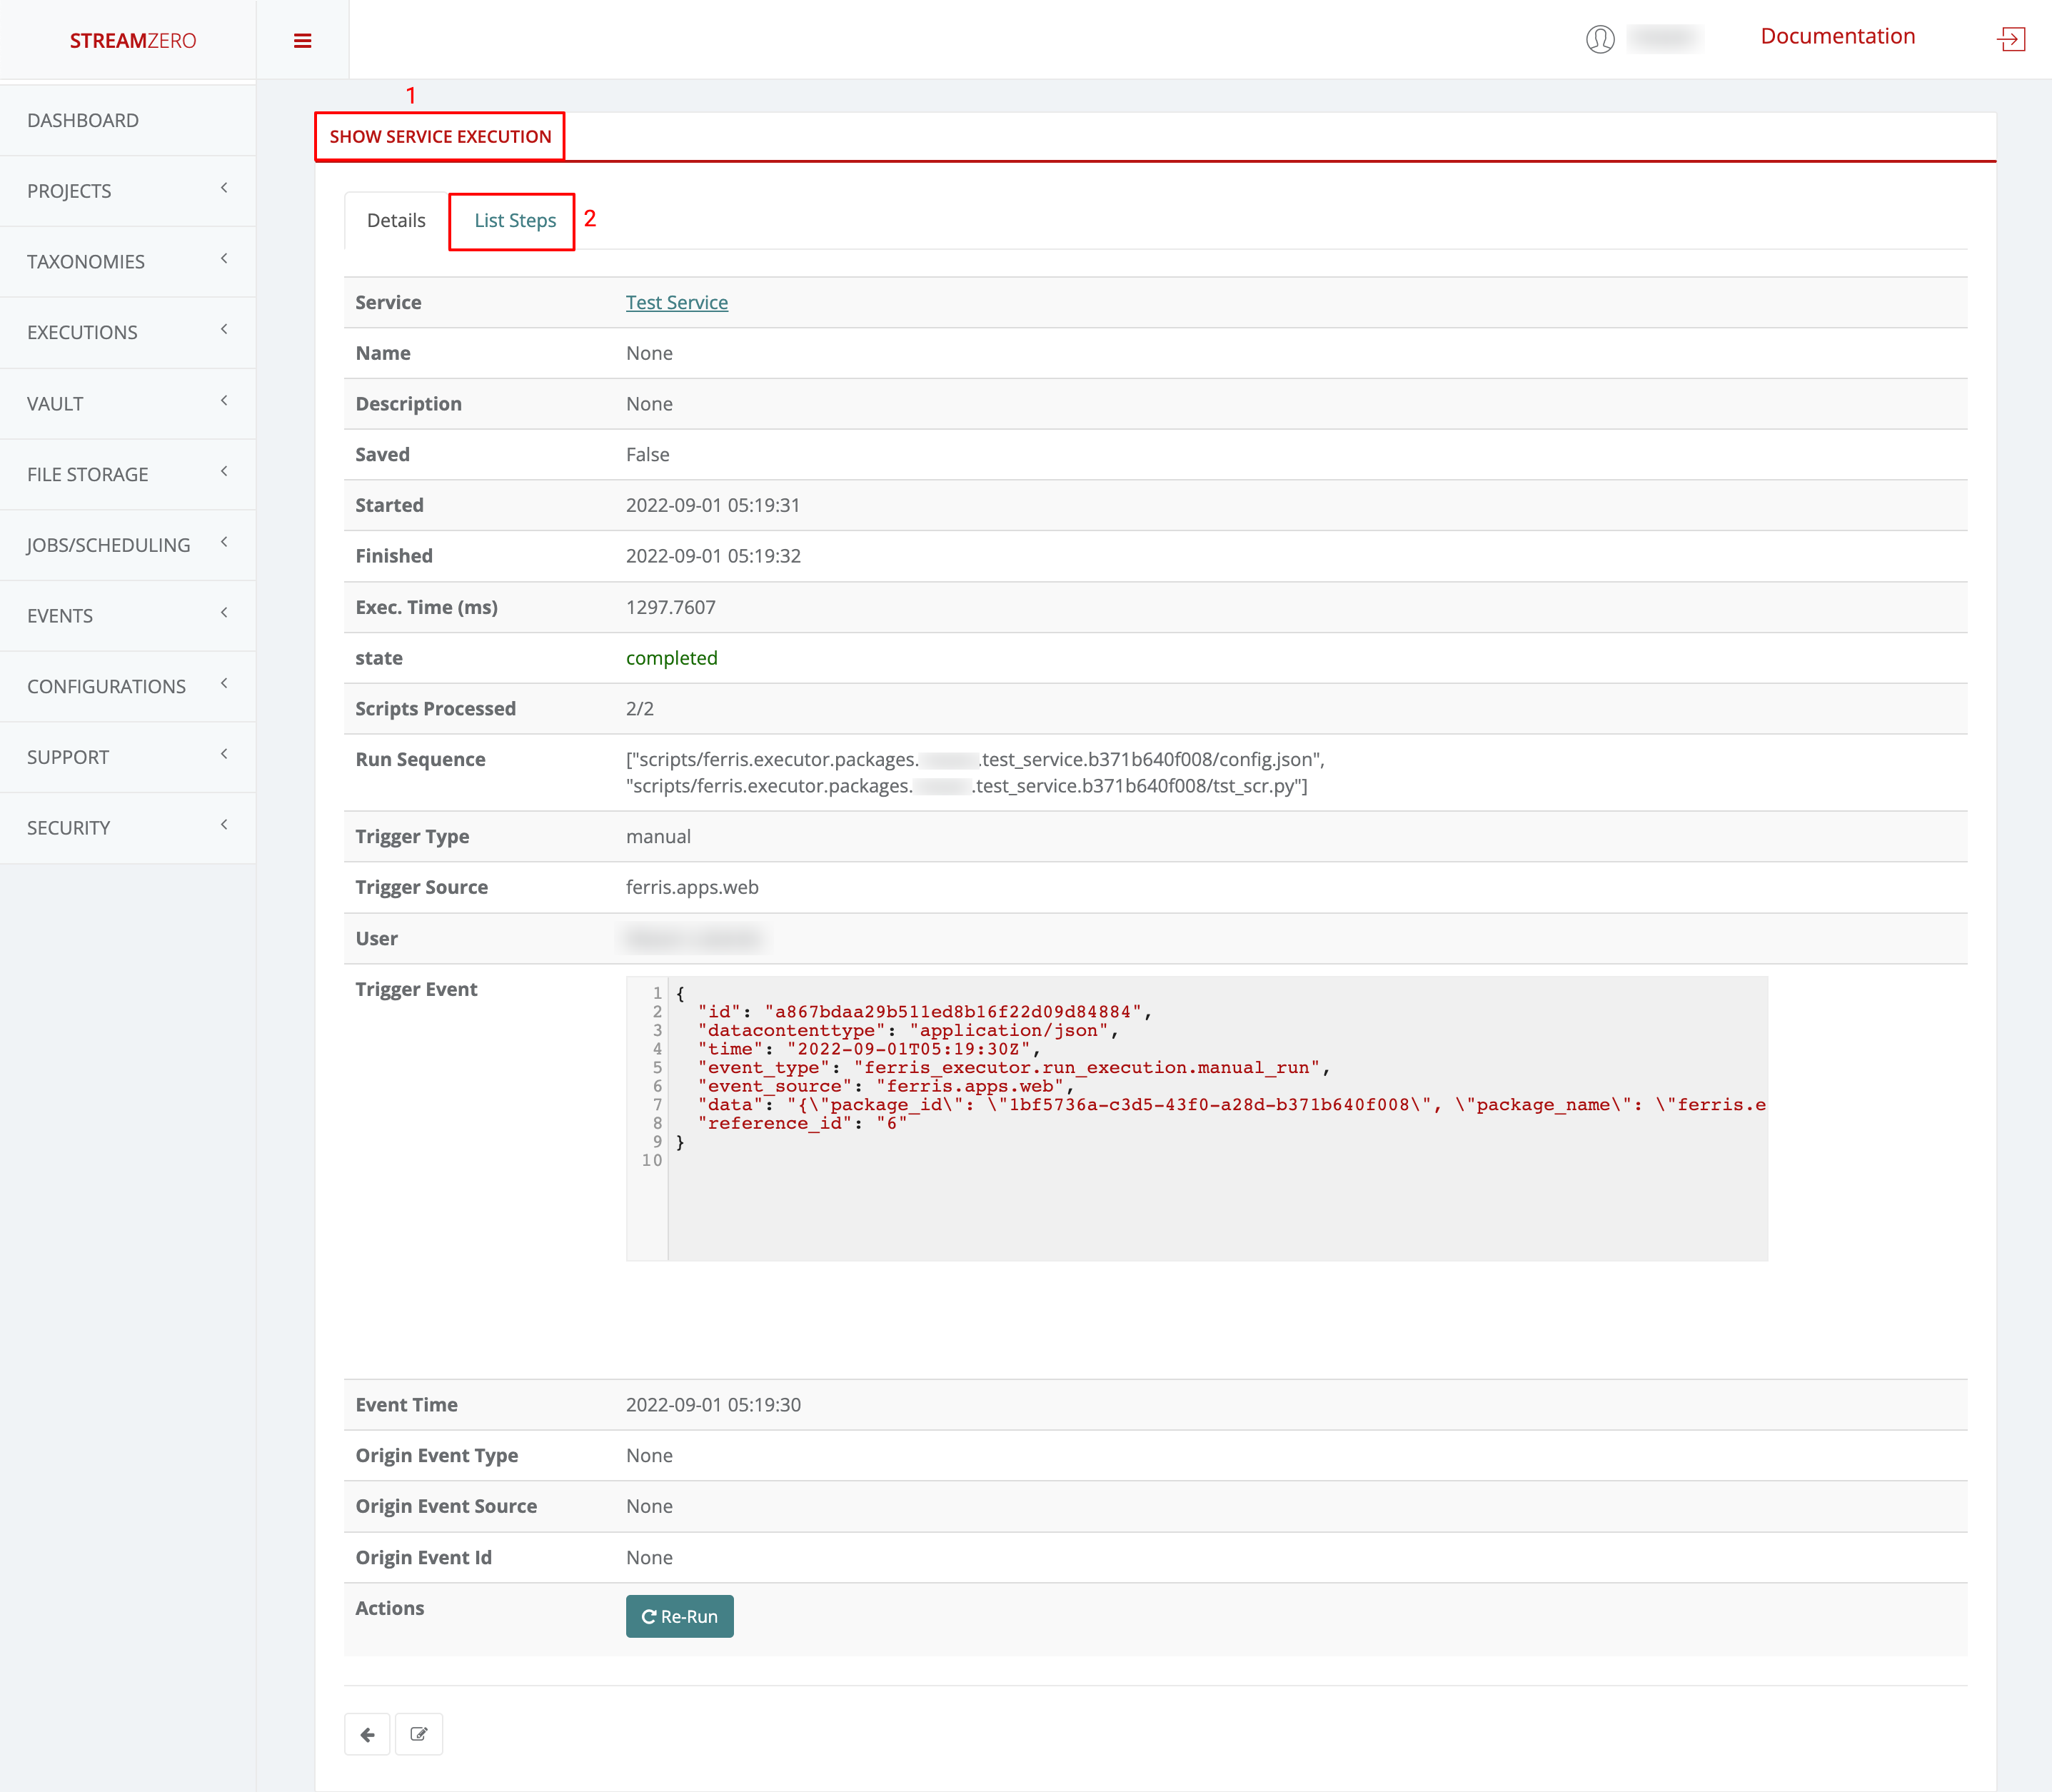
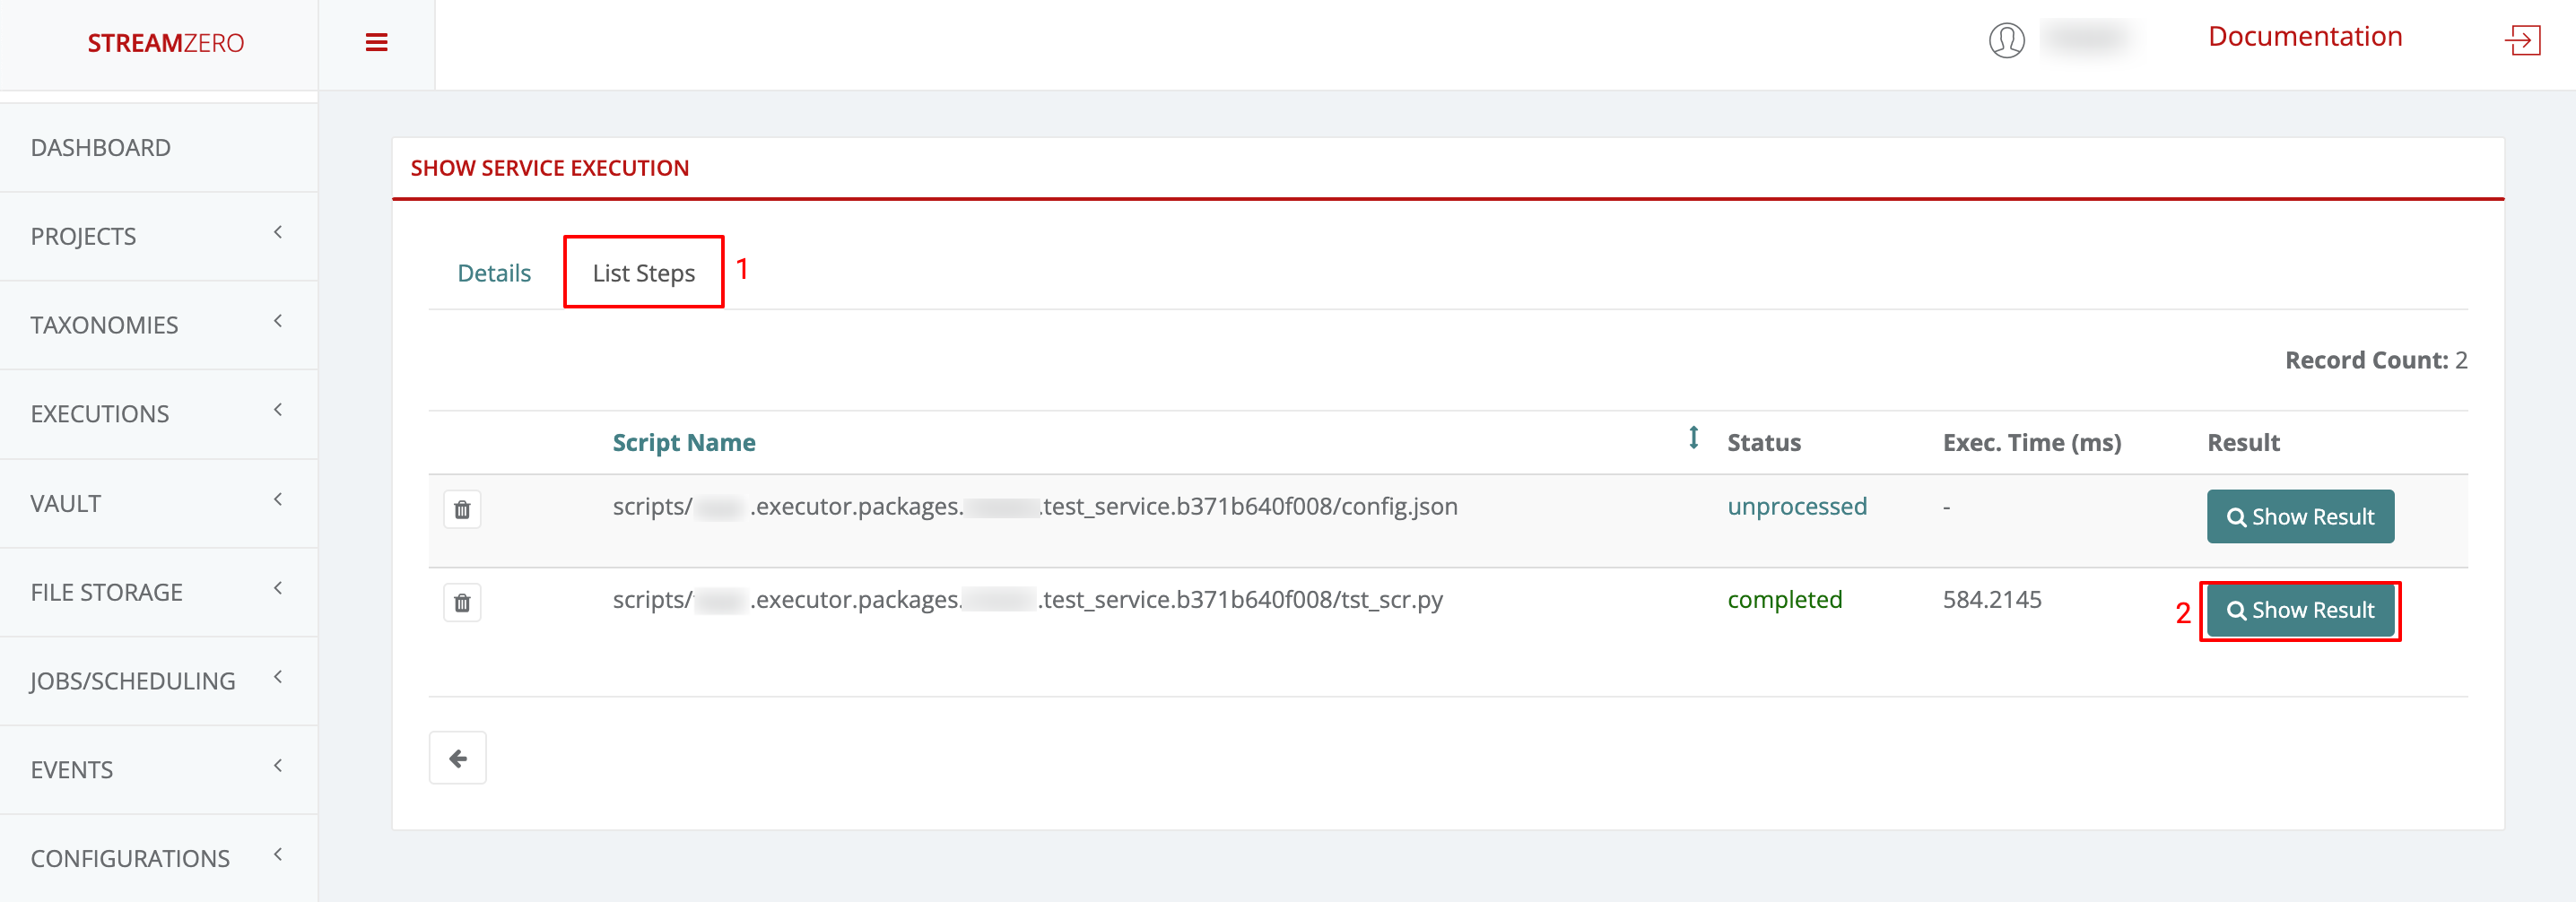
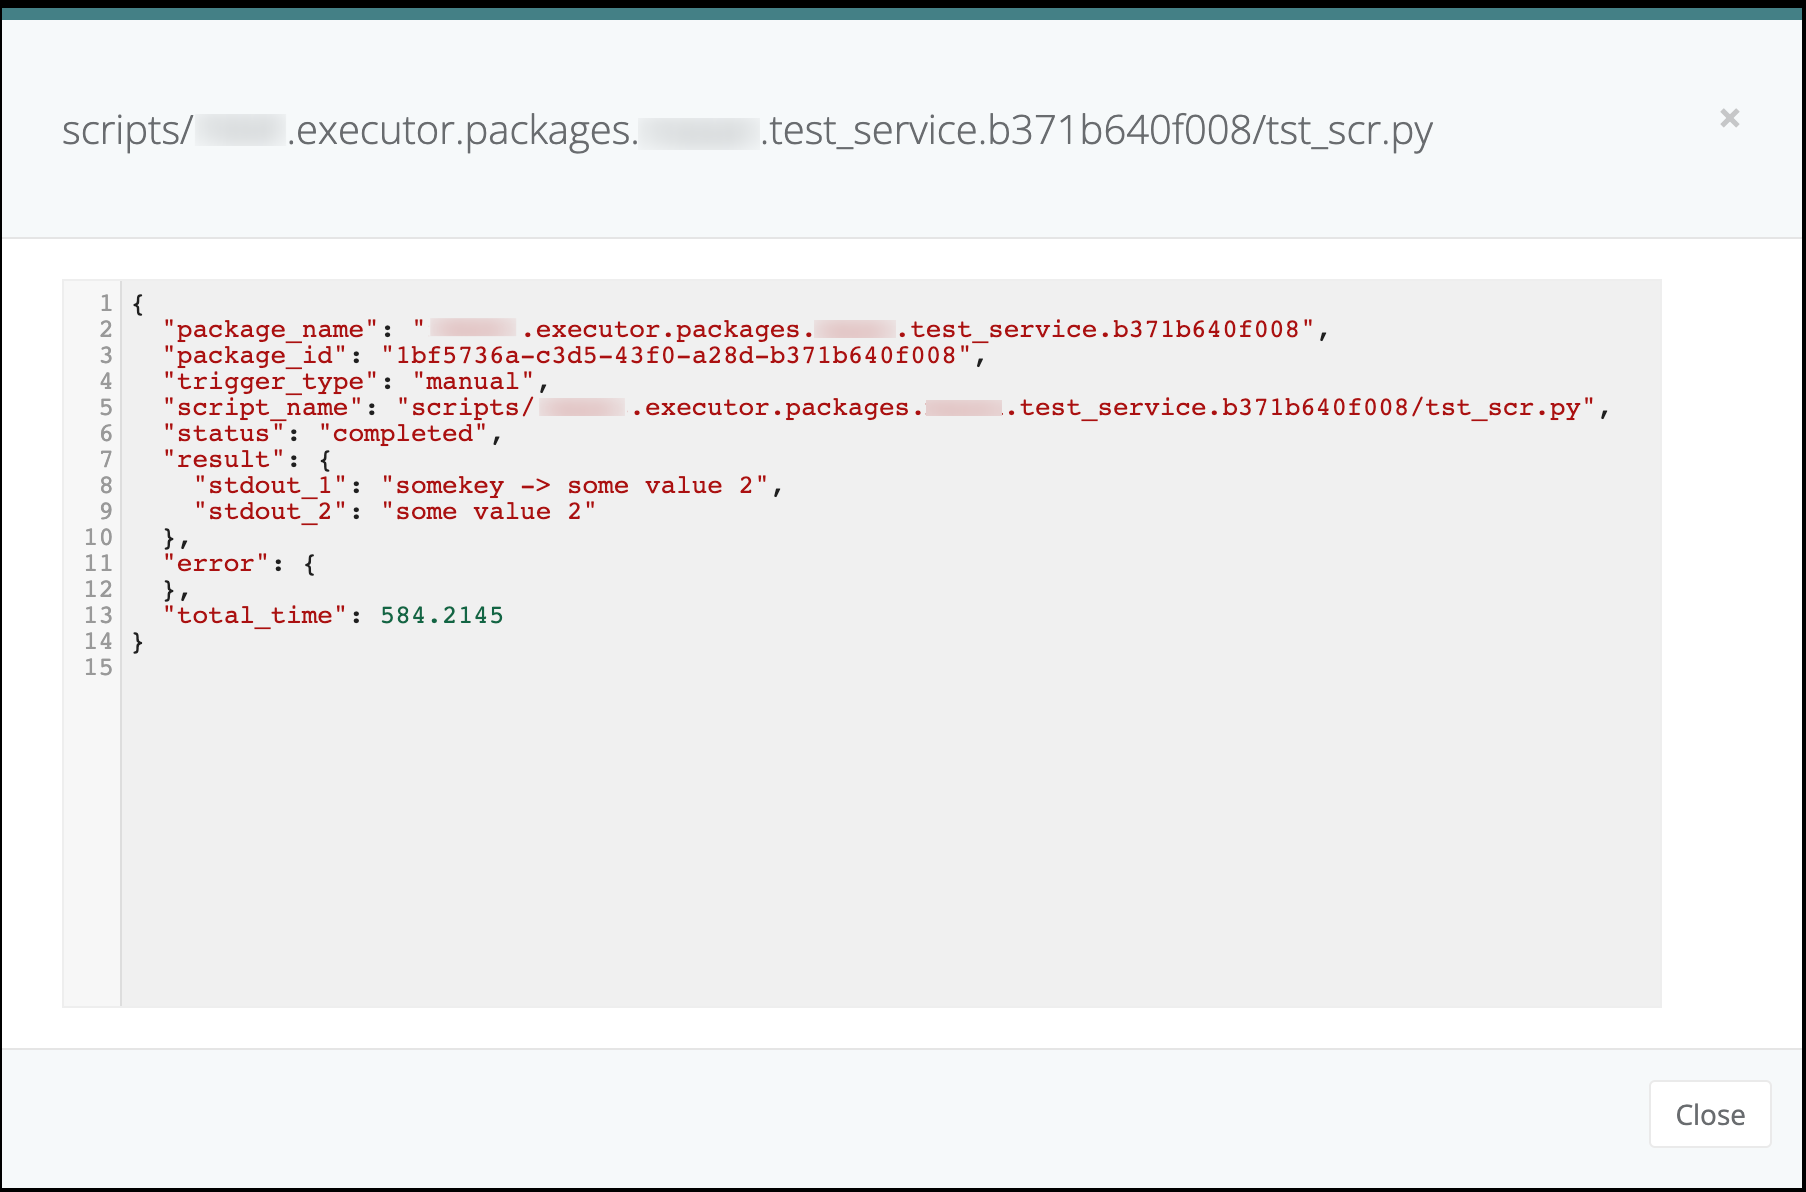
Click on the magnifying glass to open the details page of the triggered execution
Check the details page of the event triggered run
Workflow -> approval completed trigger event
To finalize the second trigger event (ferris.apps.modules.approvals.step_approval_completed), an existing Workflow will be used to trigger a Case Management that will need to get approved.
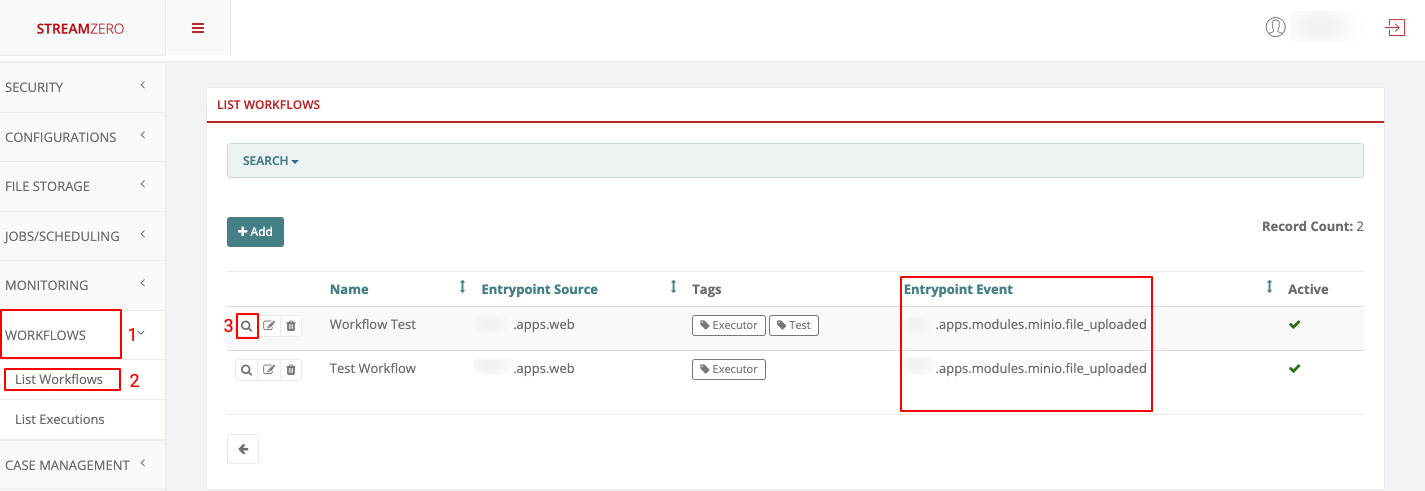
Click on Workflows on the left side of the dashboard menu to open the drop-down
Click on List Workflows
Click on the magnifying glass to show the details page of the workflow
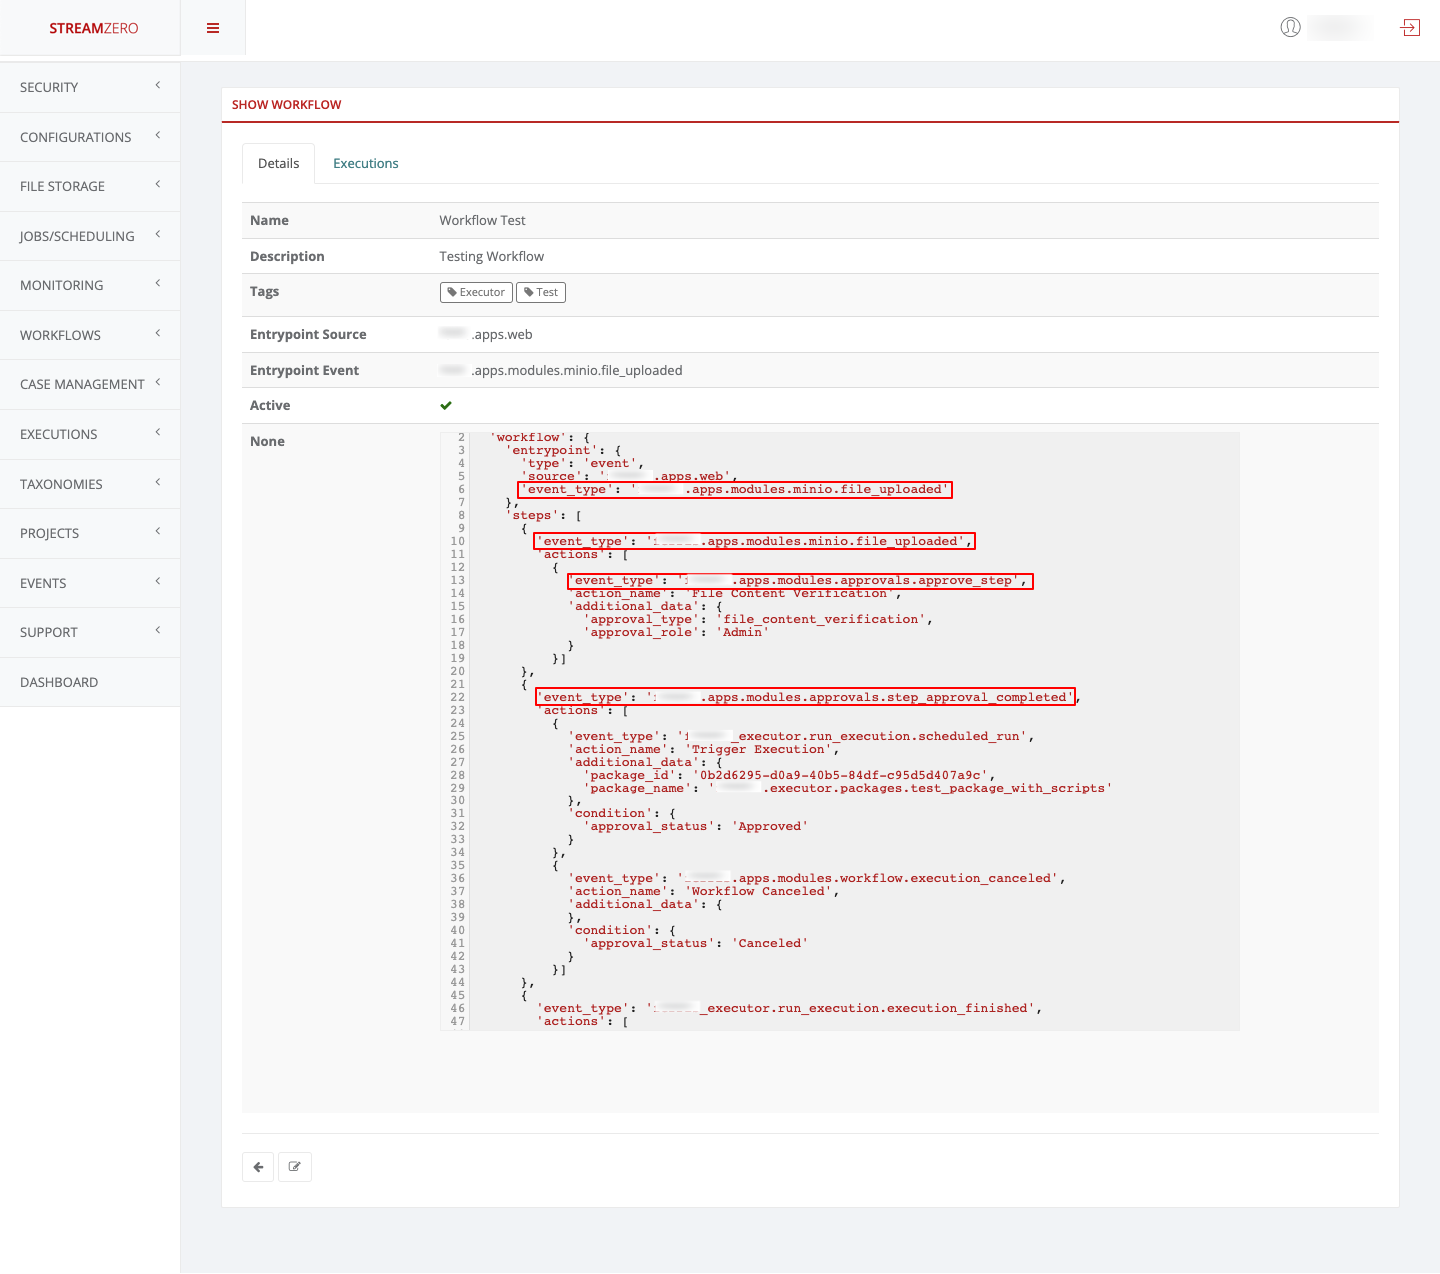
Note that before even getting a closer look at the Workflow details, the Entrypoint Event is displayed -> ferris.apps.modules.minio.file_uploaded
Check the details in the JSON snippet to understand what or which event types will trigger the second event type. The first event type shown in the JSON snippet is: ferris.apps.modules.minio.file_uploaded -> which means that a file will need to get uploaded for the event to get triggered. The second event type shown in the JSON snippet is: ferris.apps.modules.approvals.step_approval_completed -> meaning the uploaded file will need to get approved in the Case Management module before the wanted event gets triggered.
Case Management -> -> approval completed trigger event
Upload a file to a bucket (the process of uploading a file was described in detail on top of this page)
Click on Case Management on the left side of the dashboard menu to open the drop-down
Click on Approvals
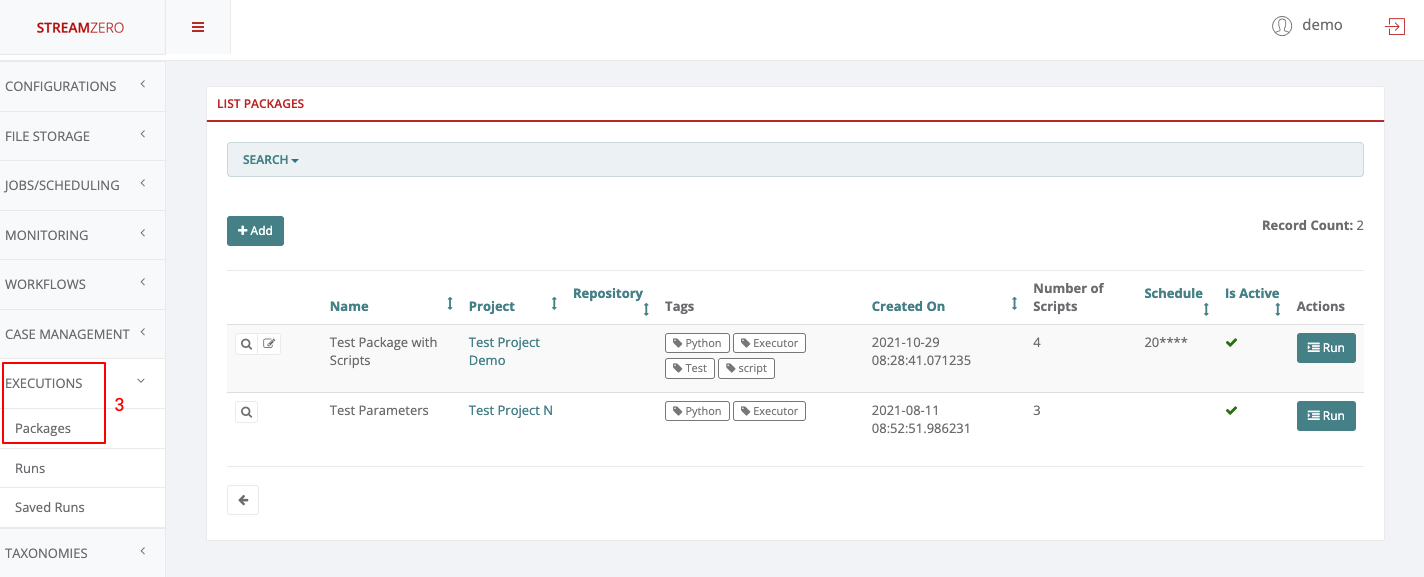
3.6 - Executions - Packages
How to use the Executions/Packages Framework for script automation and package (execution) triggering.
The Executions/Packages is an event oriented framework that allows enterprise organizations the automation of script processing which can be triggered by:
Manually: By clicking the ‘Run’ button on the StreamZero FX Management Server.
On Schedule: As a cron job whereas the Cron expression is added on the UI.
On Event: Where a package is configured to be triggered bt the FX Router when a specific type of event is observed on the platform.
It allows users to deploy their locally tested scripts without DevOps specific changes or the need to learn complex DSL (description and configuration language). In tandem with Git integrated source code management FX allows distributed and fragmented tech teans to easily deploy and test new versions of code in an agile way with changes being applied immediately.
Contiuous Change Integration / Change Deployment becomes a component based and building block driven approach, where packages can be configurable and parametrised. All scripts and their parameters like secrets and environment variables form packages which makes them reusable for similar jobs or event chains. Event based package triggering allows users to run multiple packages in parallel as a reaction to the same event.
Executions - Packages
Primary entities for “Executions” are packages which are composed by scripts that are executed in a predefined order.
Executions -> Packages
This Use Case defines how to create and run a new package.
Click on Executions on the left side of the dashboard menu to open drop-down
Click on Packages
Click on +Add to create a package
Create Package
Field name
Steps & Description
1. Name
1. Name the package
2. Description
2. Descripe the package
3. Project
3. Select the project to which the package will be bound
4. Tags
4. Add Tags of choice manually or select from predefined tags
5. Schedule
5. Schedule cron job -> “Cron like schedule definition. NOTE: day of week start on Monday (0 - Monday, 6 - Sunday) example: “20****” -> The whole definition of Cron Jobs can be found in the next sub-category of this UserGuide
6. Trigger Event Type
6. Select Value -> select event type to trigger the exectution of the package -> please visit the sub-category Events to get a better understanding of how to set event triggers.
7. Allow Manual Triggering
7. Checkbox -> click to allow manual triggering of the package
8. Active
8. Checkbox -> click to set the package to active
9. File Upload (choose file)
9. Click on Choose file (Optional) to upload a script -> upload a JSON “config.json” script to configure the package
10. File Upload (choose file)
10. Click on Choose file (Optional) to upload a script -> upload a python “test_scr.py” script to pull the configuratio from config file and print all items
11. Save
11. Click Save to save packages
Supported File upload Types
4 different file types are supported: 1. “.py file” -> A PY file is a program file or script written in Python, an interpreted object-oriented programming language. 2. “.json file” -> A JSON file is a file that stores simple data structures and objects in JavaScript Object Notation (JSON) format, which is a standard data interchange format. 3. “.sql file” -> A (SQL) file with .sql extension is a Structured Query Language (SQL) file that contains code to work with relational databases. 4. “.csv file” -> A CSV (comma-separated values) file is a text file that has a specific format which allows data to be saved in a table structured format.
config.json script
The config.json file contains key/value configuration pairs that can be accessed in scripts at execution time.
1
{"somekey":"some value 2"}
test_scr.py script
This is an example script that shows how configuration from config.json file can be accessed from a script. package_name will be passed to the script as argument and then can be used for fetching configuration using ApplicationConfigurator from ferris_cli python package.
1
2
3
4
5
6
7
8
9
10
11
import sys, json
from ferris_cli.v2 import ApplicationConfigurator

fa = json.loads(sys.argv[1])

package_name = fa['package_name']
config = ApplicationConfigurator.get(package_name)

for k, v in config.items():
    print(f"{k} -> {v}")
    print(v)
Check Created Package
The created package should be triggered every 20 minutes of every hour but can also be run manually.
Click on the magnifying glass icon to open the package’s details page
Check details page
Click on “Show Trigger Event”
Check the triggered event details
Close
Package Executions / Runs
Click on the “Run” button down the page to run the package manually
It will automatically transfer you to the “List Package Executions” tab
Check runs/package executions to see if you manually triggered execution was processed
Click on the magnifying glass icon of your latest manually triggered run to open details page of the exectuion
Check the details “Show Package Execution” of the run/exection
Click on “List Steps” tab to see the steps of the execution
Check the steps of the run and status (completed; pending; unprocessed; failed)
Click on “Show Results” to verify the script for failed executions
Close window
Note that currently only python and sql handlers are available, files of different type will be unprocessed.
Save a Run/Execution
Go back to the “List Package Executions” tab
Click on the edit icon to open make the run/execution editable
Name the execution/run
Describe the execution/run
Click “Saved” check box
Save
Click on Executions to open dropdown
Click on Saved Executions to check the saved run
In the next section “UI Generator”, the importance of the saved run will be showcased.