This the multi-page printable view of this section. Click here to print.
DOCUMENTATION
- 1: StreamZero FX
- 1.1: Architecture Overview
- 1.2: Developer Guide
- 1.2.1: Creating and Configuring Your First FX Service
- 1.2.2: FX Core Lib: Simplifying FX Service Development
- 1.2.3: Deploy a Service
- 1.2.4: Project and Code Structure
- 1.2.5: Secrets
- 1.2.6: State Management
- 1.2.7: Form Generator
- 1.2.8: Database Integration
- 1.2.9: Event Source Adapters
- 1.2.10: Extending the Platform
- 1.2.11: Git Integration
- 1.2.12: Event Manipulation Strategies
- 1.2.13: Logging and Monitoring
- 1.3: User Guide
- 1.3.1: Landing Page (Dashboard)
- 1.3.2: Projects
- 1.3.3: Taxonomy/Tagging
- 1.3.4: CronJob
- 1.3.5: Events
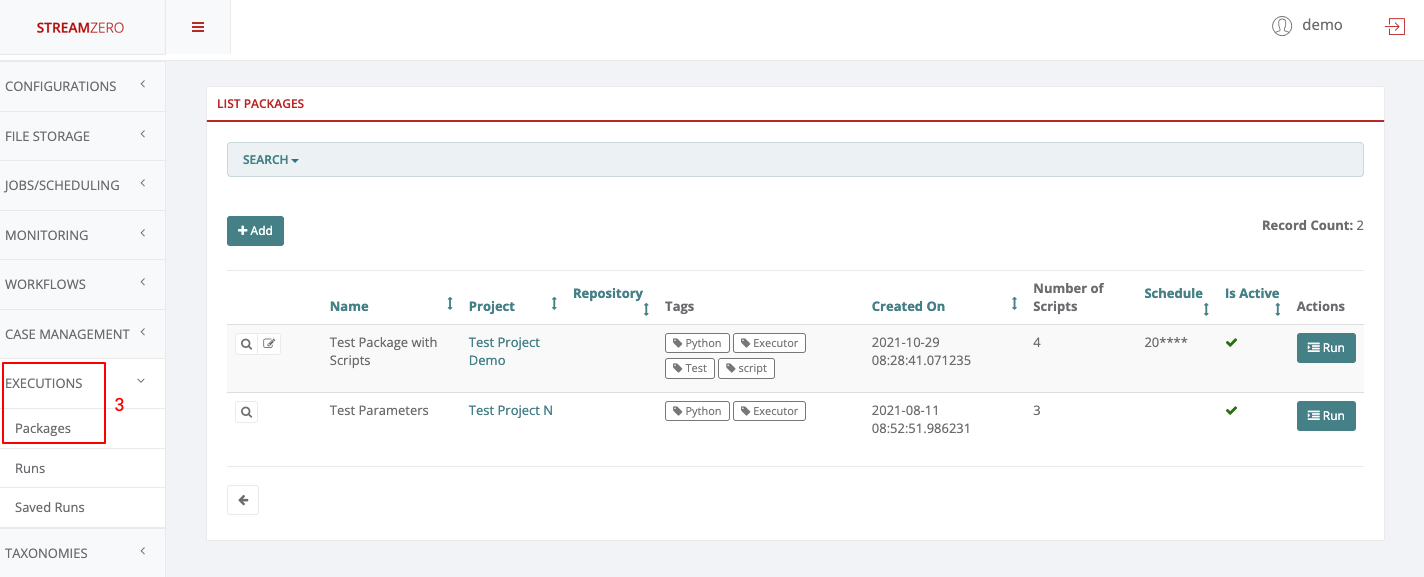
- 1.3.6: Executions - Packages
- 2: StreamZero K8X
- 2.1: K8X Developer Guide
- 2.2: User Guide
- 2.3: Architecture
- 3: StreamZero SX
- 3.1: Developer Guide
- 3.2: Integrations Guide
- 3.3: User Guide
- 3.4: Solutions snippets / explain problem solved / link to relevant use case
- 3.5: Containers + Purpose
- 3.6: Architecture
- 4: Integrations Guide
- 4.1: Database Guide
- 4.1.1: Supported Databases
- 4.1.1.1: Ascend.io
- 4.1.1.2: Amazon Athena
- 4.1.1.3: Amazon Redshift
- 4.1.1.4: Apache Drill
- 4.1.1.5: Apache Druid
- 4.1.1.6: Apache Hive
- 4.1.1.7: Apache Impala
- 4.1.1.8: Apache Kylin
- 4.1.1.9: Apache Pinot
- 4.1.1.10: Apache Solr
- 4.1.1.11: Apache Spark SQL
- 4.1.1.12: Clickhouse
- 4.1.1.13: CockroachDB
- 4.1.1.14: CrateDB
- 4.1.1.15: Databricks
- 4.1.1.16: Dremio
- 4.1.1.17: Elasticsearch
- 4.1.1.18: Exasol
- 4.1.1.19: Firebird
- 4.1.1.20: Firebolt
- 4.1.1.21: Google BigQuery
- 4.1.1.22: Google Sheets
- 4.1.1.23: Hana
- 4.1.1.24: Hologres
- 4.1.1.25: IBM DB2
- 4.1.1.26: IBM Netezza Performance Server
- 4.1.1.27: Microsoft SQL Server
- 4.1.1.28: MySQL
- 4.1.1.29: Oracle
- 4.1.1.30: Postgres
- 4.1.1.31: Presto
- 4.1.1.32: Rockset
- 4.1.1.33: Snowflake
- 4.1.1.34: Teradata
- 4.1.1.35: Trino
- 4.1.1.36: Vertica
- 4.1.1.37: YugabyteDB
- 4.2: Notifications and Messaging
- 5: Security
- 5.1: Permissions
- 5.2: Roles
- 5.3: Users
- 5.4: Statistics
- 6: Solutions
- 6.1:
- 6.2:
- 6.3: Automating Marketing Data Analysis
- 6.4: Churn Analysis and Alerting – Financial Services
- 6.5: Classification of products along different regulatory frameworks
- 6.6: Curn Analysis and Alerting – General
- 6.7: First Notice of Loss Automation
- 6.8: Idea to Trade / Next Best Product - Financial Services
- 6.9: Idea to Trade / Next Best Product - General
- 6.10: Intraday Liquidity Management Optimization
- 6.11: Metadata-controlled Data Quality & Data Lineage in Production
- 6.12: Onboarding and Fraud Remodelling - Financial Services
- 6.13: Onboarding and Fraud Remodelling - General
- 6.14: Prospecting 360 Degree
- 6.15: Prospecting 360 Degree - general
- 6.16: Regulatory Single Source of Truth
- 6.17: Sensor-based Monitoring of Sensitive Goods
- 6.18: Voice-based Trade Compliance
- 7: Release Notes
- 7.1: Release 1.0.2
- 7.2: Release 1.0.3
- 7.3: Release 1.0.4
- 7.4: Release 2.0.1
- 7.5: Release 2.0.2
- 8: Privacy Policy
- 9: Terms & Conditions
1 - StreamZero FX
StreamZero FX is a platform for building highly scalable, cross-network sync or async microservices and agents.
The unique low learning curve approach significantly reduces the cost of deploying enterprise wide process and integration pipelines across disparate systems at a speed. While at the same time creating a platform with practically unbound access and ease of integration.
FX is a ground-up rethink of how both sync and async microservices are built in multi-cloud, highly volatile and fragmented software environments.
On FX you are effectively writing large applications by connecting “blocks” of code (Services) through Events. An approach that is highly intuitive and in line with iterative agile practices.
The following is a brief review of some of the benefits and features of StreamZero FX. Upcoming features are shown in italics.
| Quality | Description |
|---|---|
| Low Learning Curve | Developers can practically learn within an hour how to work with FX. |
| Highly Scalable | Built from ground-up for scalability. The event messaging core is based on an Apache Kafka backbone we can transmit MILLIONs of jobs per day to any number of Services without break. |
| Resource Efficient | FX Microservices are deployed in real time as Events comes in. There are not 100s of microservice containers running on your platform. Just 3 components. The StreamZero Management UI, The Event Router and any number Executors. |
| Plug into anything. Practically Limitless Integrations | Leverage the whole universe of Library capabilites of Python ( Java, DOTNET or GoLang coming soon) , no need to depend solely on paid pre-packaged modules based on a strict structure and complicated build procedures and vendor lock-in. No-Code or Low-Code take your pick. |
| Combined Support for Sync and Async Microservices | Manage both your Async and Sync Service Mesh in a single interface without any expensive and cumbersome 3rd party system. Reduce the complexity of your infrastructure and the number of components. |
| Fully Containerised and Easy to Deploy | Pre-packaged Kubernetes Templates with minimal customisation requirements fit straight into your enterprise Kubernetes(and if you dont have one we will build you one). Run in 1 command and Scale as you wish. |
| All Ops Data in 1 Secure place | We record all events, logs, alerts in Kafka and store them in daily index within Elasticsearch for easy search and loading it into other systems such as Splunk, DataDog, LogTrail etc. A single scalable fault tolerant system to transport events and operational data. |
| Monitor Performance | All Service Executions are continuously tracked and recorded by FX allowing you to easily identify bottlenecks in your processing. Execution details can be viewed on the UI or within Kibana/Elasticsearch. |
| Enterprise Friendly User and Project Management | FX can be easily plugged into your identity infrastructure whether OIDC or AD or SAML we support them all. Packages are organised by Projects enabling users to have specific roles and simplify oversight and governance of your platform. Further enhanced by tagging support promoting an enterprise wide shared semantics and Taxonomy of packages. |
| Structured Service Documentation | Provide a readme.md file with your package to document it for users. Provide an OpenAPI document to automatically expose the end point and document it for users. Provide a manifest JSON file for describing package. |
| Developer Friendly GIT integration | Fits just straight into existing flow. Push to git to activate code. No more, No Less. |
| Simple Standard and Powerful Event Format | Based on Cloud Events our event format is Simple JSON which developer already know how to work with. If you know how to read JSON you can build a Microservice. |
| Simple Easy to understand and use conventions | A Microservice consists of a set of scripts run in sequence, receives events as JSON and sends events as JSON. Use a config.json to store configs, use a secrets.json to store secrets. Store files in /tmp. You can use any Python libraries and also deploy your won packages with each service. |
| Selective Feature Support | Our ‘Everything is Optional’ approach to the convetions support by services means that developers can incrementally improve the quality of their code as they get more familiar with the system. A base service is just a single script and then they can build up to support configurations, UI, reusable packages, published interface packages or custom image execution. |
| Support for Enterprise Specific Library Distributions | Package Enterprise Specific Libraries into the base executor for use by all executors within the enterprise. Saving Huge amounts of development time. |
| Real Time Code Updates | Our near real time deploy means code changes are immediately active. |
| Run AB Testing with Ease | Plug different code versions to same event to measure differences. |
| RUN Anything | Our unique RUN ANYTHING architecture furthers breaks boundaries of running polyglot container systems. Simply tell the system on which image a code is to execute. |
| Activate or Deactivate Services in Realtime | Services can be activated when you need them. |
| Instant Scaling | Just increase the number of Router or Executor replicas to process faster (provided your underlying services can support it) |
| View Logs in Realtime | View the Logs of any executor in Realtime directly on the Management UI. |
| View Event Dependencies Easily | Have an error? Trace easily the events which led to the Error with all the parameters used to run the event flow. |
| UI Support for Microservices | Drop in a metadata.json file to auto generate UIs for entering parameters for a specific package. |
| Easy Aggregated Logging | All services logs are aggregated and searchable and viewable in realtime. Developers can log easily. |
| Adaptive Event Schema | FX is continuously scanning the incoming events to populate the event catalog and their schema. Making it easier for developers to write services which react to the platform events. Continuously updating you on the Events within your platform. |
| Parallel Event Processing and Flows | The same Event can be sent to multiple services for processing. Enabling multiple flows to be triggered. |
| Anonymous and Published Interfaces | Services can easily standardise and publish their interfaces making them available in the ‘No-Code’ flows. |
| Event Mapping | Easily map parameters of one event to another event. Allowing you to easily link event flows together. |
| Event Tagging | Tag events. Enabling you to organise event groups by domain. |
| Execution Prioritisation and Cancellation | Granular queue management to prioritise or cancel specific executions if there is a backlog. |
| Modular Easily Extendible UI | Add modular custom UIs to the management interface using FX extensions to the Flask App Builder for creating a custom Management UI. |
1.1 - Architecture Overview
Concepts
StreamZero FX is based on 2 simple concepts - Services and Events
On FX you are effectively writing large applications by connecting “blocks” of code through Events.

Each Service is a self contained piece of functionality such as loading a file, running a database view rebuild or launching a container. You can link and re-link the blocks of code at anytime you like. The source code can be as big or as tiny as you like.
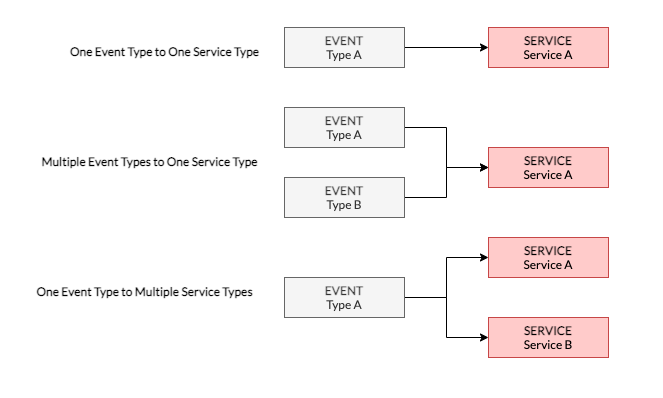
Each Service is triggered by an Event. Each Service also emits Events thereby allowing other Services to be triggered following (or during) the execution of a Service.
A Service can respond to multiple Event types, and a single Event Type may trigger multiple Services - Thereby allowing you to also extend your Application(s) on the fly with ease.
You are not required to think in terms of pre-defined DAGS and can rapidly and iteratively build, test and deploy your applications.
Services
SERVICES are collections of scripts and modules which are executed in sequence by the FX Executor.
Services are triggered by EVENTS, which are JSON messages which carry a header and payload. A Service can be Linked to one or more events.
Each script is provided with the Payload of the Event that triggered it. It is the job of the FX Router to send Events to the appropriate Service.
The following is a basic Service which parses the event sent to it and prints the payload.
|
|
Events
Events are messages passed through the platform which are generated either by Services or by the StreamZero Manager(in the case of manually triggered runs and scheduled runs).
Events are in the form of JSON formatted messages which adhere to the CloudEvents format.
Events carry a Header which indicates the event type and a Payload (or Data section) which contain information about the event.
The following is a sample Event.
|
|
Service Triggering
Services can be triggered in the following ways:
- Manually: By clicking the ‘Run’ button on the StreamZero FX Management UI.
- On Schedule: As a cron job whereas the Cron expression is in the service manifest.
- On Event: Where a package is configured to be triggered by the FX Router when a specific type of event(s) is encountered on the platform - also configured in the service manifest.
Irrespective of how a Service is triggered it is always triggered by an Event. In the case of Manual and Scheduled triggering it is the FX platform that generates the trigger event.
Late Linking
One of the most important features of the FX Platform is that you are not required to link the Service to an Event during the course of development. And you can also change the Trigger Event(s) post-deployment.
This approach gives you a great flexibility to:
- not having to think of pre-defined flows but to build the Flow as well as the Services iteratively.
- maintain and test multiple versions of the same Service in parallel.
The StreamZero FX Flow
At the core of the FX Platform messages (Events) are passed through Apache Kafka. These ’events’ are JSON formatted messages which adhere to the CloudEvents format.
Each Event consists of what may be simplified as Headers and Payload. The headers indicate the type of event and other attributes. Whereas the payload are the attributes or parameters that are sent out by Services in order to either provide information about their state or for usage by downstream Services.
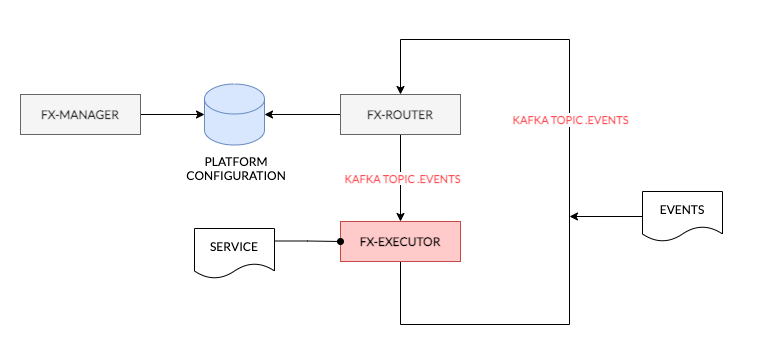
The FX Router(s) is listening on the stream of Events passing through Kafka. Based on the configuration of the platform which is managed in the StreamZero Management UI the Router decides if a Service requires to be executed based on the Event contents. On finding a configured Handler the gateway sends a message to the Executor and informs it of which packages or scripts are required to be run.
The FX Executor(s) executes the Service. The Service may use any Python module that is embedded in the Executor and also uses the platform internal configuration management database(at present Consul) for storing its configurations. The Executor sends a series of Events on Service execution. These are once again processed by the FX Router.
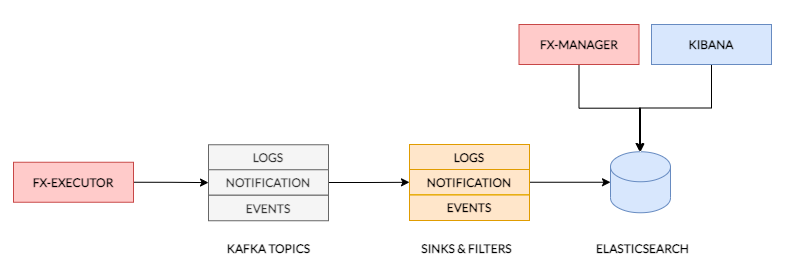
The FX Executor provides infrastructure which tracks logs, maintains record of service metrics and operational data. The Operational information is first sent to appropriate Kafka Topics from where they are picked up by Ops-Data Sinks whose role it is to store data within Elasticsearch and in some cases also filter the data for the purpose of alerting or anomaly tracking. All operational data may be viewed and queried through tools such as Kibana and is also viewable on the FX Management UI.
Required Infrastructure
The following are the infrastructure components required for a StreamZero FX installation
| Component | Description |
|---|---|
| Apache Kafka | Apache Kafka serves as the backbone to pass events and operational data within a StreamZero FX Installation. |
| PostgreSQL | Postgres is used as the database for the StreamZero FX Manager Application. |
| Consul | Consul is the configuration store used by the StreamZero FX platform. It is also used by the services to store their configurations. |
| MinIO | Minio provides the platform internal storage for scripts and assets used by the Services. |
| Elasticsearch | Elasticsearch is used as a central store for all operational data. Thereby making the data easiliy searchable. |
| Kibana | Kibana is used to view and query the data stored in Elasticsearch. |
| StreamZero FX-Management UI | StreamZero FX Management UI is the main UI used for all activities on the StreamZero FX platform. |
| StreamZero FX-Router | The Route container is responsible for listenting to events flowing through the system and forwarding the events to the appropriate micro-services that you create. |
| StreamZero FX-Executor | The executor container(s) is where the code gets executed. |
1.2 - Developer Guide
1.2.1 - Creating and Configuring Your First FX Service
Creating and Configuring Your First FX Service in a Local Environment
No Infrastructure Required!
When it comes to developing FX services, there’s no need for complex infrastructure setups. Nearly all of the platform’s essential features can be replicated in your local development environment.This guide provides a clear walkthrough of the process for creating and simulating services, all within the comfort of your desktop IDE. By following these steps, you’ll be able to seamlessly generate and define services, and then simulate their behavior before taking them live.
Step 1: Create a Virtual Environment
Before you start working on your FX service, it’s a good practice to create a virtual environment to isolate your project’s dependencies. A virtual environment ensures that the packages you install for this project won’t conflict with packages from other projects. You can create a virtual environment using a tool like virtualenv:
|
|
Activate the virtual environment:
|
|
Step 2: Set Environment Variable
Set the EF_ENV environment variable to “local” to indicate that you’re working in a local development environment:
|
|
Step 3: Project Directory Setup
Create a directory that will serve as the main project directory. Inside this directory, you will organize multiple services. For example:
|
|
Step 4: Create Service Directory
Within the project directory, create a subdirectory for your specific service. This directory should have a name that consists of alphanumeric characters in lowercase, along with underscores (_) and hyphens (-) – no spaces allowed:
|
|
Step 5: Create app.py
Inside the service directory, create an app.py file. This file will serve as the entry point for your FX service. In this file, import the necessary context from the fx_ef (core library) for your service:
|
|
Step 6: Run app.py
Run the app.py file. This step generates two JSON files:
ef_env.json: Simulates the parameters, secrets, and configurations of the service.ef_package_state.json: Holds the execution state of the service.
The above 2 files are used to simulate the service environment and are not used at runtime. They should not be checked in to git. A sample .gitignore for FX projects is provided here The GitIgnore File
|
|
Step 7: Expand Your Service
With the initial setup done, you can now expand the app.py file with your actual service logic. Build and implement your FX service within this file.
Step 8: Module Placement
It’s important to note that any modules (additional Python files) your service relies on should be placed within the same directory as the app.py file. FX does not support nested directories for modules.
By following these steps, you’ll be able to create your first FX service in a local environment, set up the necessary configurations, and start building your service logic. Remember to activate your virtual environment whenever you work on this project and customize the app.py file to match the functionality you want your FX service to provide.
Adding a manifest.json file to describe your FX service to the platform is an essential step for proper integration and communication. Here’s how you can create and structure the manifest.json file:
Step 9: Create manifest.json
Inside your service directory, create a manifest.json file. This JSON file will contain metadata about your service, allowing the FX platform to understand and interact with it.
|
|
"name": Provide a name for your FX service."version": Specify the version of your FX service (e.g., “1.0.0”)."description": Add a brief description of what your service does."author": Add your name or the author’s name."entry": Point to the entry point of your service (usuallyapp.py)."configuration": Reference theef_env.jsonfile that holds service parameters, secrets, and configurations."executionState": Reference theef_package_state.jsonfile that holds the execution state of the service."modules": List the modules that your service relies on. In this case, it’s just"app.py".
Step 10: Manifest Structure
The manifest.json file provides vital information about your FX service, making it easier for the platform to understand and manage your service’s behavior and dependencies.
By including this file and its necessary attributes, your service can be properly registered, tracked, and executed within the FX platform. This manifest file essentially acts as a contract between your service and the platform, enabling seamless integration.
Understanding manifest.json: Defining Your Service
The manifest.json file plays a crucial role in describing your application to the DX Platform, as well as to fellow users and developers. Below is a sample manifest.json file along with an explanation of its parameters:
manifest.json Example:
|
|
Parameters and Descriptions:
| Parameter | Description |
|---|---|
description |
A brief description of the service. |
entrypoint |
The script that will be executed when the service is triggered. |
execution_order |
An array indicating the sequence of scripts to be executed. If both entrypoint and execution_order are defined, entrypoint will be used. |
tags |
An array of tags that categorize the service. |
trigger_events |
An array of events that will trigger the service’s execution. |
schedule |
Optional. A cron-like definition for scheduling service executions. |
allow_manual_triggering |
Indicates whether the service can be triggered manually. |
active |
Indicates whether the service is active or inactive. |
This manifest.json file provides essential metadata about your service, making it easier for both the platform and other users to understand its purpose, behavior, and triggers. By customizing these parameters, you tailor the service’s behavior to your specific requirements.
Feel free to integrate this explanation into your documentation. Adapt the content to match your documentation’s style and format. This section aims to provide users with a comprehensive understanding of the manifest.json file and its significance in defining FX services.
Step 11: Expand ef_env.json
The ef_env.json file plays a crucial role in simulating your service’s environment during development. While on the FX platform, parameters, configs, and secrets are managed differently, in the local environment, you can define these elements within this JSON file for simulation purposes.
|
|
-
"parameters": In the local environment, you can define parameters directly within this dictionary. These parameters are typically accessed within your service code using thefx_eflibrary. -
"secrets": Similarly, you can define secret values in this section. While on the platform, secrets will be managed through the UI and loaded into your service securely. During local simulation, you can include sample secret values for testing. -
"configs": For configuration values, you can specify them in this dictionary. However, on the FX platform, configuration values are usually managed through an externalconfig.jsonfile. This is done to keep sensitive configuration data separate from your codebase.
Important Note: Keep in mind that the ef_env.json file is only for simulation purposes. On the FX platform, parameters are passed through trigger event payloads, configurations come from the config.json file, and secrets are managed through the platform’s UI.
By expanding your ef_env.json file with the appropriate parameters, secrets, and sample configuration values, you’ll be able to effectively simulate your service’s behavior in a local environment. This allows you to test and refine your service logic before deploying it on the FX platform, where parameters, secrets, and configurations are handled differently.
Step 12: Exploring the fx_ef Library
In the following section, we’ll delve into the capabilities of the ferris_ef library. This library serves as a bridge between your FX service and the platform, allowing you to seamlessly implement various platform features within your service’s logic.
The fx_ef library encapsulates essential functionalities that enable your service to interact with the FX platform, handling triggers, events, and more. By leveraging these features, you can create robust and responsive FX services that seamlessly integrate with the platform’s ecosystem.
Here’s a sneak peek at some of the functionalities offered by the fx_ef library:
-
Event Handling: The library facilitates event-driven architecture, allowing your service to react to various triggers from the platform. Whether it’s an incoming data event or an external signal, the library provides the tools to manage and respond to events effectively.
-
Parameter Access: While on the FX platform, parameters are passed through trigger event payloads. The library offers methods to access these parameters effortlessly, enabling your service to make decisions and take actions based on the provided inputs.
-
Configuration Management: Although configuration values are typically managed through a separate
config.jsonfile on the platform, thefx_eflibrary simplifies the process of accessing these configurations from within your service code. -
Secrets Handling: On the platform, secrets are managed securely through the UI. The library ensures that your service can access these secrets securely when running on the platform.
-
Service State Tracking: The library also assists in managing your service’s execution state, tracking its progress and ensuring smooth operation.
By tapping into the capabilities of the fx_ef library, you can build powerful and versatile FX services that seamlessly integrate with the FX platform’s functionalities. In the next section, we’ll dive deeper into the specifics of how to utilize these features in your service logic.
Stay tuned as we explore the fx_ef library in depth, unraveling the tools at your disposal for creating impactful and responsive FX services.
Feel free to adapt this content to your documentation’s style and structure. It’s designed to introduce users to the significance of the fx_ef library and prepare them for a deeper dive into its features and usage.
1.2.2 - FX Core Lib: Simplifying FX Service Development
FX Core Lib: Simplifying FX Service Development
The FX Helper package, available through the fx_ef library, offers an array of convenient functions that streamline the development of FX services. This guide walks you through the different ways you can leverage this package to access service configurations, parameters, secrets, and state within your service logic.
Accessing Package Configuration
Retrieve configuration values that influence your service’s behavior by using the context.config.get() method:
|
|
Accessing Execution Parameters
Access parameters that affect your service’s execution using the context.params.get() method:
|
|
Accessing Secrets
Easily access secrets stored on platform, project, or package levels with the context.secrets.get() method:
|
|
Setting Secrets
Set secrets on project and platform levels using the context.secrets.set() method:
|
|
Accessing Package ID and Name
Retrieve your package’s ID and name using the context.package.id and context.package.name attributes:
|
|
Accessing and Updating Package State
Manage your service’s execution state with context.state.get() and context.state.put():
|
|
Logging
Leverage logging capabilities at different levels - DEBUG, INFO (default), ERROR, WARNING, and CRITICAL:
|
|
Scheduling Retry of Service Execution
Use the context.scheduler.retry() method to schedule the next execution of your service from within your script:
|
|
This guide provides insight into the powerful functionalities offered by the fx_ef library, making FX service development more efficient and intuitive. These tools empower you to create responsive and feature-rich FX services with ease.
1.2.3 - Deploy a Service
Deploying Services: A Step-by-Step Overview
In this section, we provide you with a concise yet comprehensive overview of the steps required to deploy a service or a collection of services onto the FX platform. Following these steps ensures a smooth transition from development to deployment.
Step 1: Check Services into Git
Before anything else, ensure your collection of services is properly versioned and checked into a Git repository. This guarantees version control and a reliable source of truth for your services.
Step 2: Create a Project in the UI
In the FX platform UI, initiate the process by creating a project. Projects serve as containers for your services, aiding in organization and management.
Step 3: Add Git Repository to the Project
Once your project is in place, seamlessly integrate your Git repository with it. This connection allows the platform to access and manage your services’ source code.
Step 4: Sync the Repository to the Platform
The final step involves syncing the repository you’ve connected to your project with the FX platform. This synchronization imports the services’ code, configurations, and other relevant assets into the platform environment.
By following these four fundamental steps, you’re well on your way to deploying your services onto the FX platform. Each of these steps plays a vital role in ensuring that your services are seamlessly integrated, accessible, and ready for execution within the FX ecosystem.
Detailed Deployment Process: From Git to FX Platform
This section breaks down the steps outlined earlier for deploying services onto the FX platform in detail, starting with checking services into Git.
Check Services into Git
Since familiarity with Git is assumed, we’ll briefly touch on this step. Within the FX platform, each directory within a Git Repository represents a distinct service. Files placed directly in the root directory of a Repository are not considered part of any service.
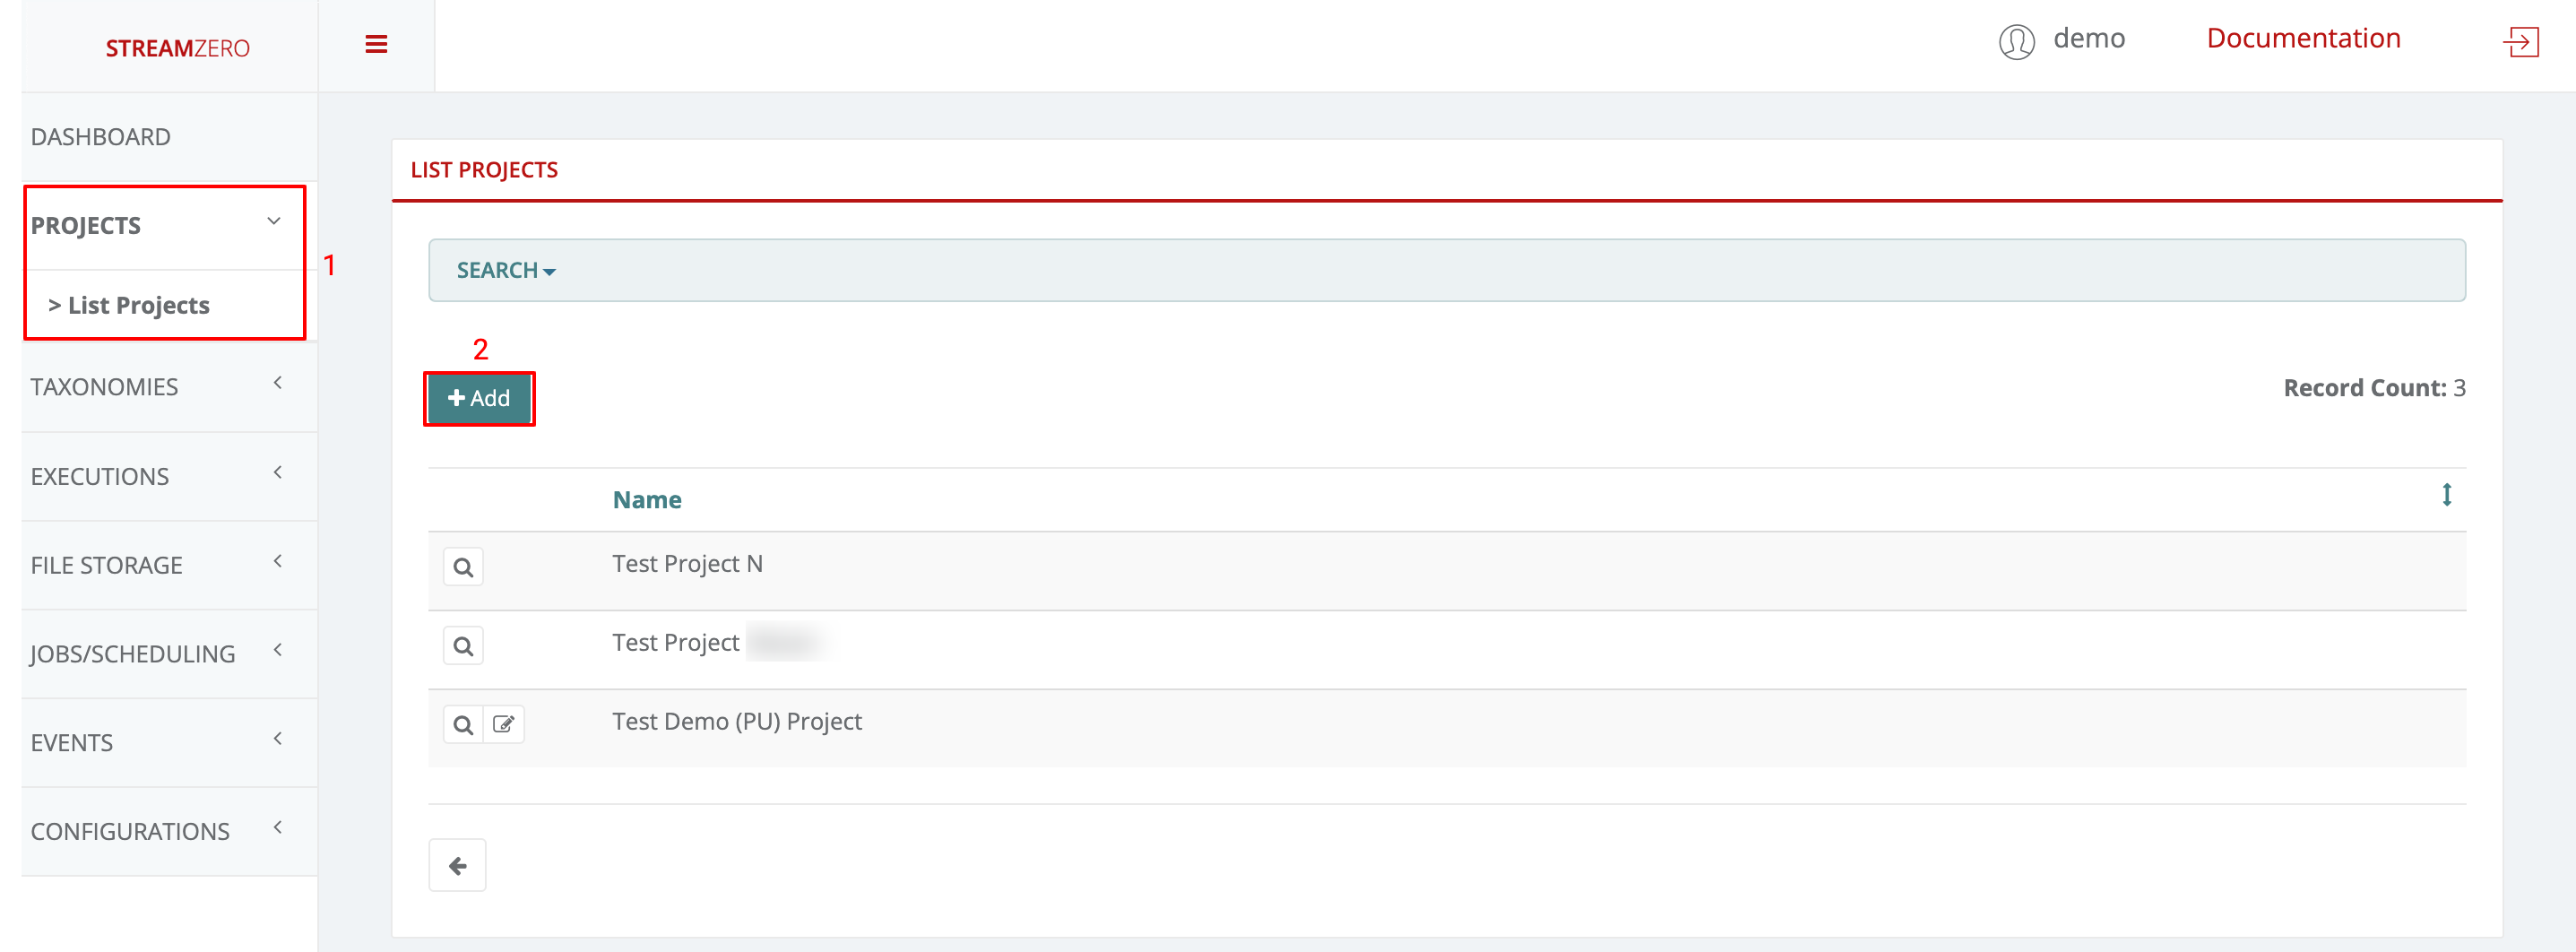
Create a Project in the UI
Creating Projects and Linking with Git Repository:
-
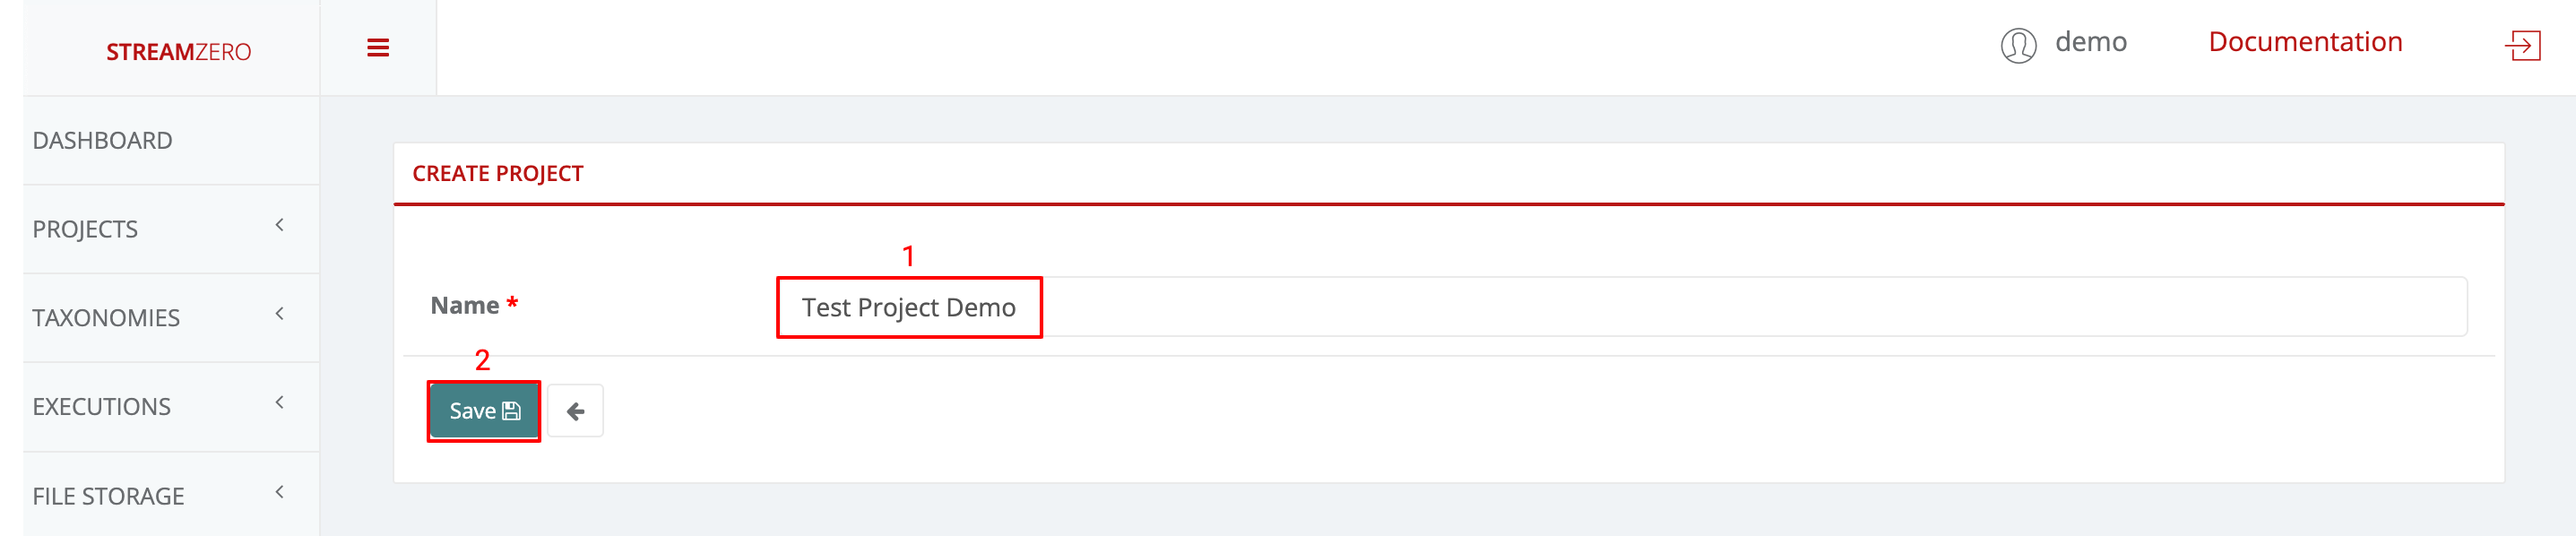
Create a New Project:
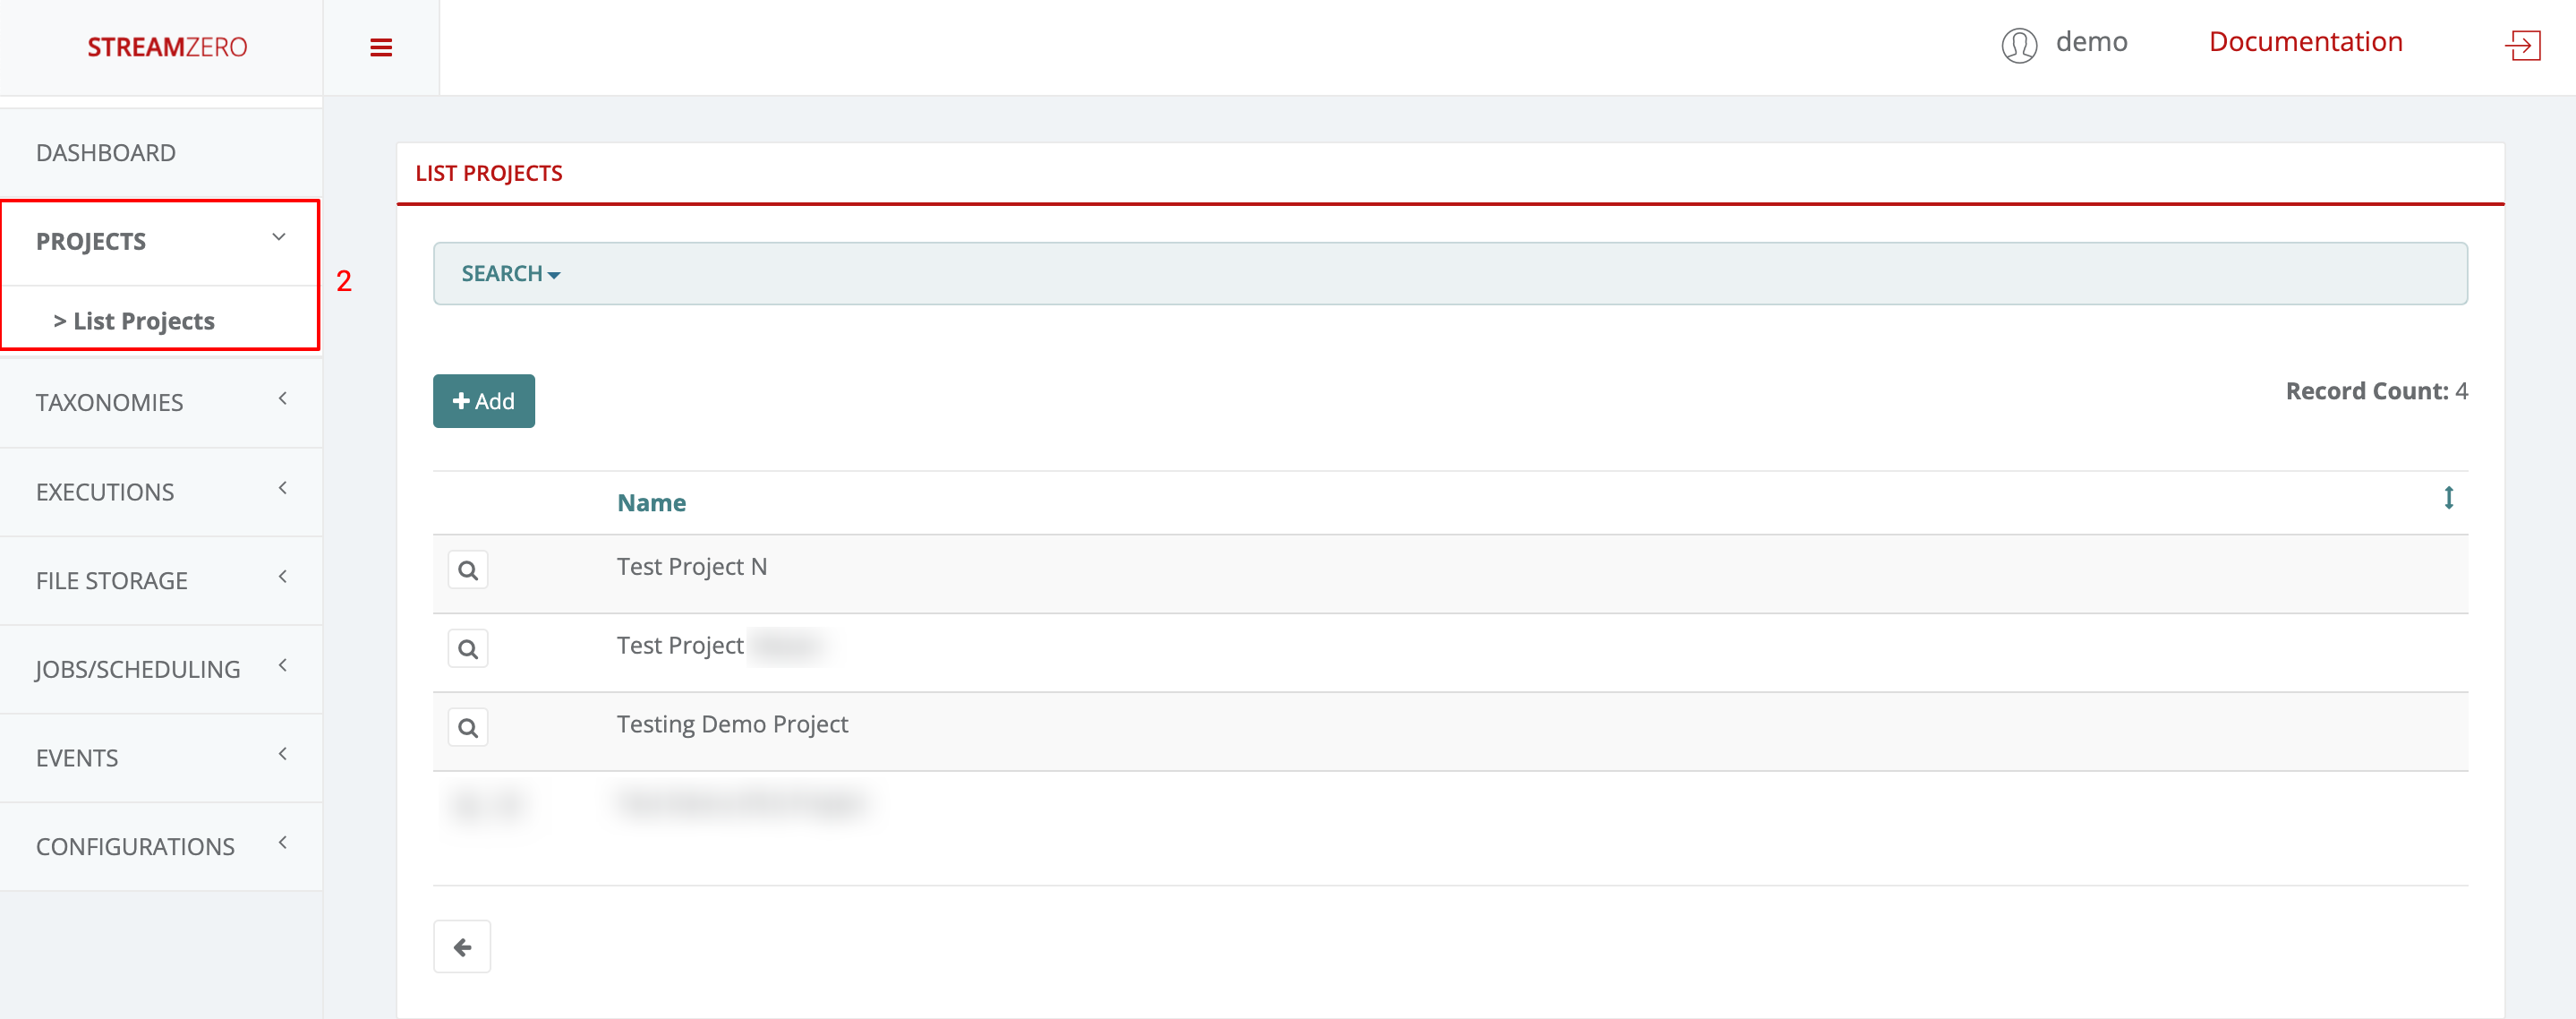
- Navigate to the “Projects” section on the left menu, then select “List Projects.”
- Click “+Add” to create a new project.
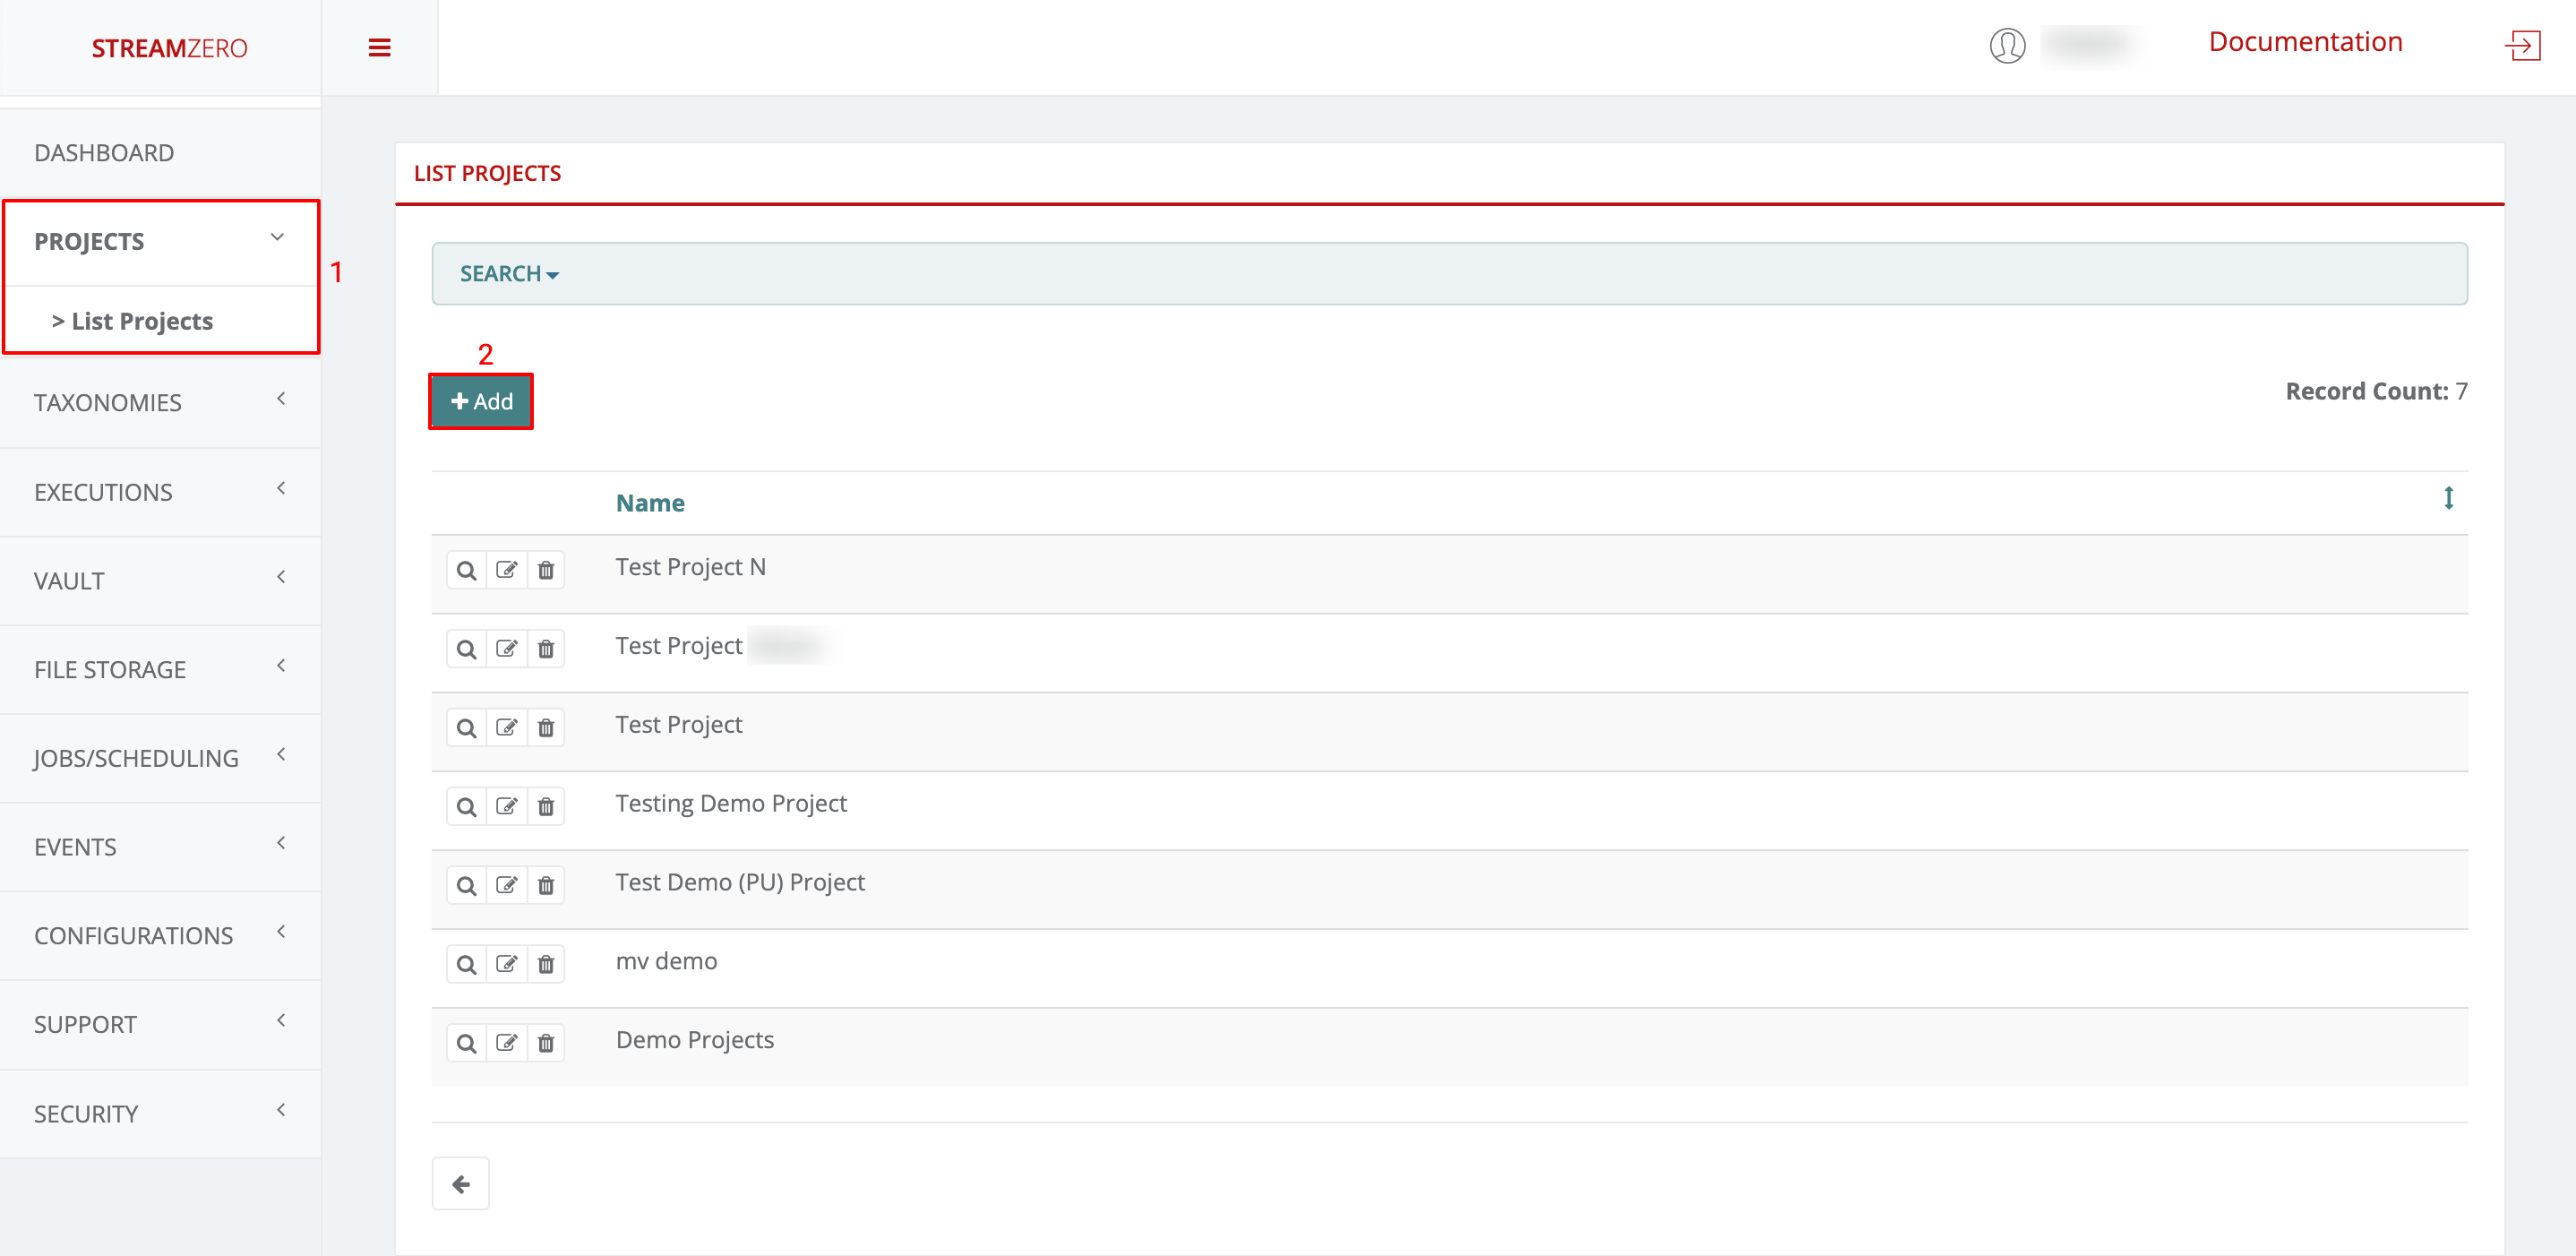
-
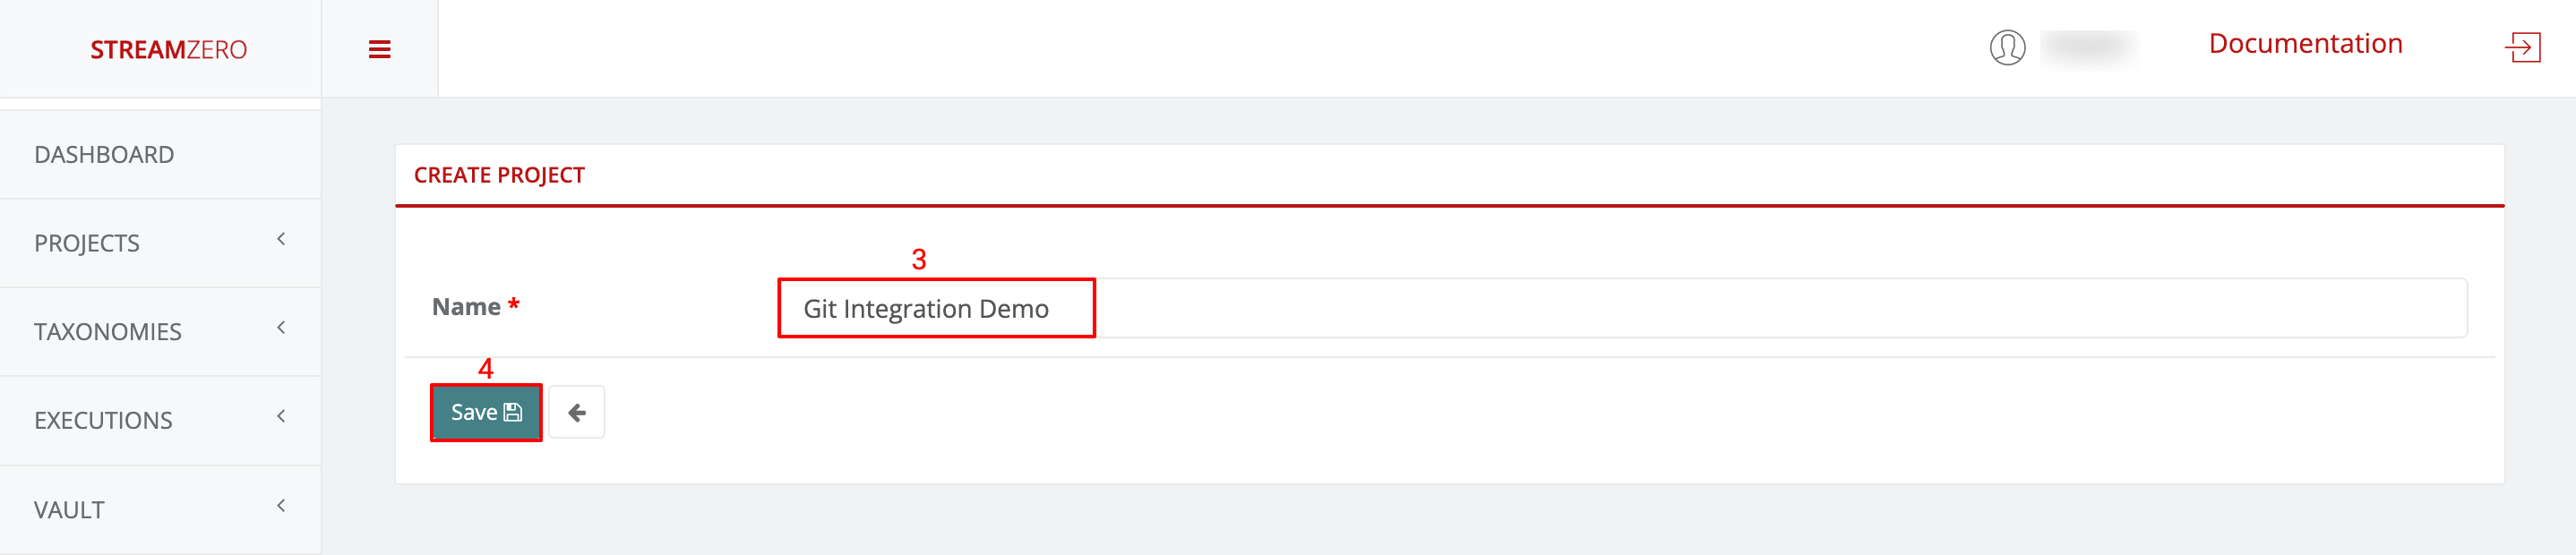
Name the Project:
- Provide a name for the project.
- Save the project.
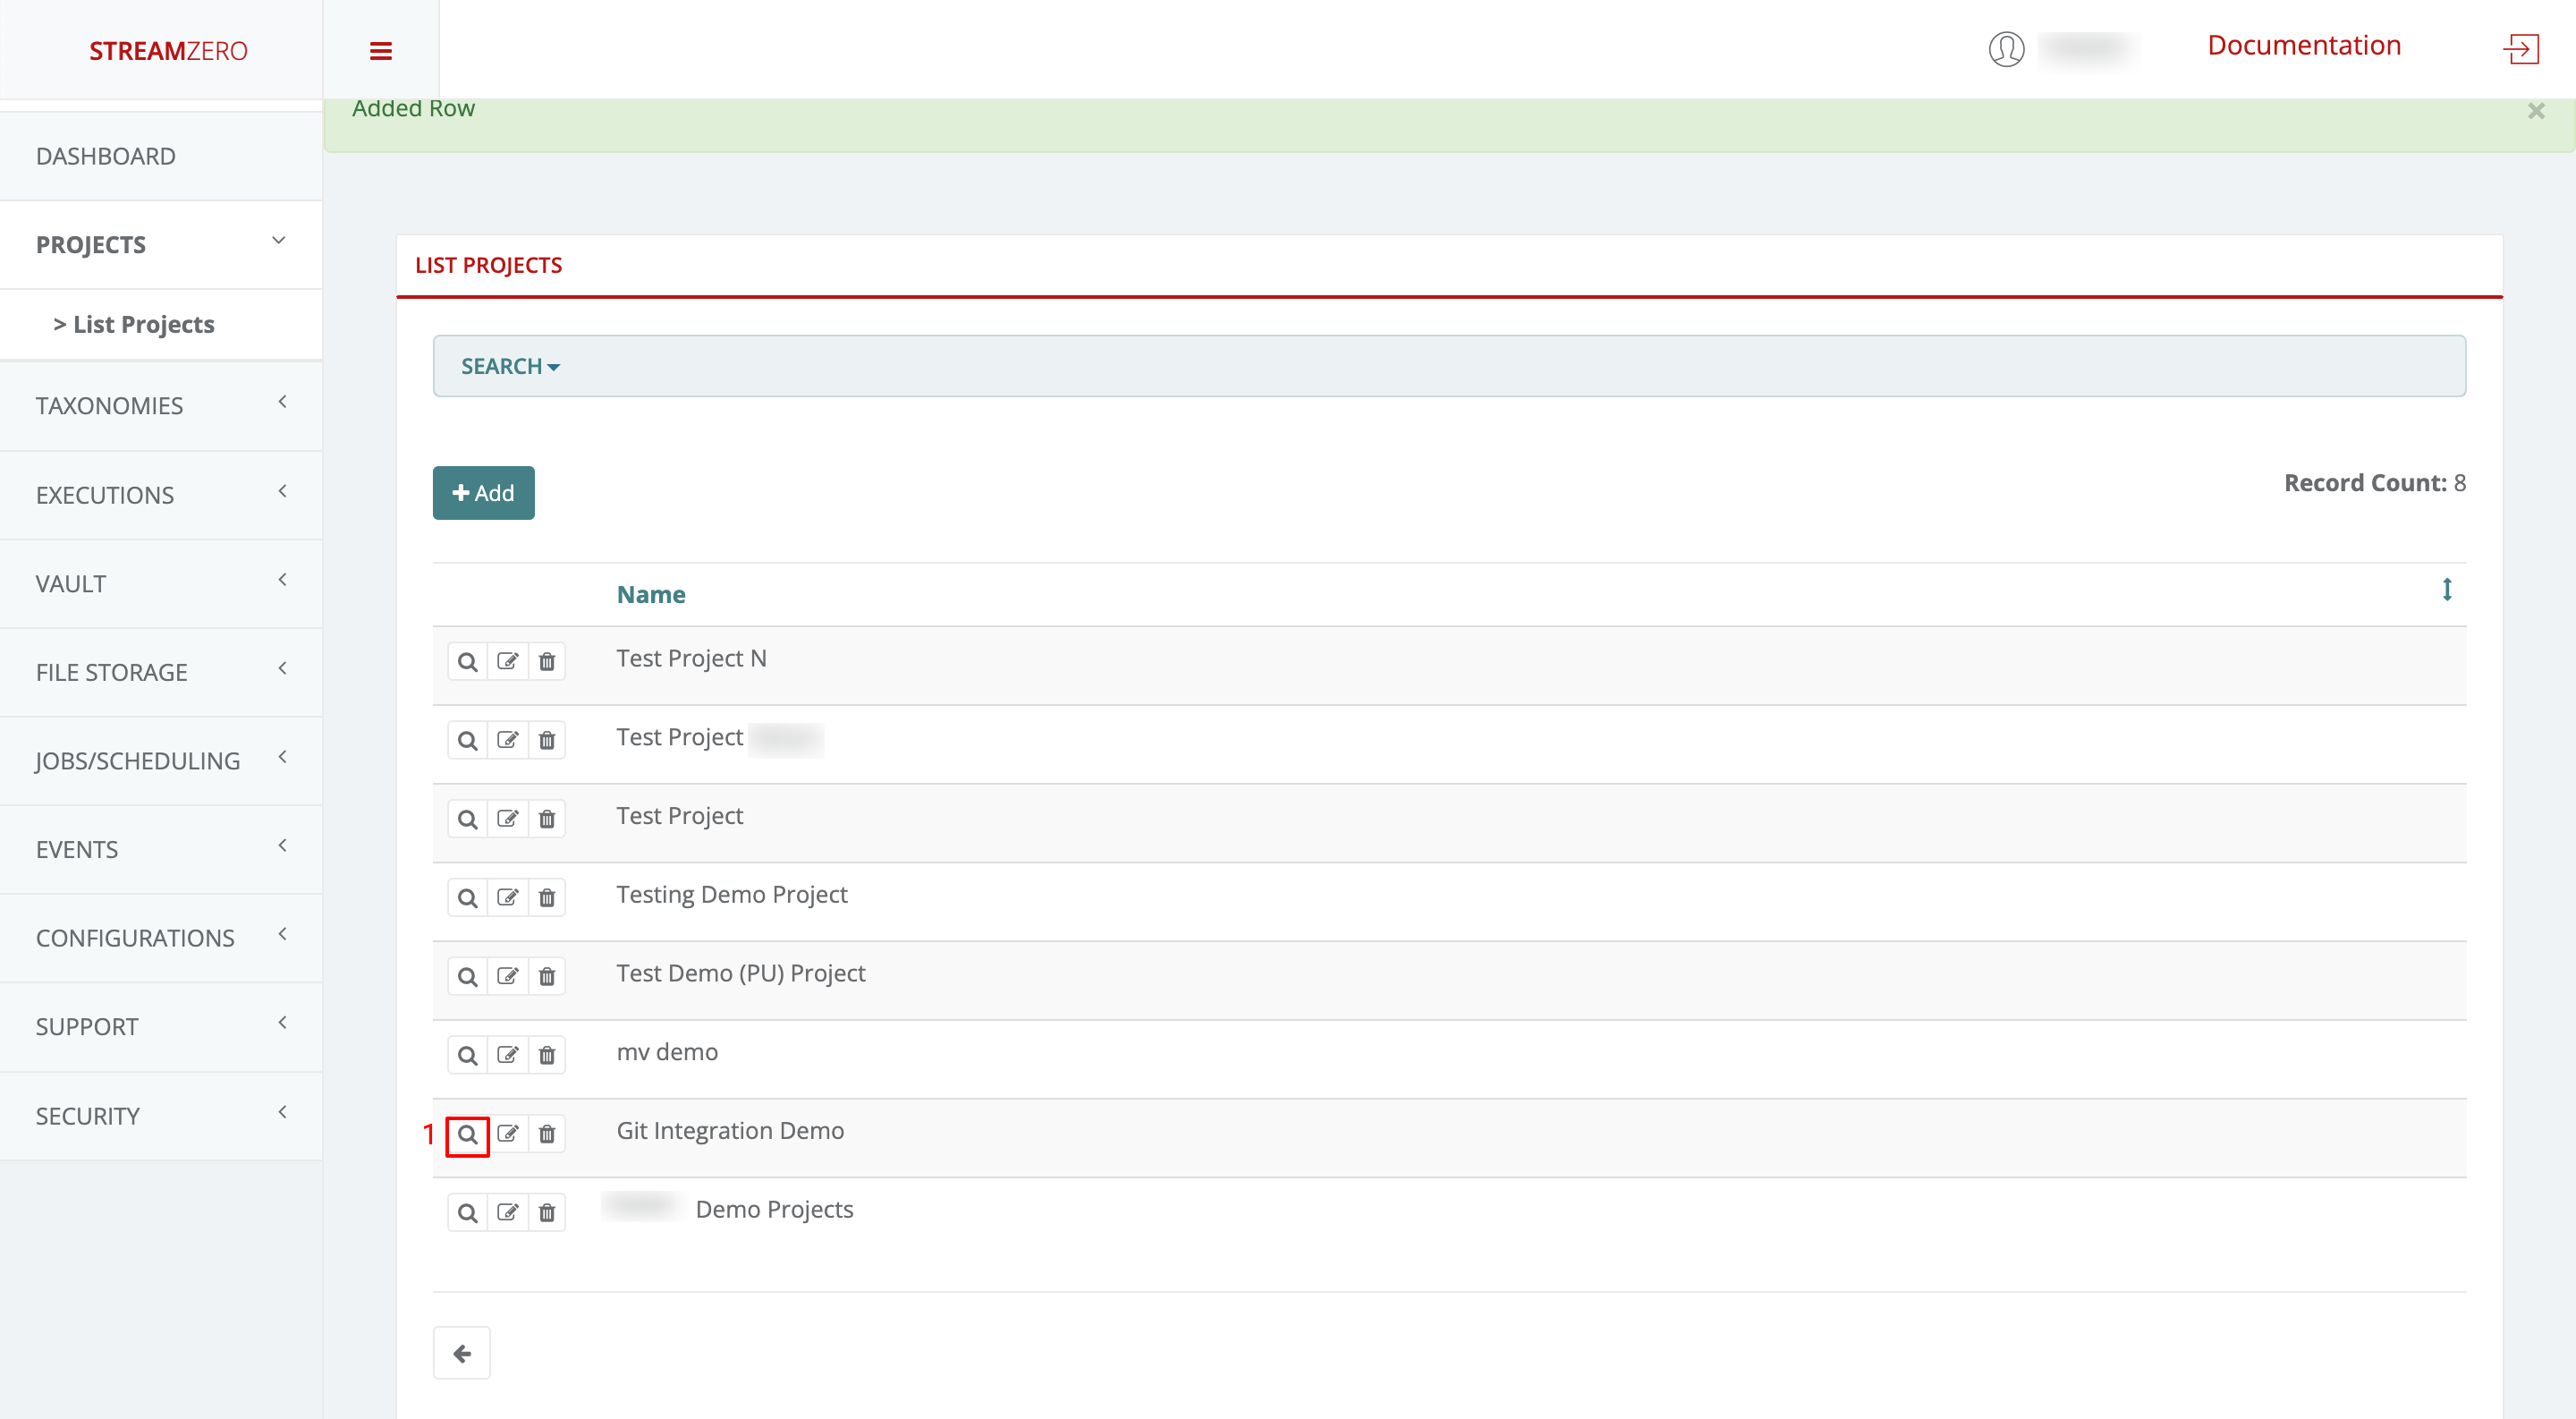
-
View Project Details:
- Click the magnifying glass icon to access the project’s details page.
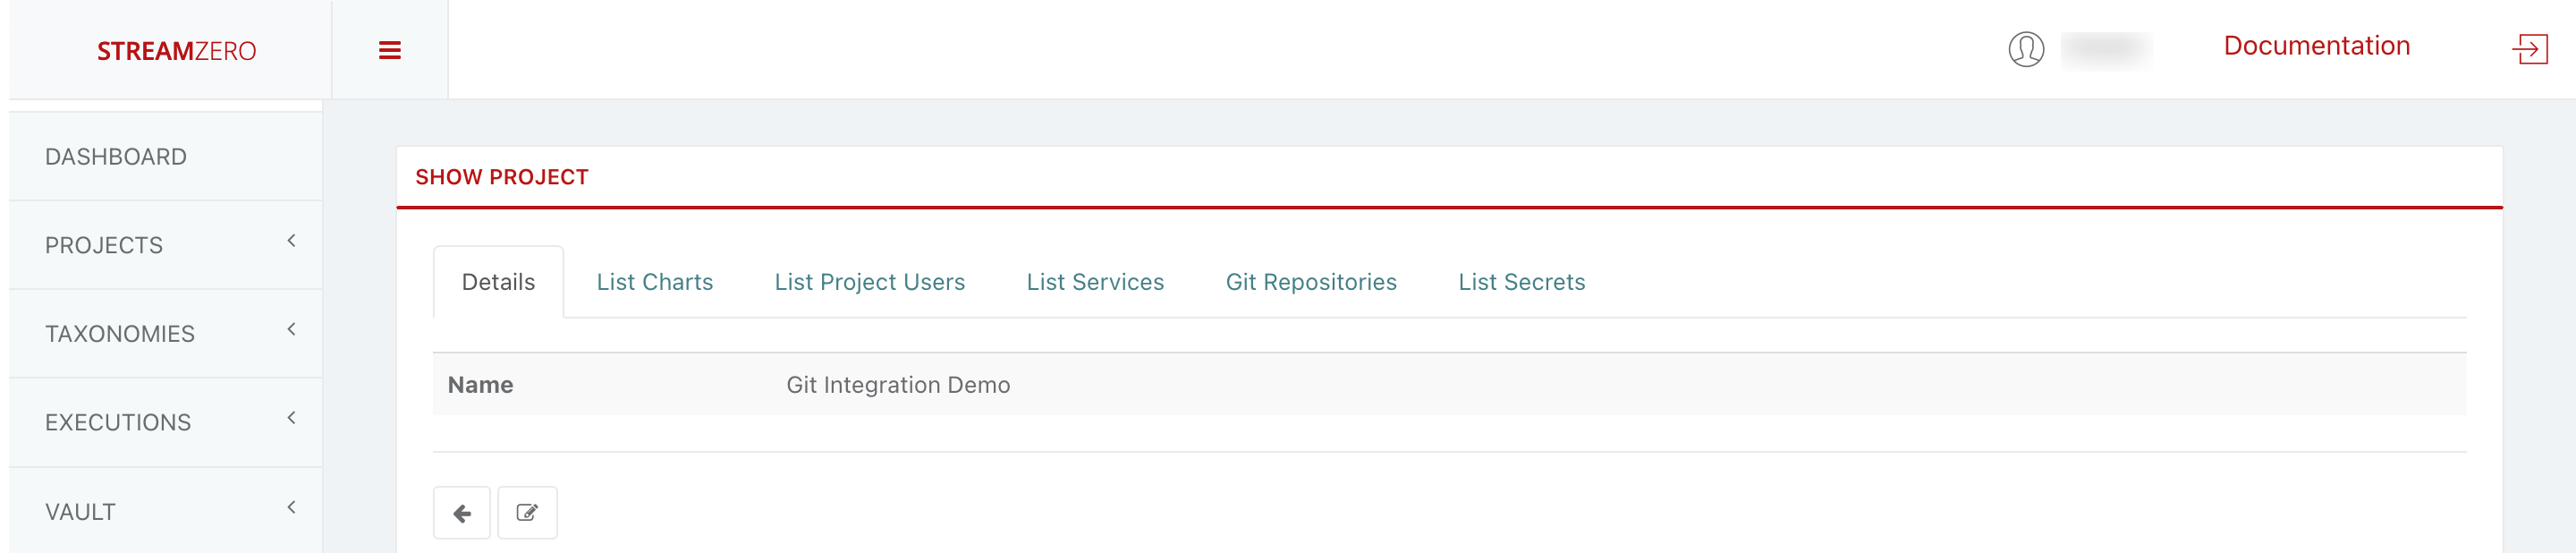
- Add a GitHub Repository:
- Access the “Git Repositories” tab.
- Click “+Add” to add an SSH repository URL.
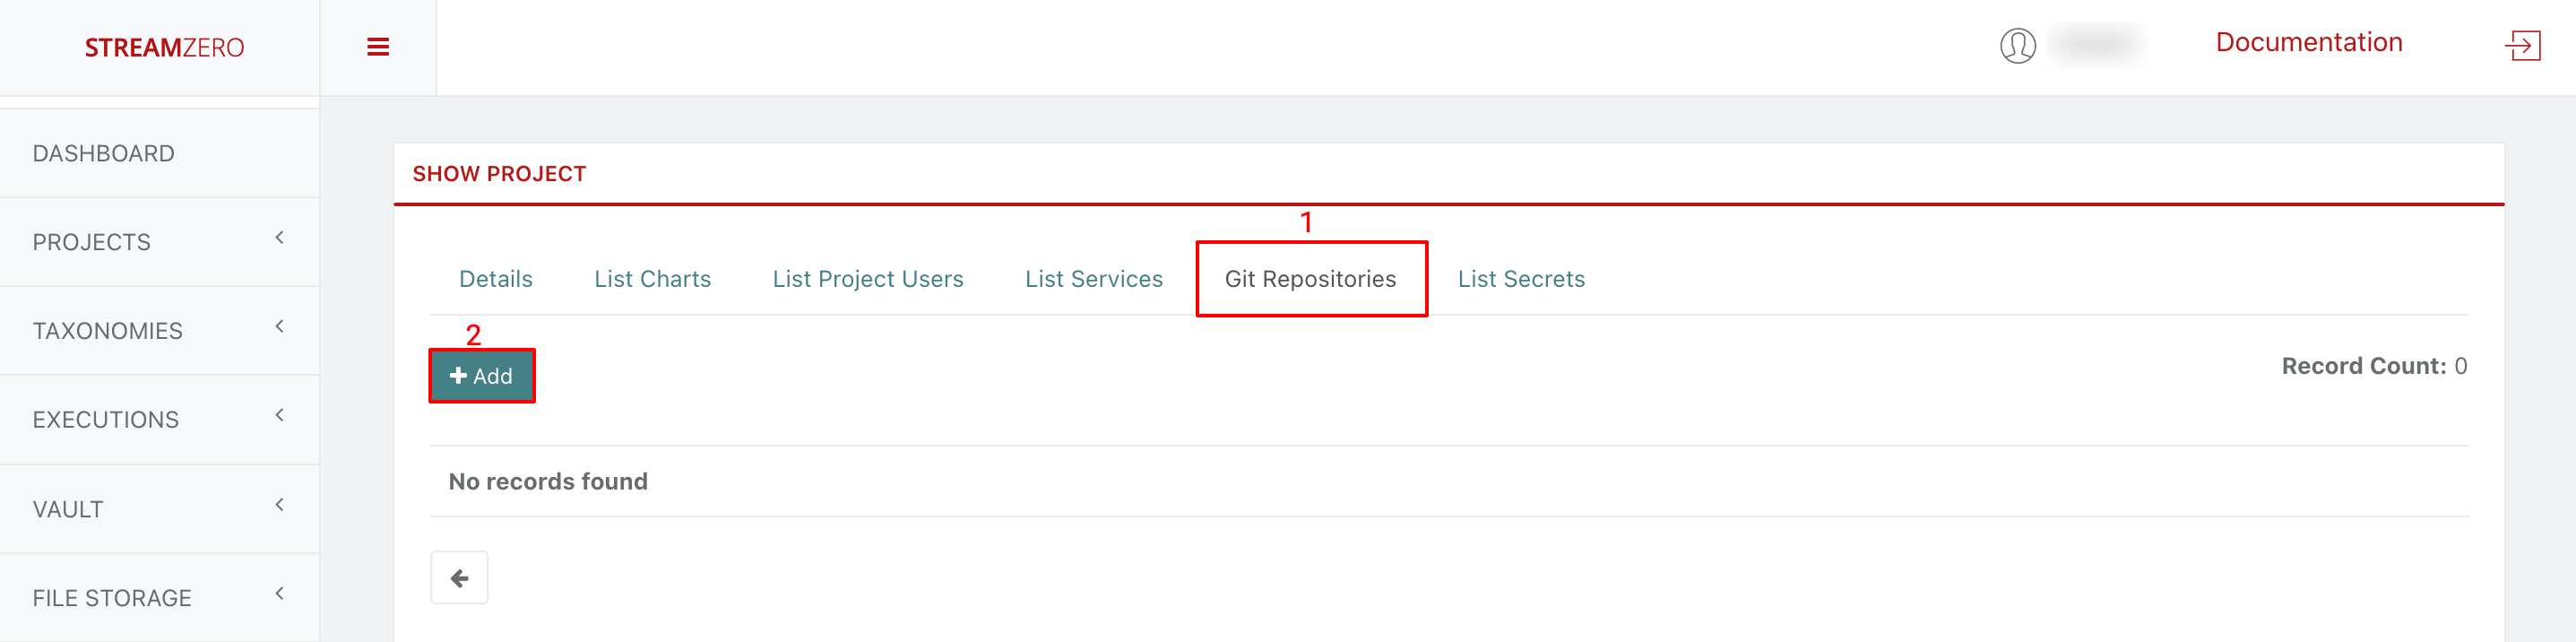
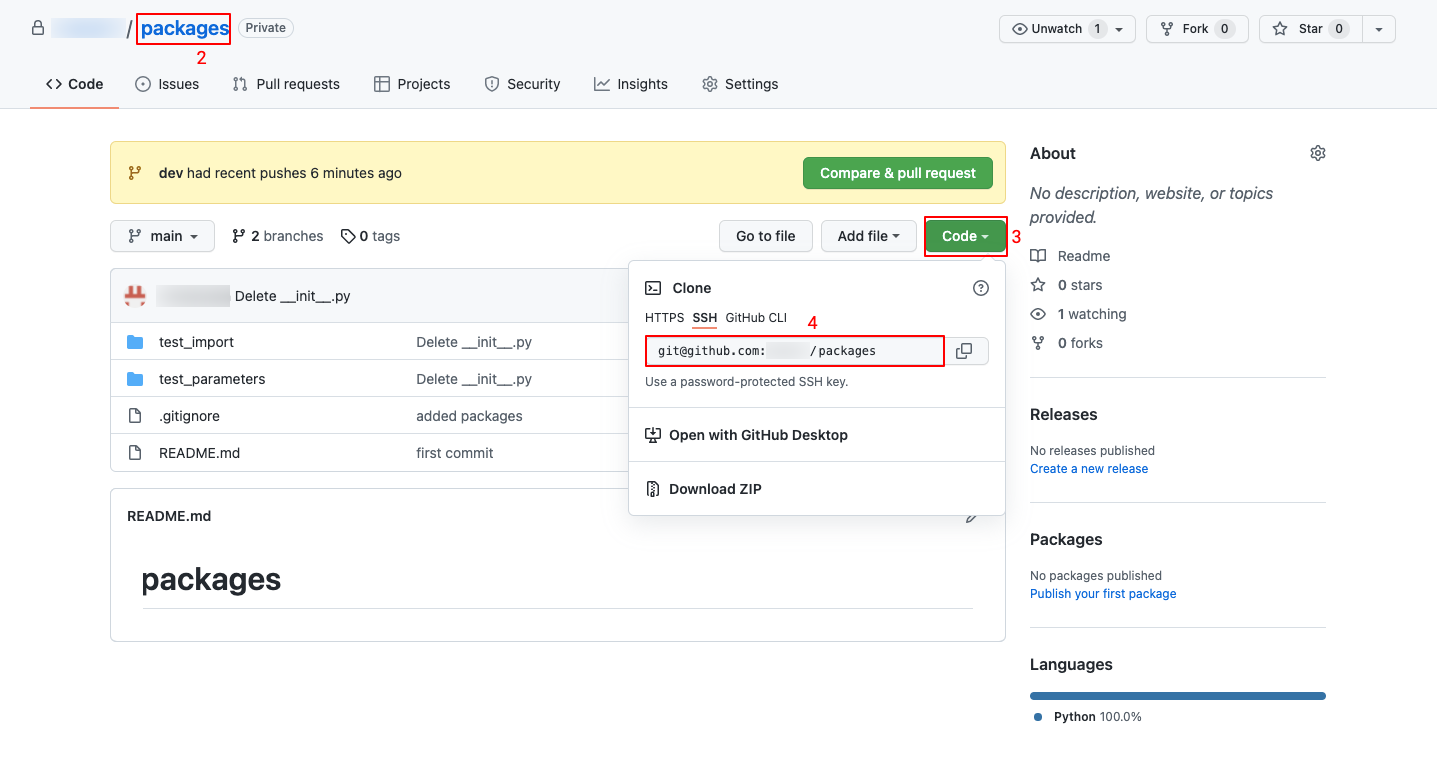
- Copy GitHub Repo:
- Generate a public SSH key (if not done previously).
- Login to your GitHub account.
- Go to the repository you want to link.
- Click the green “Code” button to reveal repository URLs.
- Copy the SSH URL.
-
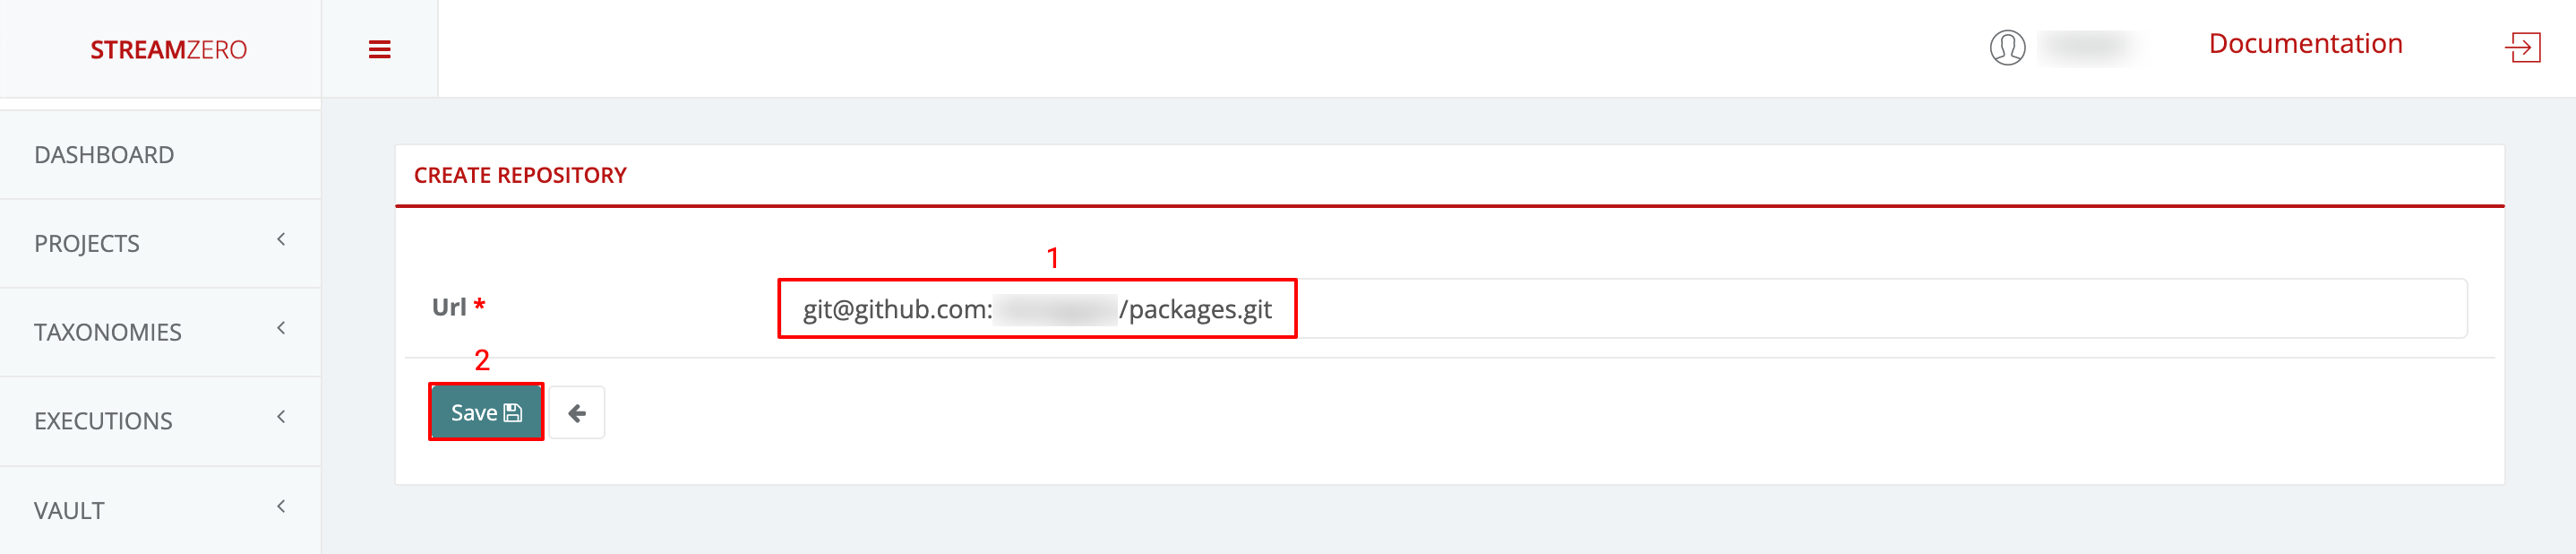
Paste SSH URL:
- Paste the copied SSH URL into the platform.
- Save to set up the repository.
- A pop-up will display a platform-generated public key. This key should be added to the GitHub Repo’s Deploy Keys to enable syncing.
-
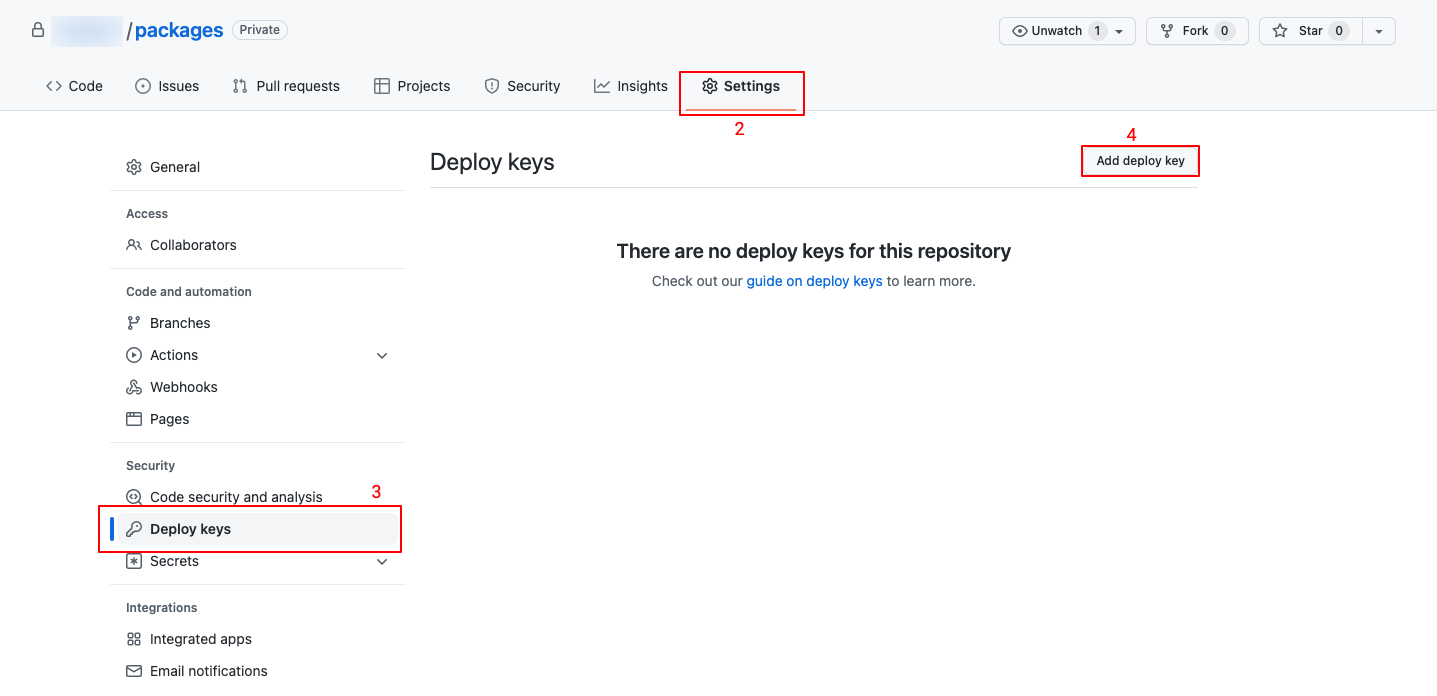
Add Public Key to GitHub:
- Return to GitHub.
- Go to Settings > Deploy Keys.
- Click “Add Deploy Key.”
- Paste the generated public key, name it, and add the key.
- Synchronize the Repository:
- Return to the FX platform.
- Click “Sync Now” to sync the platform with the Git Repository.
- Check the synchronized details page; branches will be added, and status changes.
- Check the Synced Packages:
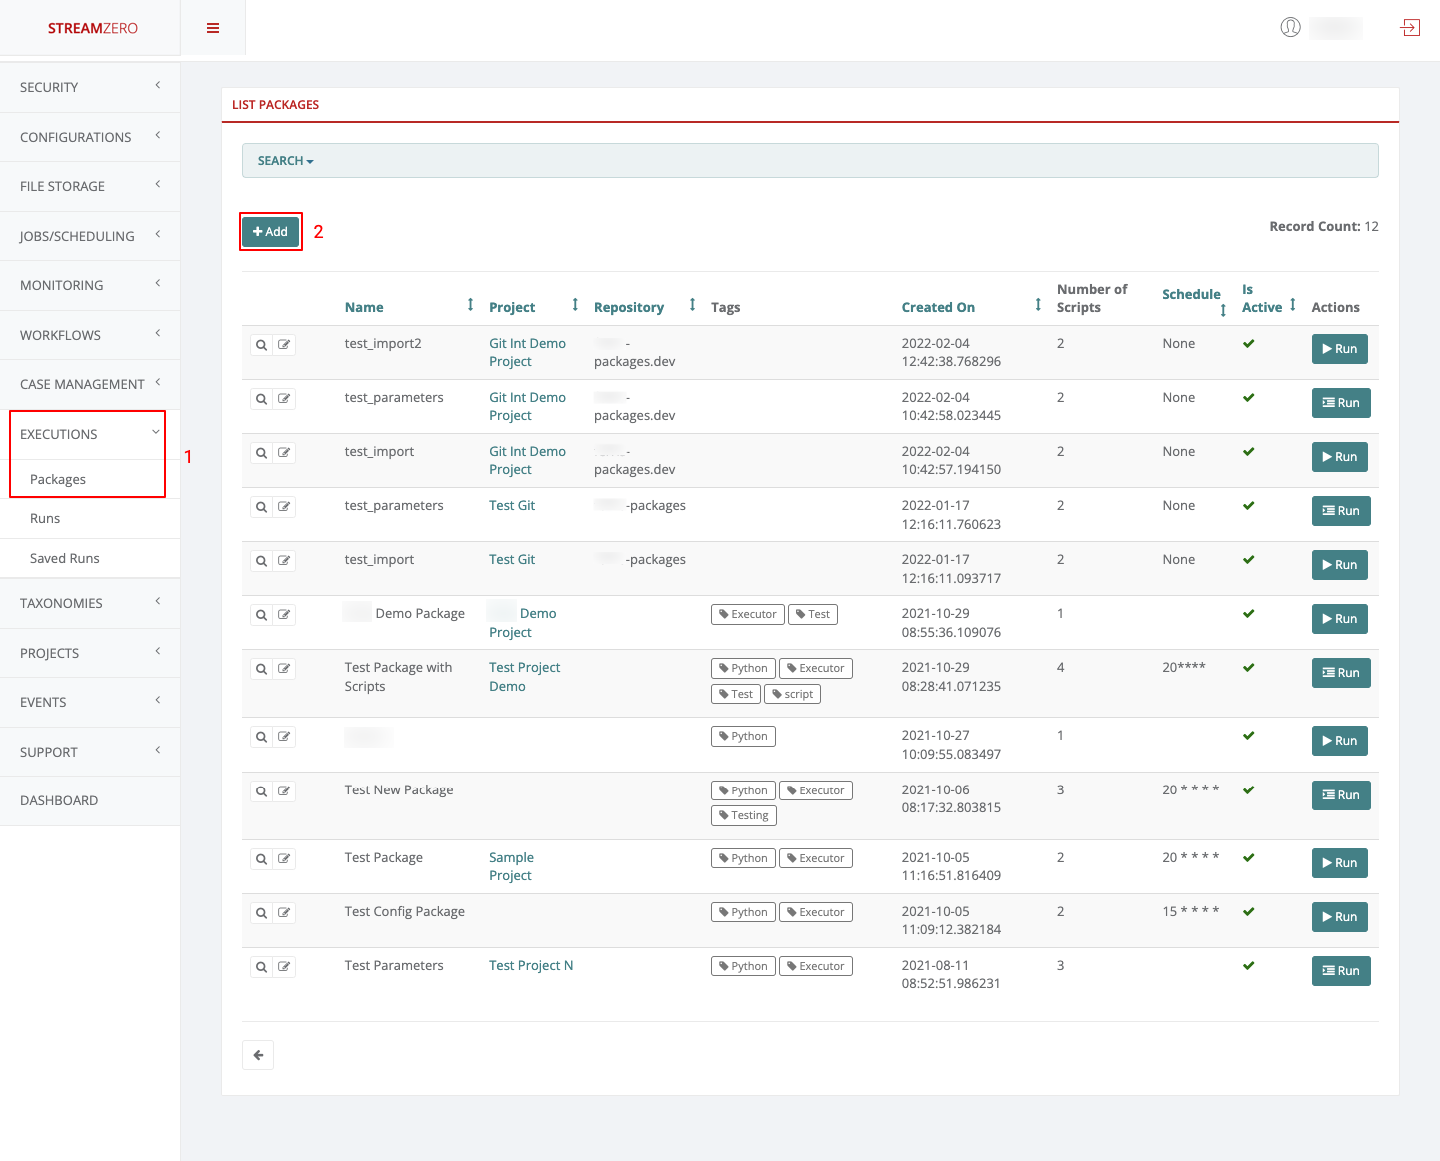
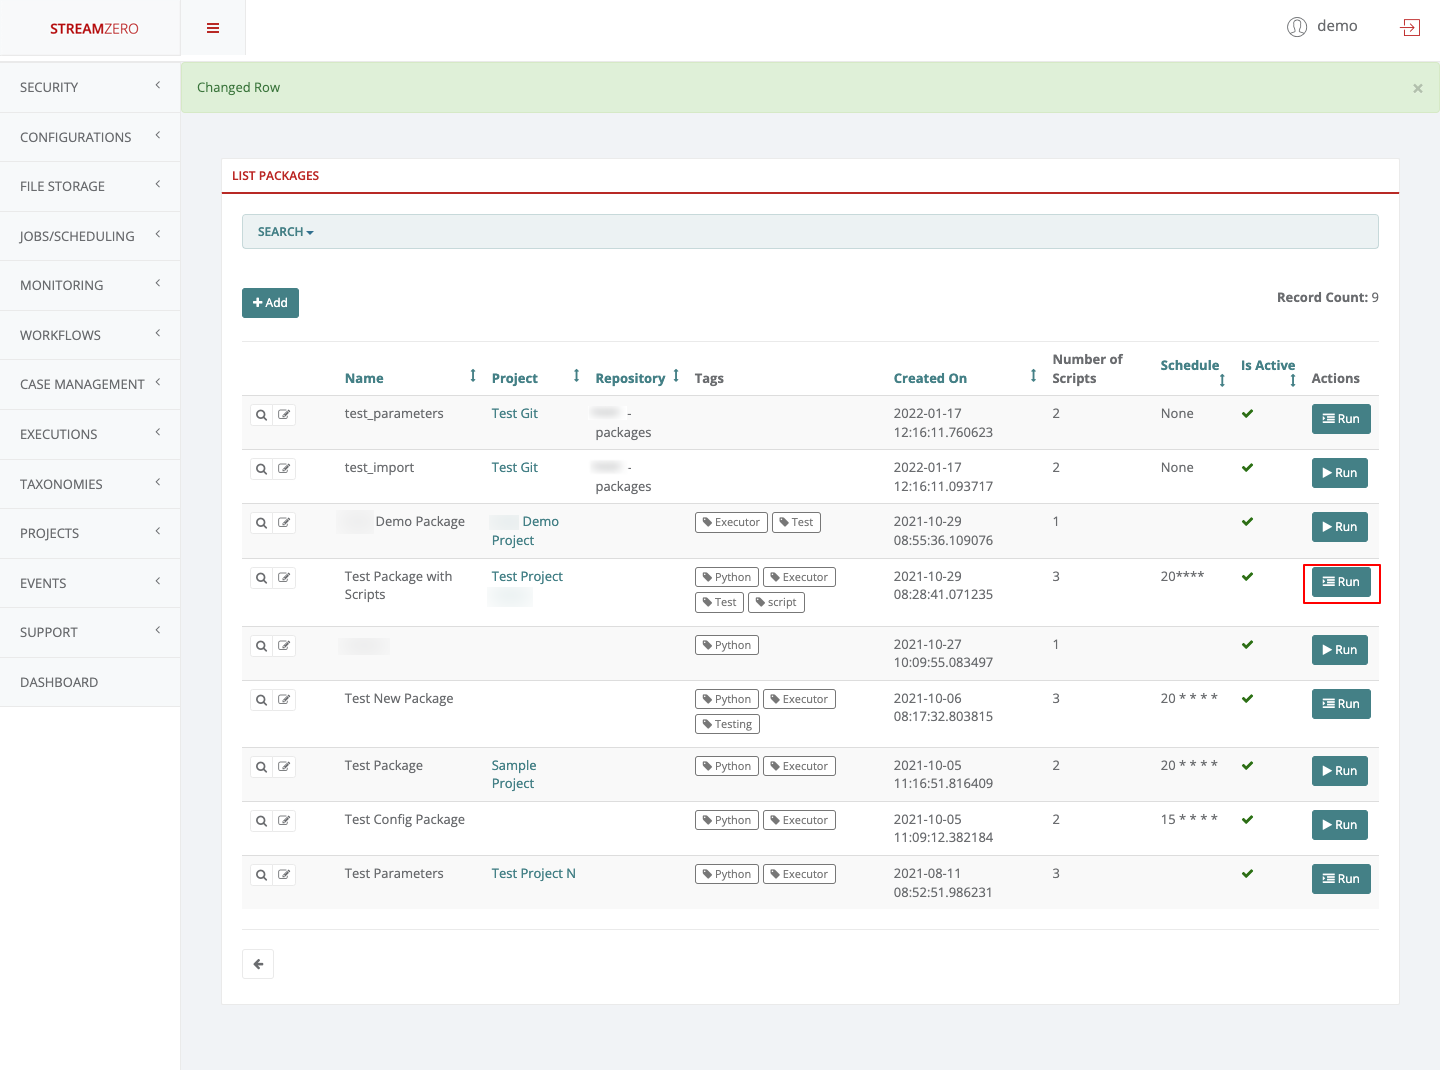
- Verify imported packages by clicking the “List Packages” tab.
- Note that the main branch is automatically synchronized. As development continues and multiple branches are used, they can also be synced individually.
- Change Git Branch on the Platform:
- Users can choose a specific branch to work on or test.
- Access the Edit Repository details page.
- Select the desired branch from the dropdown (e.g., “dev”).
- Save the selection and synchronize packages.
- Verify Synced Packages on Dev Branch:
- Check the “List Packages” tab to confirm successful synchronization from the dev branch.
Managing Public Keys for Security and Access
It’s important to understand the dynamics of managing public keys to ensure security and controlled access within the FX platform environment. Here’s a breakdown of key considerations:
-
Regenerating Public Keys:
- You can regenerate a public key at any time if there’s a concern that unauthorized access might have occurred.
- Regenerated keys must be added to GitHub again and synchronized on the platform afterward.
-
Ensuring Synchronization:
- Whenever a new public key is generated, it must be added to the respective GitHub repository.
- Failure to complete this step will result in synchronization issues on the platform.
-
Synchronization and Key Addition:
- When generating a new key, add it to GitHub’s Deploy Keys.
- Afterward, ensure the key is synchronized on the platform to maintain access.
-
Revoking Access:
- If a situation arises where platform access should be revoked, keys can be deleted directly on GitHub.
The meticulous management of public keys is essential for maintaining the security and integrity of your FX services. By being proactive in regenerating keys, properly adding them to GitHub, and ensuring synchronization on the platform, you’re taking steps to uphold a secure development and deployment environment.
Integrate these insights into your documentation, adapting the content to match your documentation’s tone and style. This note aims to provide users with a clear understanding of how to manage public keys effectively within the FX platform ecosystem.
1.2.4 - Project and Code Structure
In this section, we’ll delve into the structure and components that make up an FX service. Understanding the organization of services, repositories, and the various artefacts involved is pivotal for efficient development within the FX platform.
Understanding Projects
Within the FX Platform, a Project serves as a container for multiple Services. Projects don’t play a functional role; they primarily aid in organizing services based on functional relationships, solution domains, or user access groups.
A project can be associated with multiple git repositories, each containing a collection of services.
Repository Structure
In the DX platform, every directory within a Repository represents a distinct service. Files located in the root directory of a Repository are disregarded.
Service Artefacts
A service encompasses an assortment of scripts, modules, and assets, including configuration files. The following are the supported types of artefacts along with their respective roles:
| Artefact Type | Description |
|---|---|
*.py |
Python scripts form the core of a service. You can include multiple python scripts, and they are executed in the order defined in the manifest.json file. These scripts can define classes, static methods, and more. |
*.sql |
SQL files containing SQL statements. They are executed against the default database defined in the platform. These files support a ‘jinja’ like notation for parameter extraction and embedding program logic within the SQL. |
manifest.json |
The manifest.json file serves to describe the service to the platform and other users. It adheres to a predefined structure and is detailed further in the ‘Manifest File’ section. |
config.json |
This JSON file defines the service’s configuration. These values are stored in Consul once imported into the platform. Configuration values can be accessed using the service’s ‘context’ with the ferris_ef module. |
secrets.json |
This file outlines the secrets accessible within a specific service. The secrets.json file is uploaded via the UI and should not be committed to Git. |
*.txt, *.json, *.jinja, etc. |
Various assets utilized by the service. |
parameters.json |
Optional. This file defines MicroUIs, which generate forms to trigger a service. |
Understanding the components that constitute a service, repository, and project sets the foundation for effective FX service development. With this knowledge, you can seamlessly create, organize, and manage your services within the DX platform.
Sample Repository and Directory Structure
|
|
1.2.5 - Secrets
Secrets are sensitive configuration information which you wish to use within your service. These may be a single attribute(such as a password) structures with multiple attributes.
Secrets are the ability to deal with sensitive data through scripts (secrets.json) needed for package execution, such as:
- Database Passwords
- Secret Keys
- API Keys
- any other sensitive data
Secrets aren’t visible to any users and are passed encrypted to the actual script at the predefined package execution time. Once the script (secrets.json) is uploaded to the platform, the data is read and securely (double encryption) stored in the database.
Secret Scopes
The DX platform supports the following scopes for a secret.
| Scope | Description |
|---|---|
| Service secrets | Service Scope secrets are only available to the specific service within which the secret was defined. They are managed by uploading a secrets.json file on the service management UI. While they can also by synced from GIT, this is not a preferred approach in order to avoid having secrets in git. |
| Project Secrets | Secrets that are accessible to any service within a specific project. These are created by uploading a JSON file on the project secrets tab on the UI. |
| Platform Secrets | Secrets that are accessible to any service running on the platform. These are created by uploading JSON file on the Vault->Secrets page. |
When accessing secrets using fx_ef.context.secrets.get('secret_name') it will first lookup for secret_name within service secrets, then project and finally platform
The secrets.json File
To add service scope secrets you can upload a secrets.json file.
Those values are stored double encrypted in database and can be only accessed within the executing script. A sample secrets.json
|
|
Accessing secrets
With fx_ef.context.secrets you can access secrets stored on at the platform, project or service scope.
|
|
This command will first lookup for secret named secret_name within package secrets (defined in secrets.json file of the package). If such key doesn’t exist it will lookup for it within project secrets, and finally within platform’s secrets. If secret with such name doesn’t exist None will be returned.
Can be accessed using fx_ef.context.secrets.get('secret_name'). Can be set using context.secrets.set(“secret_name”, {“somekey”:“someval”}, “project”)`
Can be accessed using fx_ef.context.secrets.get('secret_name'). Can be set using context.secrets.set("secret_name", {"somekey":"someval"}, "platform")
Setting secrets
Using fx_ef.context.secrets.set(name, value, context) method you can set secrets on project and platform level.
|
|
| Parameter | Description |
|---|---|
| name | Name of the secret to be set. If secret with the same name already exist it will be updated |
| value | Value of the secret that should be set |
| context | Context of the secret. Possible values are platform and project |
Create a new package
Note that the package creation was presented in another submenu of the User Guide, so only the needed parameters will be filled in the package to showcase the Secrets functionality.
-
Click on Executions in the left side menu and on Packages
-
Click on Add to create a new package
- Name the package
- Click on choose file and add the python scrypt (test_secrets.py)
- Click on Add more scripts and click on choose file to add the JSON script (secrets.json)
- Click on Save to save the package

test_secrets.py script
This is an example script that shows how secrets from the secrets.json file can be accessed from a script at execution time using the get_secret() helper function from the fx_ef package.
|
|
1.2.6 - State Management
One key aspect in reactive applications is how to manage state between runs.
With StreamZero FX this is simple. Each Service has a state object available at run time. All you need to do is the following.
|
|
The state is stored across Service runs. A state log is also maintained and stored for reference and reload.
How it works
When a Service is started the state is loaded from the consul key store.
When a state is stored it is placed in Consul as well as sent to Kafka. The Kafka stream maintains an audit log of the state. And also serves to retreive state after a system shut down.
1.2.7 - Form Generator
Occasionally you will come across use cases where you are required to provide a frontend for trigerring a service - usually by a non-technical person. FX and K8X both provide the ability to define Forms using a simple JSON structure.
The Forms are generated automatically by the StreamZero Management UI based on the ‘parameters.json’ file.
When a service directory contains a parameters.json file the ‘Run’ Button on th Management UI will automatically change the icon to a ‘Form’ icon.
The parameters.json file can be added to an existing service directory. When doing so you need to ensure that within the manifest.json file the ‘allow_manual_trigerring’ is set to ’true’
The following is a template for a parameters.json file.
The parameters.json file
The parameters.json file contains a JSON definition of fields that will be rendered and presented to user upon manually triggering a package execution in order to gather the parameter values for running the package. This way, same package can be easily adapted and reused by different scenarios or environments simply by sending different parameter values to the same package.
|
|
The above template will display a form which looks as below.
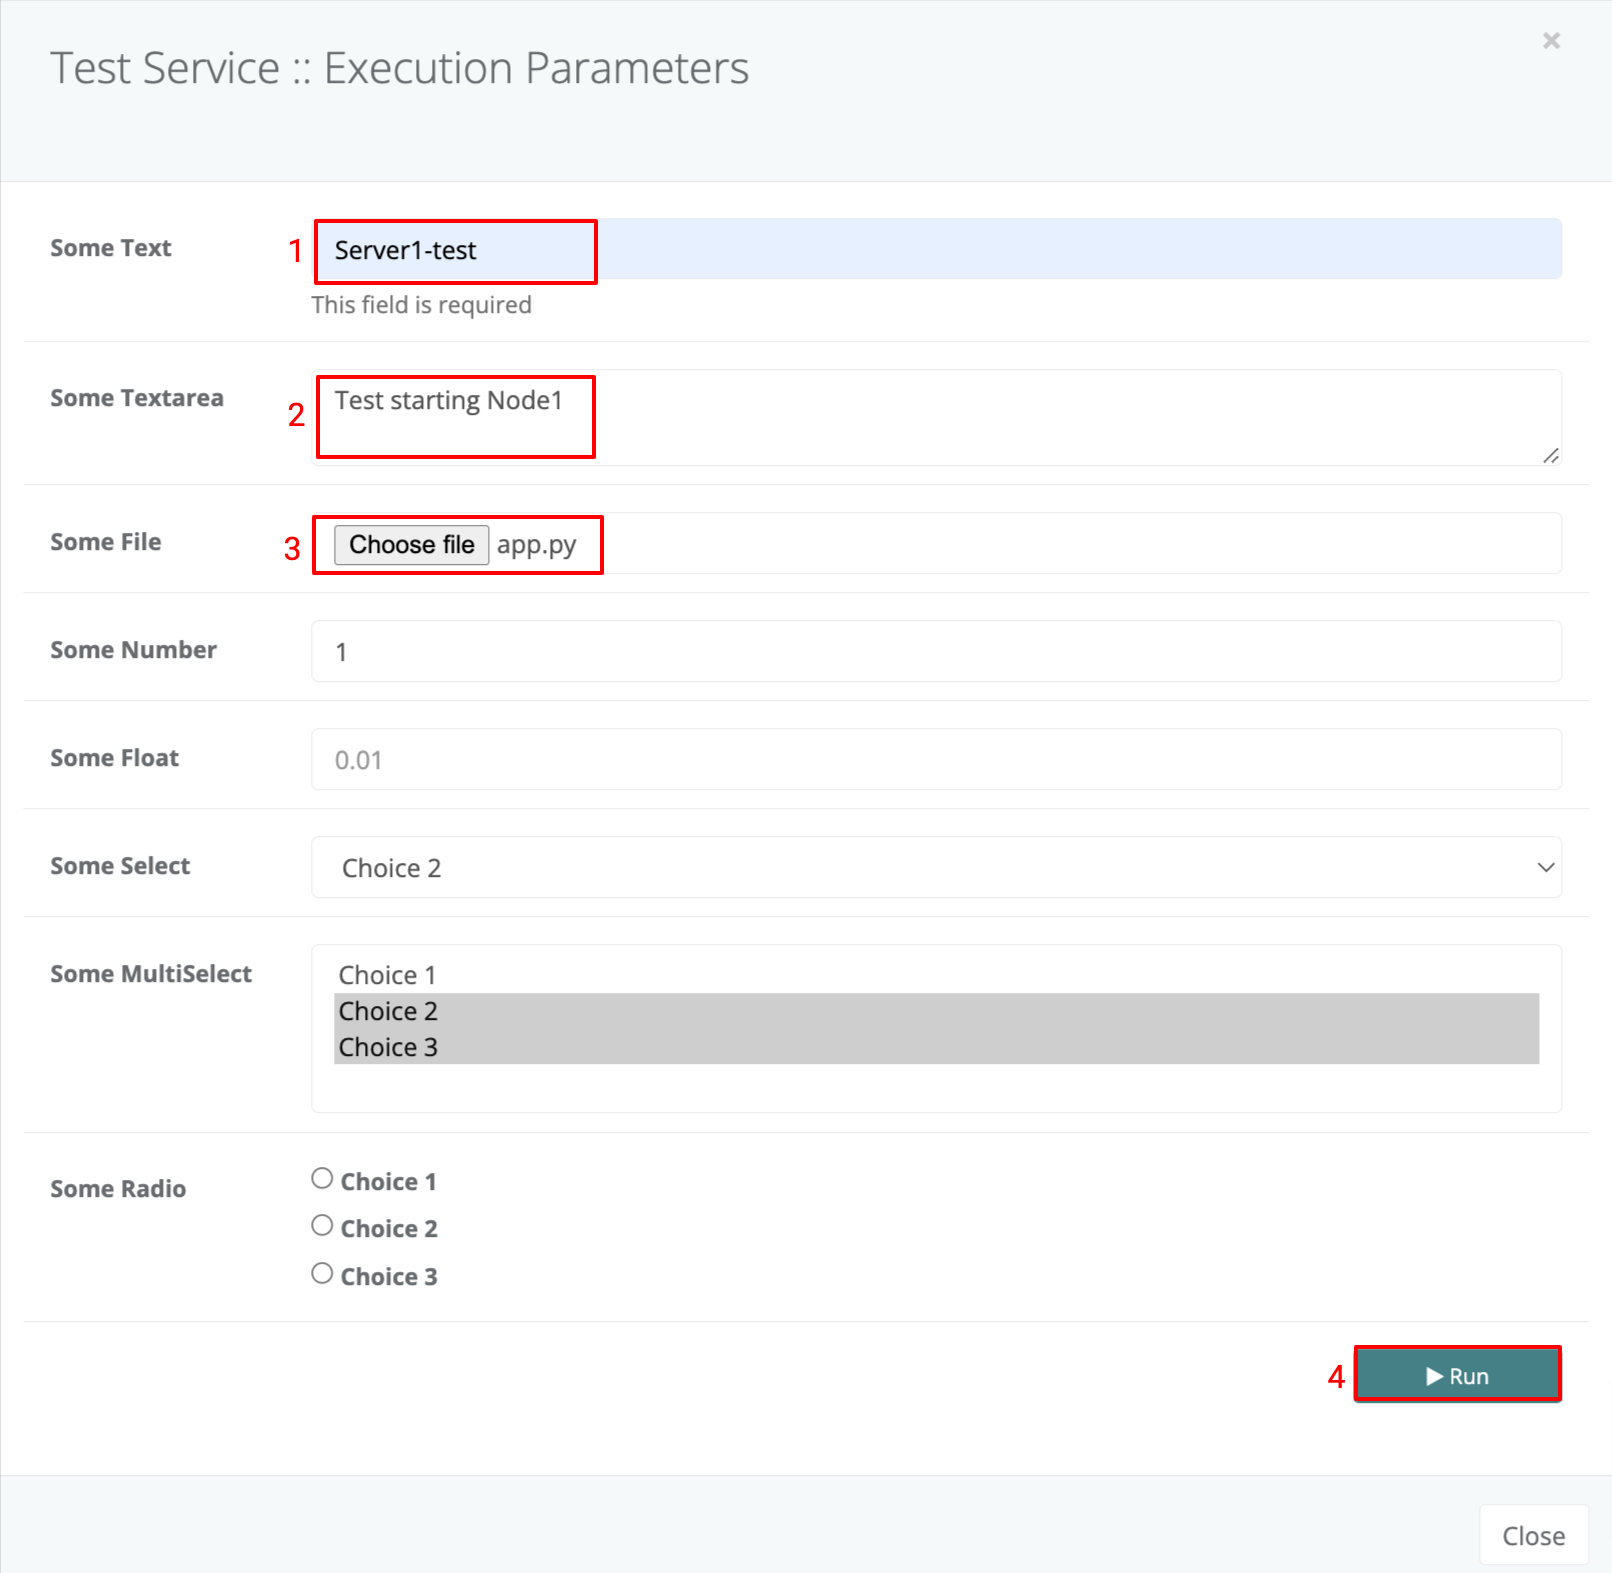
When the form values and entered and the ‘Run’ Button is clicked the form parameters and values will be sent to the service on trigger and these will be available to the service just as if it were trigerred by an event with the same payload as the form values.
The following is a sample script that extracts the parameters (you will notice it is no different from an event trigerred script). The only exception are the text areas which are dealt with as String data type and therefore should be converted using the relevant JSON library.
|
|
1.2.8 - Database Integration
Install Database Drivers
StreamZero DX requires a Python DB-API database driver and a SQLAlchemy dialect to be installed for each datastore you want to connect to within the executor image.
Configuring Database Connections
StreamZero can manage preset connection configurations. This enables a platform wide set up for both confidential as well as general access databases.
StreamZero uses the SQL Alchemy Engine along with the URL template based approach to connection management. The connection configurations are maintained as secrets within the platform and are therefore not publicly accessible i.e. access is provided for administrators only.
Retrieving DB Connections
The following is how to retrieve a named connection. The following sample assumes that the connection identifier key is uploaded to the package as a secrets.json.
|
|
In the above example the db_url is set up as a secret with name 'my_connection'.
Depending on whether this is a service, project or platform level secret there are different approaches to set up the secret. For service level secret the following is a sample set up for a secrets.json file of the package.
|
|
- For Project scope use the
'secrets'tab of the Project Management UI. - For Platform scope secrets use the
Vault UIin the DX Manager Application.
Database Drivers
The following table provides a guide on the python libs to be installed within the Executor docker image. For instructions on how to extend the Executor docker image please check this page: /docs/extending_executor_image
You can read more here about how to install new database drivers and libraries into your StreamZero DX executor image.
Note that many other databases are supported, the main criteria being the existence of a functional SQLAlchemy dialect and Python driver. Searching for the keyword “sqlalchemy + (database name)” should help get you to the right place.
If your database or data engine isn’t on the list but a SQL interface exists, please file an issue so we can work on documenting and supporting it.
A list of some of the recommended packages.
| Database | PyPI package |
|---|---|
| Amazon Athena | pip install "PyAthenaJDBC>1.0.9 , pip install "PyAthena>1.2.0 |
| Amazon Redshift | pip install sqlalchemy-redshift |
| Apache Drill | pip install sqlalchemy-drill |
| Apache Druid | pip install pydruid |
| Apache Hive | pip install pyhive |
| Apache Impala | pip install impyla |
| Apache Kylin | pip install kylinpy |
| Apache Pinot | pip install pinotdb |
| Apache Solr | pip install sqlalchemy-solr |
| Apache Spark SQL | pip install pyhive |
| Ascend.io | pip install impyla |
| Azure MS SQL | pip install pymssql |
| Big Query | pip install pybigquery |
| ClickHouse | pip install clickhouse-driver==0.2.0 && pip install clickhouse-sqlalchemy==0.1.6 |
| CockroachDB | pip install cockroachdb |
| Dremio | pip install sqlalchemy_dremio |
| Elasticsearch | pip install elasticsearch-dbapi |
| Exasol | pip install sqlalchemy-exasol |
| Google Sheets | pip install shillelagh[gsheetsapi] |
| Firebolt | pip install firebolt-sqlalchemy |
| Hologres | pip install psycopg2 |
| IBM Db2 | pip install ibm_db_sa |
| IBM Netezza Performance Server | pip install nzalchemy |
| MySQL | pip install mysqlclient |
| Oracle | pip install cx_Oracle |
| PostgreSQL | pip install psycopg2 |
| Trino | pip install sqlalchemy-trino |
| Presto | pip install pyhive |
| SAP Hana | pip install hdbcli sqlalchemy-hana or pip install apache-Feris[hana] |
| Snowflake | pip install snowflake-sqlalchemy |
| SQLite | No additional library needed |
| SQL Server | pip install pymssql |
| Teradata | pip install teradatasqlalchemy |
| Vertica | pip install sqlalchemy-vertica-python |
| Yugabyte | pip install psycopg2 |
1.2.9 - Event Source Adapters
The Event Source Adapter enables easy integration of external event streams to Ferris.
The role of the Event Source Adapter is to receive events from external streams, convert them into Cloud Events and push them to the ferris.events Kafka Topic. The Cloud Events that are generated will contain an indicator of the source, one or more specific event types (depending on the type of source and the use case) and the content of the source event in the payload of the output Cloud Event.
Example Event Source Adapters
The following are a couple of examples of source adapters
Generic Webhook Adapter : Exposes a webhook end point outside the cluster which may be used to submit events as webhook requets. The generic adapter may source multiple event types and does not filter the content. It may be used for example to simultaneously accept AWS EventBrige CouldEvents and GitHub Webhooks. It is the role of a package to filter or split events as is suited for the use case.
Twitter Adapter: Streams twitter based on configured hash tags and converts them to cloud events.
IBM MQ Adapter
Kafka Adapter: Sources data from JSON streams within kafka and converts them to Cloud Events.
Azure MessageBus Adapter:
Amazon SQS Adapter
MQTT Adapter
Redis Queue Adapter
ActiveMQ Source
Amazon CloudWatch Logs Source
Amazon CloudWatch Metrics Sink
Amazon DynamoDB Sink
Amazon Kinesis Source
Amazon Redshift Sink
Amazon SQS Source
Amazon S3 Sink
AWS Lambda Sink
Azure Blob Storage Sink
Azure Cognitive Search Sink
Azure Cosmos DB Sink
Azure Data Lake Storage Gen2 Sink
Azure Event Hubs Source
Azure Functions Sink
Azure Service Bus Source
Azure Synapse Analytics Sink
Databricks Delta Lake Sink
Datadog Metrics Sink
Datagen Source (development and testing)
Elasticsearch Service Sink
GitHub Source
Google BigQuery Sink
Google Cloud BigTable Sink
Google Cloud Functions Sink
Google Cloud Spanner Sink
Google Cloud Storage Sink
Google Pub/Sub Source
HTTP Sink
IBM MQ Source
Microsoft SQL Server CDC Source (Debezium)
Microsoft SQL Server Sink (JDBC)
Microsoft SQL Server Source (JDBC)
MongoDB Atlas Sink
MongoDB Atlas Source
MQTT Sink
MQTT Source
MySQL CDC Source (Debezium)
MySQL Sink (JDBC)
MySQL Source (JDBC)
Oracle Database Sink
Oracle Database Source
PagerDuty Sink
PostgreSQL CDC Source (Debezium)
PostgreSQL Sink (JDBC)
PostgreSQL Source (JDBC)
RabbitMQ Sink
RabbitMQ Source Connector
Redis Sink
Salesforce Bulk API Source
Salesforce CDC Source
Salesforce Platform Event Sink
Salesforce Platform Event Source
Salesforce PushTopic Source
Salesforce SObject Sink
ServiceNow Sink
ServiceNow Source
SFTP Sink
SFTP Source
Snowflake Sink
Solace Sink
Splunk Sink
Zendesk Source
Generic Webhook Adapter
The Edge Adapter exposes a single endpoint for Webhooks. The webhook may be used for a large number of incoming integrations. Some examples are provided below.
To see the API please visit webhook.edge.YOURDOMAIN.COM/ui . For example webhook.edge.ferris.ai .
In order to use the end point you must first generate a token to be used when submitting to the endpoint. To generate a token please follow instructions here ….
How it Works
The StreamZero Edge Adapter is an edge service which is exposed to services outside the network for incoming integrations with external services. It exposes a single token protected endpoint which accepts a JSON payload within a POST request.
The payload encapsulated within the POST is forwarded to the ferris.events topic with the data encapsulated in the Cloud Events ‘data’ section. The event type is ‘ferris.events.webhook.incoming’ .
The platform may host any number of packages which then process the webhooks based on parsing the data section.
The StreamZero Edge Adapter is one of the few services exposed to the Internet.
Integrations
The following sections document details on some of the possible integrations.
AWS EventBridge
AWS S3 ( please switch images)
A pre-requisite is to ensure that EventBridge is sending Events to Ferris. Please see this section on how to set it up.
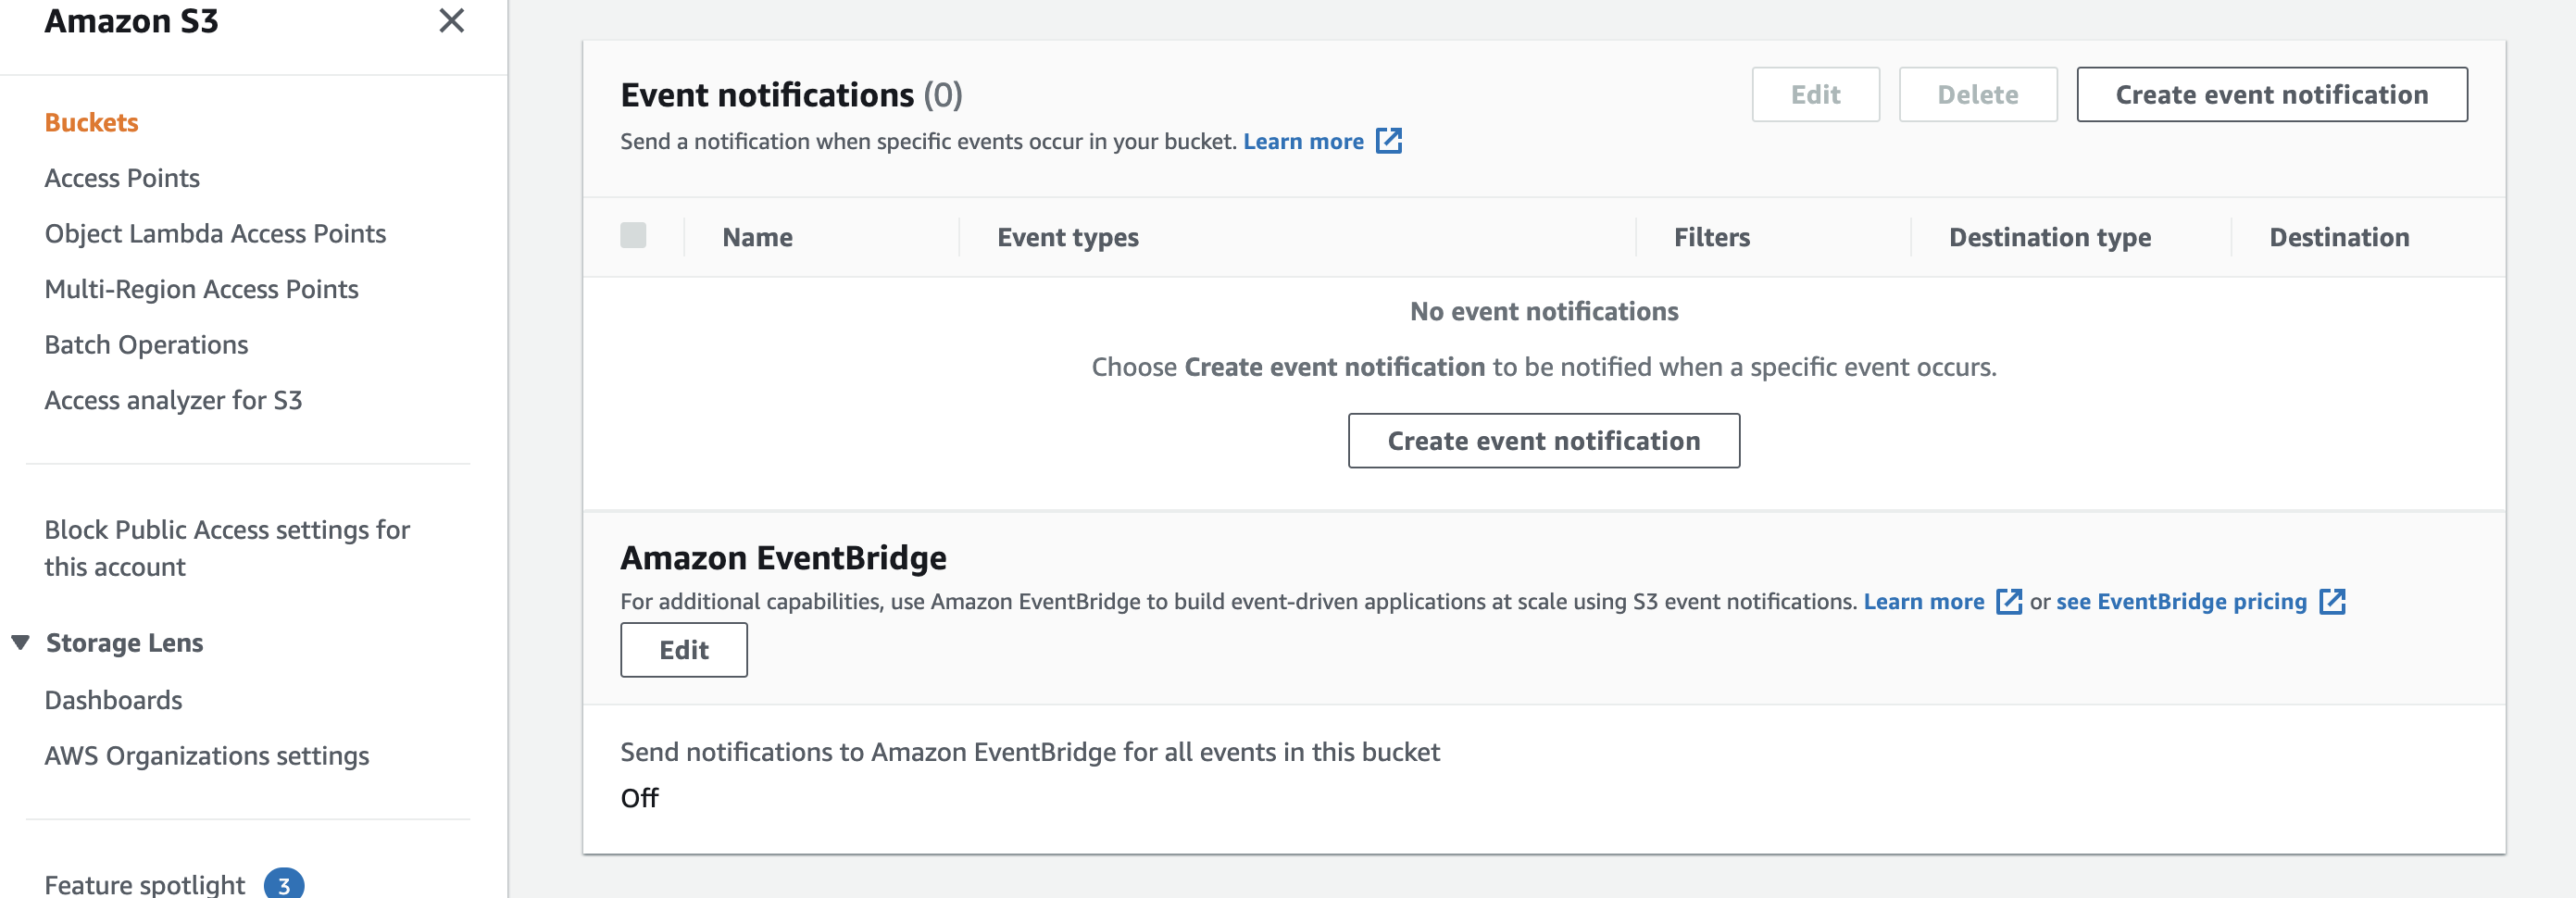
Create a bucket and switch to the Properties Tab of the UI

Scroll to the bottom and turn on Event Bridge Notfications by clicking on the Edit button below the section Amazon EventBridge
GitHub Integration
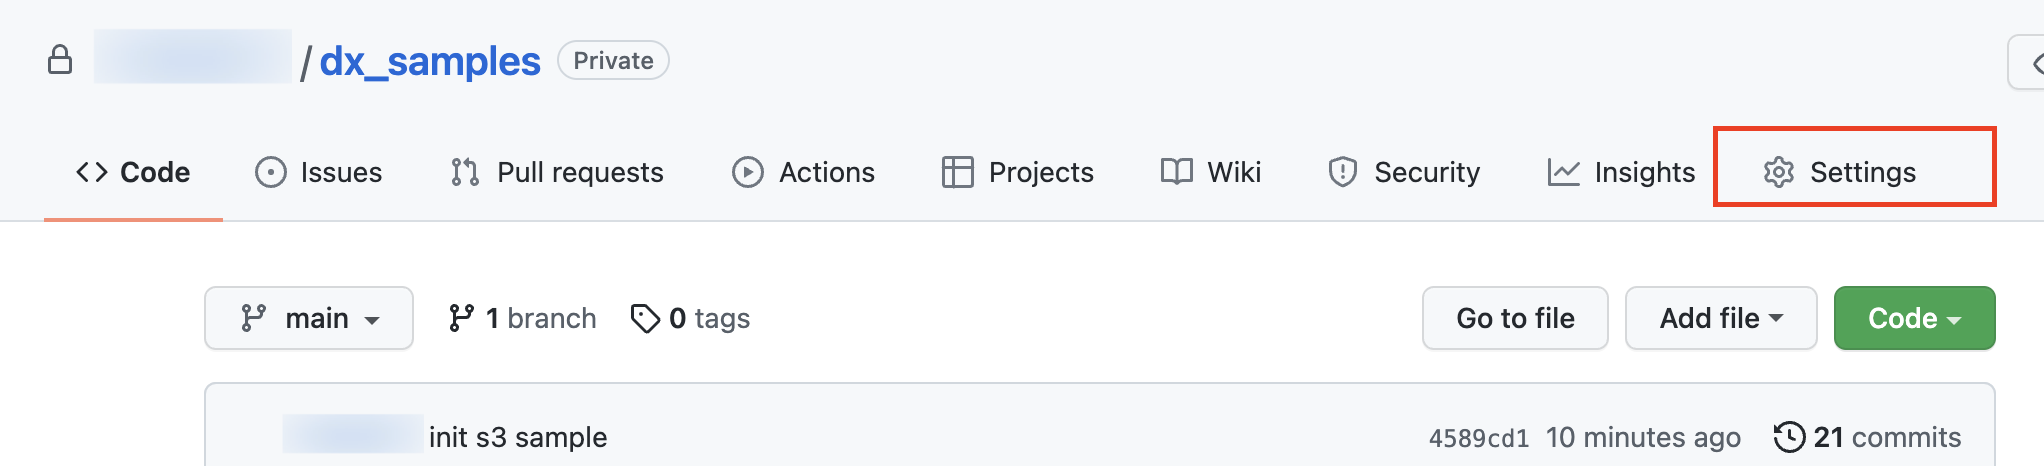
To be notified on changes to a Git Hub Repo please follow the steps below.
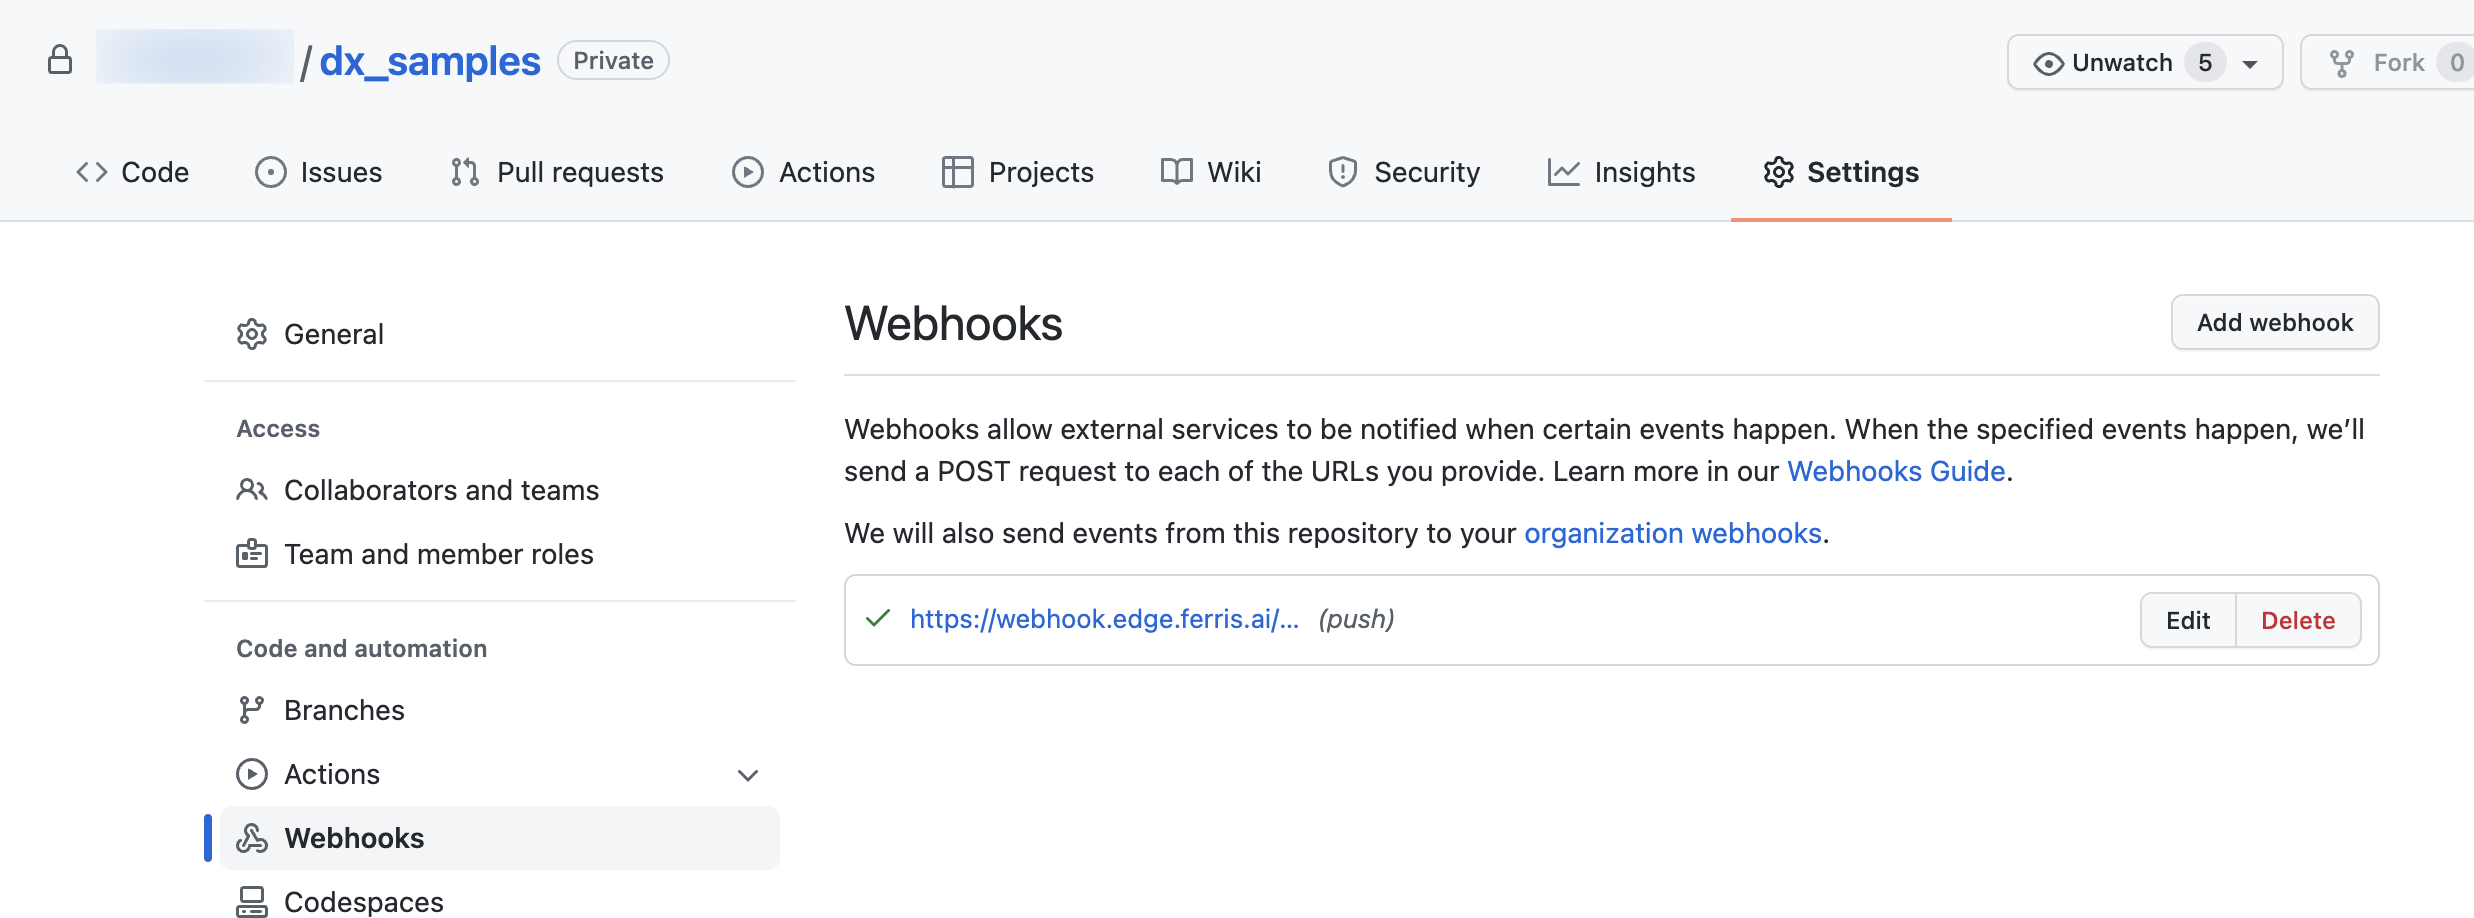
Click on the ‘Settings’ icon for the repo
Select the Webhooks menu on the left of the ‘Settings’ page. Then click on the ‘Add webhook’ button.
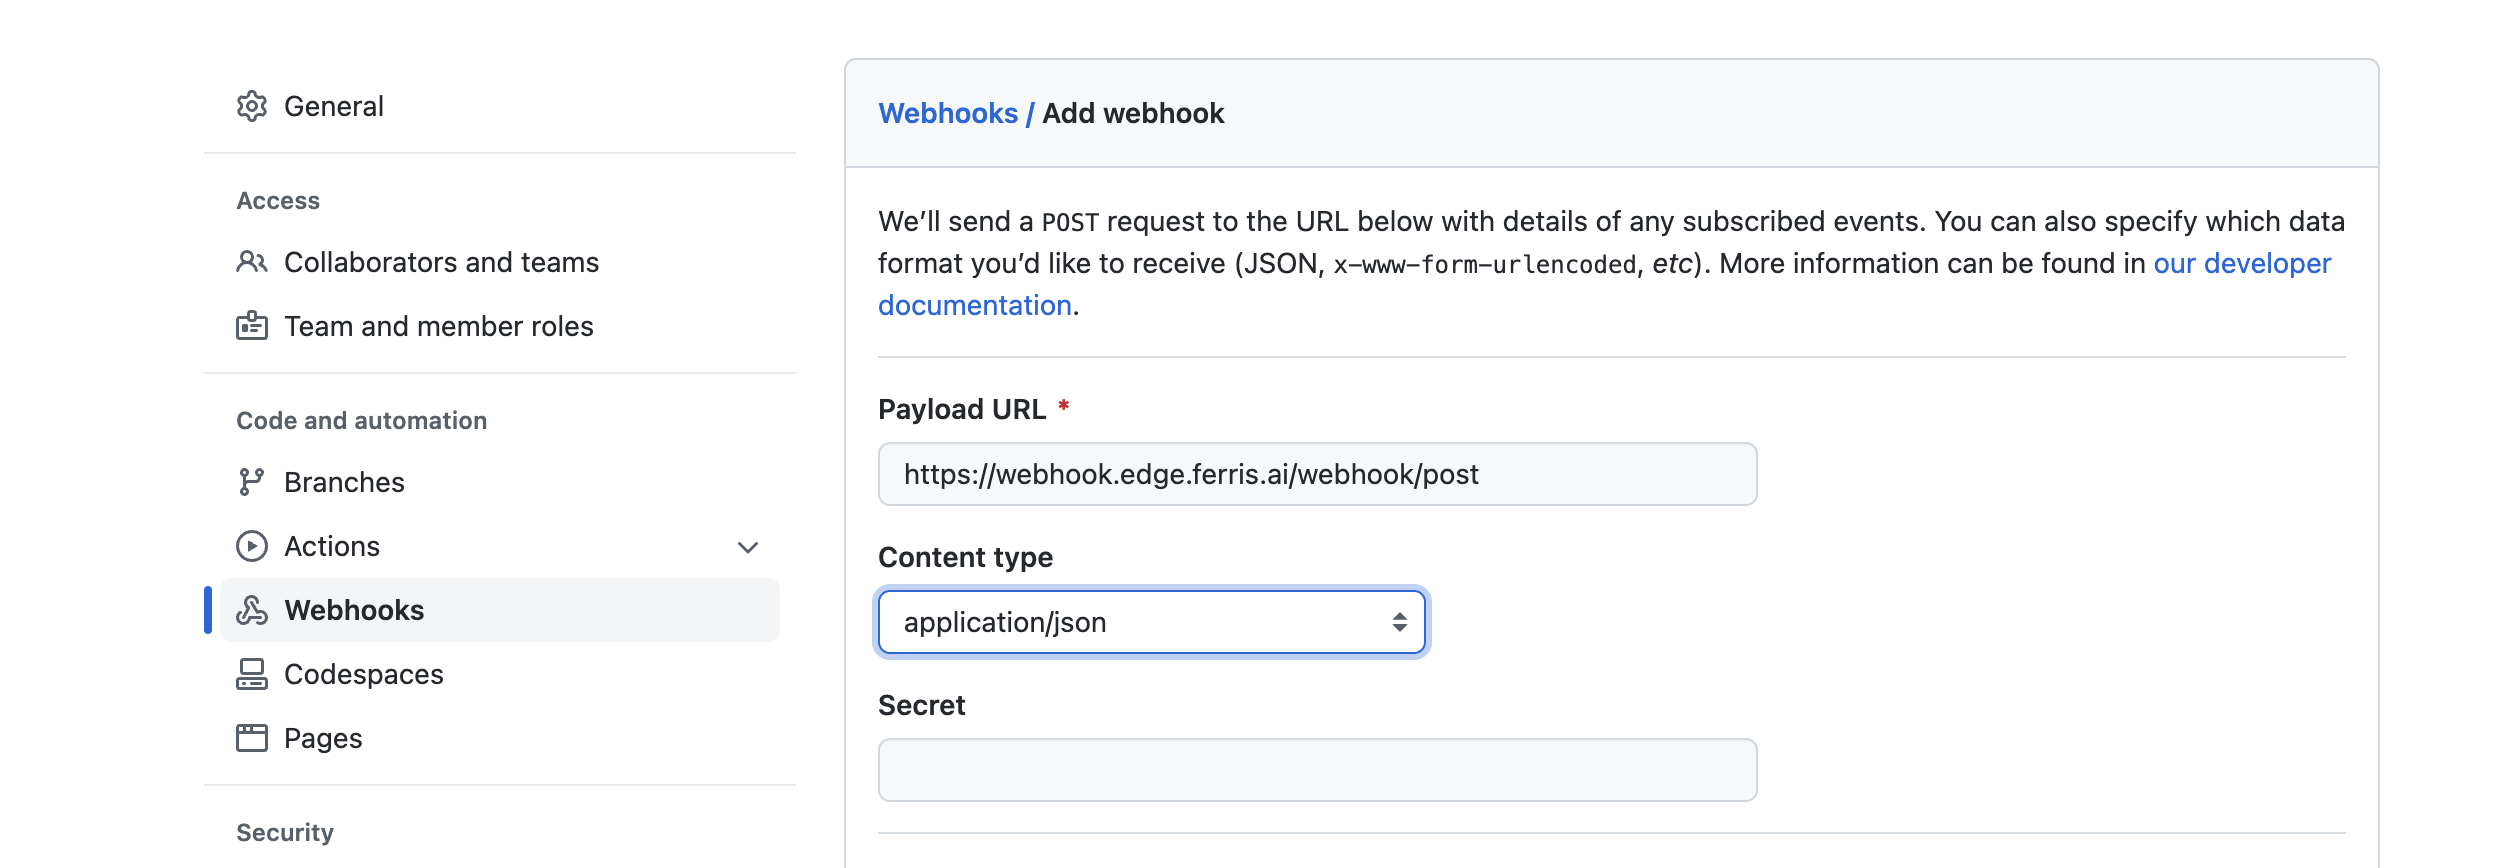
Add the URL of your edge adapter end point. And ensure the content type is application/json. Finally add the api token generated on the StreamZero Management UI. Further in the page you may select what event types should be sent. If unsure please maintain the default settings.
Test your integration by pushing an update to the repository.
1.2.10 - Extending the Platform
Extending the Platform
The platform may be extended at 3 logical points within the event life cycle.
- At Entry Point:
- They are respnsible for injecting external event streams into the platform. Primarily they mediate betweeen the exrernal event stream and the internal CloudEvents based Kafka Topics. These run on separate containers within the platform. The following are the typical examples.
- Event Gateway: are the primary mechanism. To build event gateways we provide templates. Please check this document on extension.
- They are respnsible for injecting external event streams into the platform. Primarily they mediate betweeen the exrernal event stream and the internal CloudEvents based Kafka Topics. These run on separate containers within the platform. The following are the typical examples.
- At Processing
- These are extensions that operate on internal event streams or are required by services that are created on the platform. The following are the types thereof.
- Configuration Adapters and UIs. These are primarily used for connection setups and configurations which are applicable across the platform. Examples are the variety of connection set up UIs we provide. They are very easy to create. Use the the followinng guide to build your own.
- Python Libraries and Modules: These are attached to the executor. It primarily involves extending the executor image with the required library. In order to add them to the platform use this guide.
- Event Processing Packages: These are services that only modify event attributes normally convert one type of event to another. These can be implemented as services within the platform. Please see following guide to see how they are used and some typical scenarios.
- No Code Generators: Generators combine UI based with templated code to allow No Code based approach to creating services. Please check this guide on how that works.
- These are extensions that operate on internal event streams or are required by services that are created on the platform. The following are the types thereof.
- At Exit Point
- These are primarily modules that interact with external systems but operate across the example. The primarily operate on streams that originate from the platform and mediate with the outside. These run on separate containers within the platform. The following are typical implementaions. Examples are
- Protocol Adapters They adapt between the internal kafka even streams and external protocols for example webhook adapter, Kafka to imbm mq adapter etc. Their primary purpose is to offload activity from the platform which may cause bottle necks or require long running services.
- Splitters and Filters: These may operate on strams to split content or event infromation into derivative streams. Or feed data into supporting infrastructure. The elastissearch and Splunk adapters are typical examples. In order to build these use the following guide and related templates.
- These are primarily modules that interact with external systems but operate across the example. The primarily operate on streams that originate from the platform and mediate with the outside. These run on separate containers within the platform. The following are typical implementaions. Examples are
1.2.11 - Git Integration
The Git Integration is the capability to generate a connection from a git repository with projects and synchronise the Packages from the Executor with the git repository, with the goal to execute it through the StreamZero FX Platform. It provides another, more fluent way for connecting scripts with the StreamZero FX Platform without the necessity to upload files directly to the platform.
A new Project will be created to showcase the capabilty of the git integration:
Create a new project
- Click on Projects in the left side menu to open drop-down and then on List Projects
- Click on +Add to create a new project
- Name the project
- Save the new project
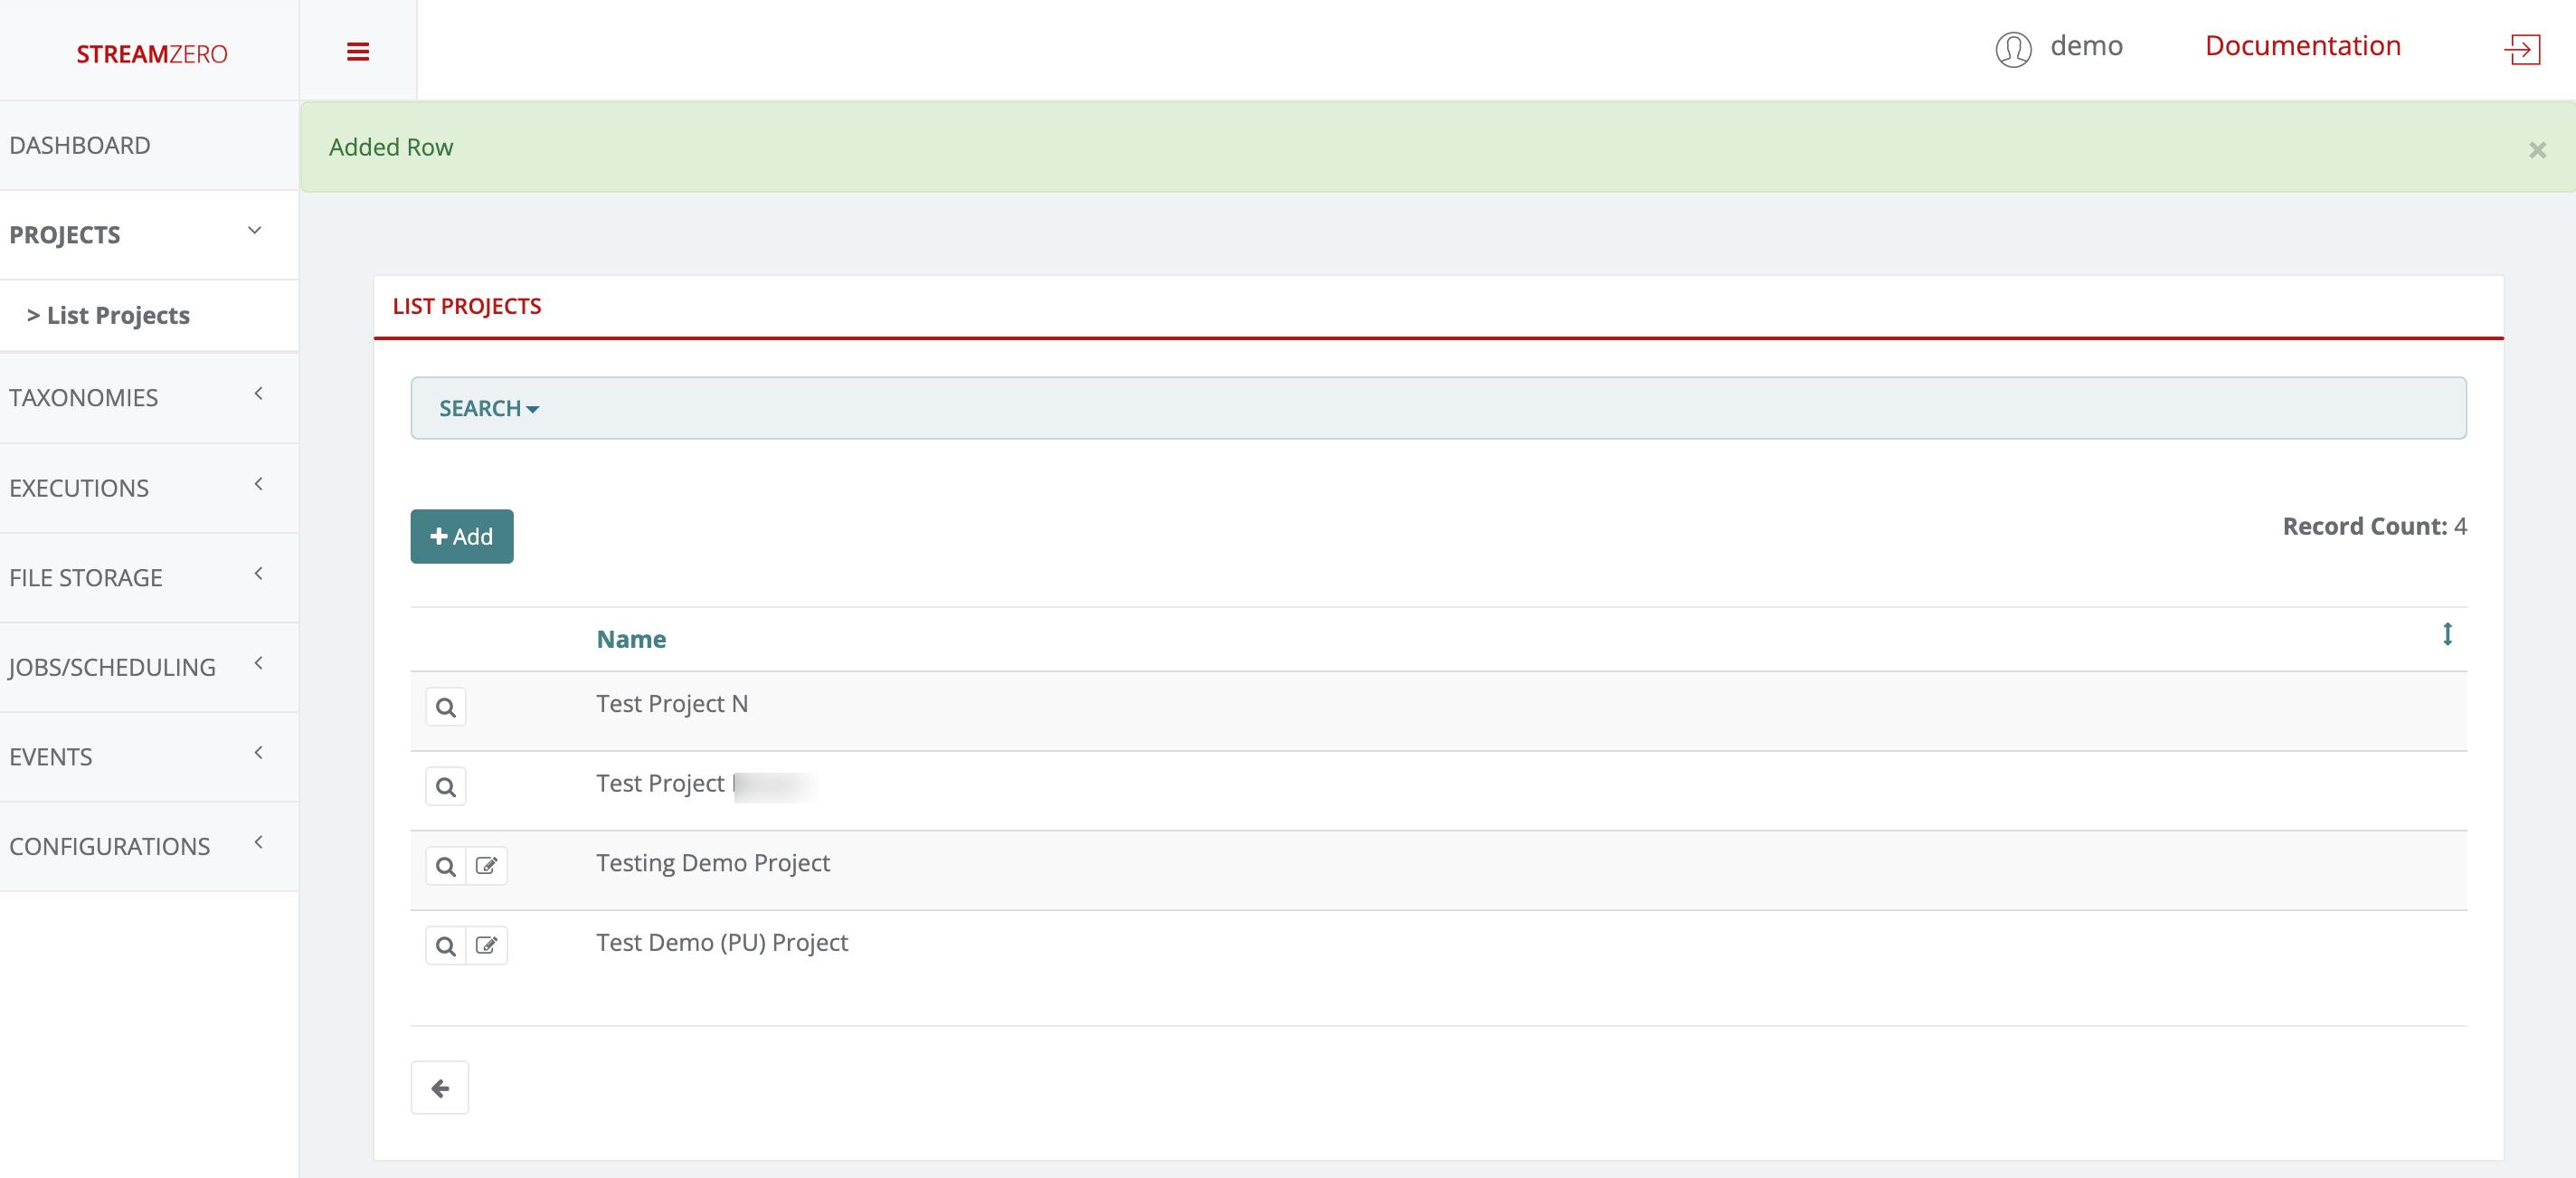
Check the created project
- Click on the magnifying glass to open the details page of the project
Add a GitHub Repository to the created project
- Click on the Git Repositories tab
- Click on +Add to add a SSH repository URL
Copy GitHub Repo
Note that before adding your GitHub Repository to the platform, a public SSH key needs to be generated.
- Login to your GitHub account
- Go to the Repository you want to add to the project, in this use case “ferris-packages”
- Click on the the green Code button to showcase the repository URLs
- Copy the SSH URL
Paste SSH URL
- Paste the copied SSH URL from your repo
- Click save to create the repository on the platform
Note that a pair of public and private keys are generated for each repository which is safed on the StreamZero FX platform. The private key is encrypted and stored safely in the database and will never be presented to anyone, whereas the public key should be copied and added to the git repository in order to provide the StreamZero FX access to the repository and the possibility to clone packages.
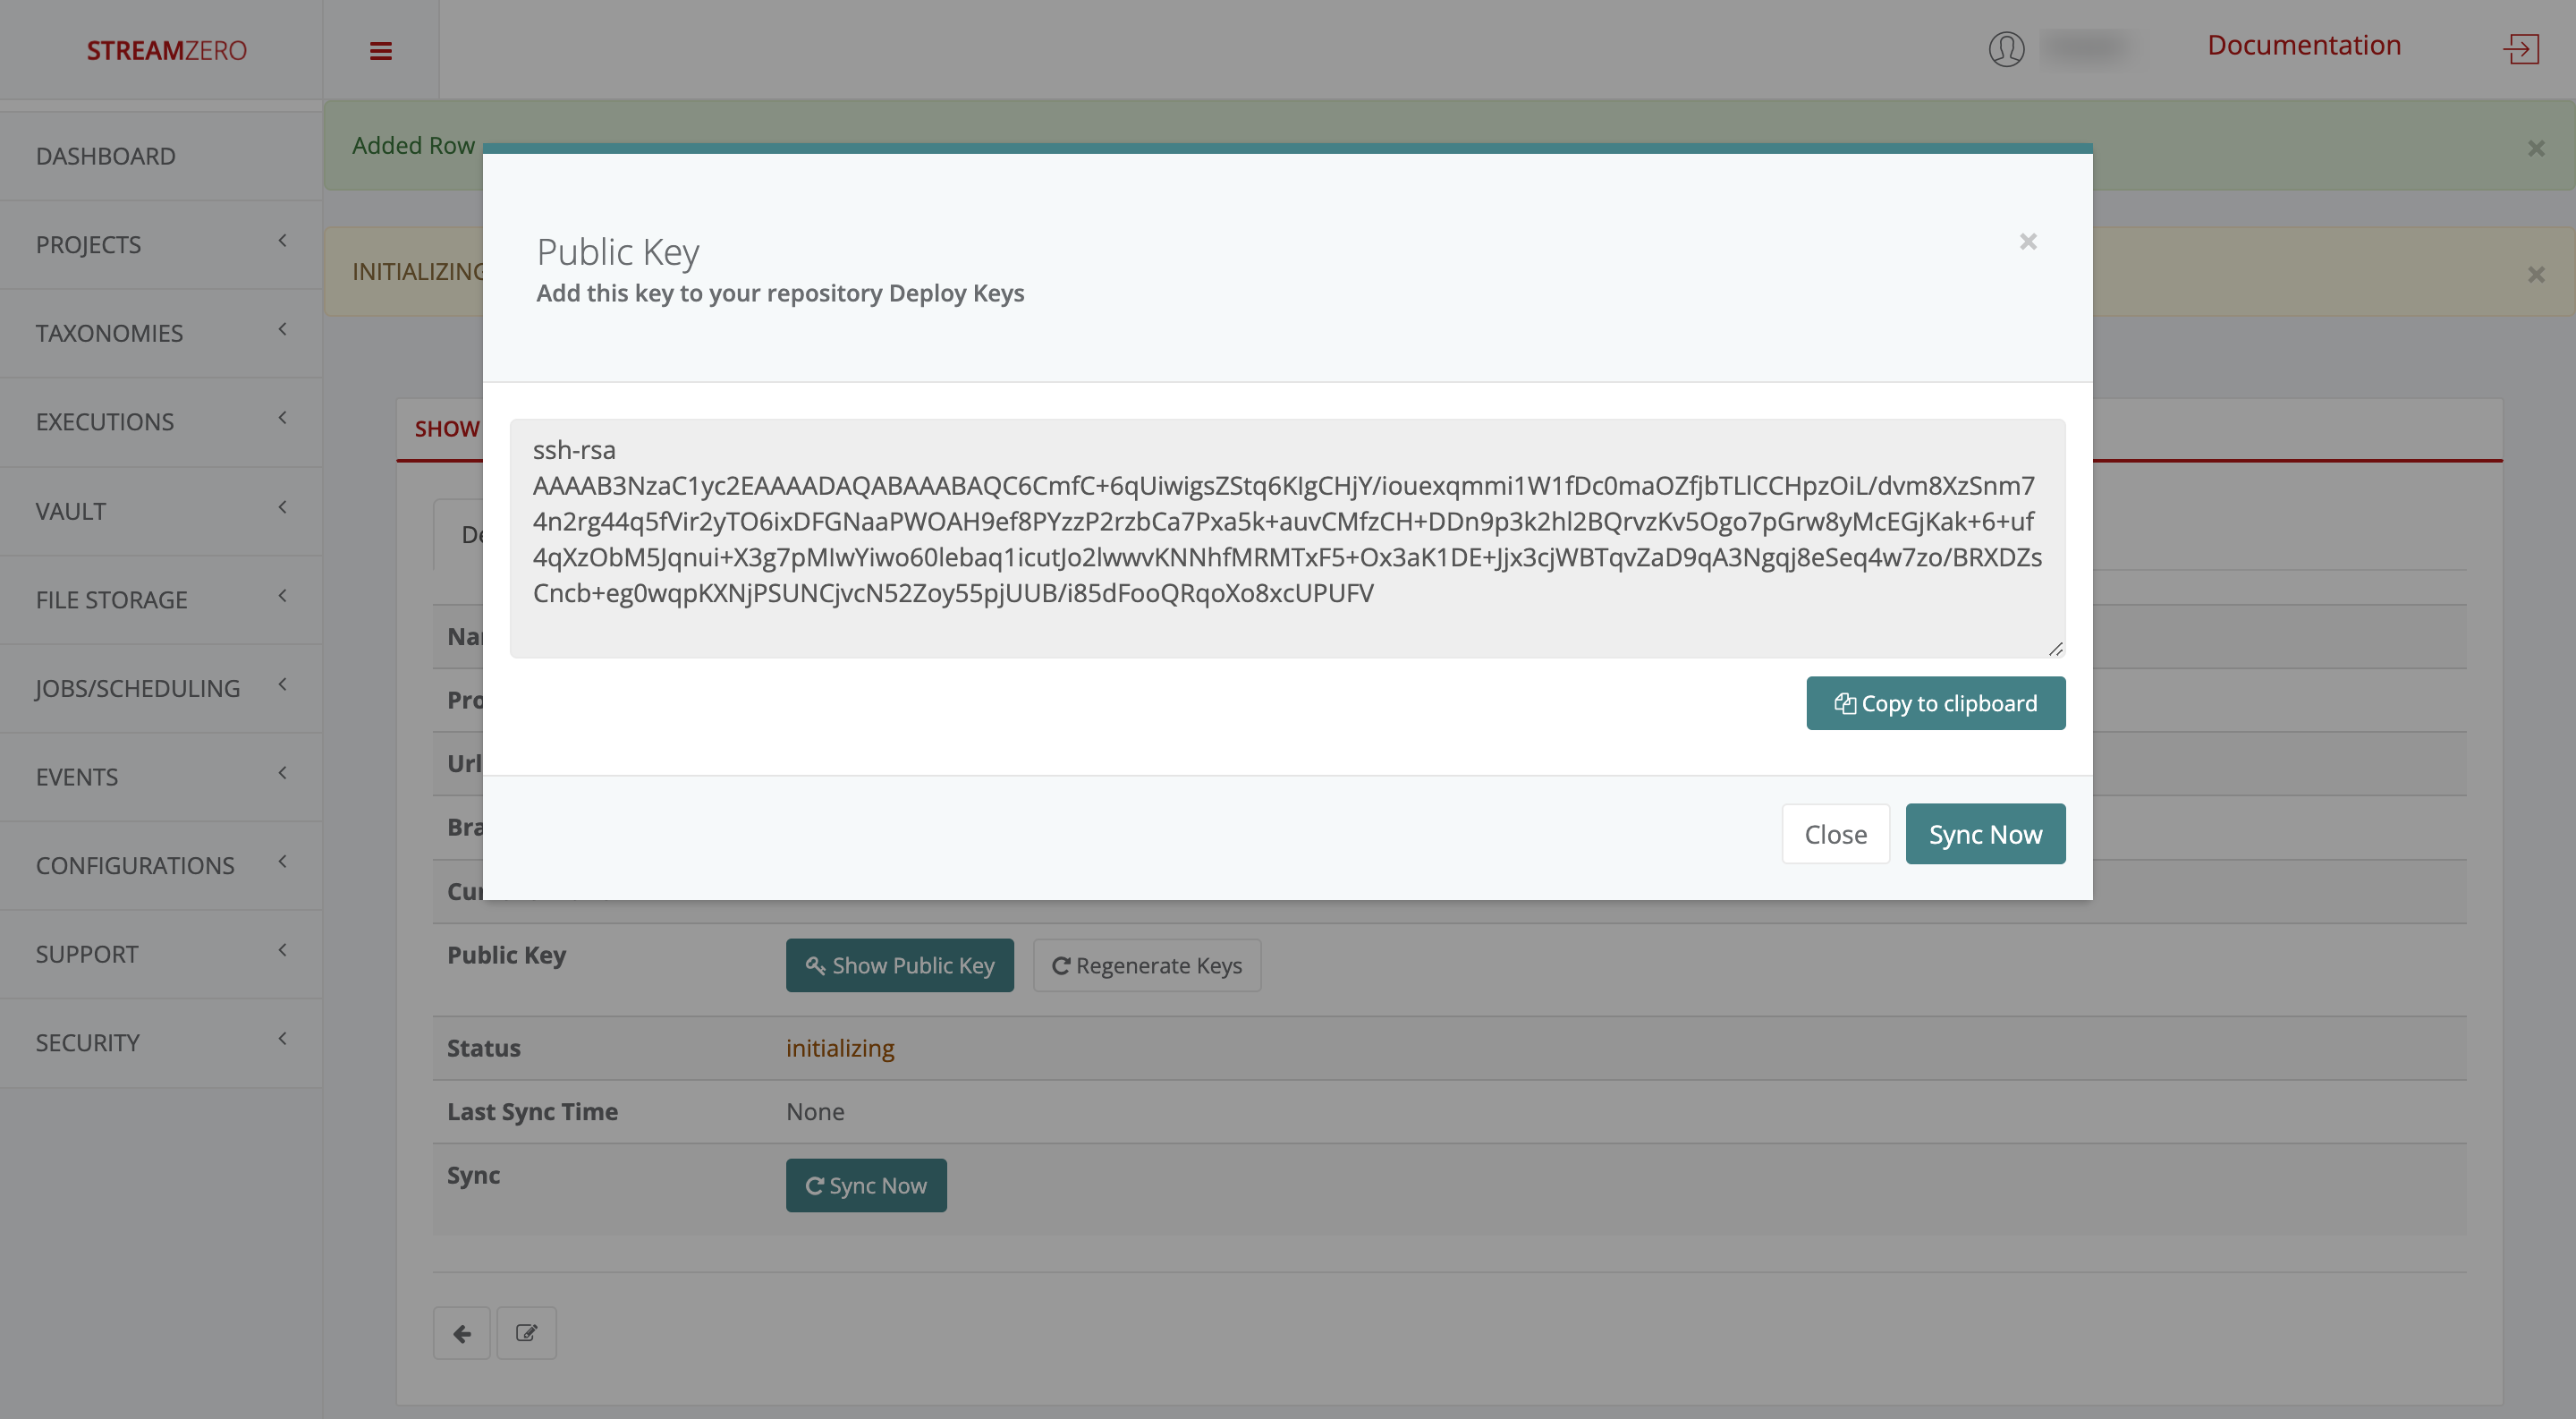
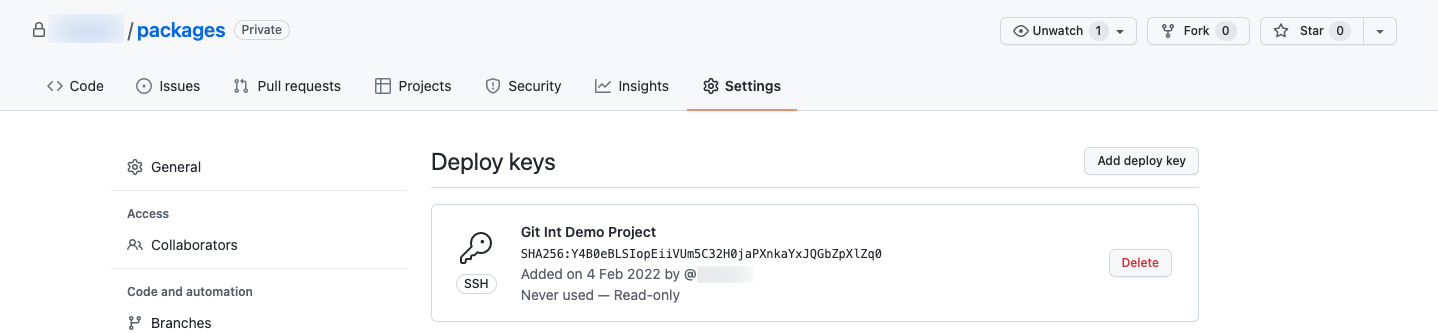
Add the public key to GitHub
- Return to your GitHub account
- Click on Settings in the top menu bar
- Click on deploy keys
- Click on Add deploy key
- Paste the generated public key
- Name the public key
- Click on Add key
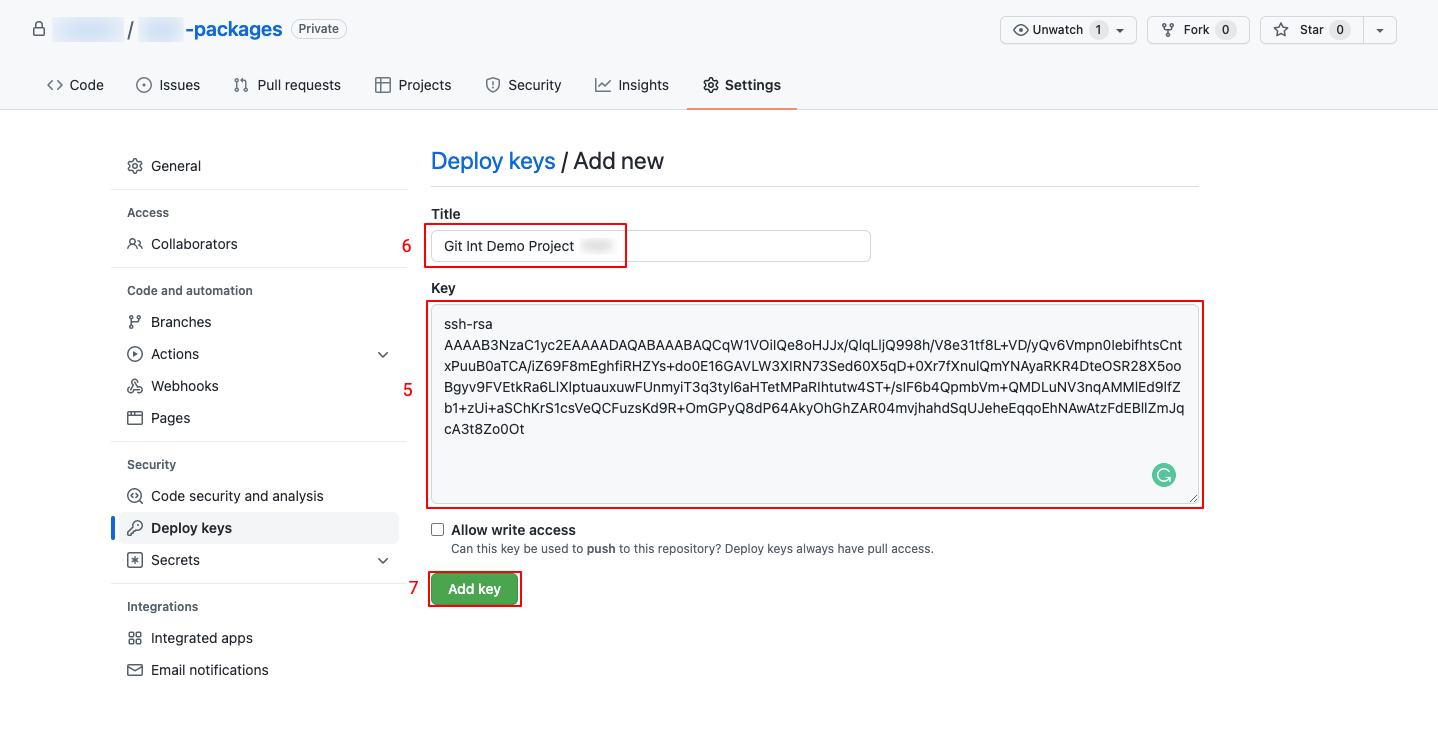
- Check the saved public key
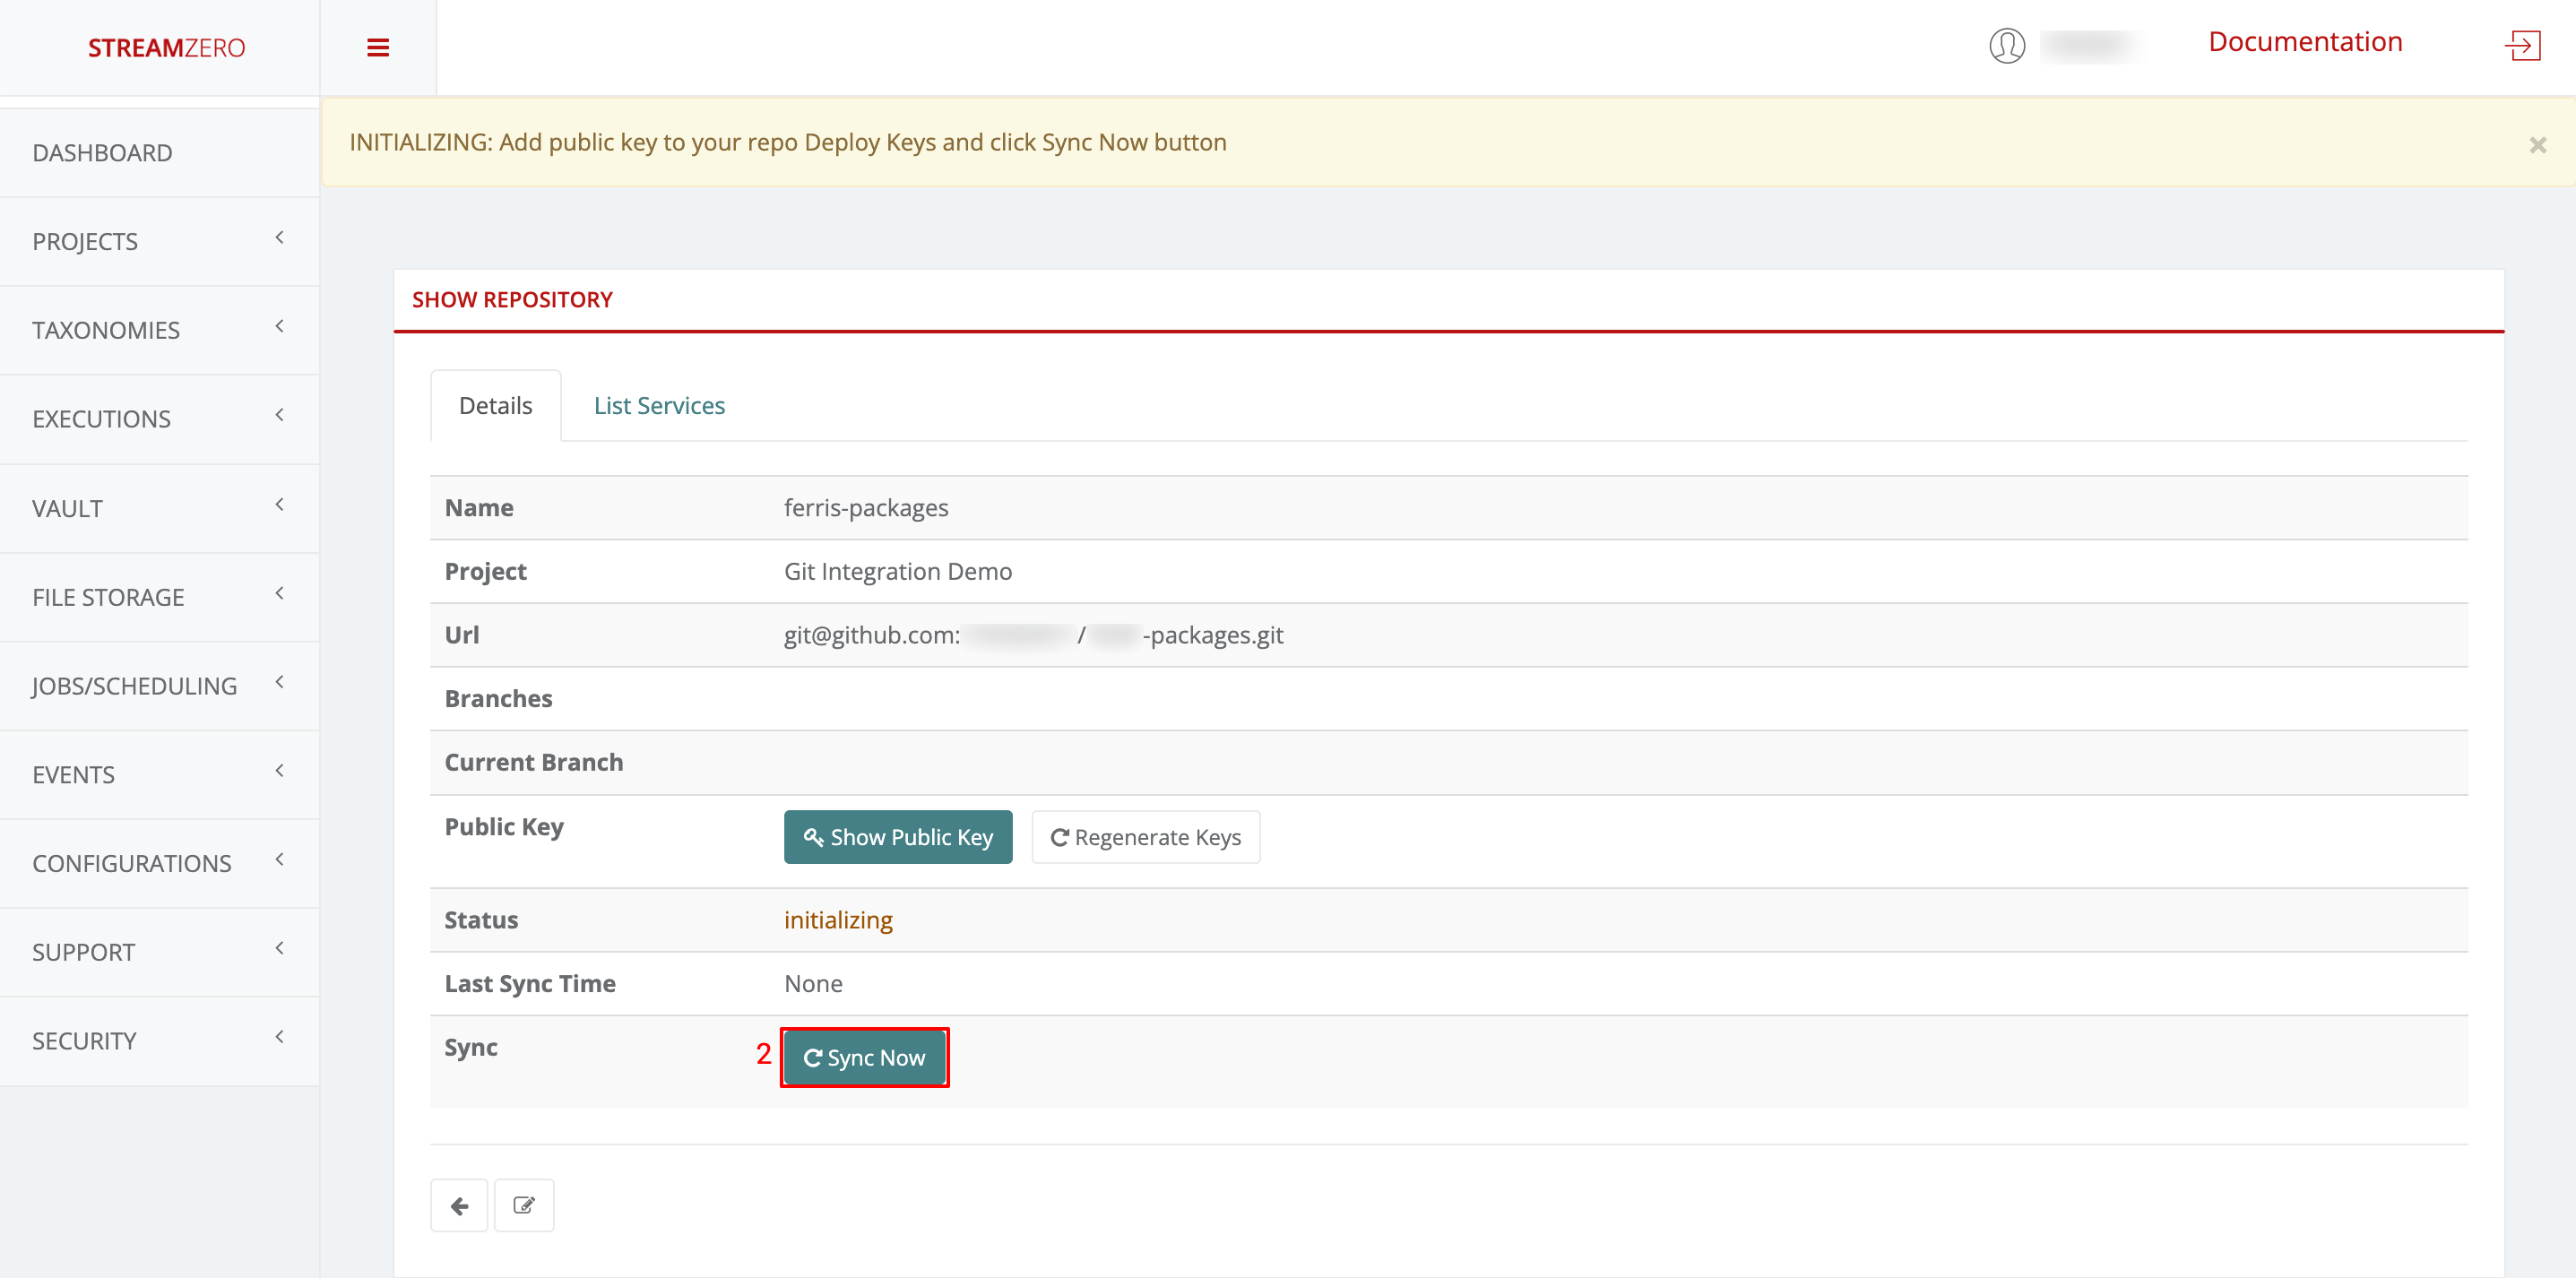
Synchronise the repository
- Return to the StreamZero FX platform
- Click the Sync Now button to synchronise the platform with the GitHub
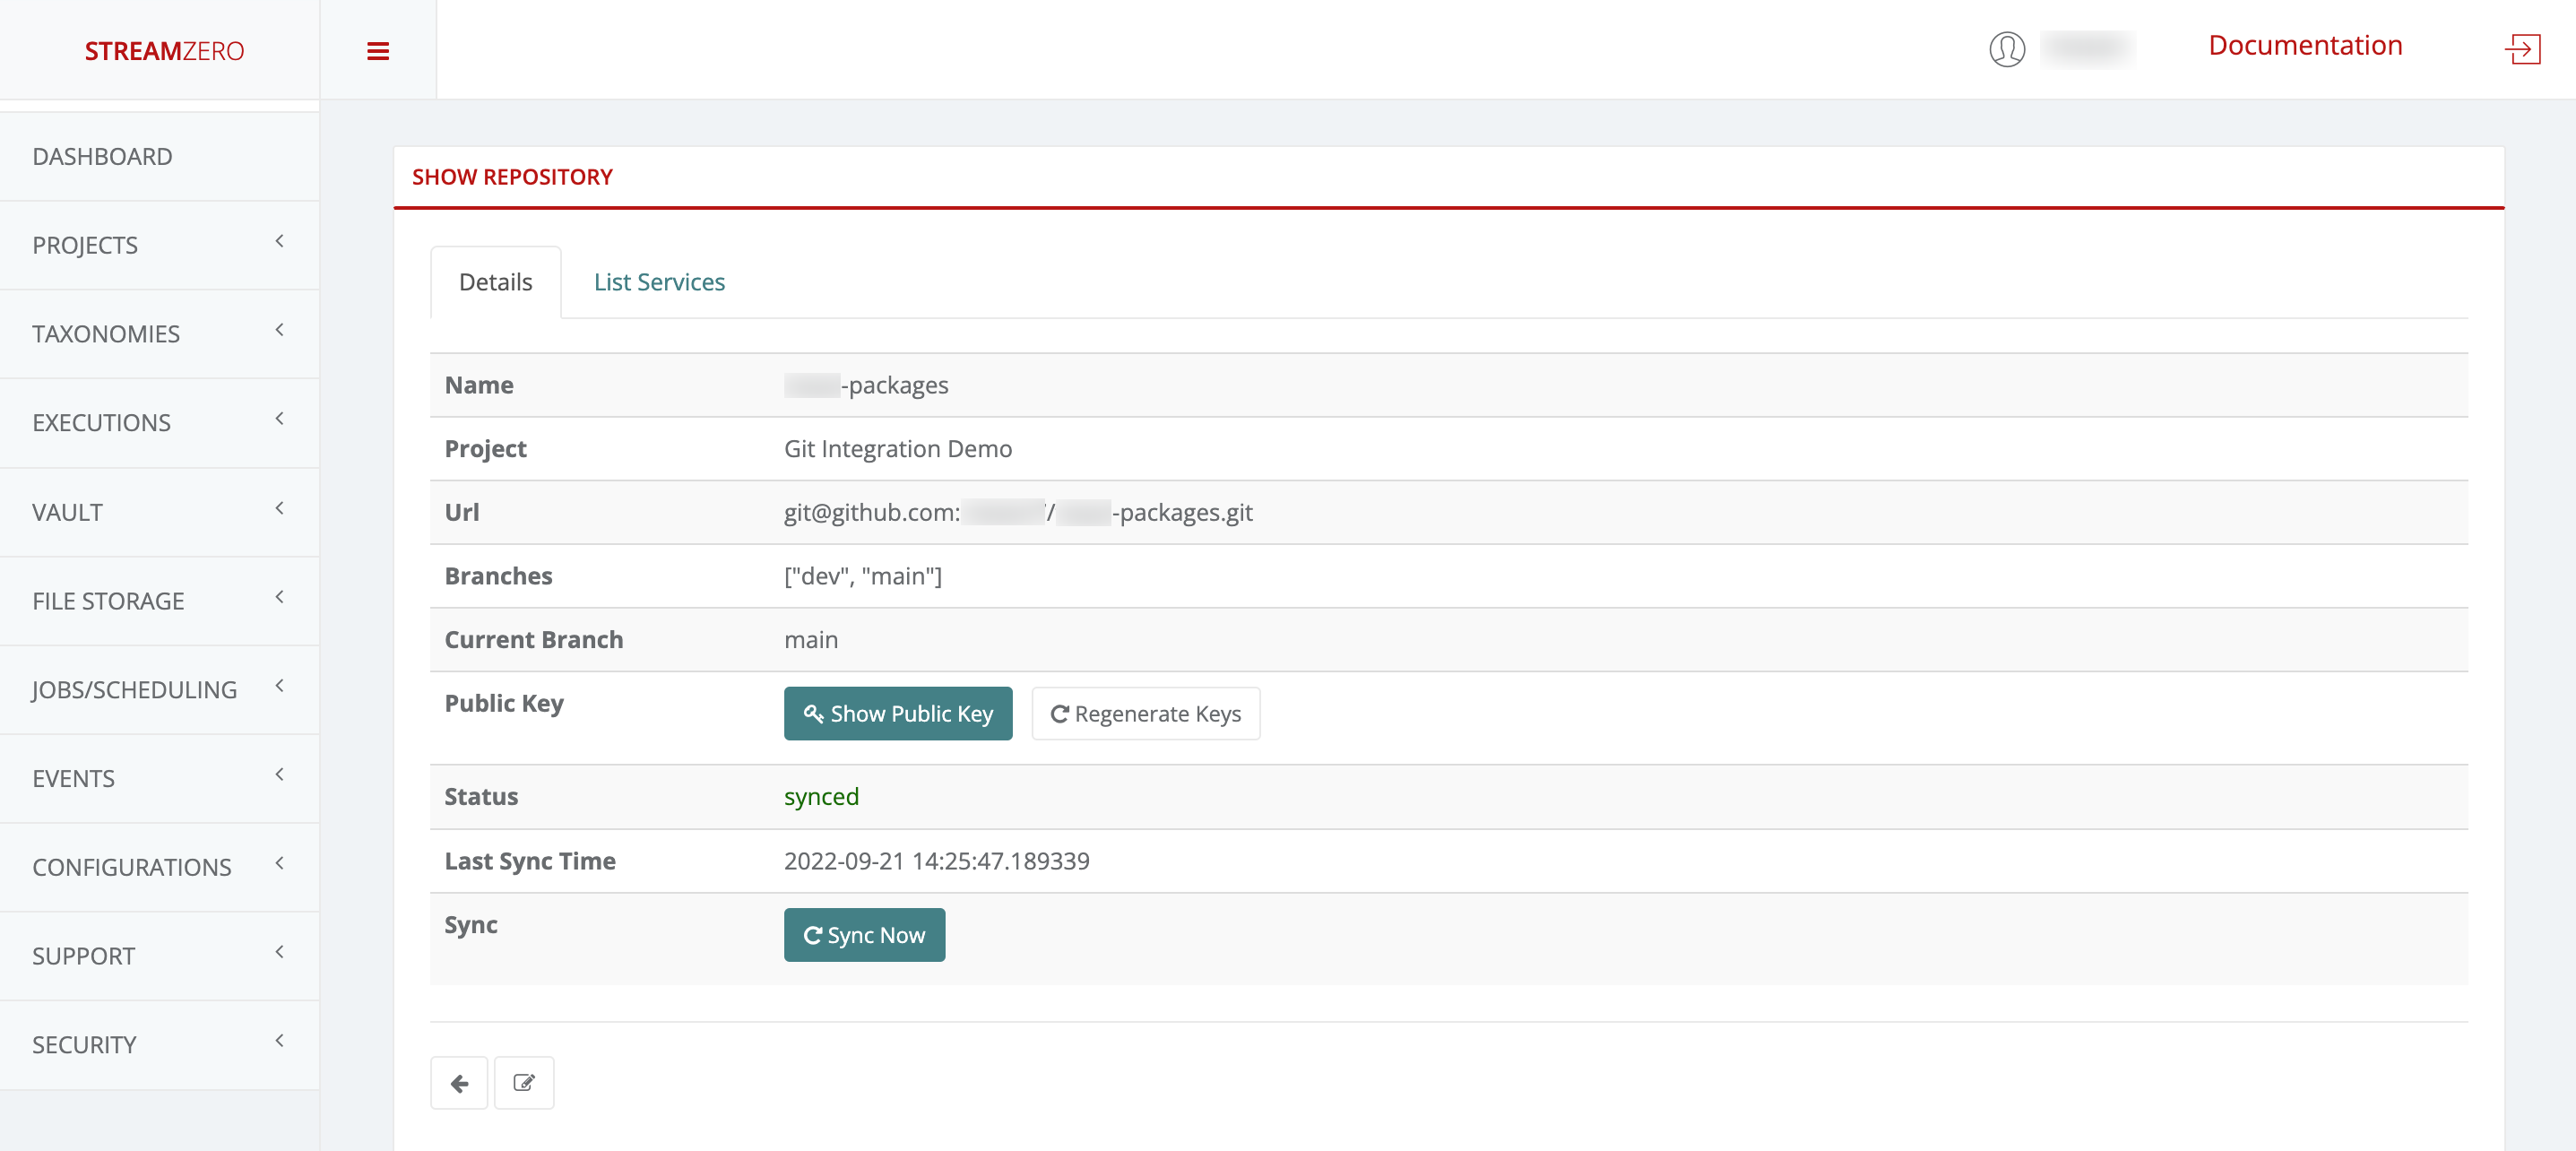
- Check the synchronised details page
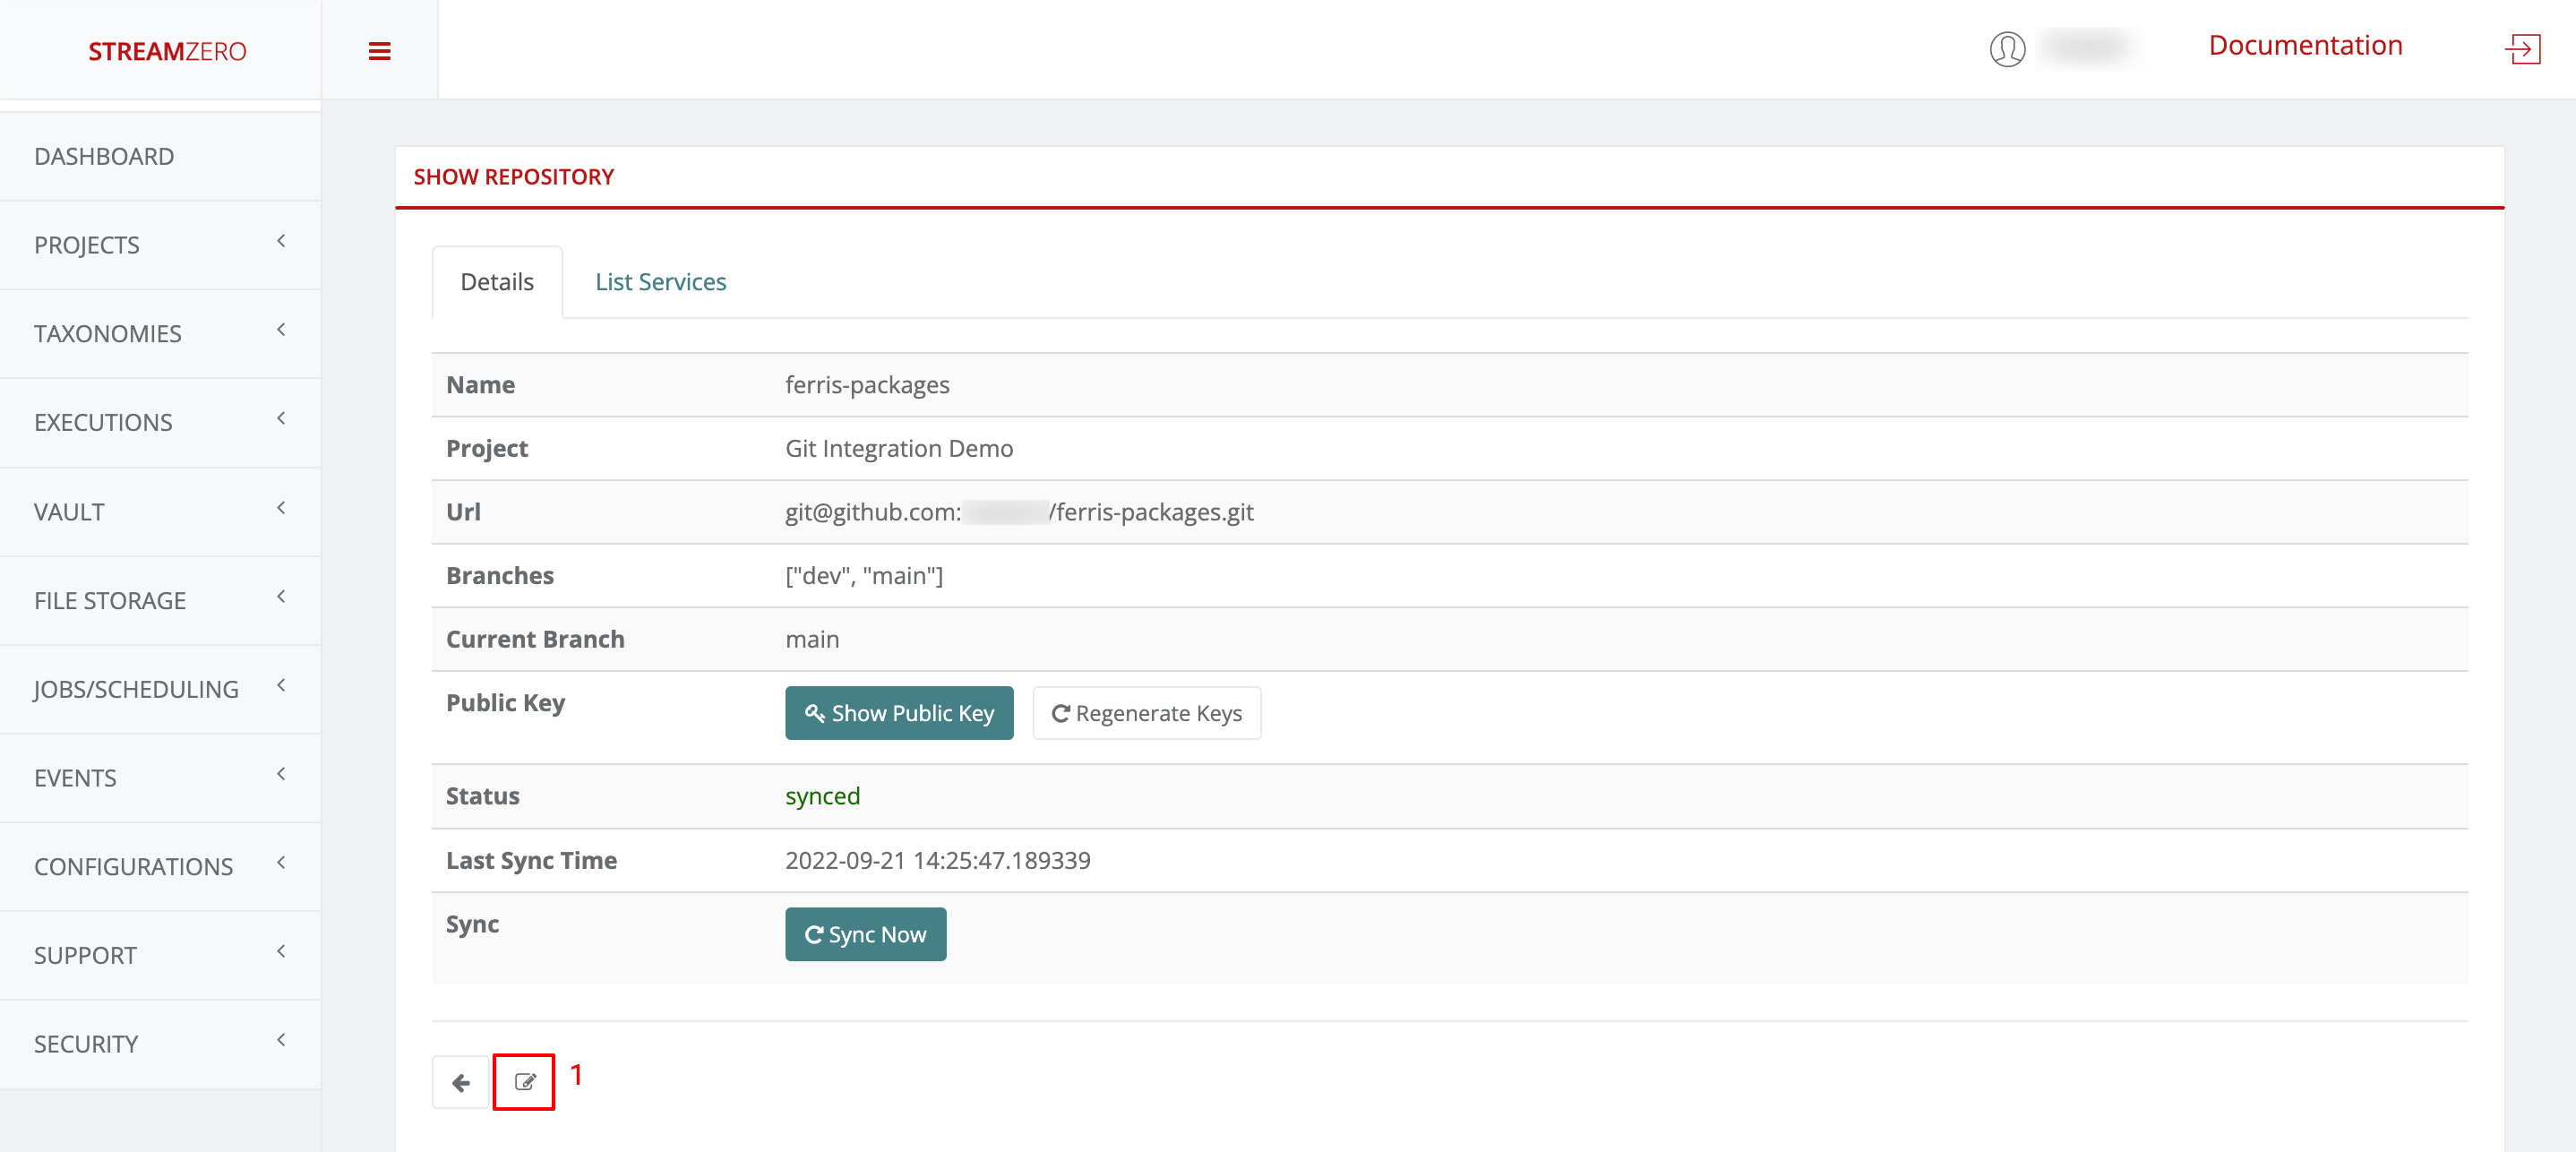
Note that the branches (main; dev) were added and the status has changed (synced).
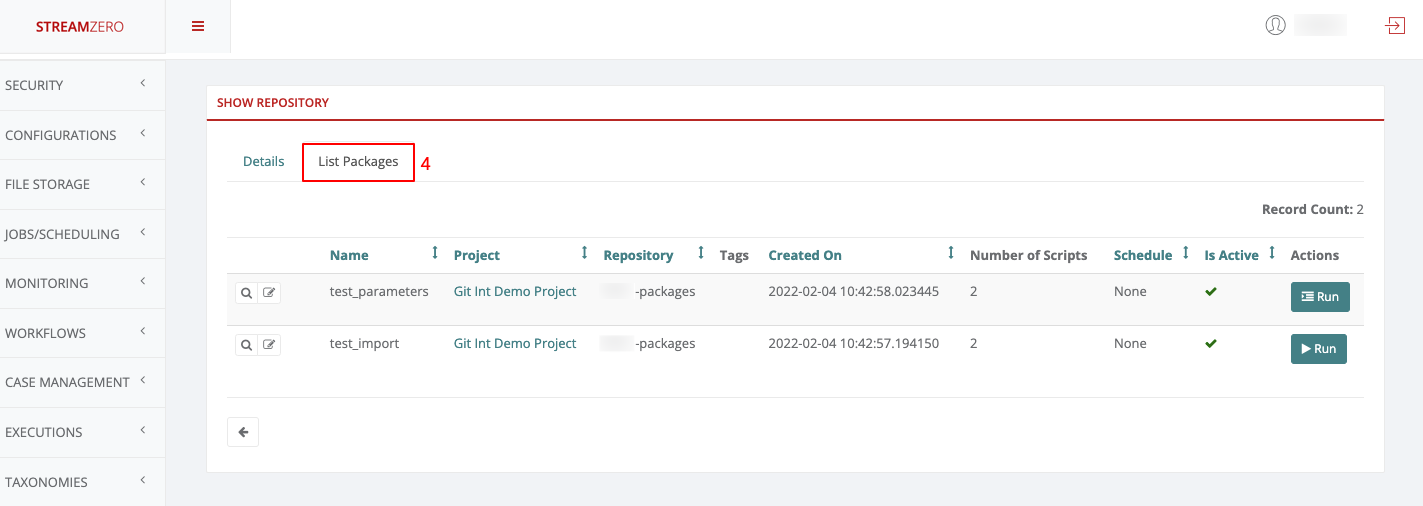
- Click on the List Packages tab to verify that the packages were imported
Change Git Branch on the platform
If a user wants to test or work on a specific branch, he can select the branch required to do so. The main branch is selected by default.
- Click on the edit button to open the Edit Repository details page
- Click in the drop-down to select the branch, in thise case “dev”
- Click on Save to save the selected branch
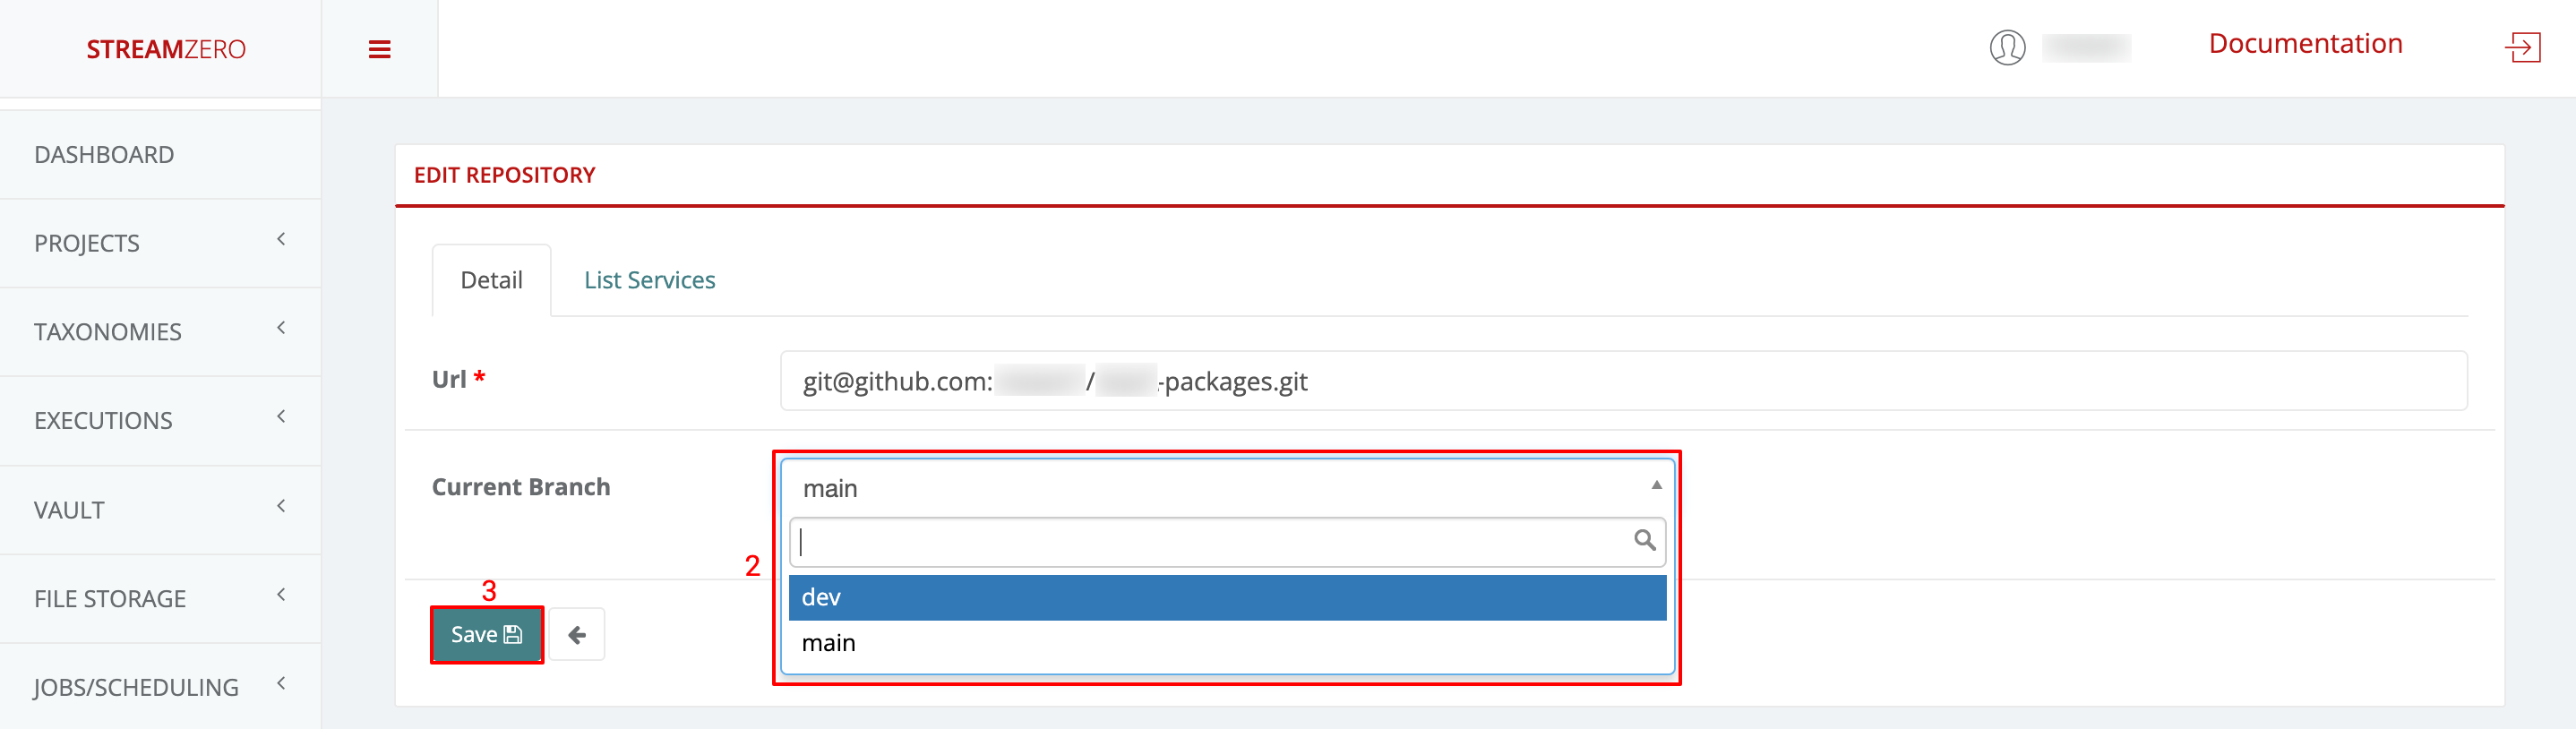
- Click on Sync to synchronise the packages from the dev branch
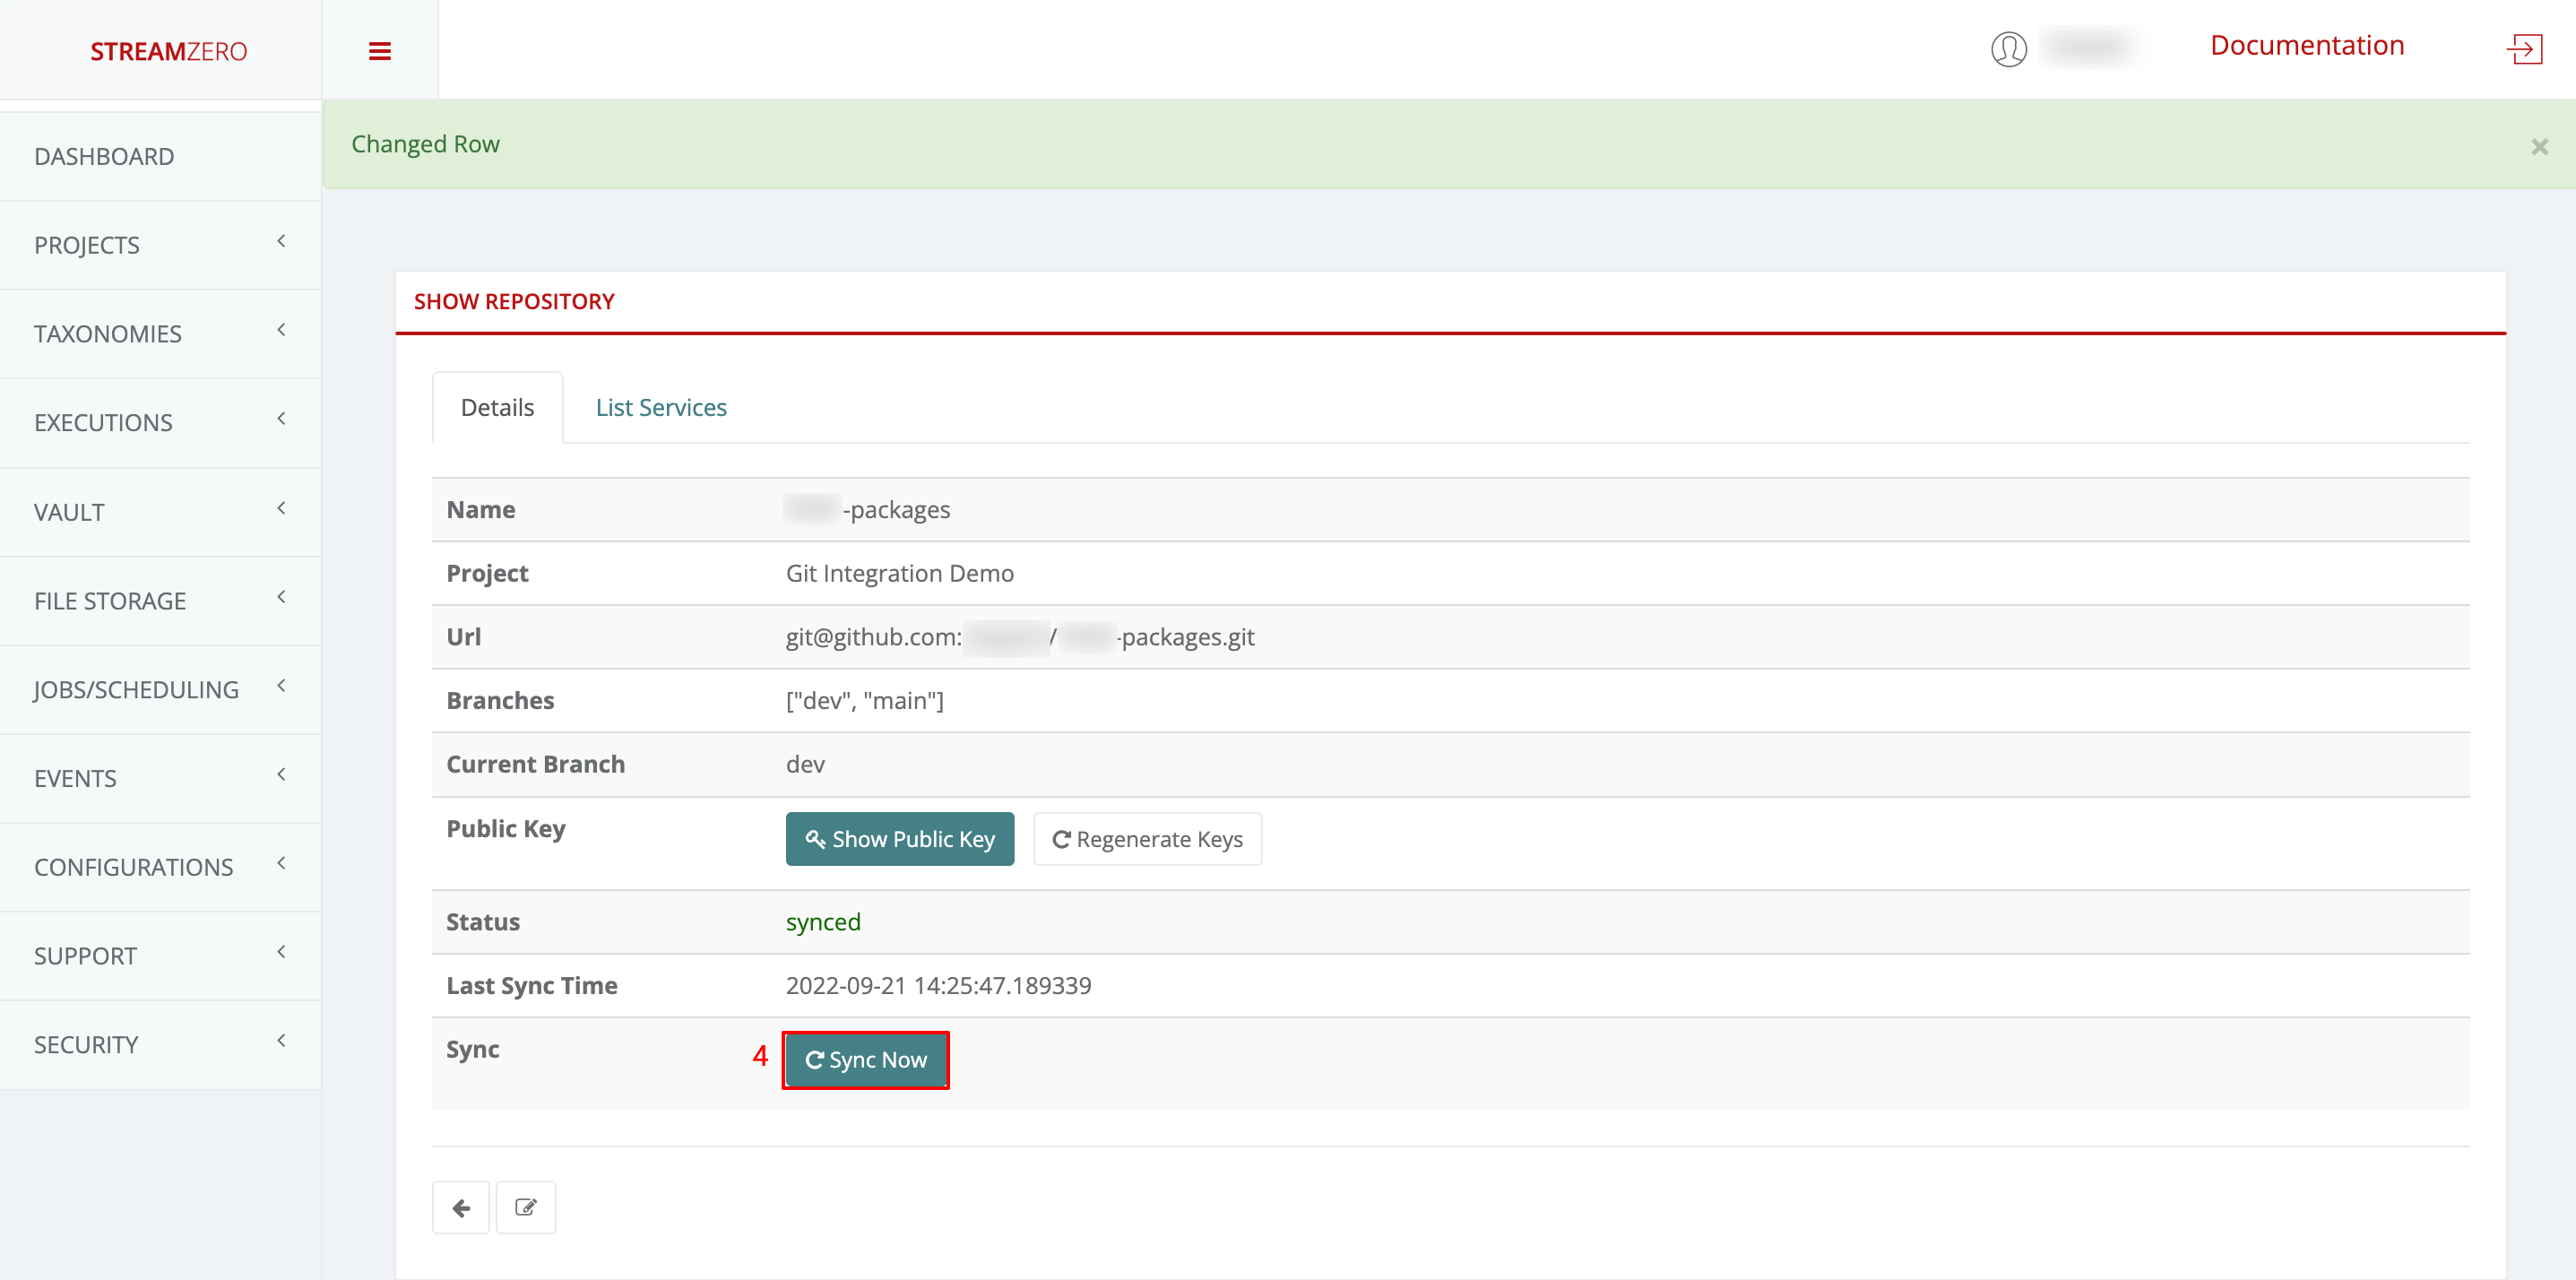
- Click on the List Packages tab to verify the packages have been synced from the dev branch
Note that a public key can be regenerated at any moment if in doubt that someone has access to it. If a new key gets generated, it needs to get added to GitHub again and synced on the platform afterwards. If the step of adding the key is missed, the synchronisation will fail. Keys can also be deleted directly on GitHub if the platform access shouldn’t be granted anymore.
1.2.12 - Event Manipulation Strategies
Events are the powerful concept at the center of the DX Platform. There are a number of strategies for using event structures. The following are a few important related topics.
- Correlation IDs
- Event Mappings
Understand the Structure
The StreamZero FX events are based on CloudEvents …
Understanding Correlation IDs
Correlation IDs are a time tested approach within the Enterprise Software Landscape. A correlation ID allows one to correlate 2 steps in a flow with eachother and identify their location in the flow sequence.
When a package receives and event the platform also passes a CorrelationID. The correlation ID is usually generated by the platform at the start of the event or assigned by the event originator. If a correlation ID does not exist then a package may create a correlation id using the library provided. The correlation id consists of 2 parts
|
|
The first part is the identifier of the unique originator id. The second part is a sequence ID which is incrementally assigned by subsequent processors. This allows the processor to indicate which the next stage of the processing is. It is left to packages to determine whether they wish to pass through the correlation ID or not. Usually it is preferable to apss the correlation ID with any event that is generated from within a package.
The following is a sample output
ABCDEF1234_01 -> ABCDEF1234_02 -> ABCDEF1234_03
Searching for a correlation ID will result in a time sorted list of runs which were triggered. By steppoing through the rsults of each stage you can easily identify the outgoing events and the results at each stage.
Leverage Event Mapping
Event mapping is the mechanism of converting from one event type to the other.
This is useful for converting from one type of even to another to trigger crossflows without altering the code of the target service.
Event mapping is done within the platform by using a configuration of event maps. Event maps describe the mapping of the attributes between the source and the target event. The also must chose between 1 of 2 strategies
- Map ONLY Mapped Fields
- Map ALL Fieds
Strategy Map only Mapped Fields
When this strategy is applied only the attributes present in the mapping file will be available in the output event.
Please note that you cannot map events to the same event type to avoid loopbacks.
Map
|
|
Source Event
|
|
Output Event
When the above map is combined with the event it will result in the name and role attributes being available as first_name and designation in the output event. But the mobile number will be stripped.
|
|
Strategy Map All Fields
When this strategy is applied only the attributes present in the mapping file will be available in the output event.
Please note that you cannot map events to the same event type to avoid loopbacks.
Map
|
|
Source Event
|
|
Output Event
When the above map is combined with the event it will result in the name and role attributes being available as first_name and designation in the output event. But the mobile number will be stripped.
|
|
1.2.13 - Logging and Monitoring
Logging and Monitoring
StreamZero FX aggregates all operational data into Elasticsearch. Most operational data and events are transported through Kafka from which it is placed in Elasticsearch by Elasticsearch Sink containers.
The following are the Kex Data and The matching Elasticsearch Indexes
Logs
Contains Logs from all applications. Elasticsearch index is XYZ
Events
All events that are transported through the ferris.events Topic are loaded into Elasticsearch Index.
Checking Logs
StreamZero Logs are in logstash format. The logs can be aggregated from the application by using the ferris_cli library.
The following is a sample log entry with extended descriptions below.
Logs are identified by the app_name attribute which provides you with an indication of the application from which it was generated.
To Filter Application Logs use the following
App_name:
Checking Events
Events are in form of cloud events. The data section of an event is schema less i.e. the data provided in the attributes may vara from event type to event type. If you require custom extractions for specific event types the best is to tap into the
Event Name Spaces
1.3 - User Guide
1.3.1 - Landing Page (Dashboard)
The StreamZero FX Landing page provides insights and analytics around typical platform related metrics mostly related to Data Ops and detailed event handling. It can be finetuned and tailored to customer specific needs.
In this specific use case the insights and analytics of the StreamZero FX Data Platform are highlighted as follows:
-
In the first row, the last 18 executions and the last 18 executions with failed state
-
the last 18 executions showcase the following details:
- Package (name)
- Status
- Execution time
- Finished
-
the last 18 executions with failed state showcase the following details:
- Package (name)
- Status failed
- Triggered time
It allows users of the platform to verify why the triggered package has failed executing.
-
-
In the second row, the executions statuses per day (last 7 days) and the executions by status (last 7 days)
- Completed
- Failed
- Pending
- In_progress
-
In the third row, the exectuions trigger type per day (last 7 days) and the exectuions by trigger type (last 7 days)
- triggered
- scheduled
- manual
-
In the 4th row, the average execution time per day (last 7 days) and the most recently updated packages
- the details of the most recently updated packages are divided as follows:
- Package
- Project
- Updated on (date and time)
- the details of the most recently updated packages are divided as follows:
-
In the 5th row, the most frequently executed packages in the last 7 days with the following details:
- Package (name)
- Number of exections
1.3.2 - Projects
This subcategory explains the creation of new projects and users withtin these projects.
Project
- Click on Projects in the menu on the left side to open dropdown and then on List Projects
- Click on "+Add"
- Name the new project
- Save
Project on the StreamZero Platform form the overarching organizational bracket for different types of objects. All users, packages, scripts, parameters, secrets and other elements are organized into projects to ease enterprise data management. The default owner for new projects is the Platform Admin (PA).
User creation within the project
Since the Platform Administrator created the Project, he is automatically assigned as the Project Owner. All user roles on the project level are defined in detail as follows:
- Project Owner - has all permissions on project and related entities (packages, users) including deletion of project(s) (and users) created by the PO. By default it is the user that created project
- Project Admin - has all permissions as Owner except deletion
- Project User - has only list / view permissions
Please note that users without Platform Administrator role, do not see any projects and packages they are not assigned to. All project role rights are translated to package level also, eg. a user with Project User role will not be able to edit packages of that project, only to list/view them and run a (manual) execution
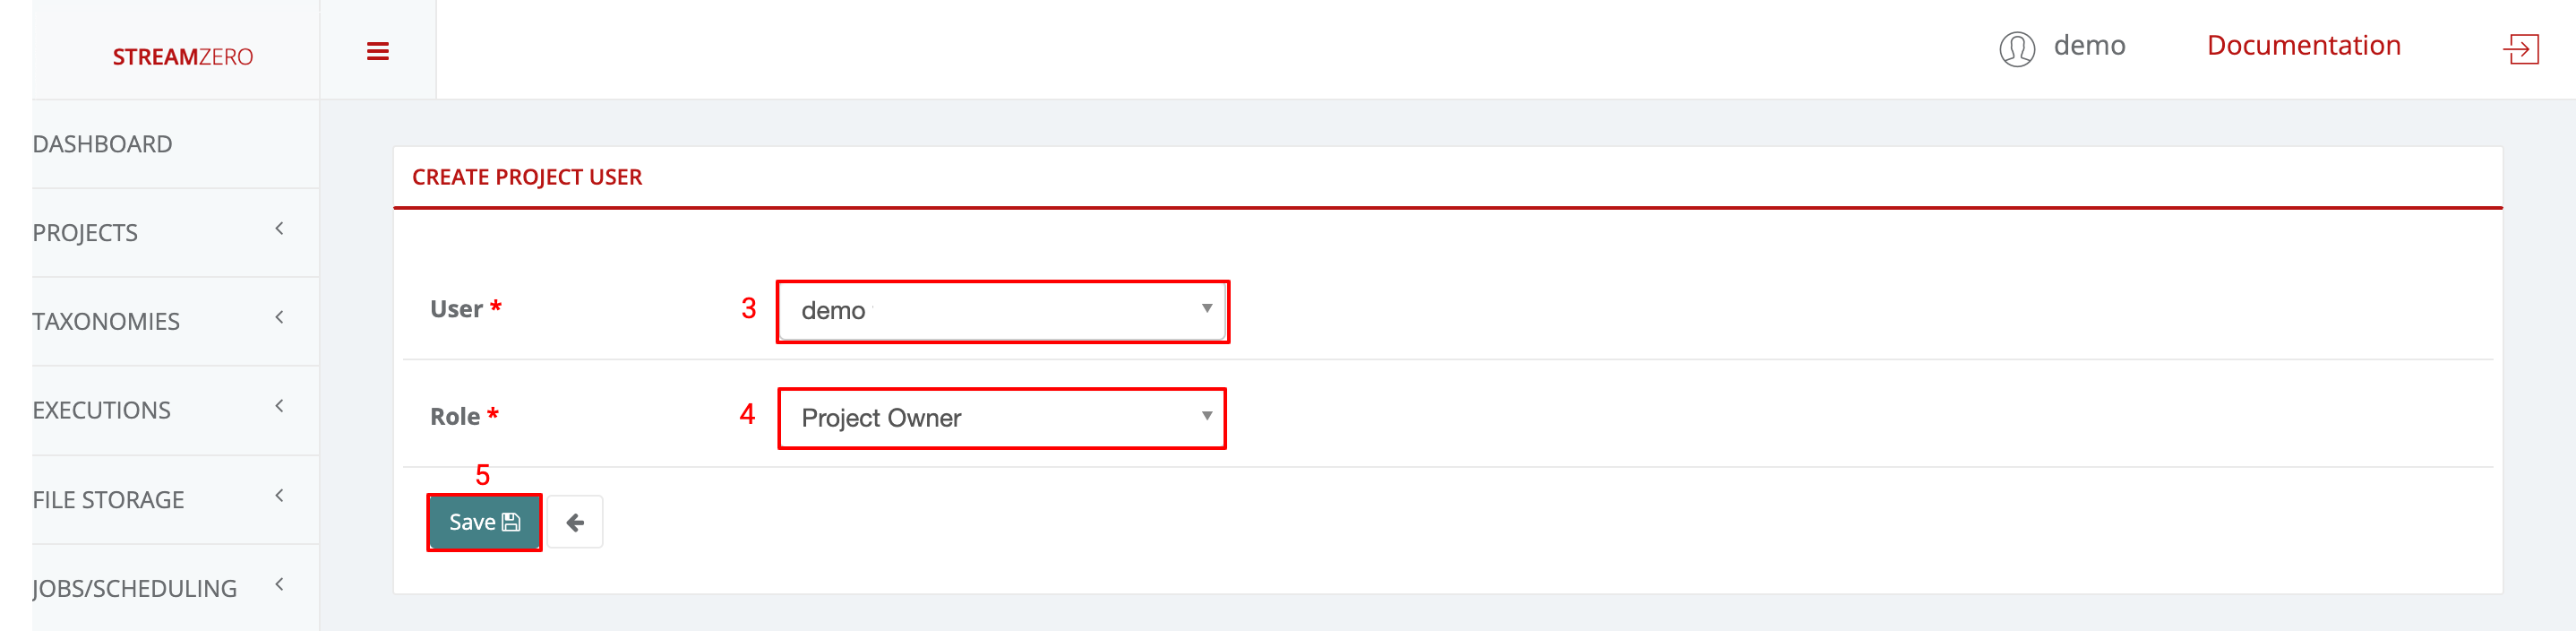
- Click on the magnifying glass to open Project details page

- Click on "+Add" to add a new user to the project
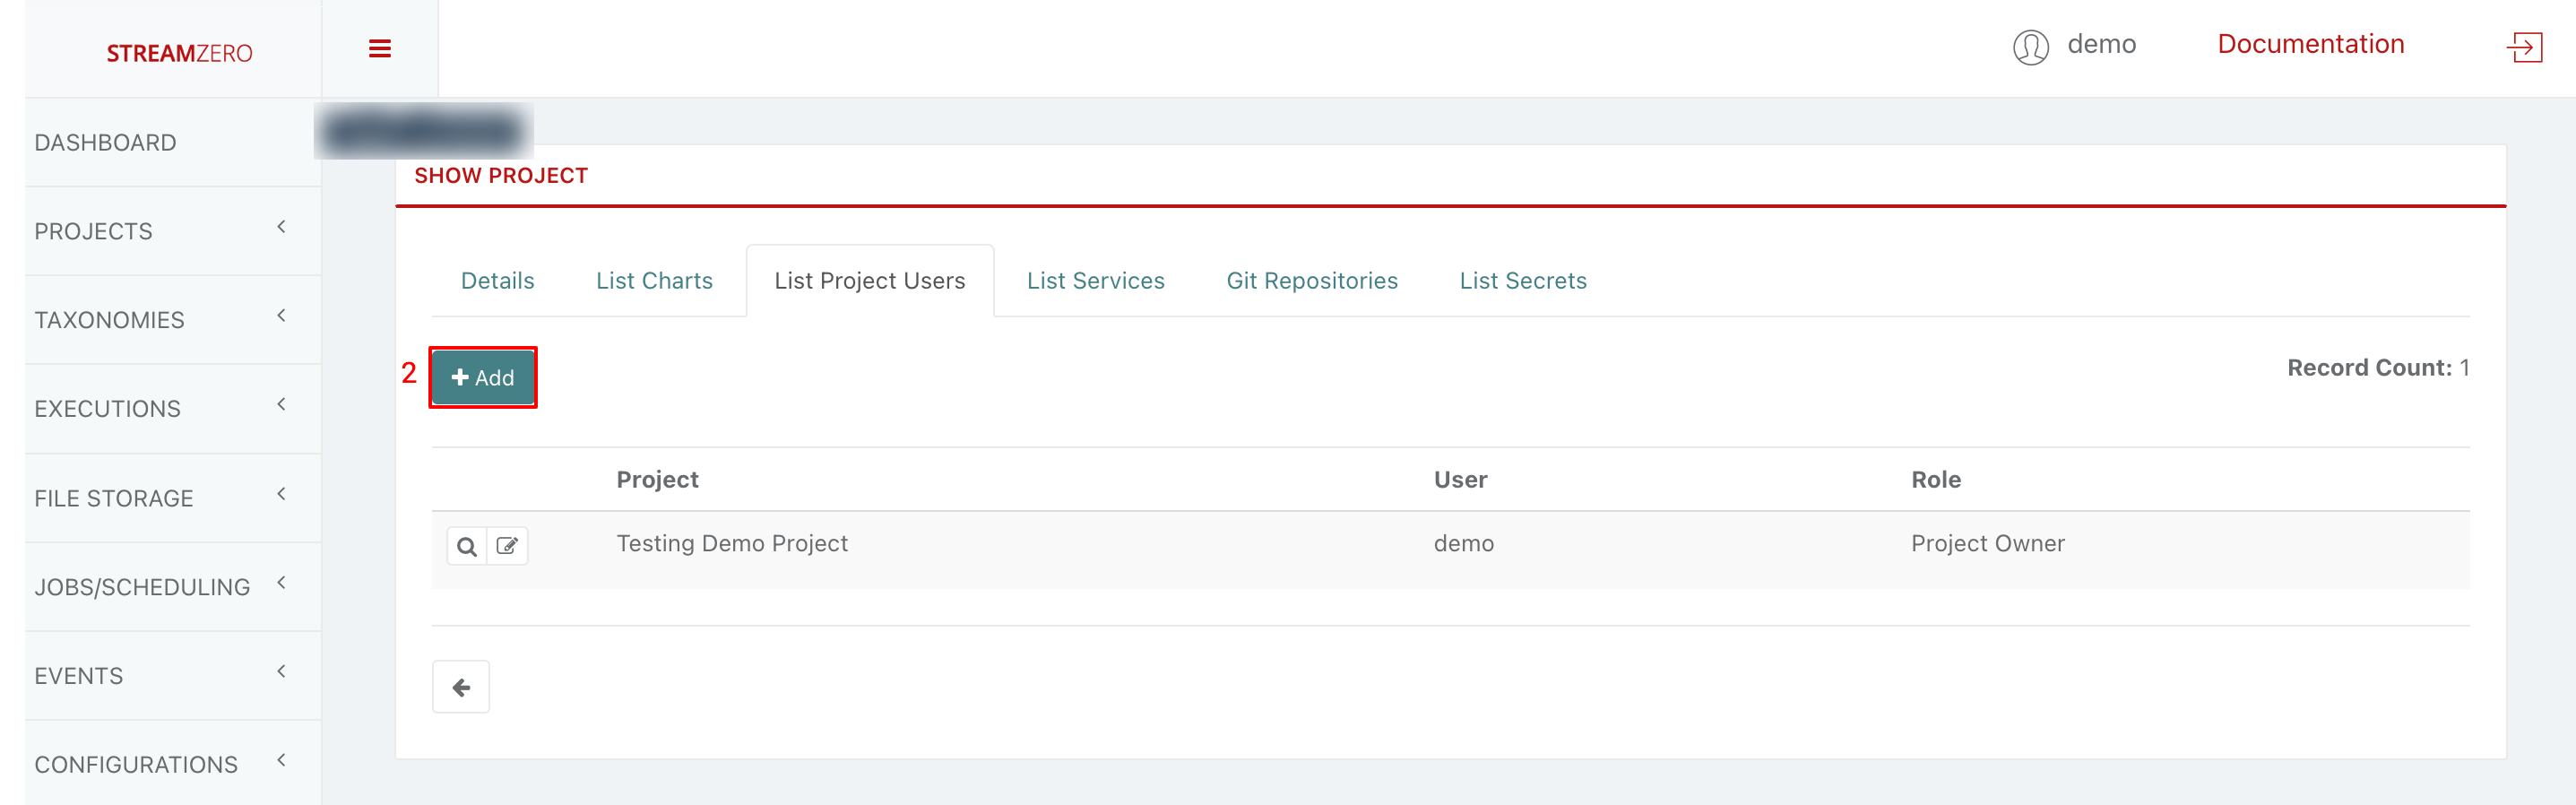
- Choose a user from the drowdown
- Choose a user role from dropdown (Owner; Admin; User)
- Click Save
- Check the user has been created
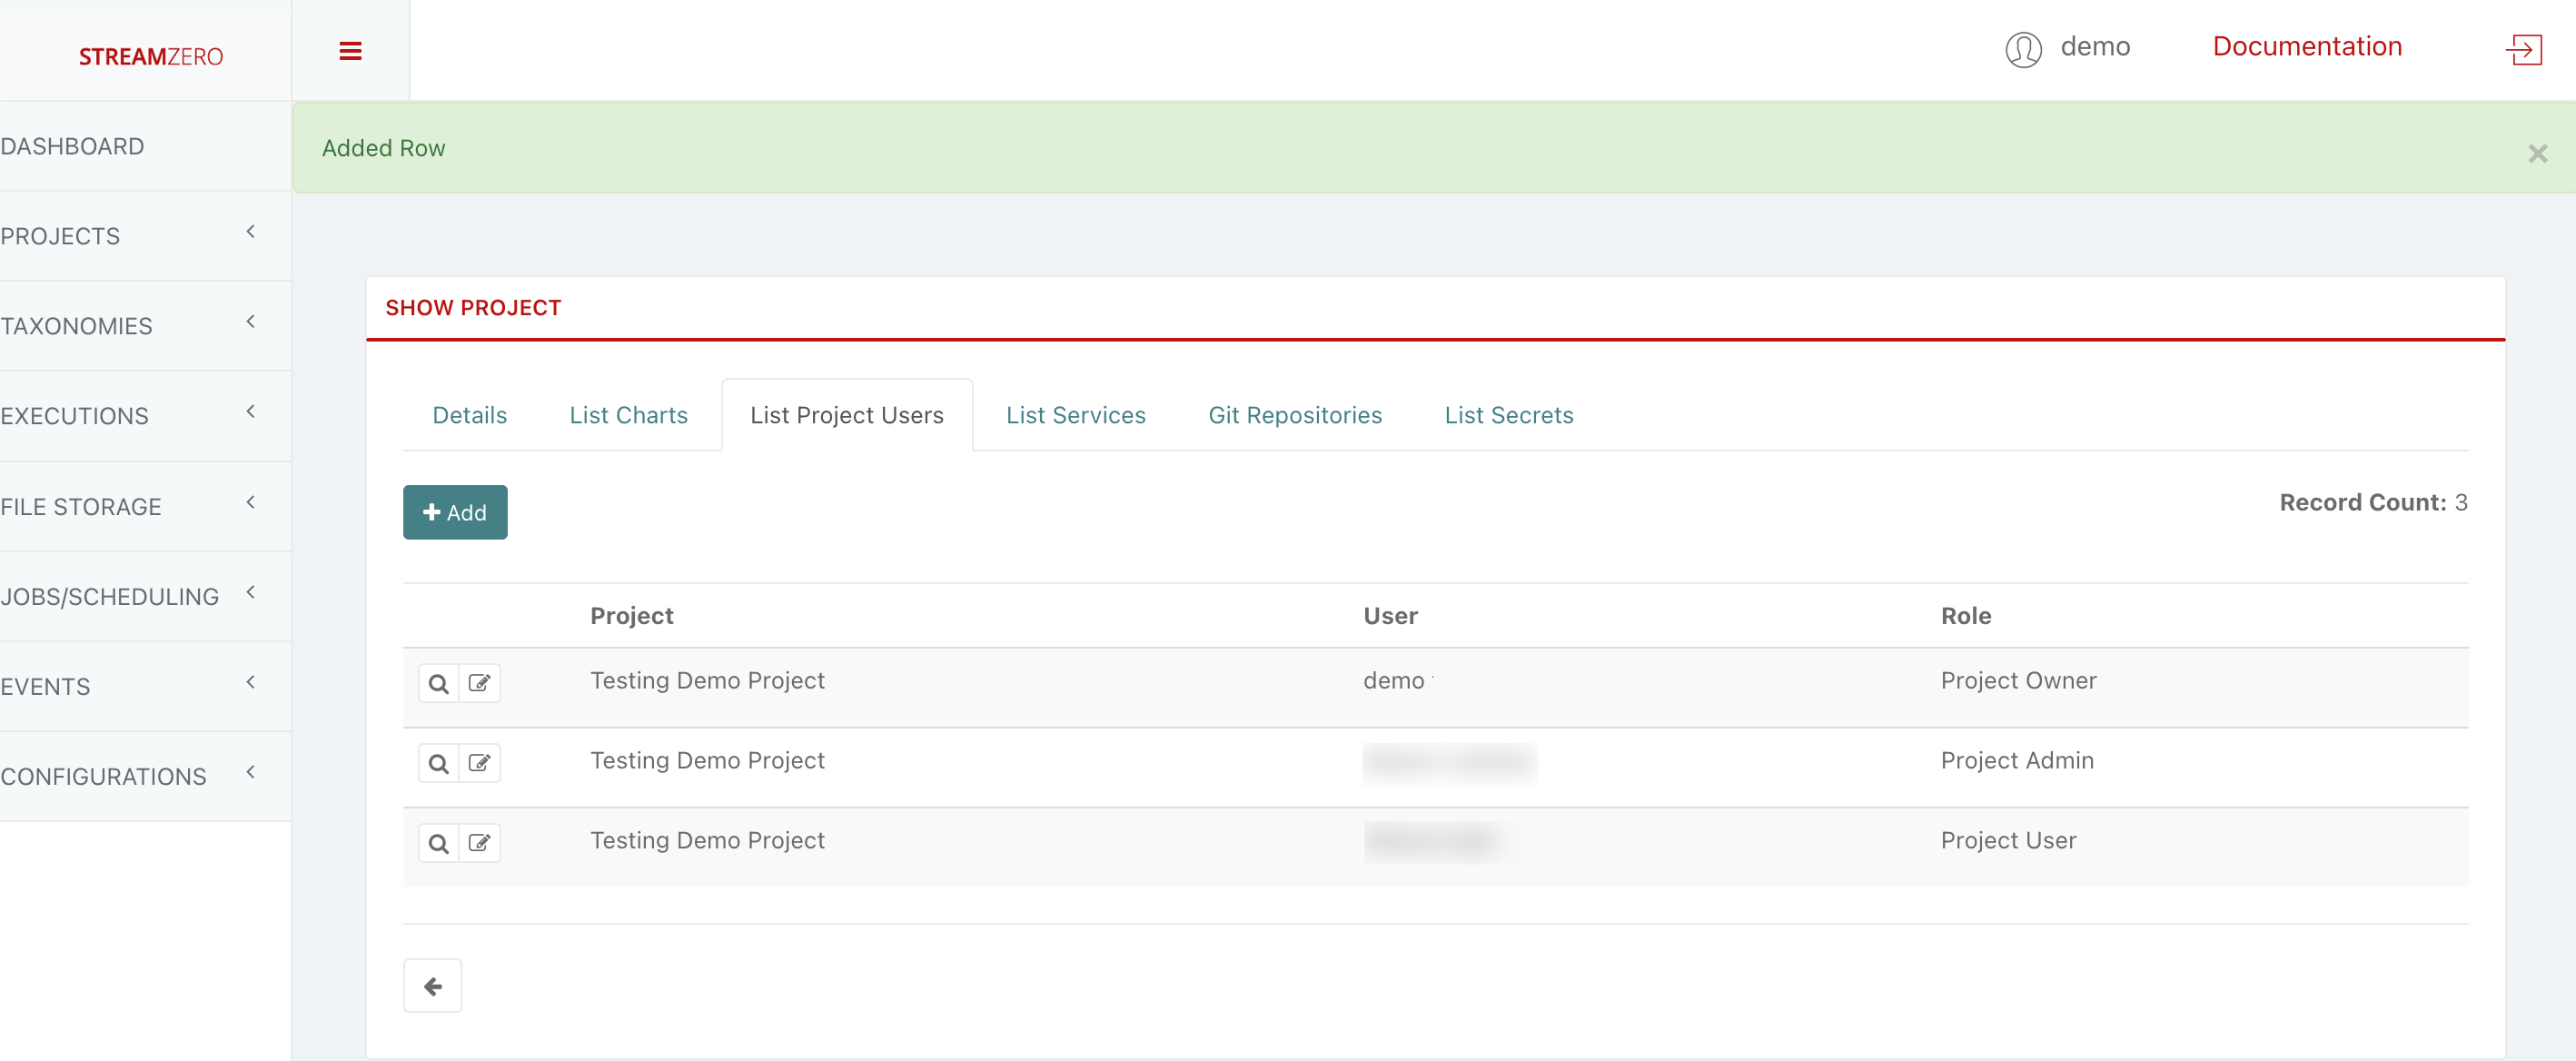
Since new users were created, no package(s) are yet assigned to the project. A project needs to be assigned to an existing package as follows:
- Click on Executions to open dropdown and then Packages in the menu on the left
- Click on edit
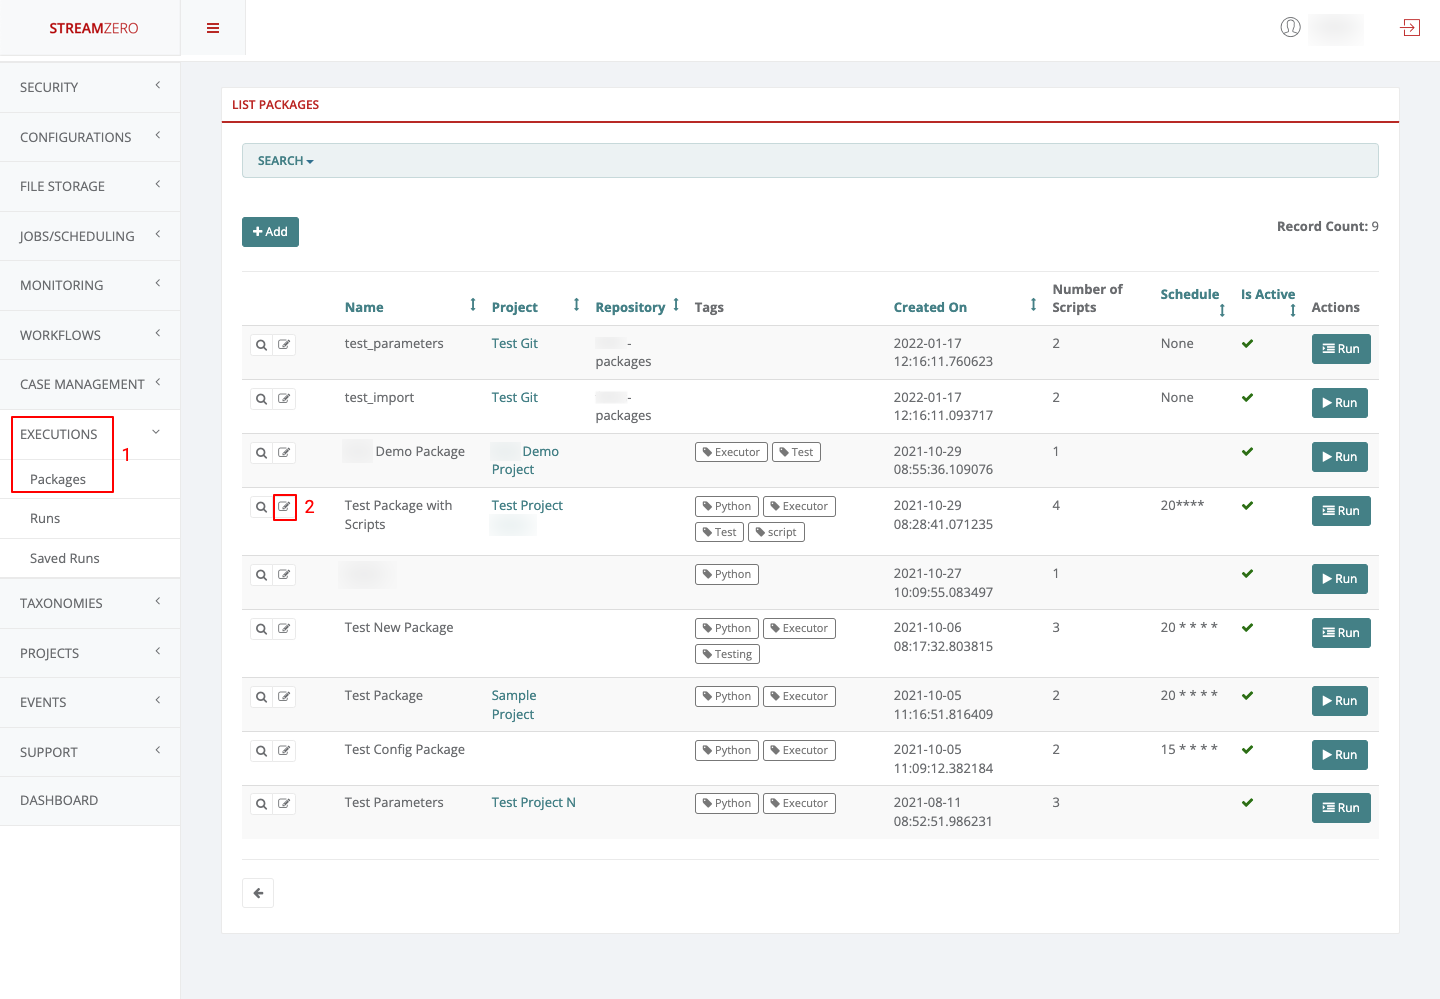
- Choose a project from dropdown
- Click Save

Once that a project was assigned to a package, the users created within that project will be able to perform their chores.
Project Owner
- Log in as “Project Owner”
- Click on Projects to open dropdown and then List Projects

As defined above, a Project Owner can add new projects, view, edit and delete the projects he belongs to.
- Click on Executions to open dropdown and then on Packages

As Project Owner, one can add new packages, view, edit, delete and trigger manual runs and delete the packages within the projects the user belongs to.
Project Admin
- Log in as “Project Admin”
- Click on Projects to open dropdown and then List Projects

As defined above, a Project Admin can add new projects, view and edit the projects he belongs to but can not delete anything.
- Click on Executions to open dropdown and then on Packages
As Project Admin, one can add new packages, view, edit and trigger manually runs within the projects the user belongs to. The Project Admin can not delete the packages, runs or related elements.
Project User
- Log in as “Project User”
- Click on Projects to open dropdwon and then List Projects
As defined above, a Project User can only view the projects he belongs to. He can neither edit, nore delete anything.
- Click on Executions to open dropdown and then on Packages.

As Project User, one can view packages and trigger manually runs within the projects the user belongs to. The Project User can not delete or edit packages, runs or related elements.
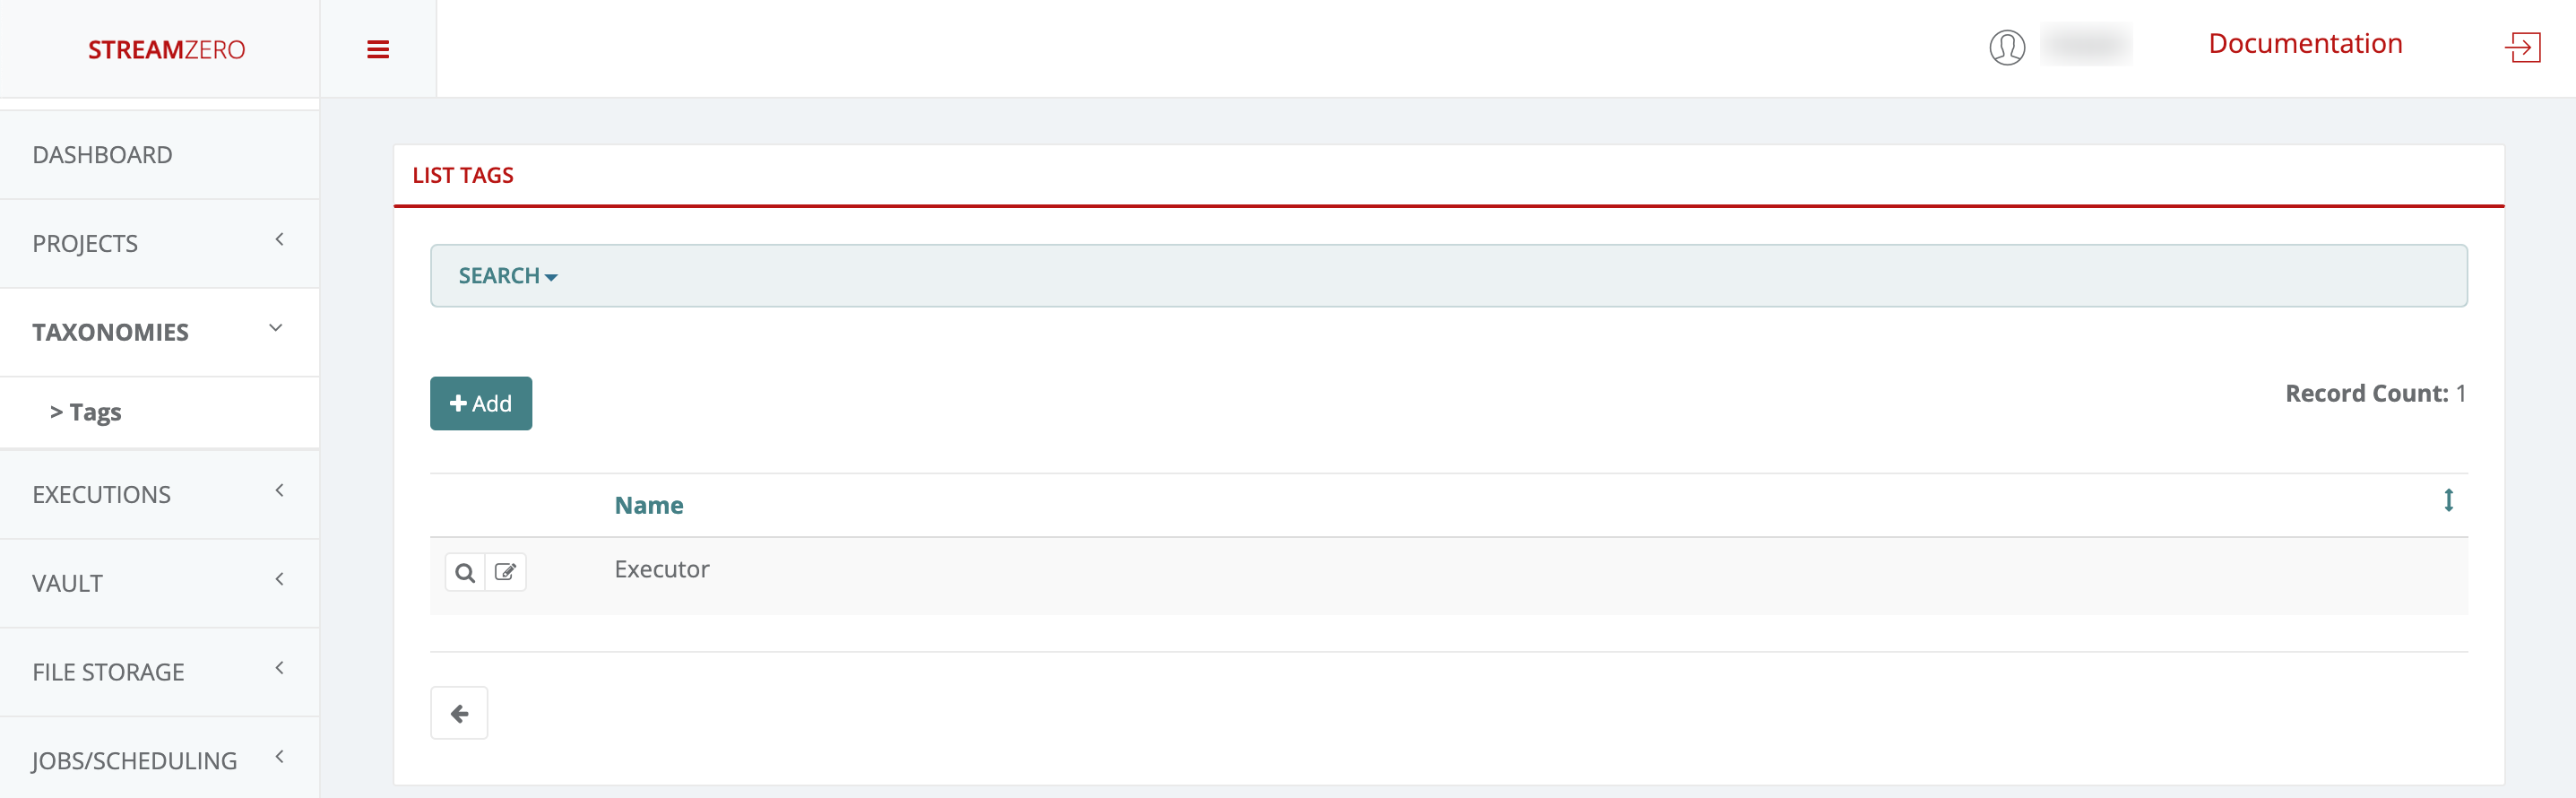
1.3.3 - Taxonomy/Tagging
Taxonomies or Tags describe the ability to organize and structure types and classes of objects and their correlations within executions/packages, events (event types) and workflows across any given application, use case or project. Tags are searchable and makes it easy to group and relate objects across different components and lifecycle stages.
As a generic base module “taggability” can easily be included in any model, use case or application by the developers/users.
Note: As of the current release the Taxonomy is universal across all projects, use cases and cannot be segregated along different functional domains. It is thus essential to create a unified naming convention to be shared among the different projects & user groups.
Taxonomies / Tags
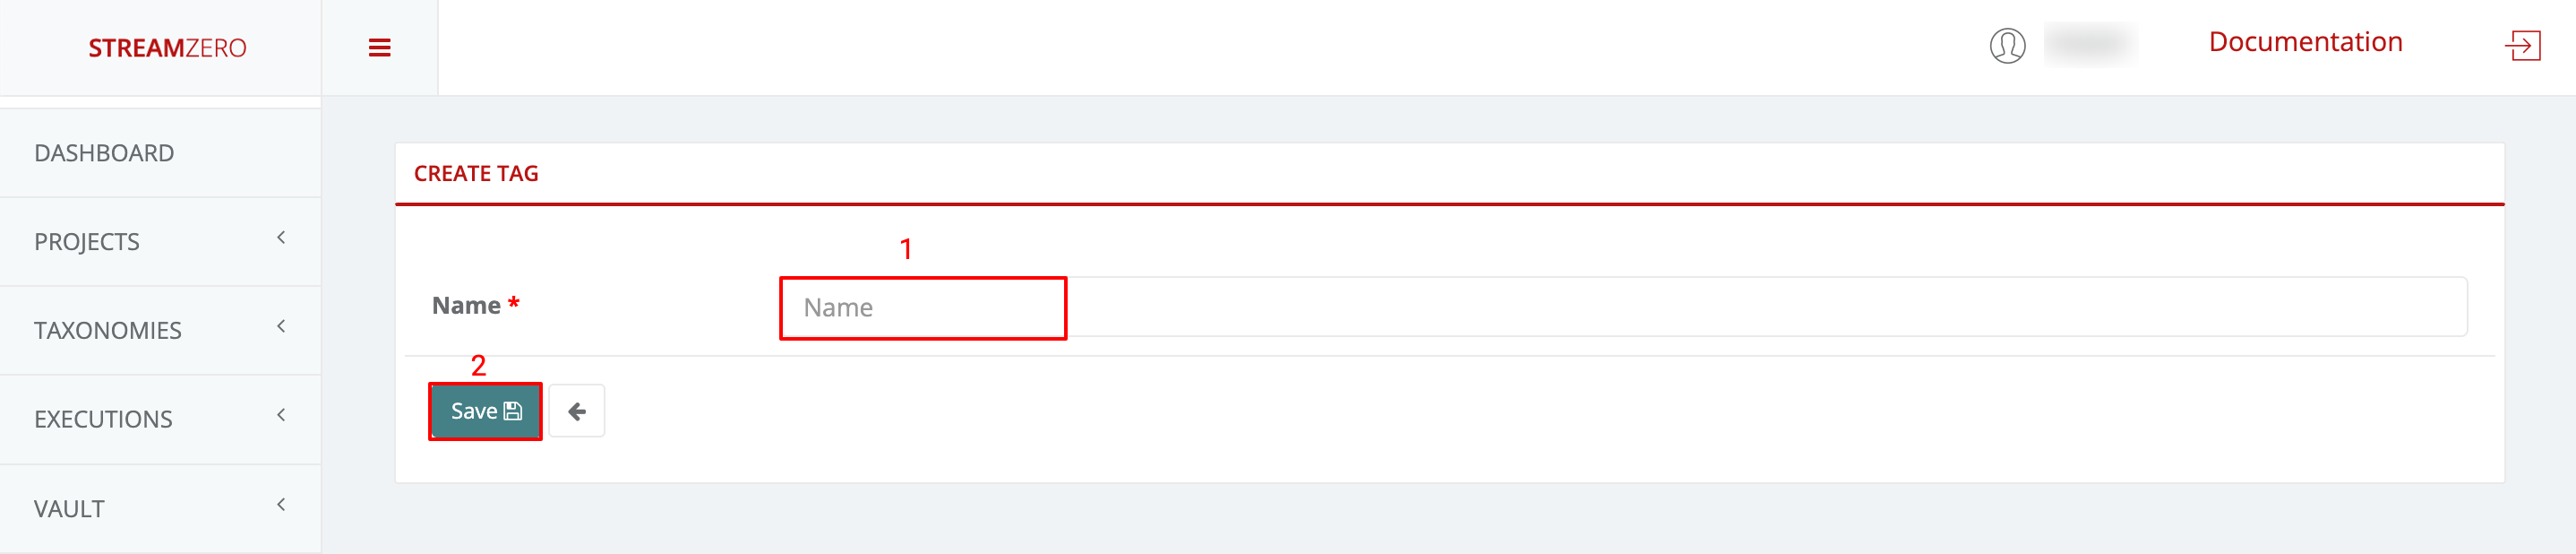
- Click on Taxonomies in the left menu to open dropdown and then on Tags
- Click Add to create a tag

- Name Tag
- Save
- Check created Tag(s)
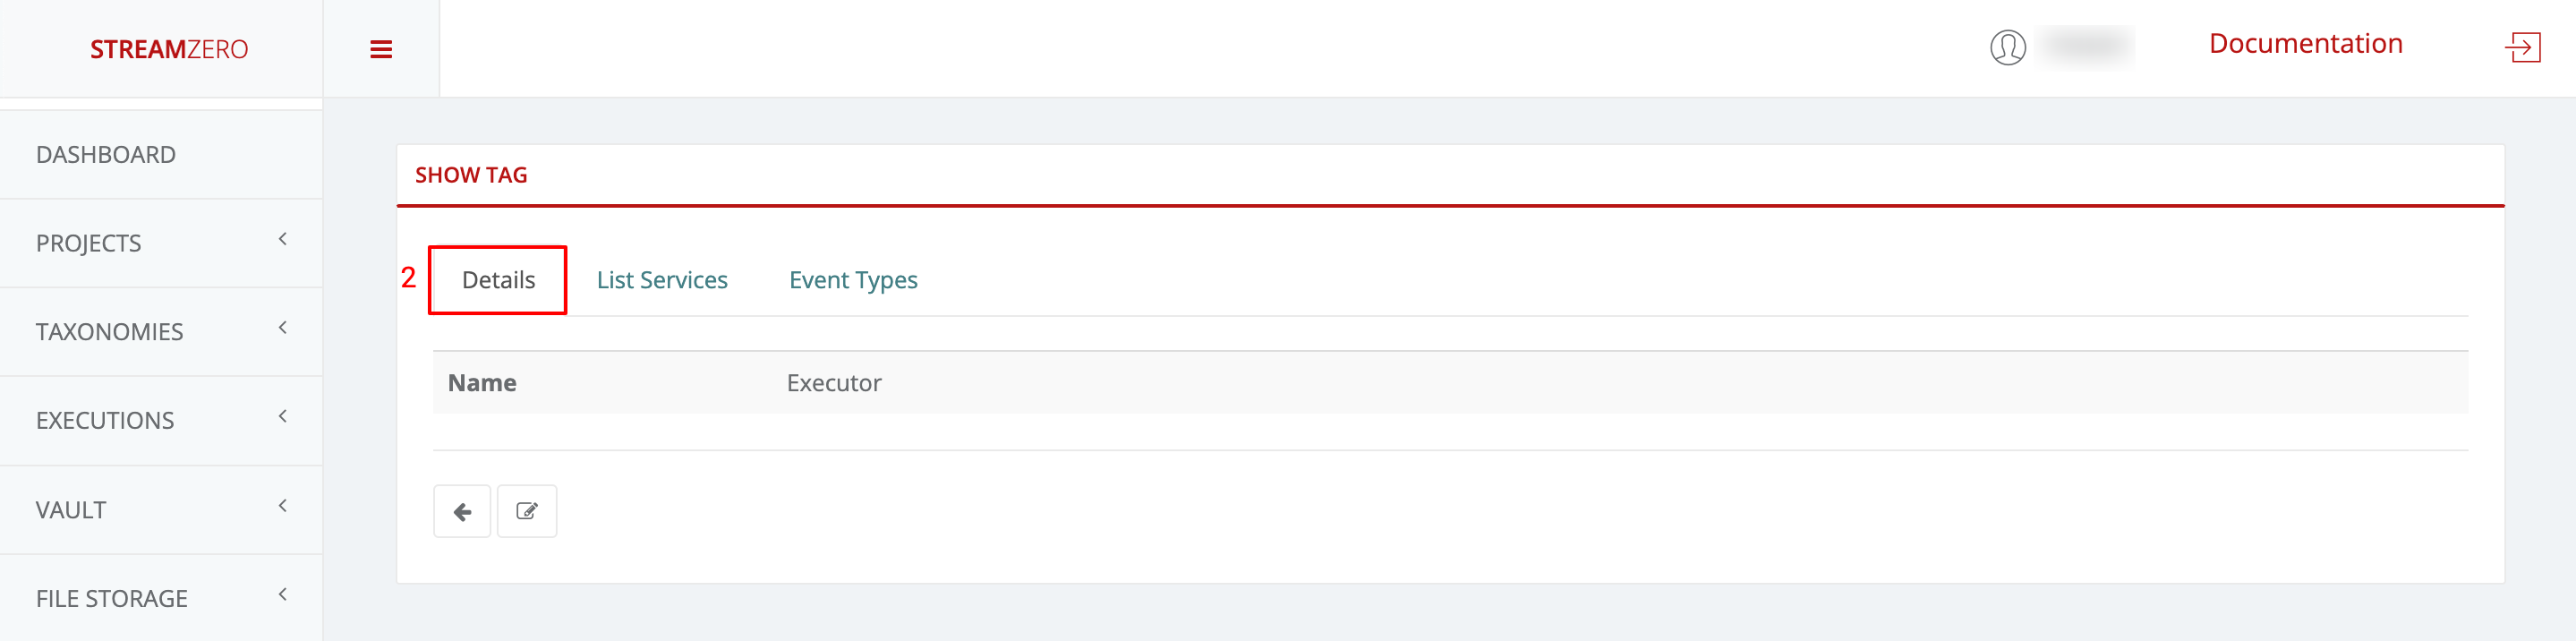
- Click on the magnifying glass to open details (show tag) page
- This will automatically transfer you to the tag details page
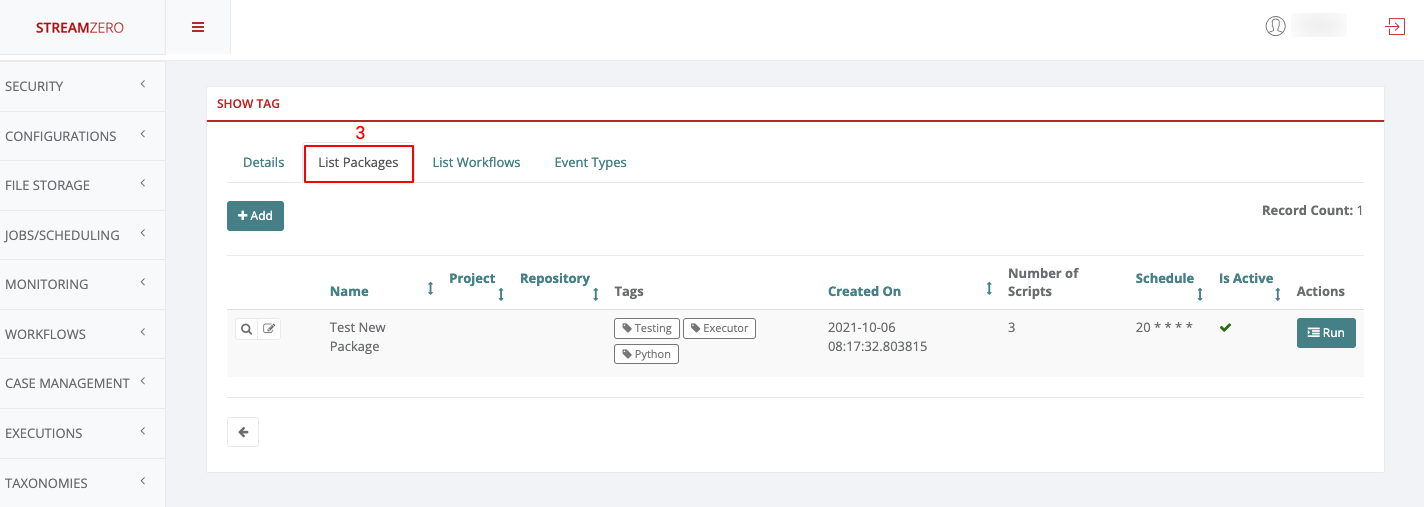
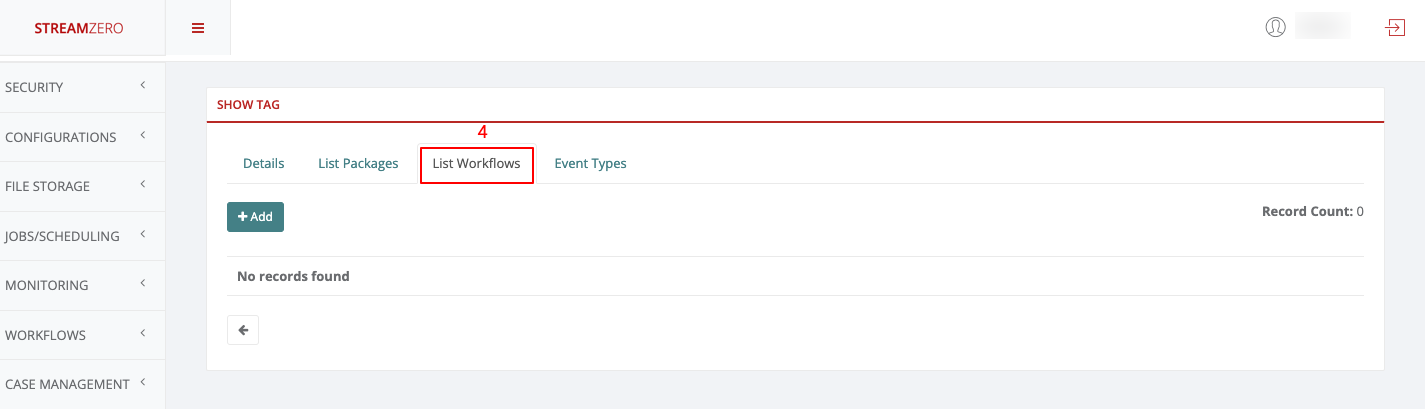
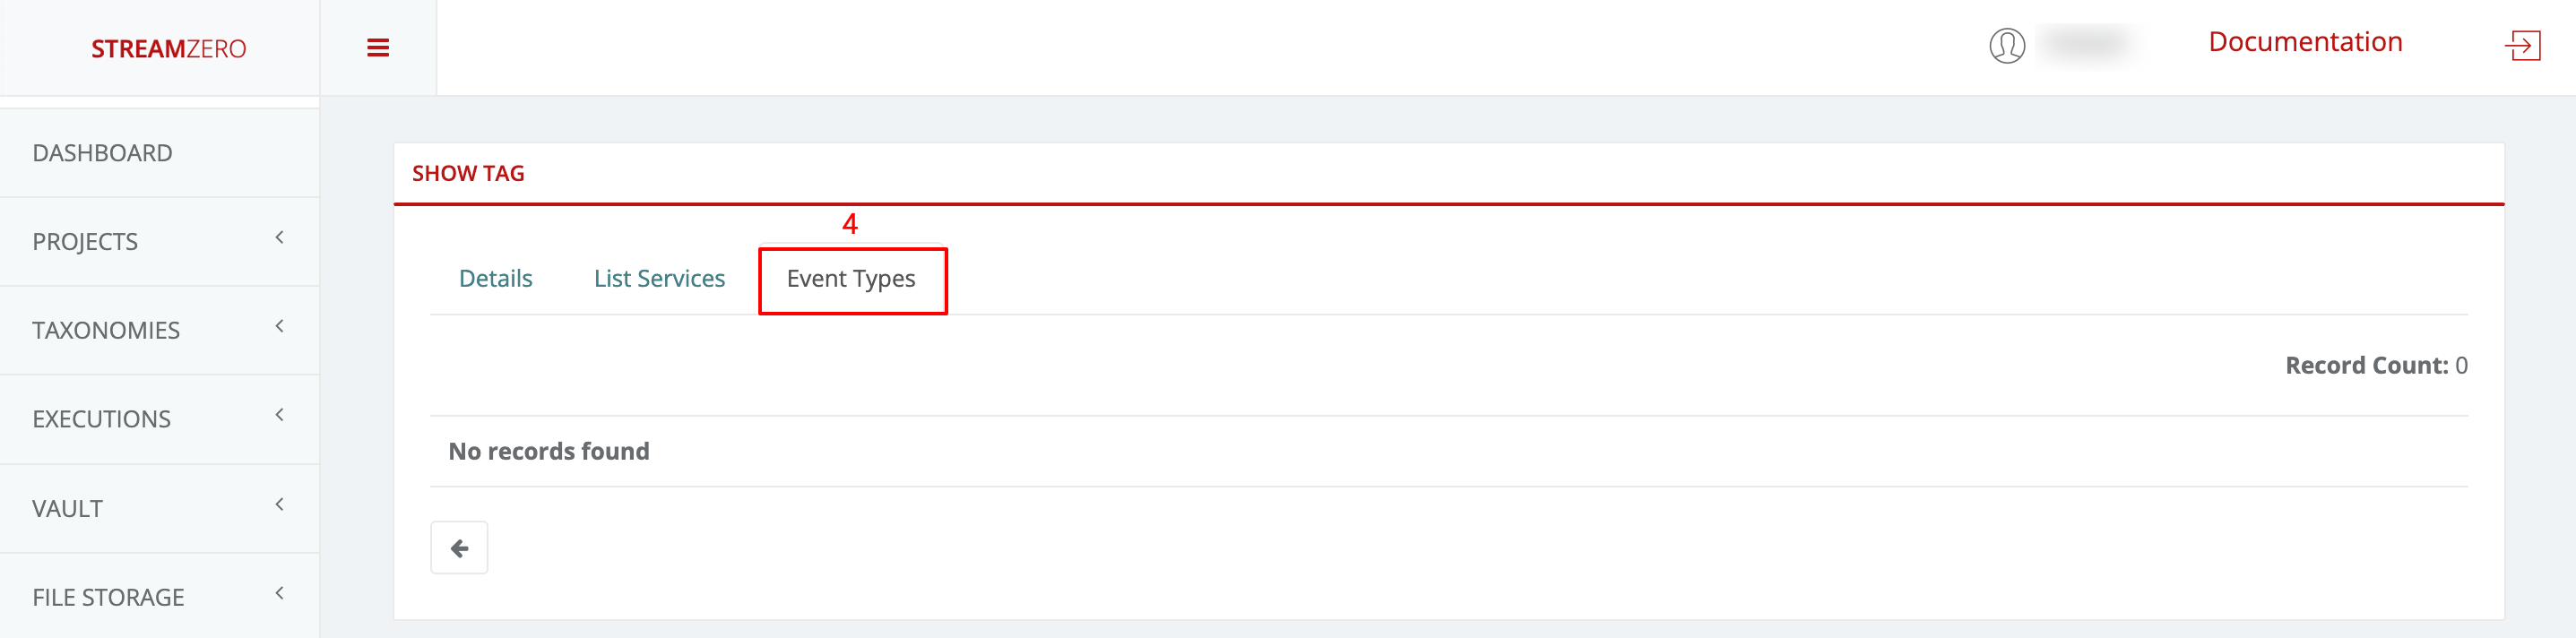
- Click on List Packages to see in which packages the same tag is used
- Click on List Workflows to see in which workflows the same tag is used (in this example no workflow is associated with the tag just created)
- Click on Event Types to see in which event type the same tag is uses (in this example no event type is associated with the tag just created)
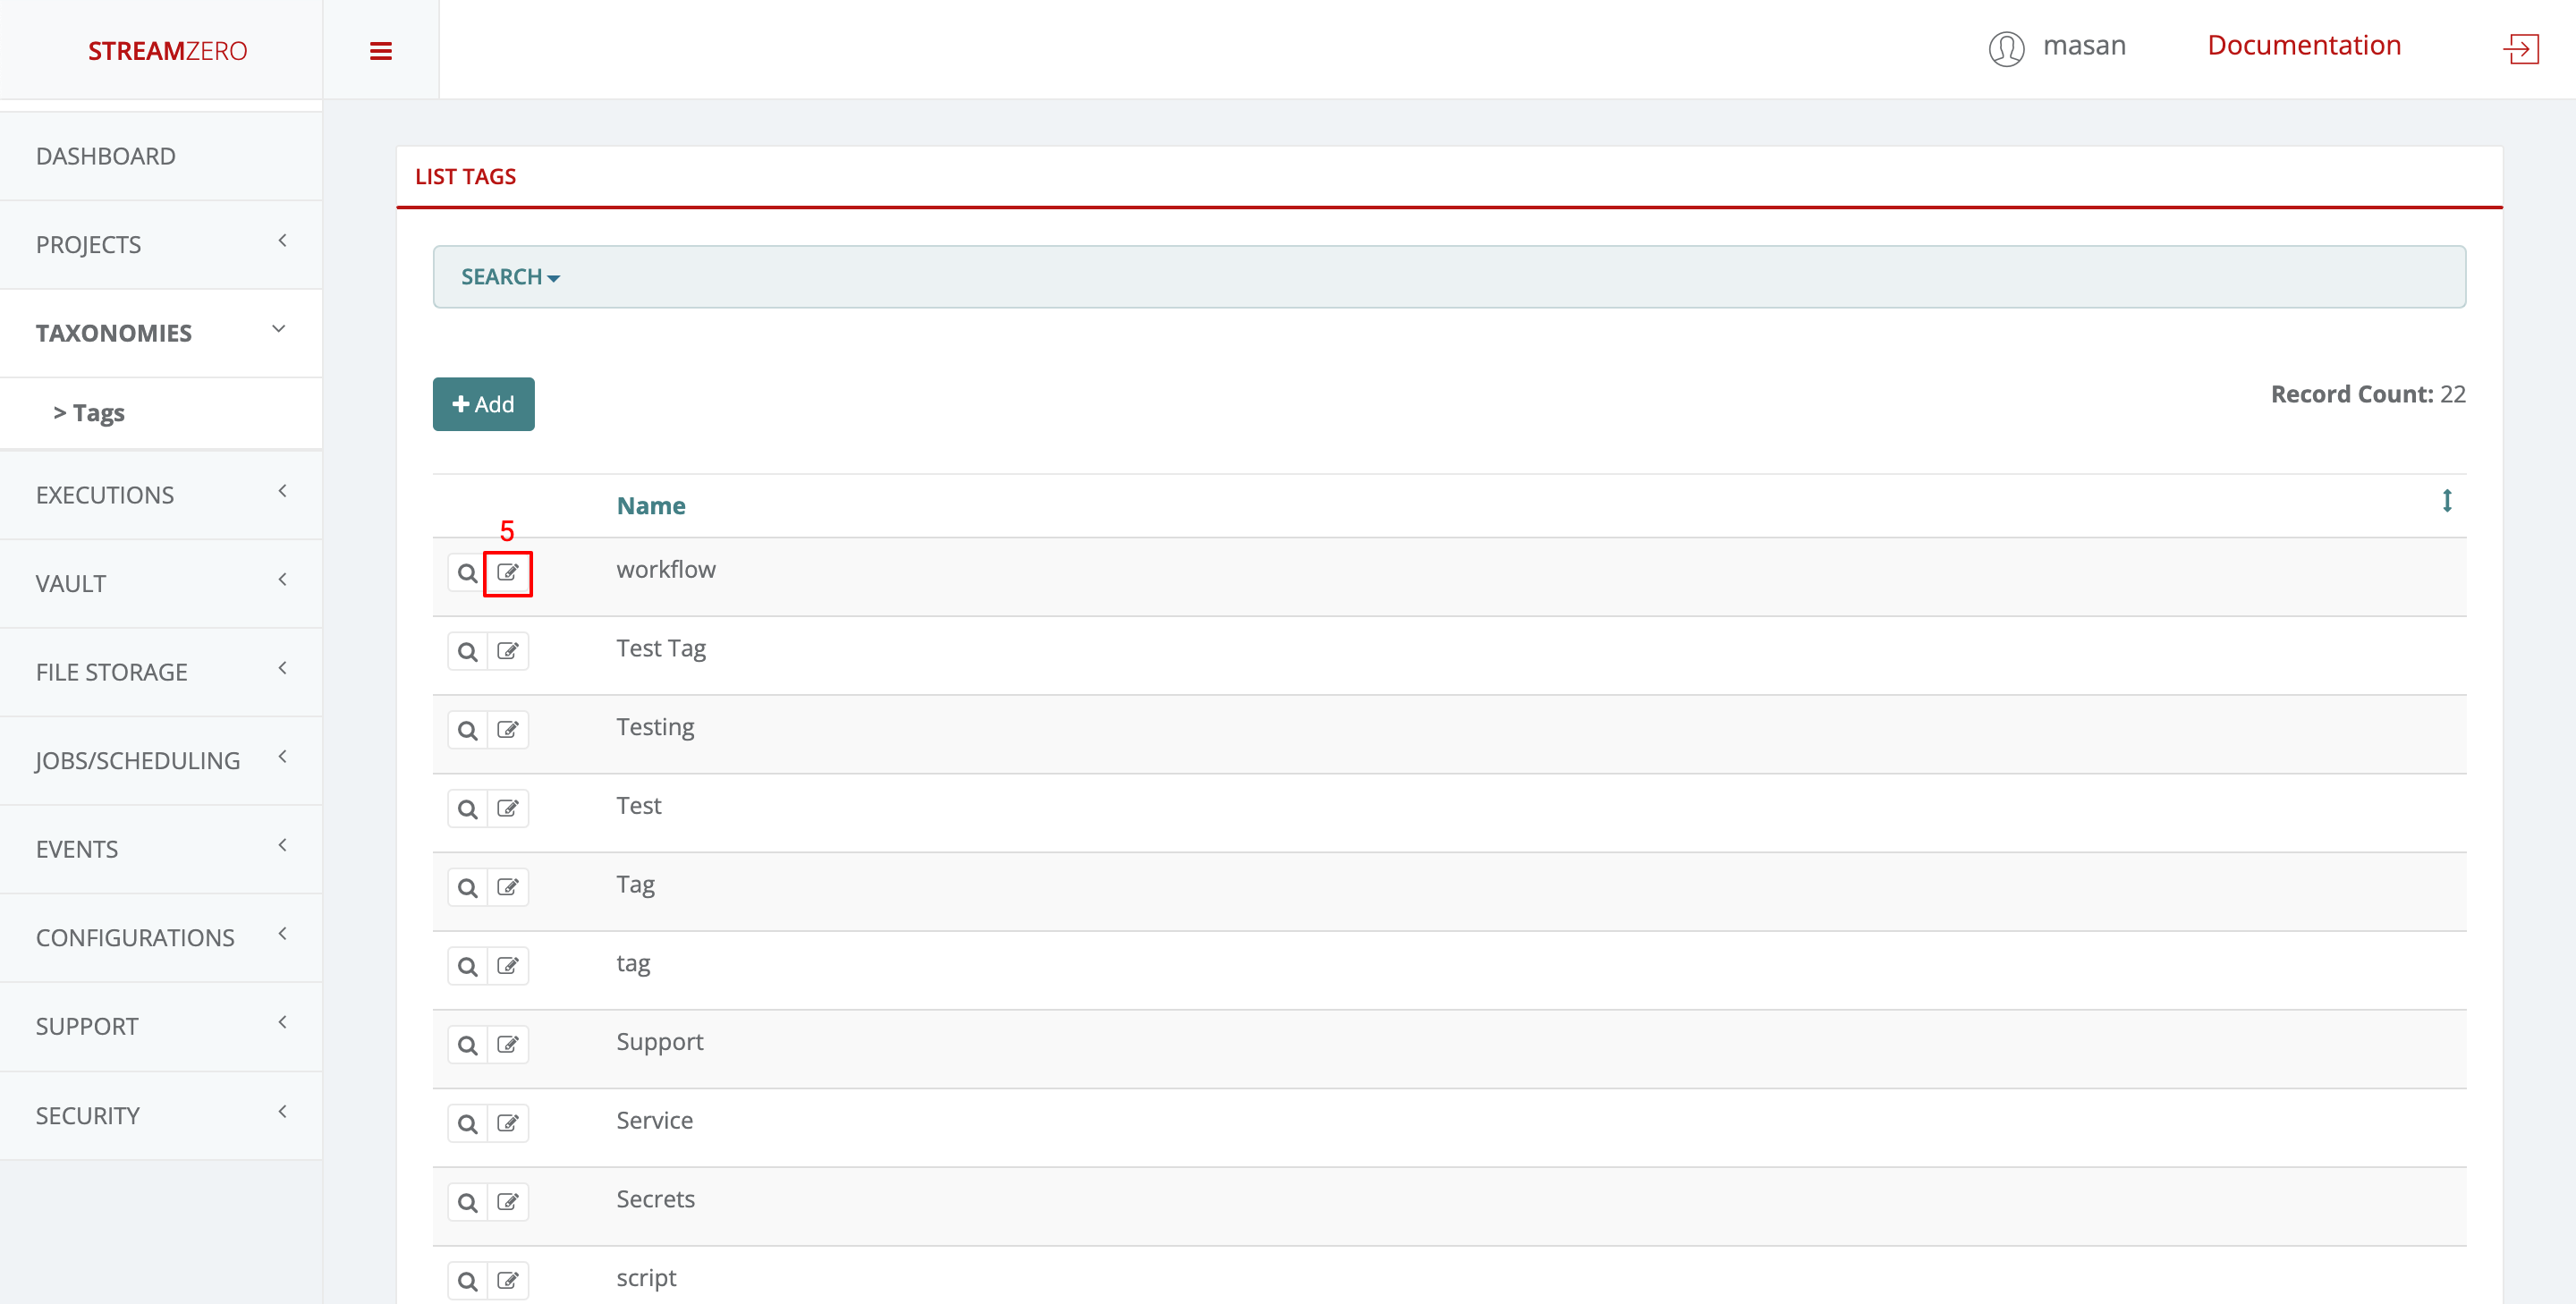
- Click on the Edit icon (List tags page) to edit/rename a tag

Search Tag
- Click Search on top of the List Tags / Details Page
- Click Add Filter to choose a filter (currently only the “Name” filter is supported)
- From the dropdown list choose the tag to be searched for
- Starts with
- Ends with
- Contains
- Equal to
- Etc.
- Insert tag “Name”
- Hit the Search button

- Check search results
1.3.4 - CronJob
CronJobs are used to schedule regularly recurring actions such as backups, report generation and similar items. Each of those tasks should be configured to recur for an indefinite period into the future on a regular frequency (for example: once a day / week / month). The user also can define the point in time within that interval when the job should start.
Example:
This example CronJob manifest would execute and trigger an event every minute:
|
|
Cron Schedule Syntax
|
|
For example, the line below states that the task must be started every Friday at midnight, as well as on the 13th of each month at midnight:
0 0 13 * 5
To generate CronJob schedule expressions, you can also use web tools like crontab.guru.
Useful Cron Patterns
| Entry | Description | Equivalent to |
|---|---|---|
| @yearly (or @annually) | Run once a year at midnight of 1 January | 0 0 1 1 * |
| @monthly | Run once a month at midnight of the first day of the month | 0 0 1 * * |
| @weekly | Run once a week at midnight on Sunday morning | 0 0 * * 0 |
| @daily (or @midnight) | Run once a day at midnight | 0 0 * * * |
| @hourly | Run once an hour at the beginning of the hour | 0 * * * * |
20 Useful Crontab Examples
Here is the list of examples for scheduling cron jobs in a Linux system using crontab.
1. Schedule a cron to execute at 2am daily.
This will be useful for scheduling database backup on a daily basis.
|
|
- Asterisk (*) is used for matching all the records.
2. Schedule a cron to execute twice a day.
Below example command will execute at 5 AM and 5 PM daily. You can specify multiple time stamps by comma-separated.
0 5,17 * * *
3. Schedule a cron to execute on every minutes.
Generally, we don’t require any script to execute on every minute but in some cases, you may need to configure it.
* * * * *
4. Schedule a cron to execute on every Sunday at 5 PM.
This type of cron is useful for doing weekly tasks, like log rotation, etc.
0 17 * * sun
5. Schedule a cron to execute on every 10 minutes.
If you want to run your script on 10 minutes interval, you can configure like below. These types of crons are useful for monitoring.
*/10 * * * *
*/10: means to run every 10 minutes. Same as if you want to execute on every 5 minutes use */5.
6. Schedule a cron to execute on selected months.
Sometimes we required scheduling a task to be executed for selected months only. Below example script will run in January, May and August months.
* * * jan,may,aug
7. Schedule a cron to execute on selected days.
If you required scheduling a task to be executed for selected days only. The below example will run on each Sunday and Friday at 5 PM.
0 17 * * sun,fri
8. Schedule a cron to execute on first sunday of every month.
To schedule a script to execute a script on the first Sunday only is not possible by time parameter, But we can use the condition in command fields to do it.
0 2 * * sun [ $(date +%d) -le 07 ] && /script/script.sh
9. Schedule a cron to execute on every four hours.
If you want to run a script on 4 hours interval. It can be configured like below.
|
|
10. Schedule a cron to execute twice on every Sunday and Monday.
To schedule a task to execute twice on Sunday and Monday only. Use the following settings to do it.
|
|
11. Schedule a cron to execute on every 30 Seconds.
To schedule a task to execute every 30 seconds is not possible by time parameters, But it can be done by schedule same cron twice as below.
|
|
13. Schedule tasks to execute on yearly ( @yearly ).
@yearly timestamp is similar to “0 0 1 1 *“. It will execute a task on the first minute of every year, It may useful to send new year greetings 🙂
|
|
14. Schedule tasks to execute on monthly ( @monthly ).
@monthly timestamp is similar to “0 0 1 * *“. It will execute a task in the first minute of the month. It may useful to do monthly tasks like paying the bills and invoicing to customers.
|
|
15. Schedule tasks to execute on Weekly ( @weekly ).
@weekly timestamp is similar to “0 0 * * mon“. It will execute a task in the first minute of the week. It may useful to do weekly tasks like the cleanup of the system etc.
|
|
16. Schedule tasks to execute on daily ( @daily ).
@daily timestamp is similar to “0 0 * * *“. It will execute a task in the first minute of every day, It may useful to do daily tasks.
|
|
17. Schedule tasks to execute on hourly ( @hourly ).
@hourly timestamp is similar to “0 * * * *“. It will execute a task in the first minute of every hour, It may useful to do hourly tasks.
|
|
1.3.5 - Events
FX is an event driven platform wich means that each action generating an event can be reused for further triggering of executions. Also within an executing script, an event can be generated and sent as a message. Each event is defined at least by it’s source, type and payload (data). Event message format is following the cloudevents standard. A list of all event types is maintained so the user can bound package execution to certain event type, which means that each time such an event is received, the package execution will be triggered.
Events
Events are messages passed through the platform which are generated by Services.
Events are in the form of JSON formatted messages which adhere to the CloudEvents format. They carry a Header which indicates the event type and a Payload (or Data section) which contain information about the event.
To have a better detailed understanding of how Events are generated, please refer to the Architecture subcategory in the Overview category.
Events
This use case defines how to configure a package to be triggered bt the FX Router when a specific type of event is observed on the platform.
- Click on Events on the left side of the dashboard menu to open drop-down
- Click on Event Types
- Check the predefined Event Types
- ferris.apps.modules.approvals.step_approval_completed
- ferris.apps.modules.minio.file_uploaded
Events can be created within scripts during package execution by sending a message to the Kafka Topic using the ferris_cli python package. For example, a package can be bound to a file_upload event that is triggered every time a file gets uploaded to MinIO using FX file storage module. New event types will be registered as they are sent to the Kafka Topic using the ferris_cli python package.
Further details regarding ferris_cli can be found in the subcategory Development Lifecycle in the Developer Guide.

Executions - Packages -> file upload trigger event
In this use case an existing package will be edited to define the file upload event type.
- Click on Executions on the left side of the dashboard menu to open drop-down
- Click on Packages
- Click on the edit record button to edit the existing package Test Package with Scripts
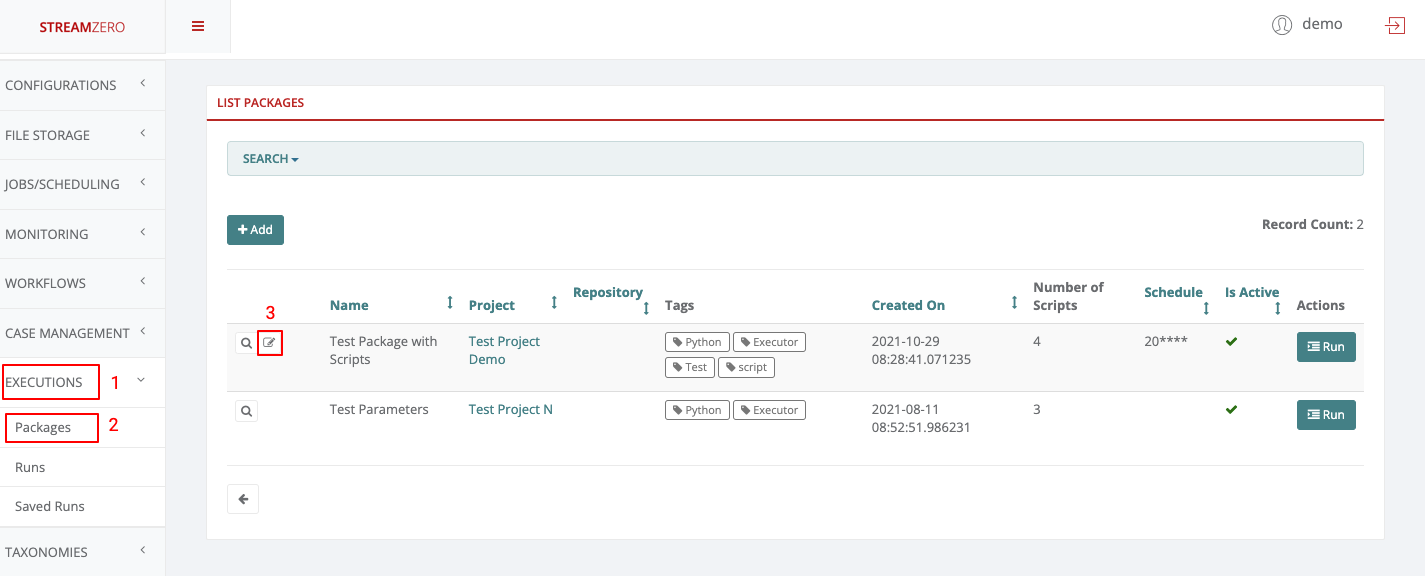
- Delete the CronJob Schedule to allow a Trigger Event Type
- Select the Value of the event type (ferris.apps.modules.minio.file_uploaded)
- Save the edited package.

File Storage
To finalize the process, a file needs to be uploaded to a MinIO bucket (file storage).
- Click on File Storage on the left side of the dashboard menu to open drop-down
- Click on List Files
- Click on +Add to upload a file to the bucket

- Choose file to upload
- Choose File Type (CSV Table; Plain Text; JSON)
- Select the Bucket Name
- Click on Save to save the file
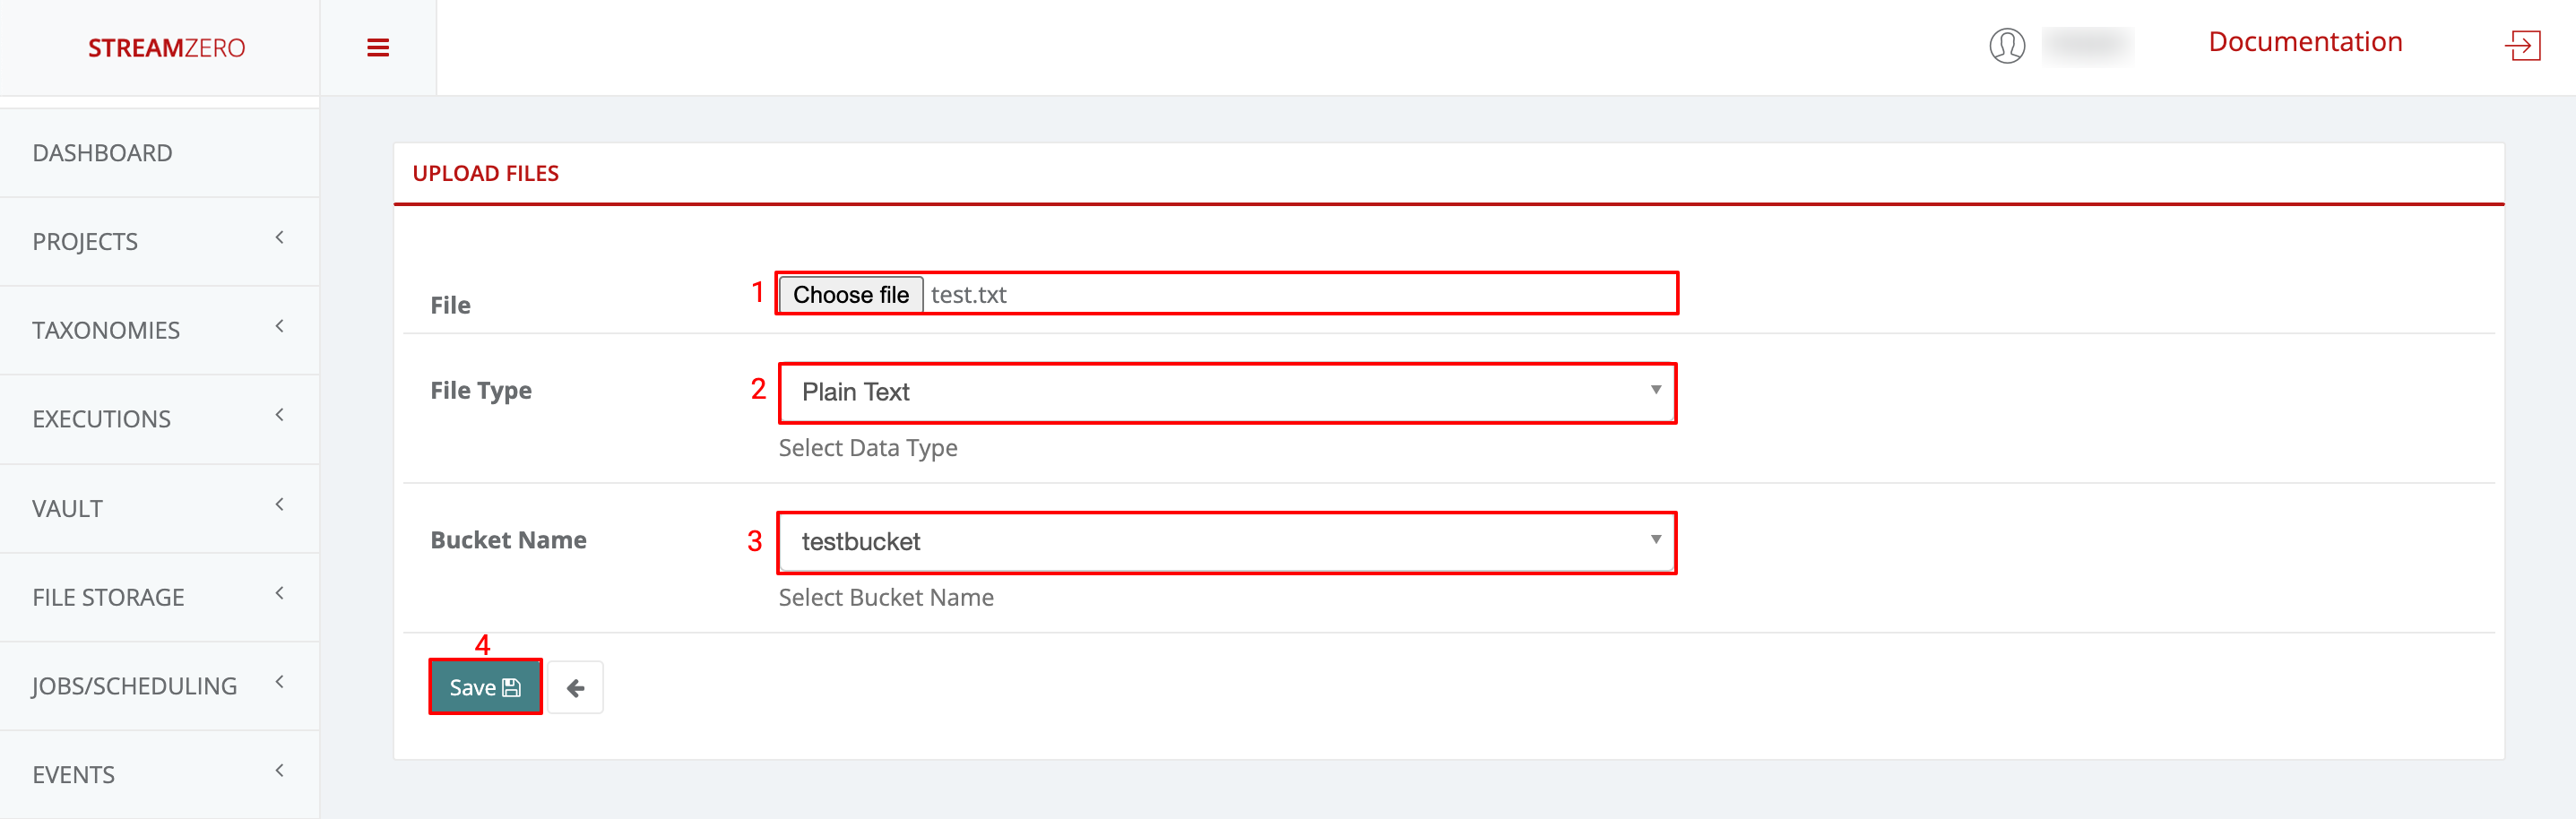
To verify if the package execution has been triggered, go back to the initial, edited package.
- Click on Executions on the left side of the dashboard menu to open drop-down
- Click on Packages
- Click on the magnifying glass to open the details page of the package Test Package with Scripts
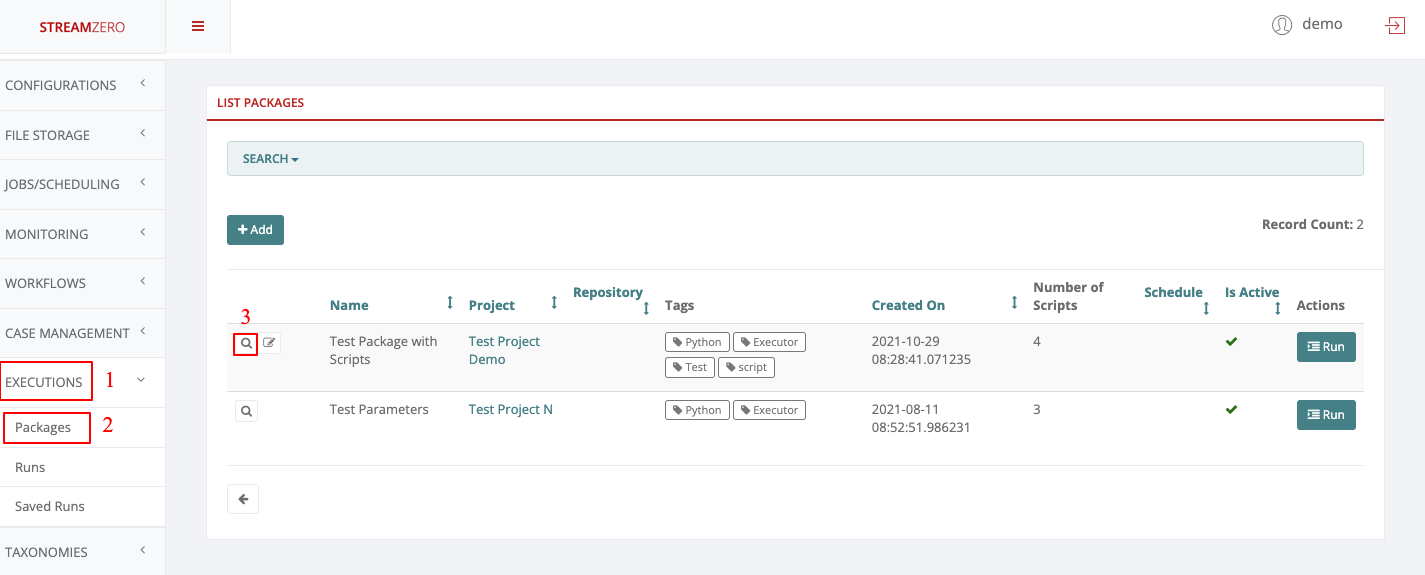
It will automatically open the List Package Executions tab.
- Check the last Event, date and time to verify it corresponds to the time the file was uploaded
- Click on the magnifying glass to open the details page of the triggered execution
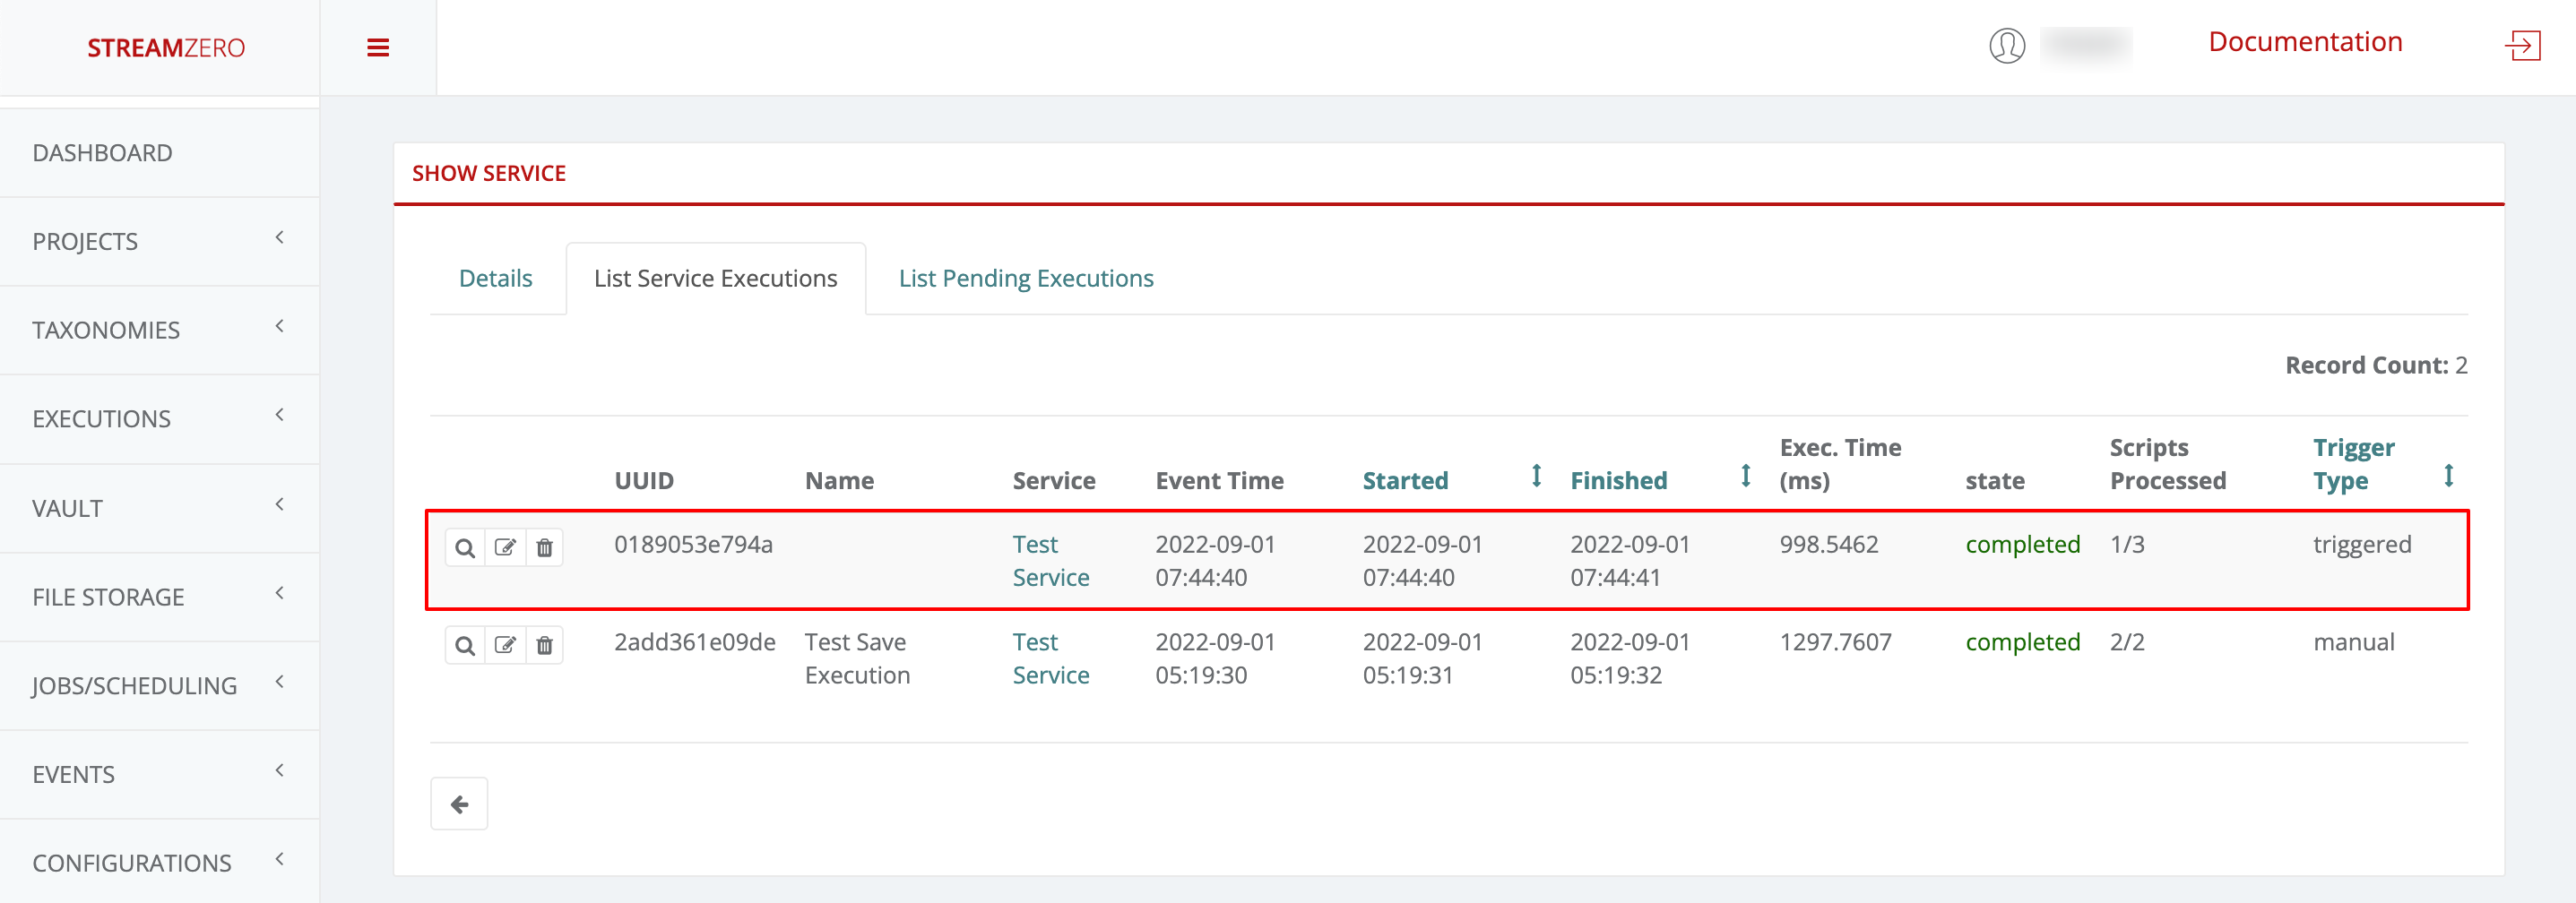
- Check the details page of the event triggered run
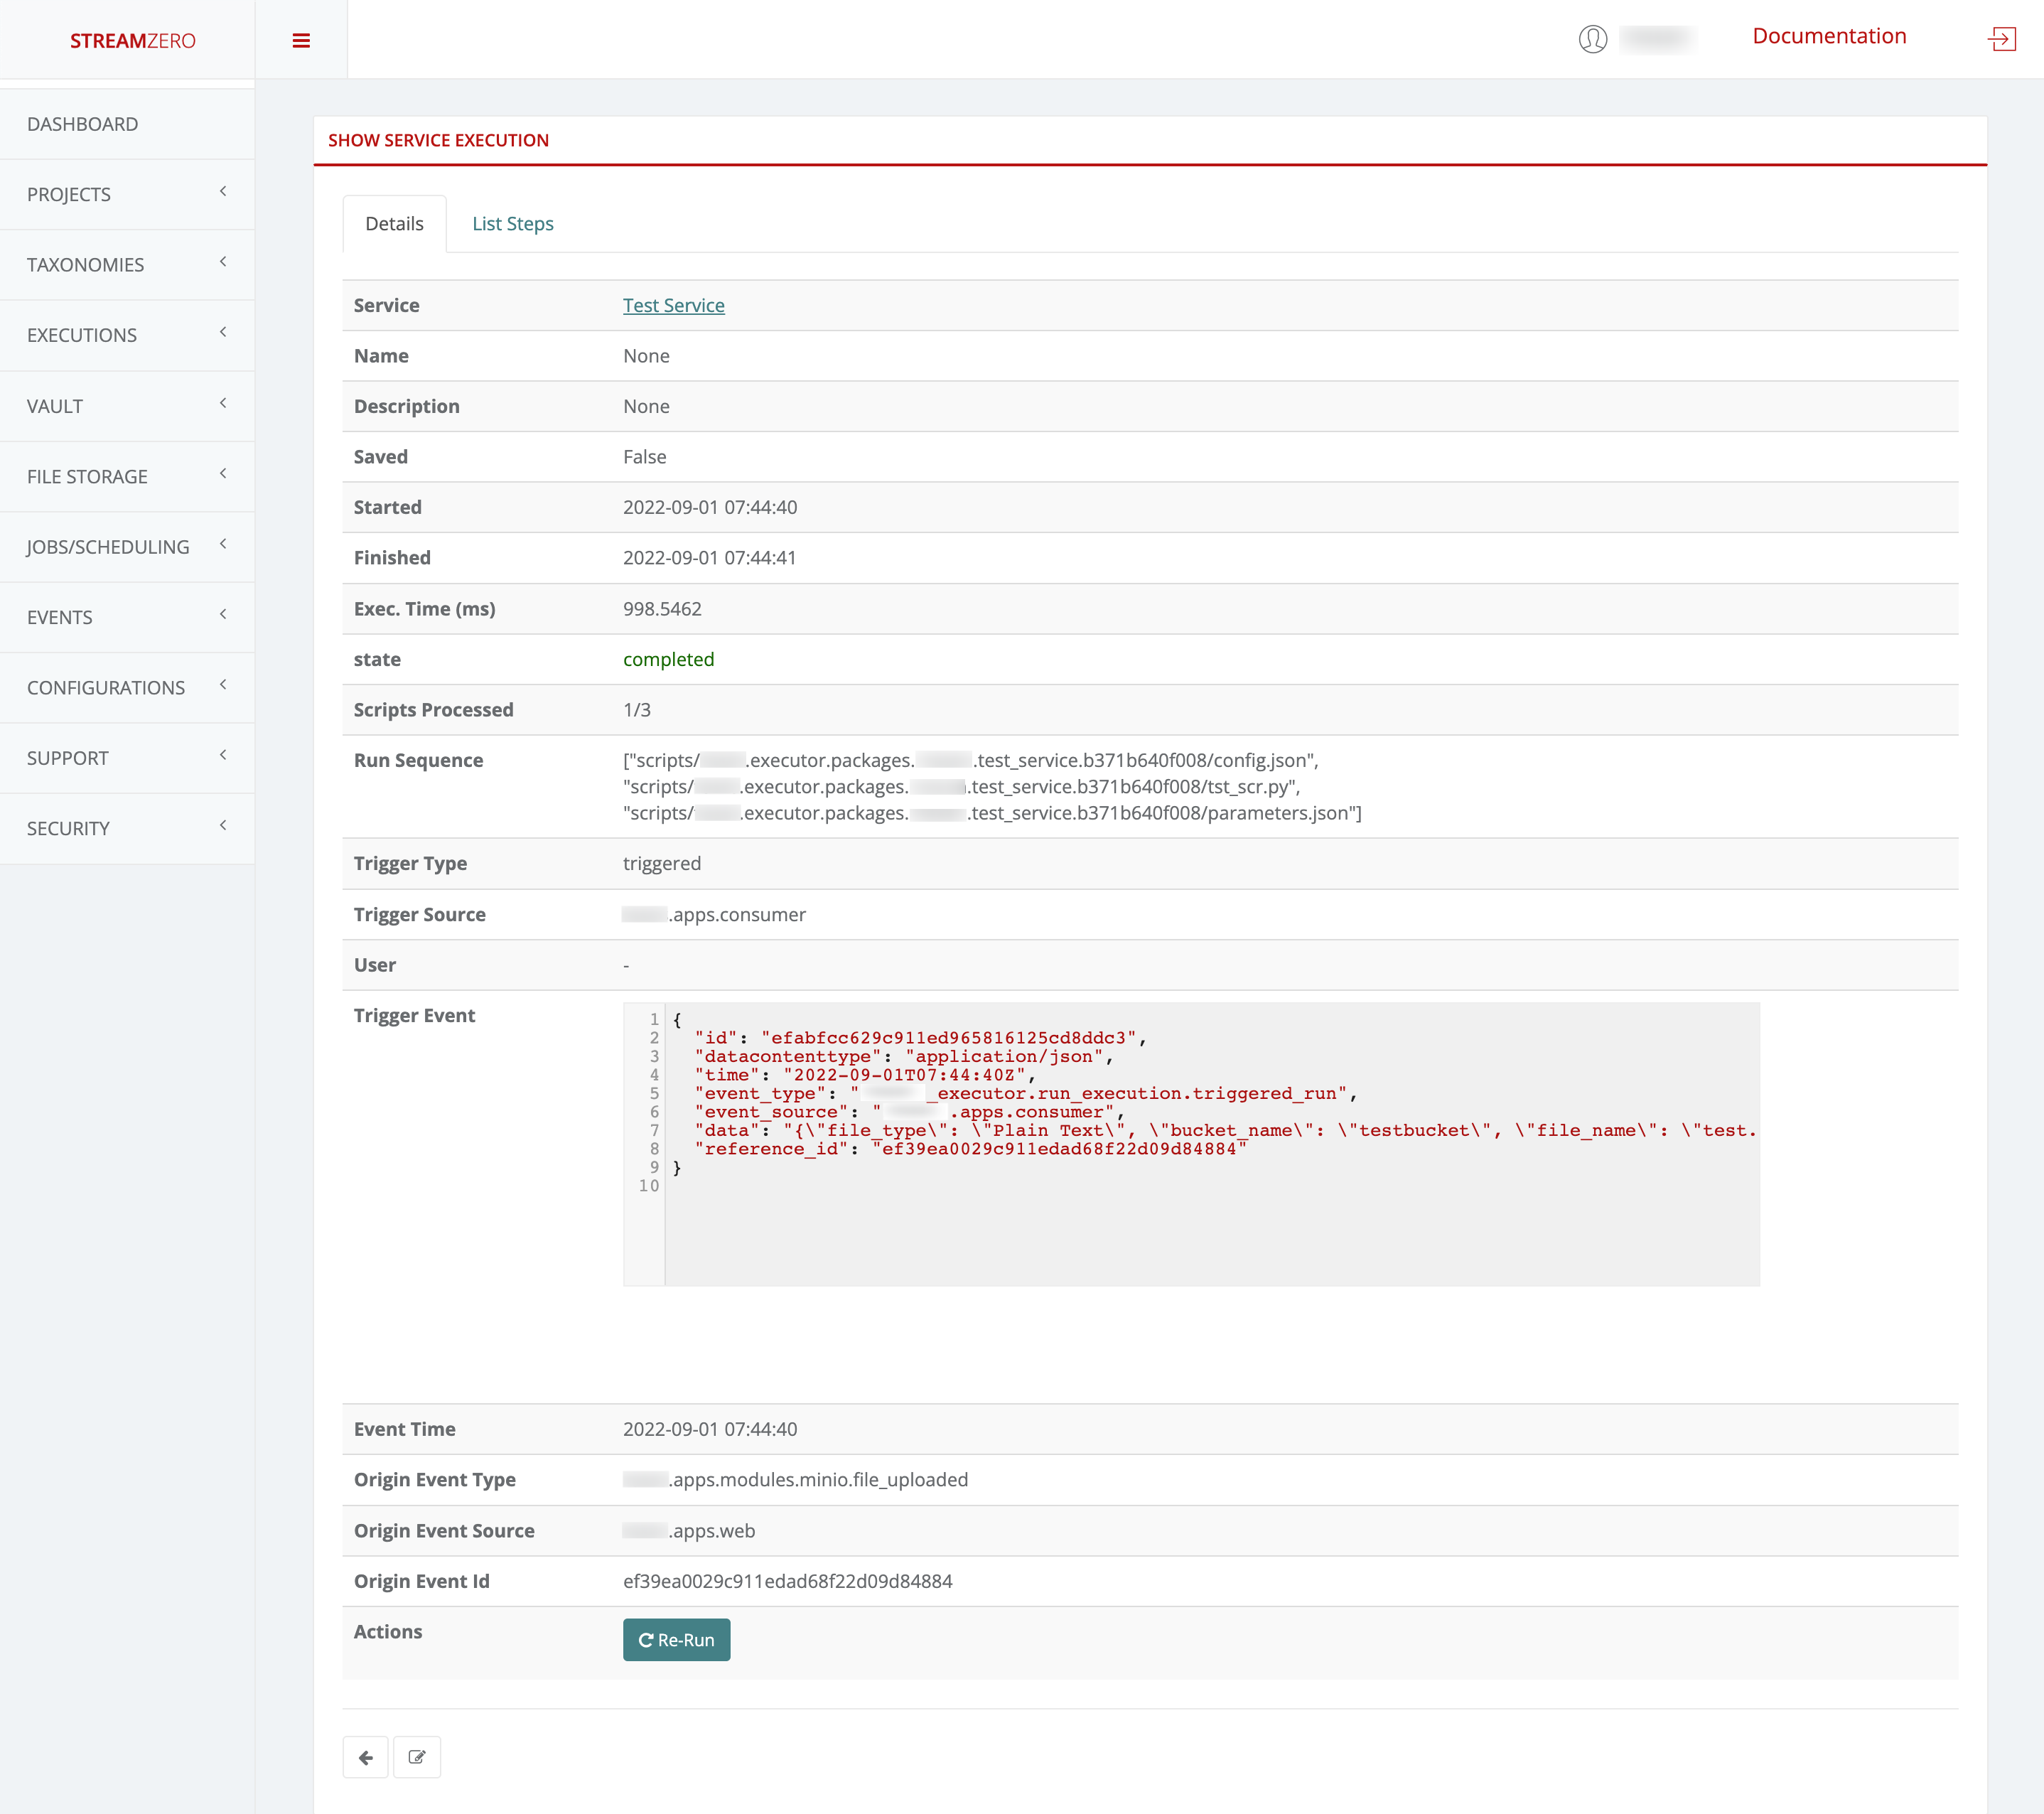
Workflow -> approval completed trigger event
To finalize the second trigger event (ferris.apps.modules.approvals.step_approval_completed), an existing Workflow will be used to trigger a Case Management that will need to get approved.
- Click on Workflows on the left side of the dashboard menu to open the drop-down
- Click on List Workflows
- Click on the magnifying glass to show the details page of the workflow
Note that before even getting a closer look at the Workflow details, the Entrypoint Event is displayed -> ferris.apps.modules.minio.file_uploaded
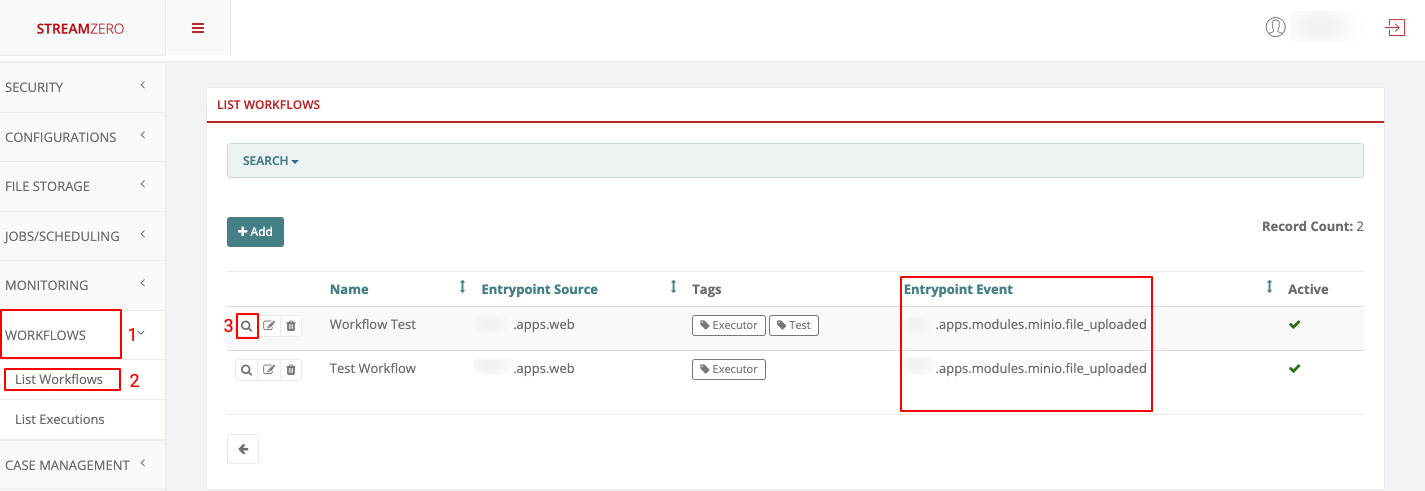
Check the details in the JSON snippet to understand what or which event types will trigger the second event type. The first event type shown in the JSON snippet is: ferris.apps.modules.minio.file_uploaded -> which means that a file will need to get uploaded for the event to get triggered. The second event type shown in the JSON snippet is: ferris.apps.modules.approvals.step_approval_completed -> meaning the uploaded file will need to get approved in the Case Management module before the wanted event gets triggered.
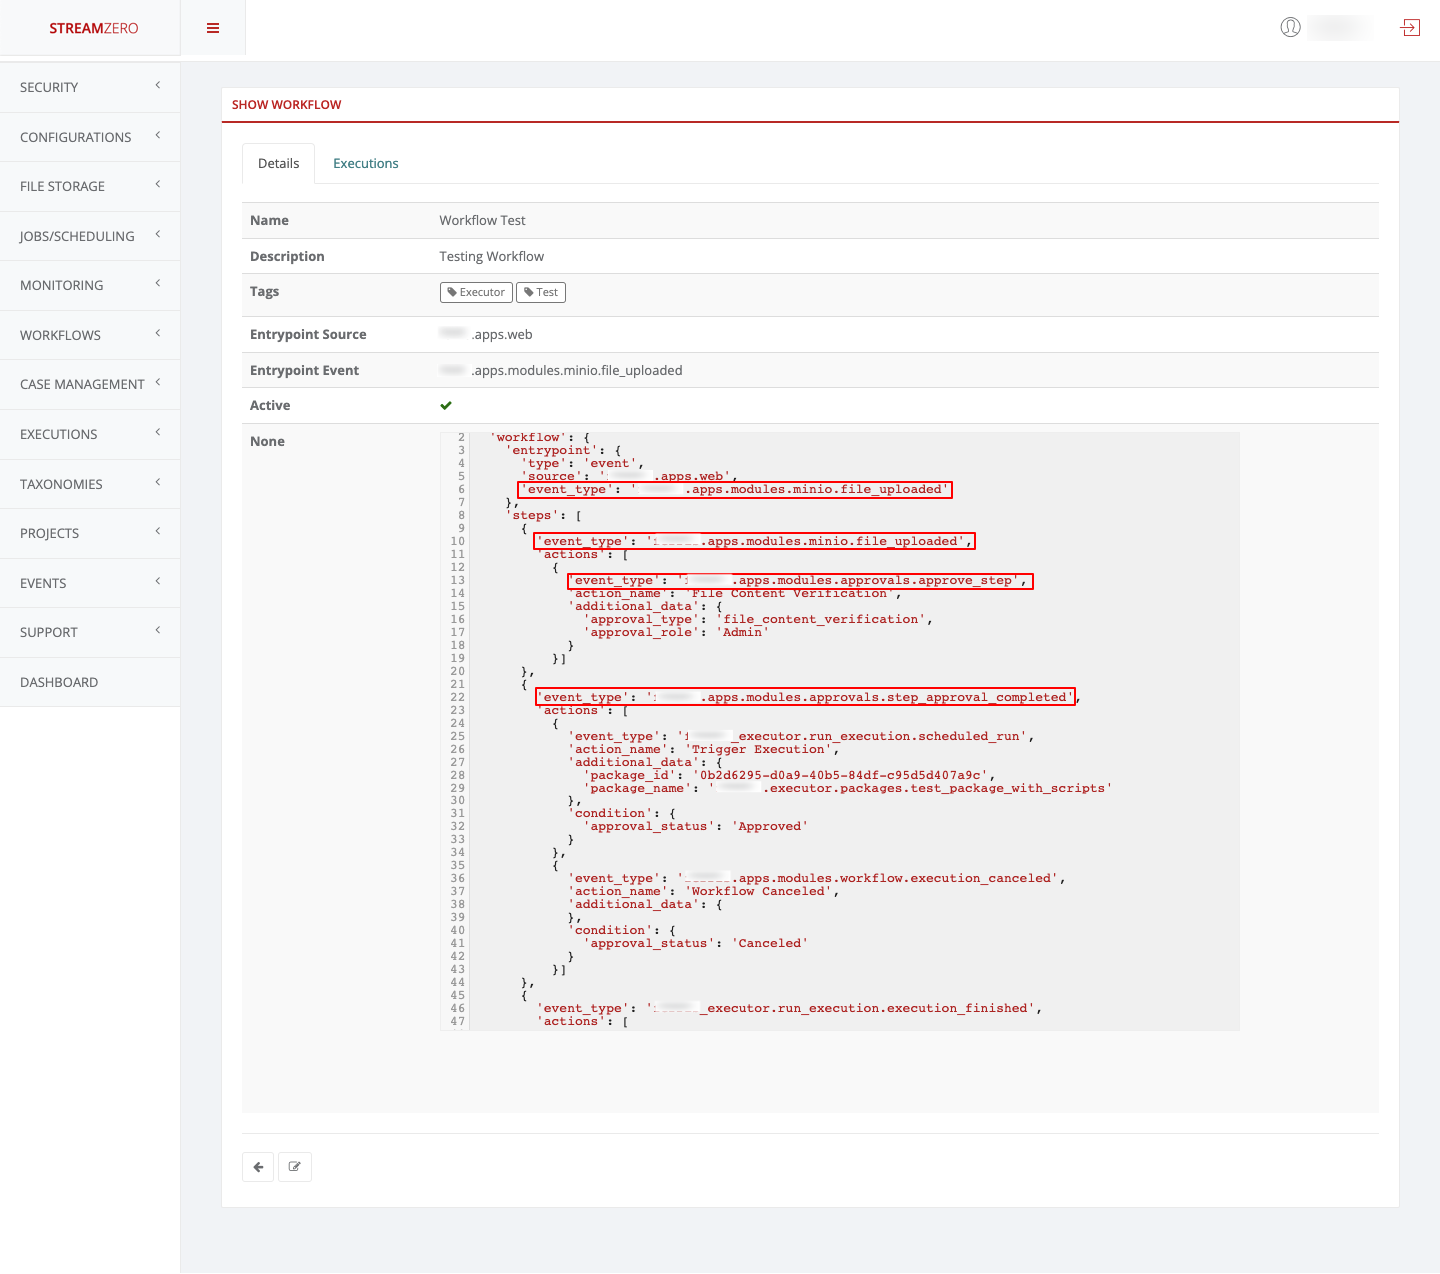
Case Management -> -> approval completed trigger event
- Upload a file to a bucket (the process of uploading a file was described in detail on top of this page)
- Click on Case Management on the left side of the dashboard menu to open the drop-down
- Click on Approvals
1.3.6 - Executions - Packages
The Executions/Packages is an event oriented framework that allows enterprise organizations the automation of script processing which can be triggered by:
- Manually: By clicking the ‘Run’ button on the StreamZero FX Management Server.
- On Schedule: As a cron job whereas the Cron expression is added on the UI.
- On Event: Where a package is configured to be triggered bt the FX Router when a specific type of event is observed on the platform.
It allows users to deploy their locally tested scripts without DevOps specific changes or the need to learn complex DSL (description and configuration language). In tandem with Git integrated source code management FX allows distributed and fragmented tech teans to easily deploy and test new versions of code in an agile way with changes being applied immediately.
Contiuous Change Integration / Change Deployment becomes a component based and building block driven approach, where packages can be configurable and parametrised. All scripts and their parameters like secrets and environment variables form packages which makes them reusable for similar jobs or event chains. Event based package triggering allows users to run multiple packages in parallel as a reaction to the same event.
Executions - Packages
Primary entities for “Executions” are packages which are composed by scripts that are executed in a predefined order.
Executions -> Packages
This Use Case defines how to create and run a new package.
- Click on Executions on the left side of the dashboard menu to open drop-down
- Click on Packages
- Click on +Add to create a package
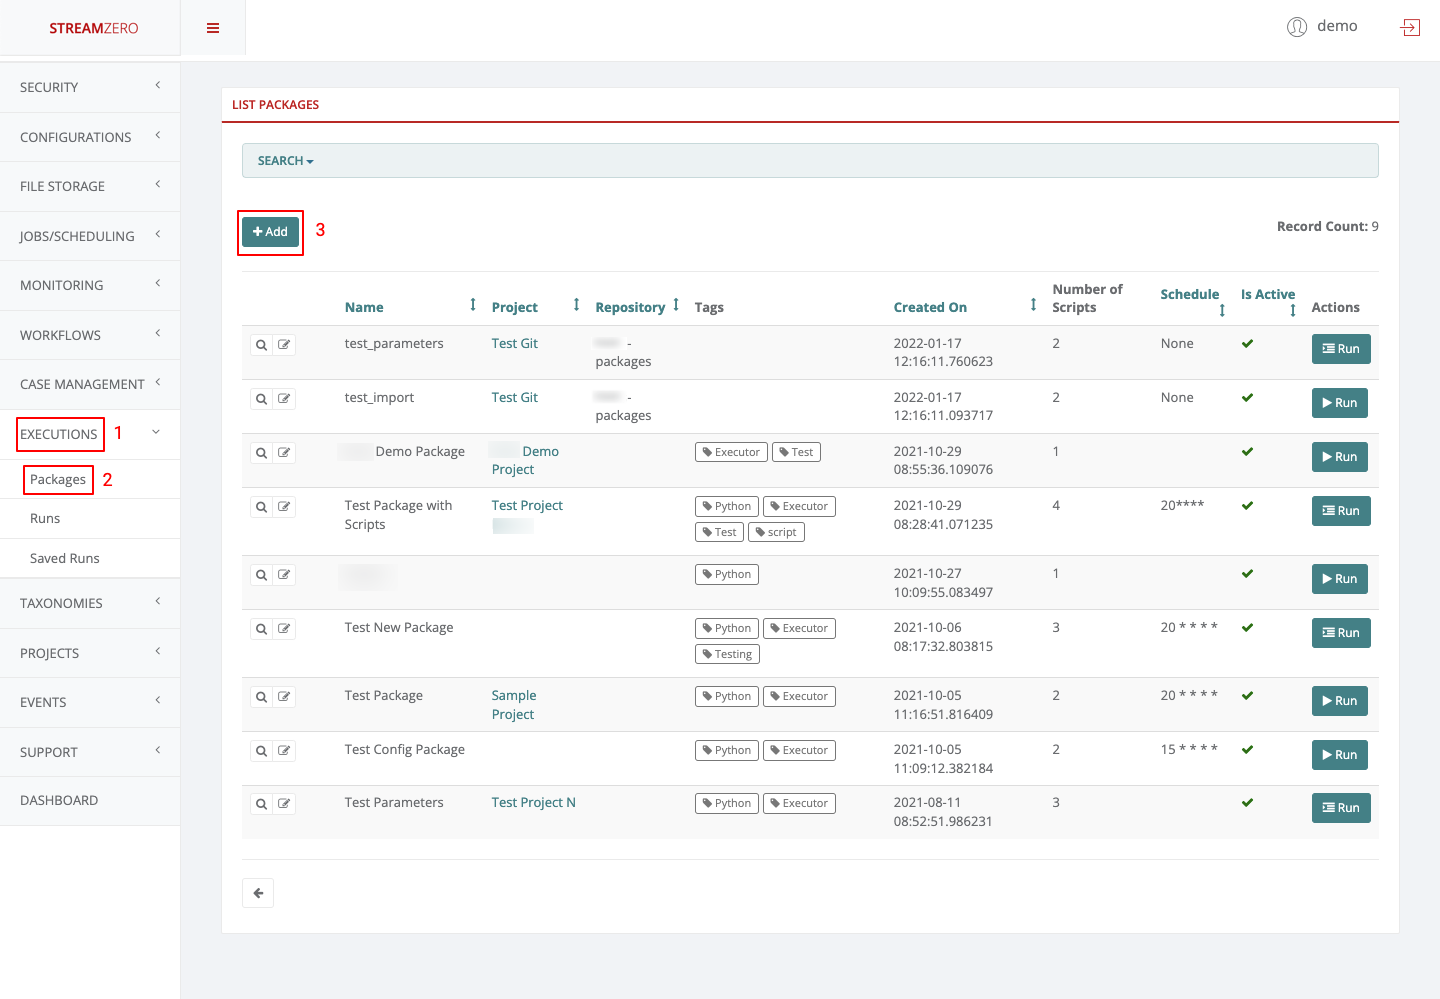
Create Package
| Field name | Steps & Description |
|---|---|
| 1. Name | 1. Name the package |
| 2. Description | 2. Descripe the package |
| 3. Project | 3. Select the project to which the package will be bound |
| 4. Tags | 4. Add Tags of choice manually or select from predefined tags |
| 5. Schedule | 5. Schedule cron job -> “Cron like schedule definition. NOTE: day of week start on Monday (0 - Monday, 6 - Sunday) example: “20****” -> The whole definition of Cron Jobs can be found in the next sub-category of this UserGuide |
| 6. Trigger Event Type | 6. Select Value -> select event type to trigger the exectution of the package -> please visit the sub-category Events to get a better understanding of how to set event triggers. |
| 7. Allow Manual Triggering | 7. Checkbox -> click to allow manual triggering of the package |
| 8. Active | 8. Checkbox -> click to set the package to active |
| 9. File Upload (choose file) | 9. Click on Choose file (Optional) to upload a script -> upload a JSON “config.json” script to configure the package |
| 10. File Upload (choose file) | 10. Click on Choose file (Optional) to upload a script -> upload a python “test_scr.py” script to pull the configuratio from config file and print all items |
| 11. Save | 11. Click Save to save packages |
| Supported File upload Types | 4 different file types are supported: 1. “.py file” -> A PY file is a program file or script written in Python, an interpreted object-oriented programming language. 2. “.json file” -> A JSON file is a file that stores simple data structures and objects in JavaScript Object Notation (JSON) format, which is a standard data interchange format. 3. “.sql file” -> A (SQL) file with .sql extension is a Structured Query Language (SQL) file that contains code to work with relational databases. 4. “.csv file” -> A CSV (comma-separated values) file is a text file that has a specific format which allows data to be saved in a table structured format. |
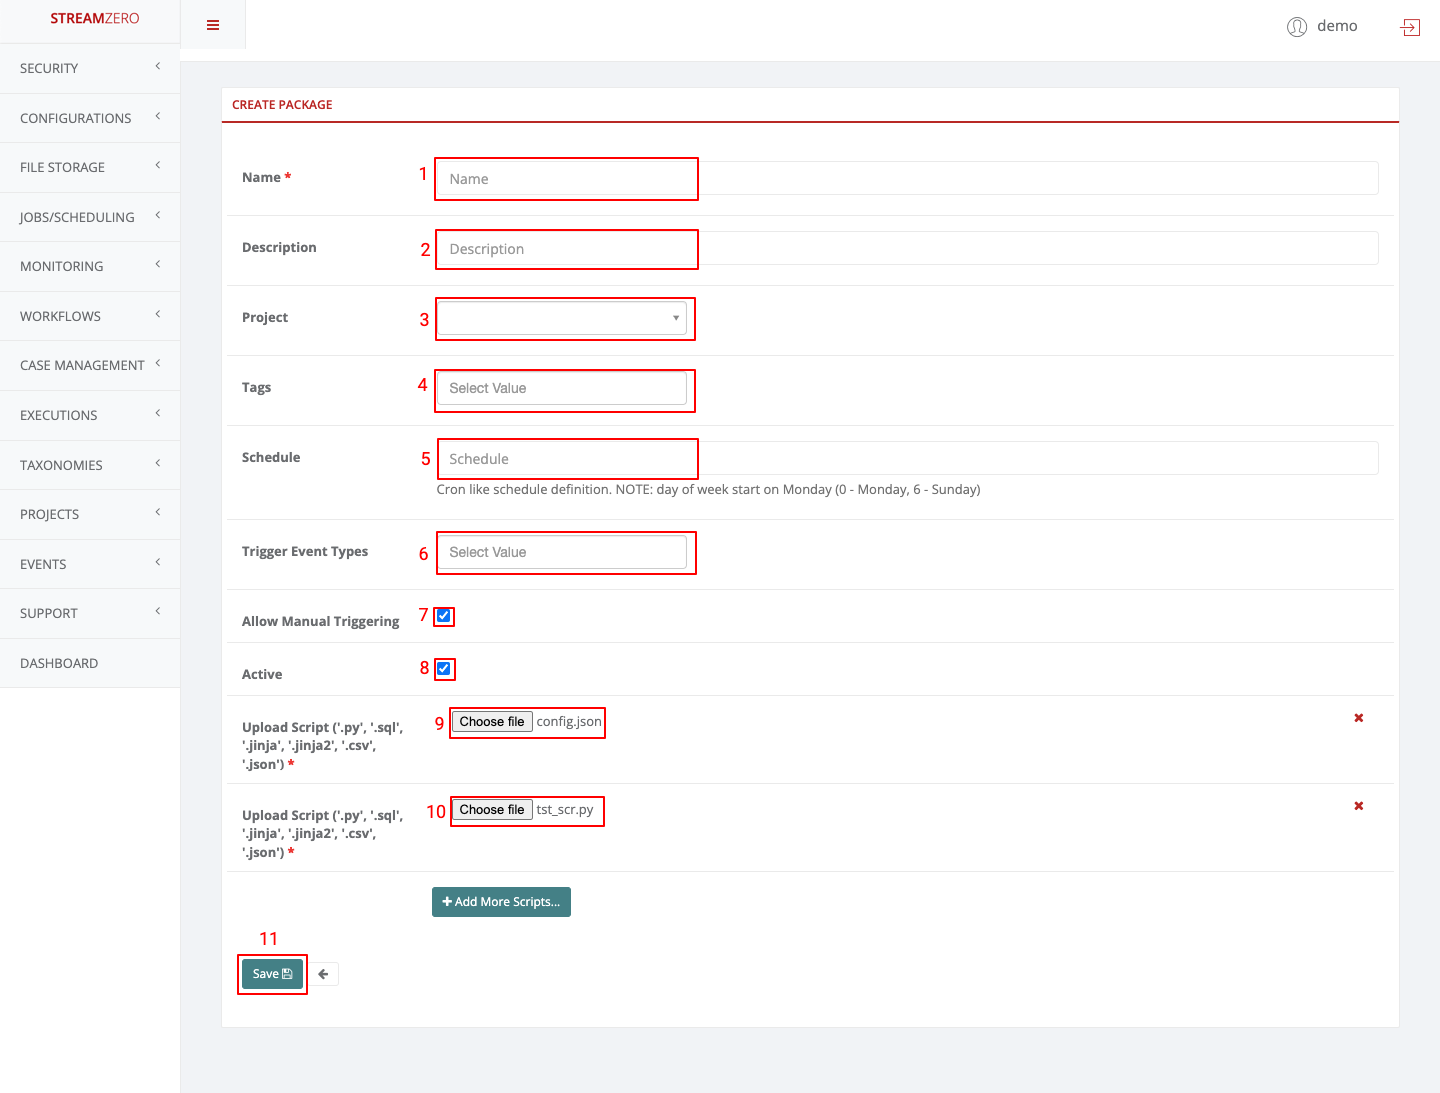
config.json script
The config.json file contains key/value configuration pairs that can be accessed in scripts at execution time.
|
|
test_scr.py script
This is an example script that shows how configuration from config.json file can be accessed from a script. package_name will be passed to the script as argument and then can be used for fetching configuration using ApplicationConfigurator from ferris_cli python package.
|
|
Check Created Package
The created package should be triggered every 20 minutes of every hour but can also be run manually.
- Click on the magnifying glass icon to open the package’s details page
- Check details page
- Click on “Show Trigger Event”

- Check the triggered event details
- Close
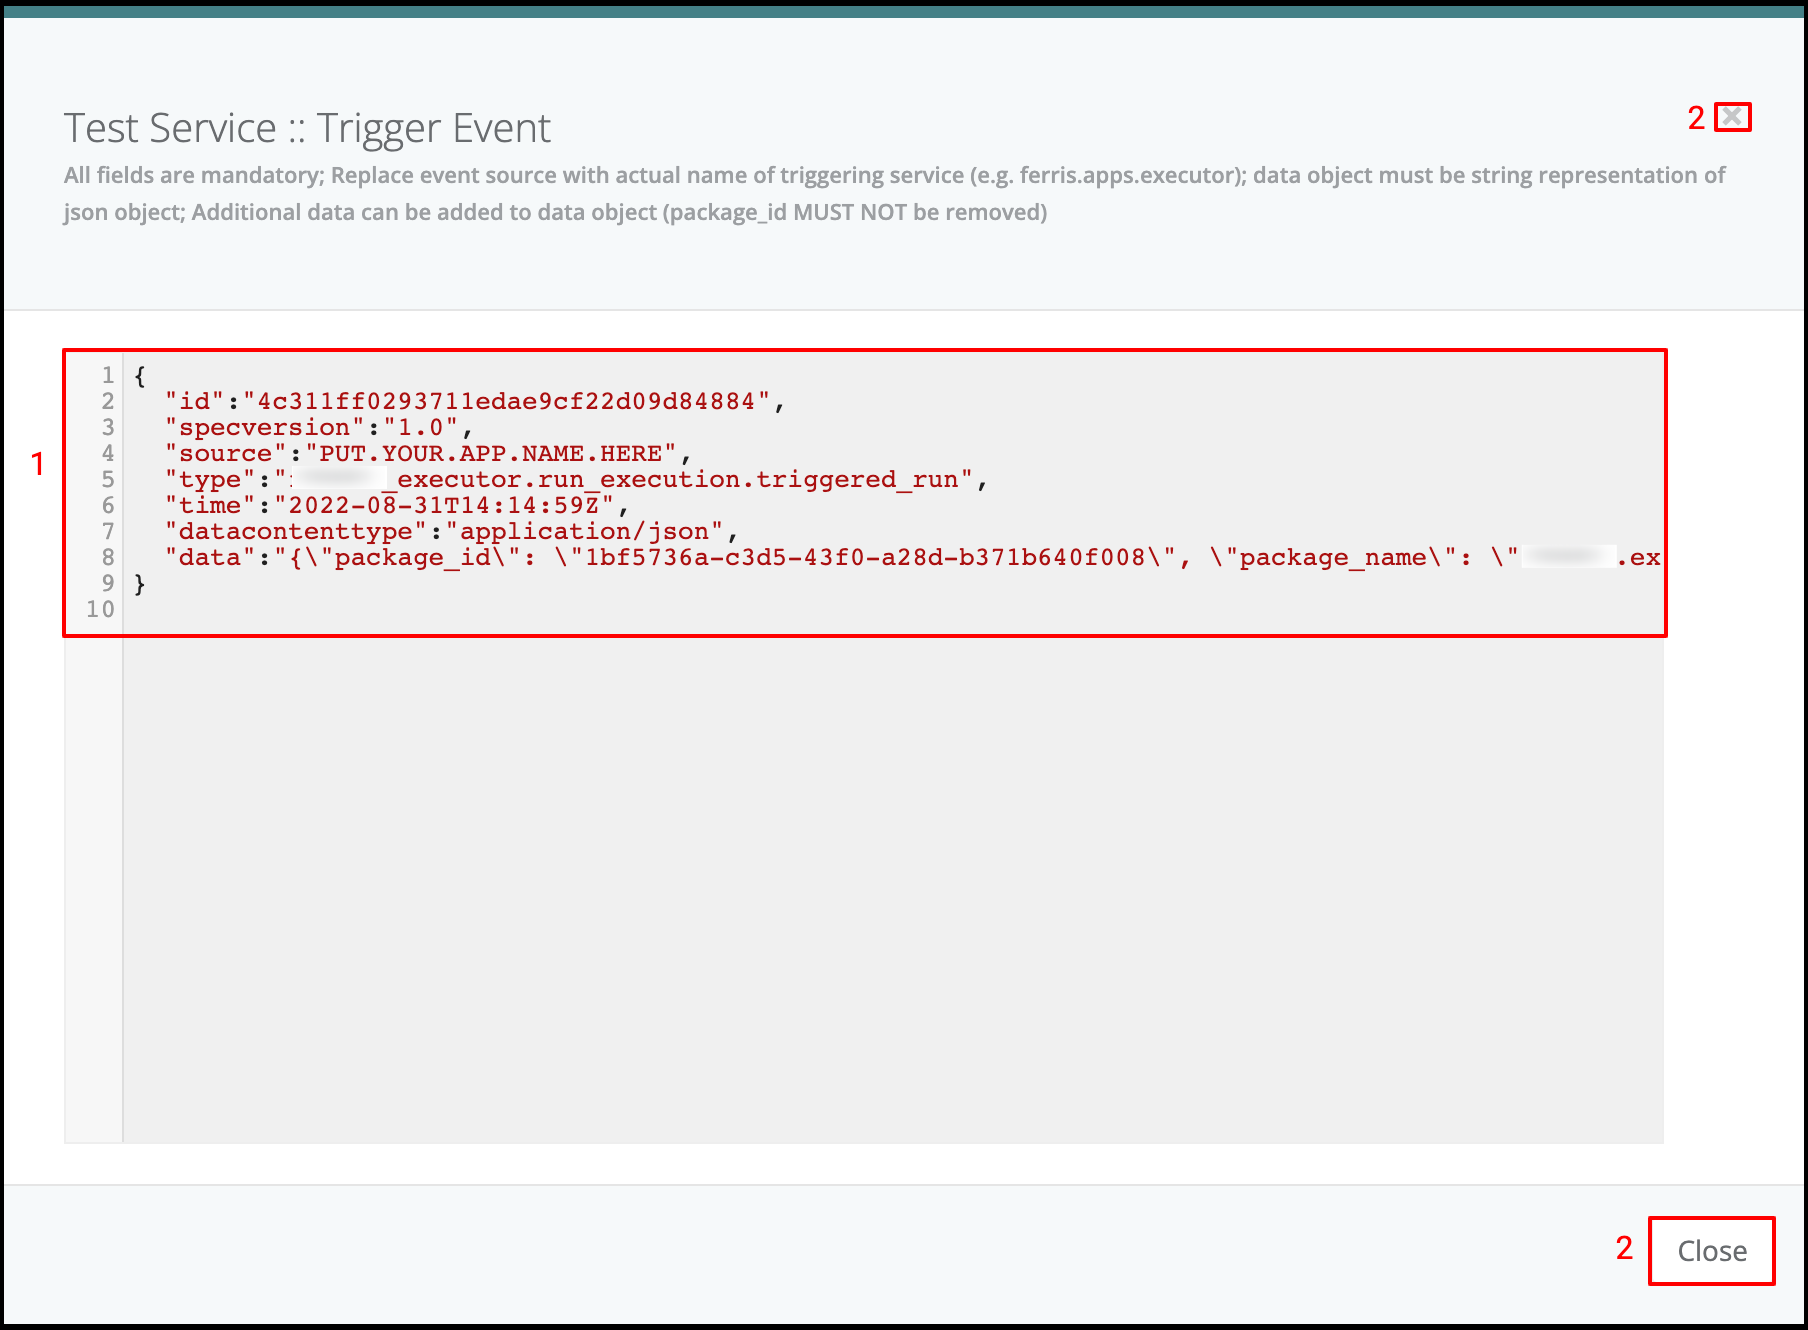
Package Executions / Runs
- Click on the “Run” button down the page to run the package manually

It will automatically transfer you to the “List Package Executions” tab
- Check runs/package executions to see if you manually triggered execution was processed
- Click on the magnifying glass icon of your latest manually triggered run to open details page of the exectuion
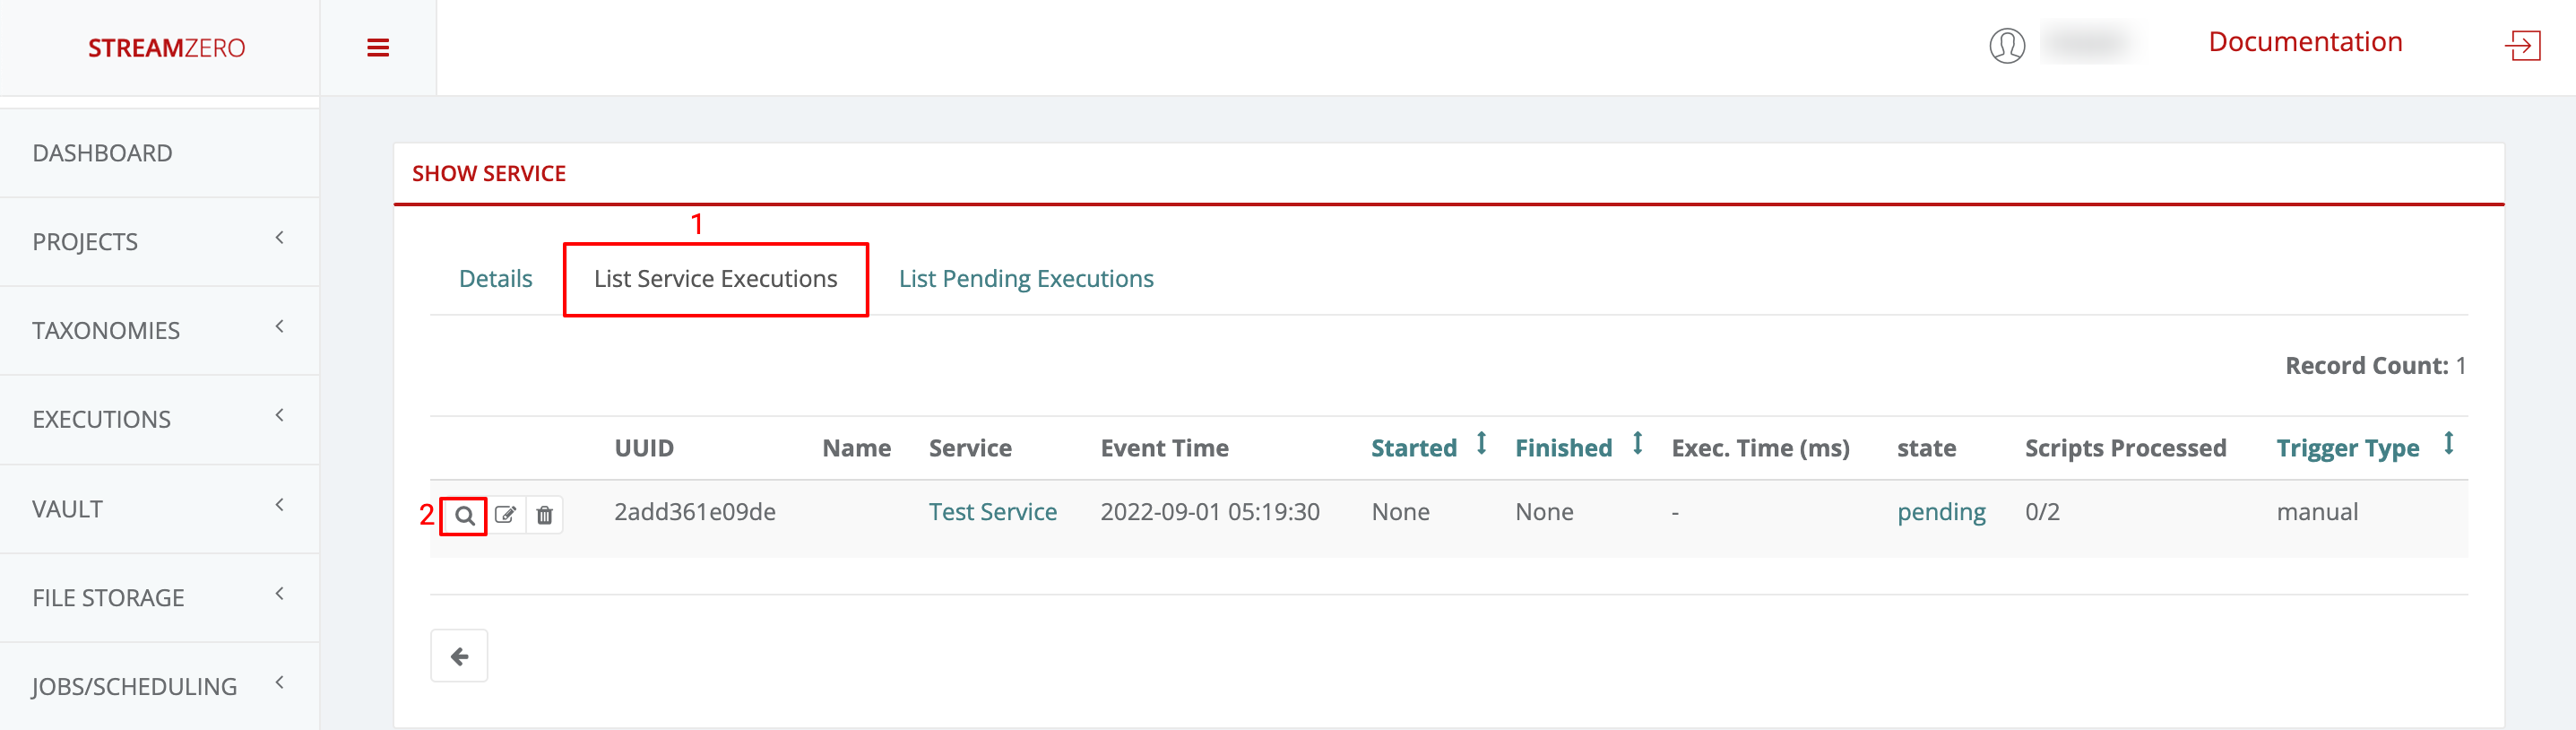
- Check the details “Show Package Execution” of the run/exection
- Click on “List Steps” tab to see the steps of the execution
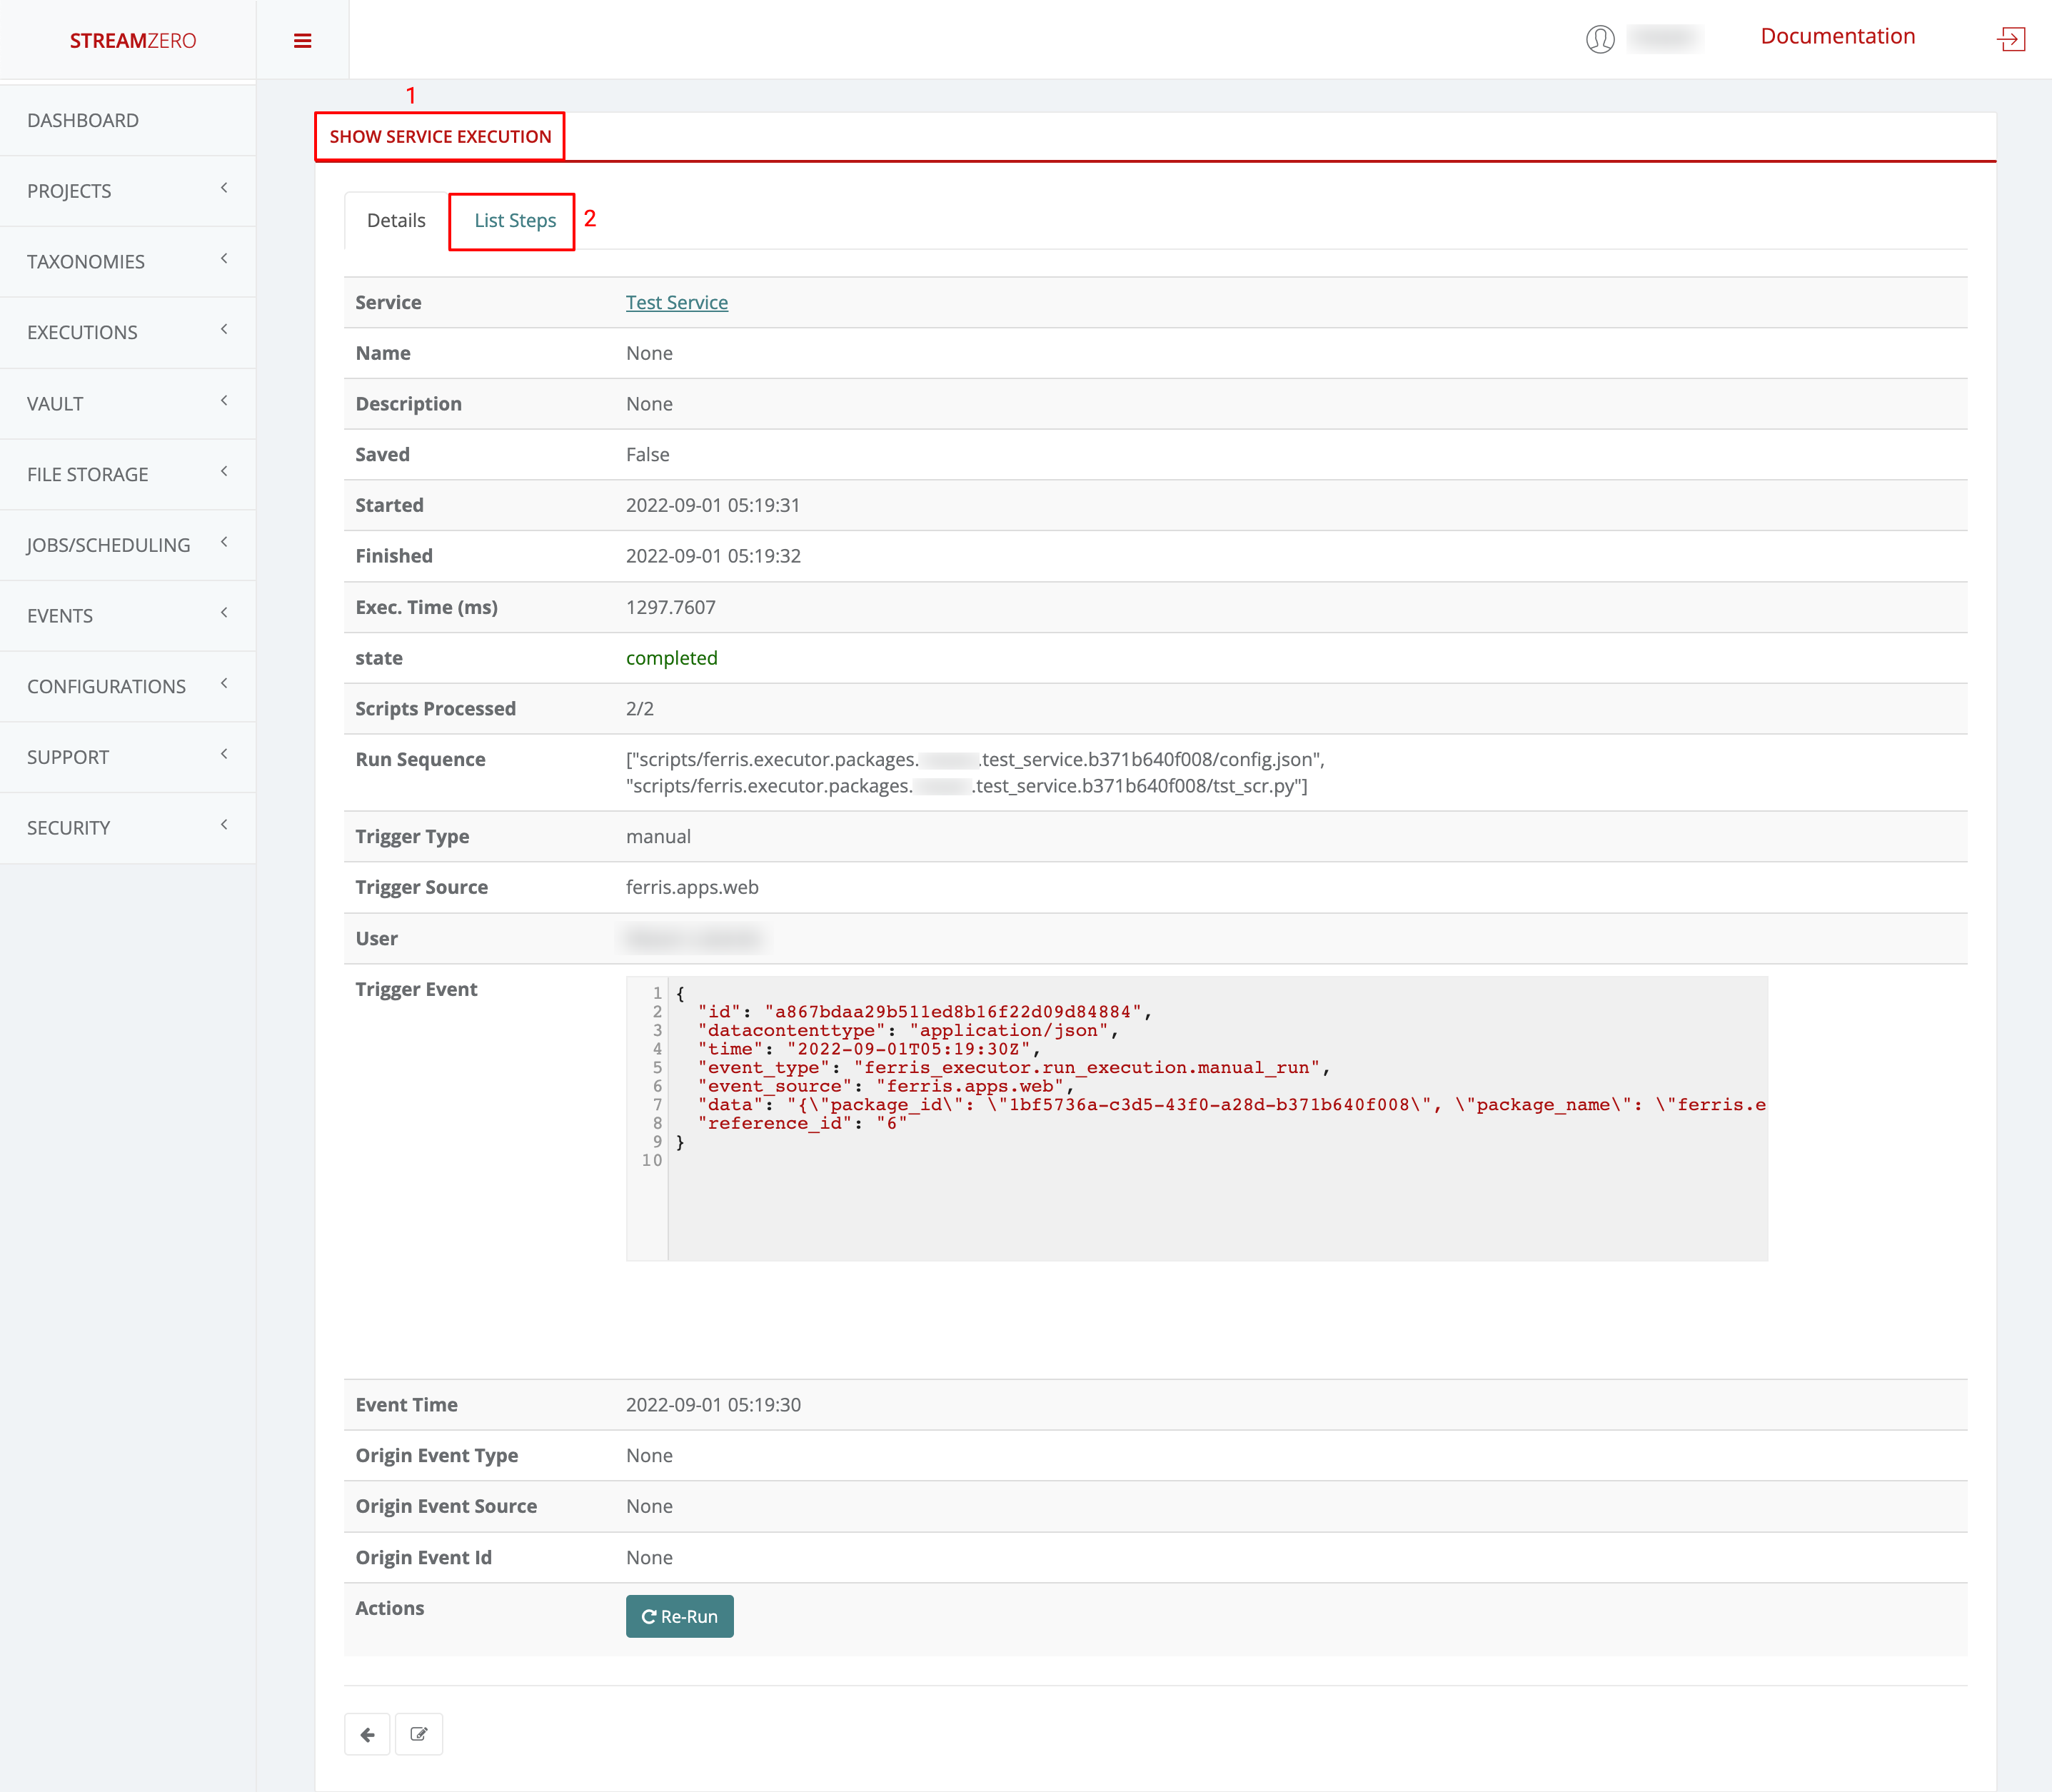
- Check the steps of the run and status (completed; pending; unprocessed; failed)
- Click on “Show Results” to verify the script for failed executions
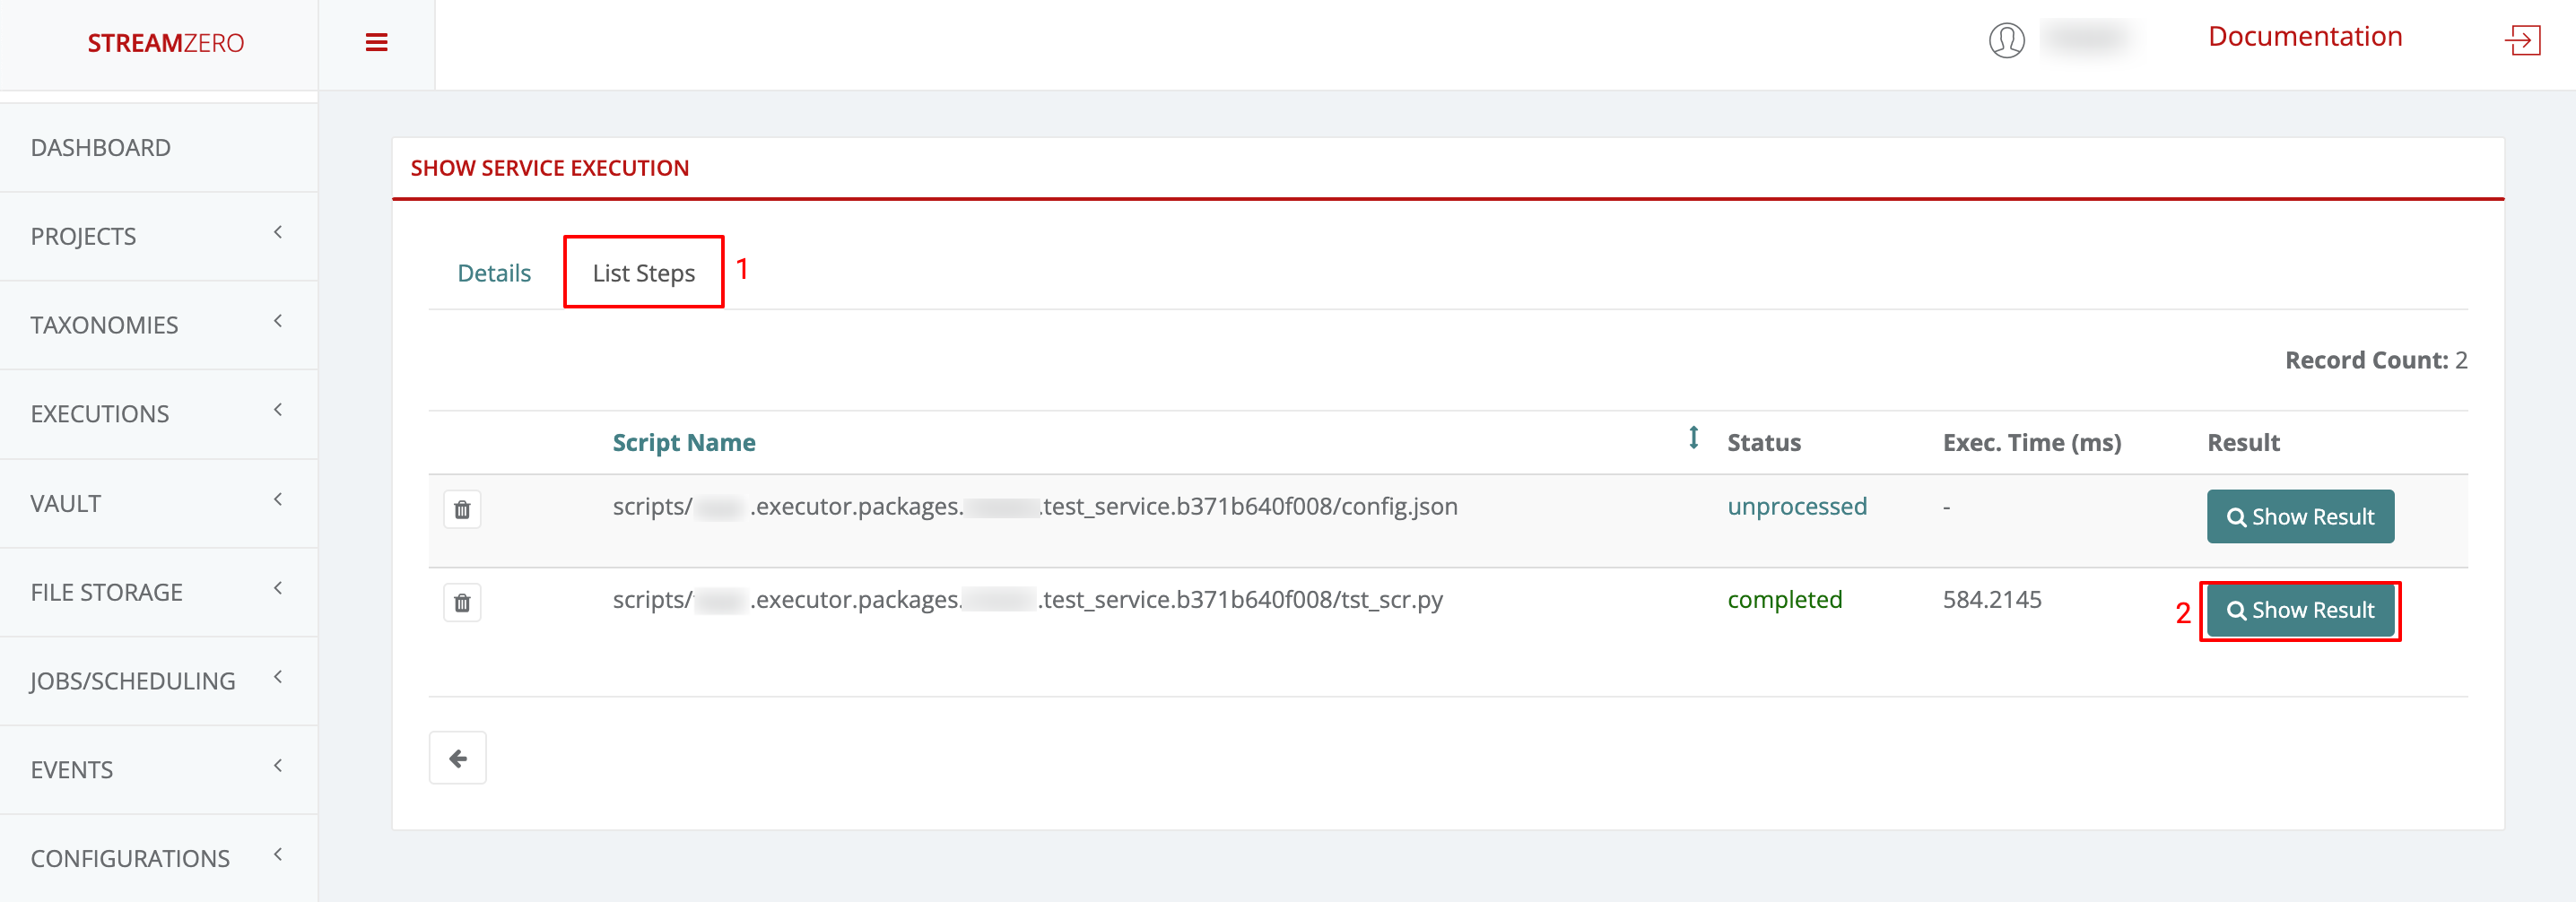
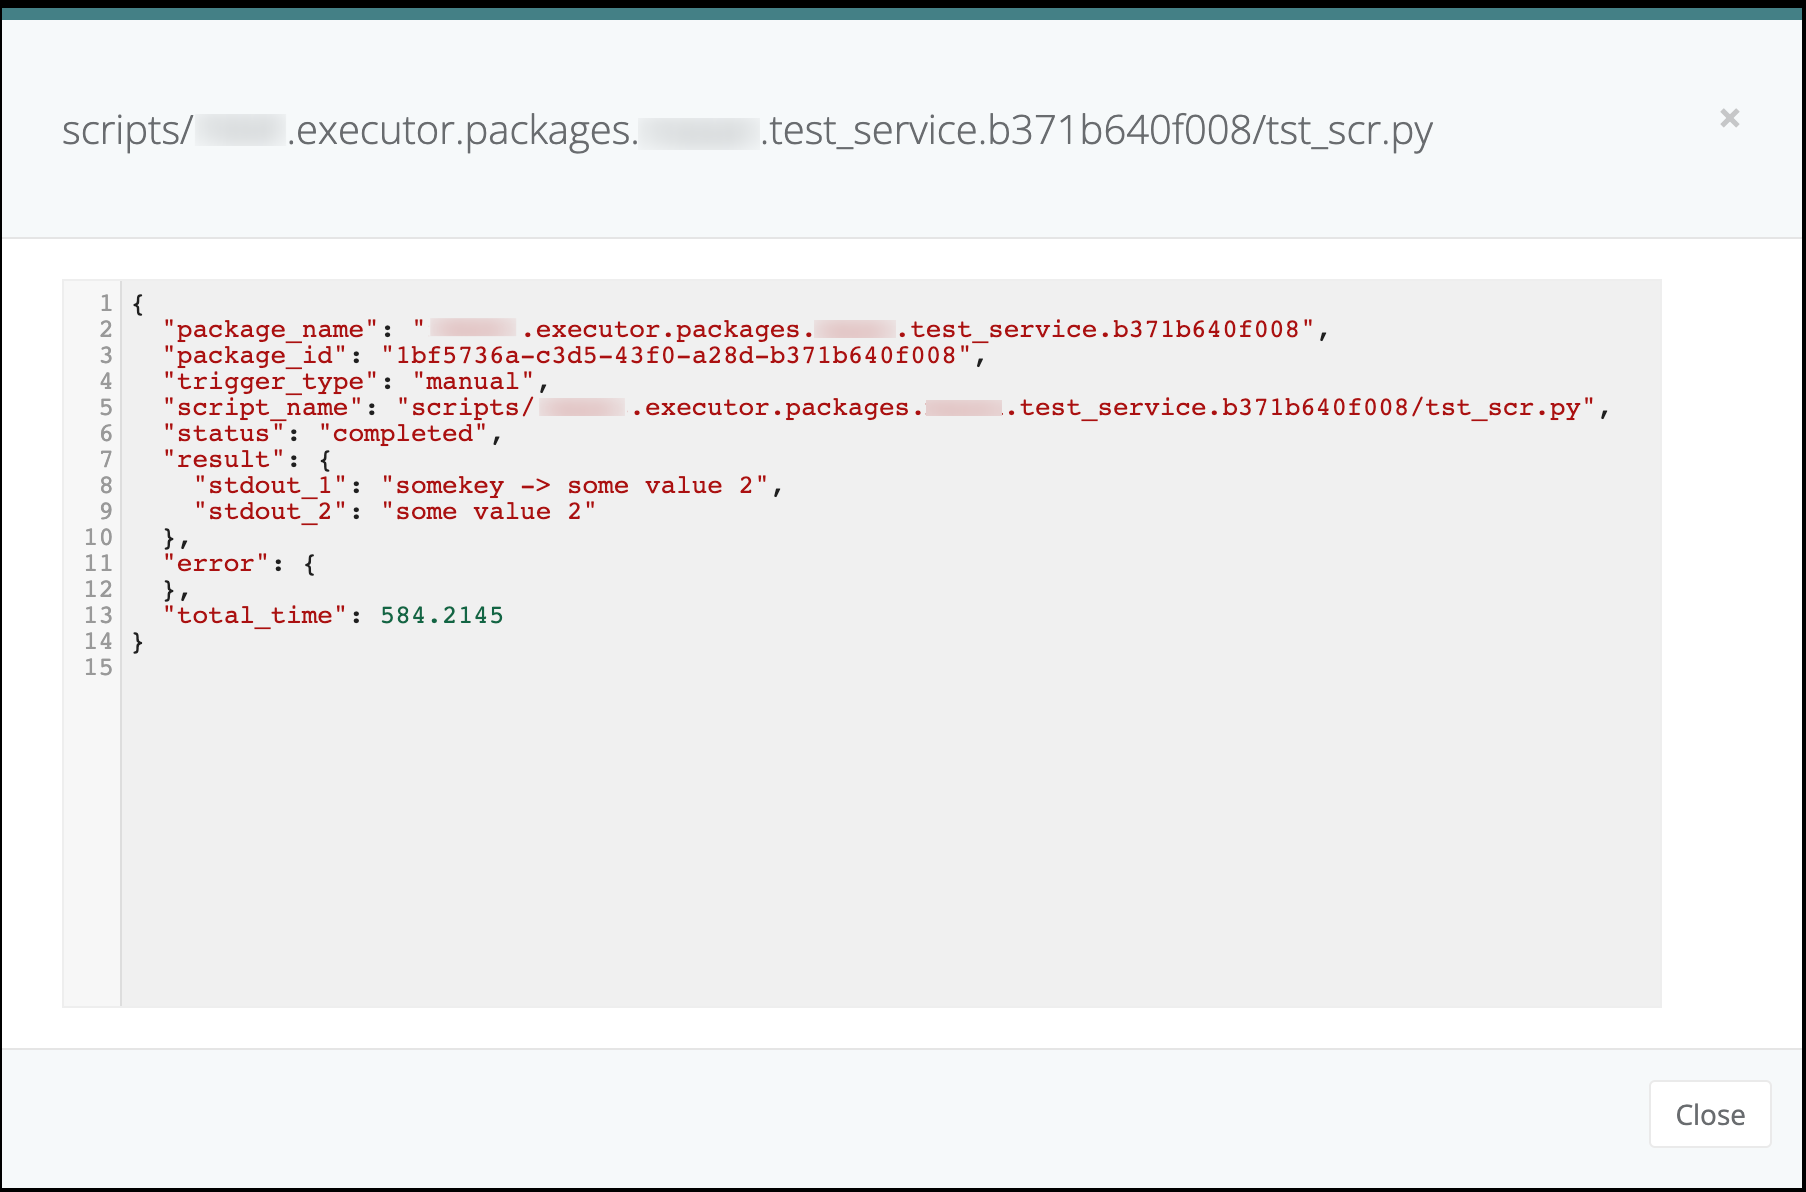
- Close window
Note that currently only python and sql handlers are available, files of different type will be unprocessed.
Save a Run/Execution
- Go back to the “List Package Executions” tab
- Click on the edit icon to open make the run/execution editable
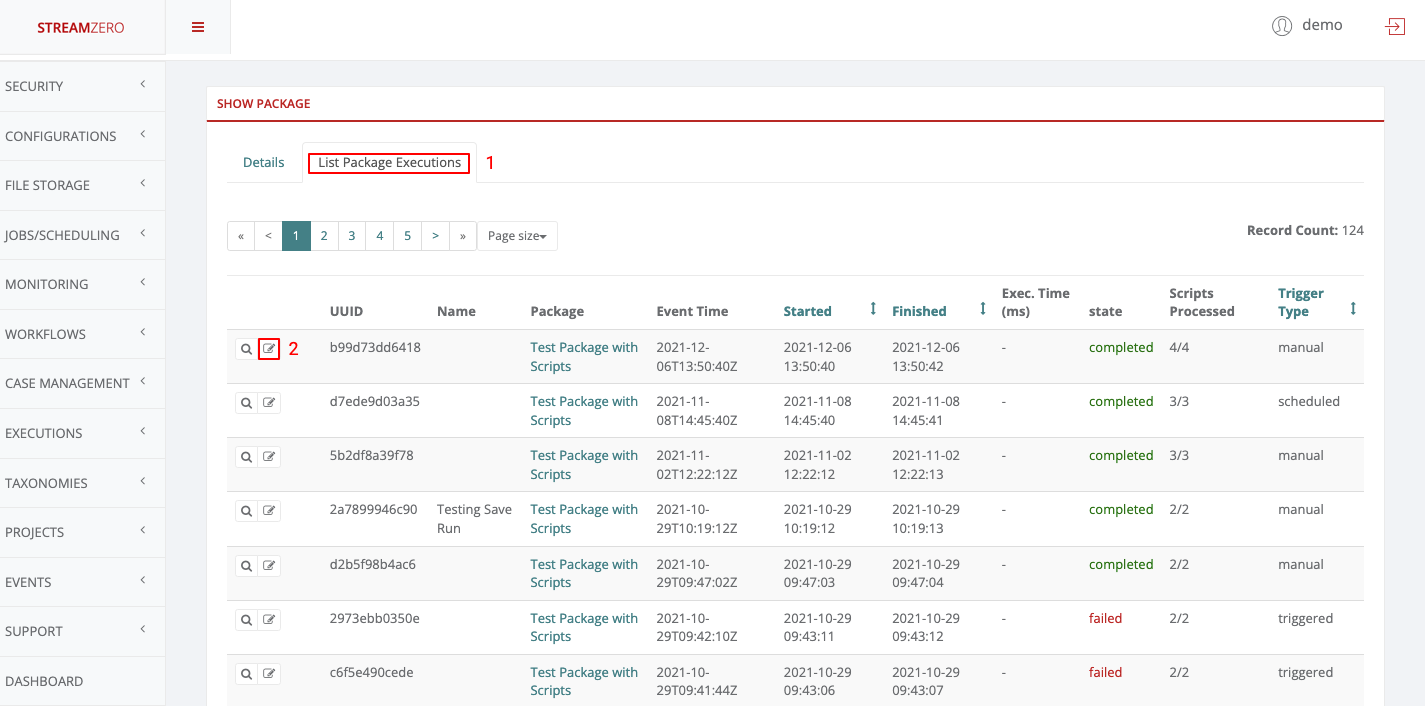
- Name the execution/run
- Describe the execution/run
- Click “Saved” check box
- Save
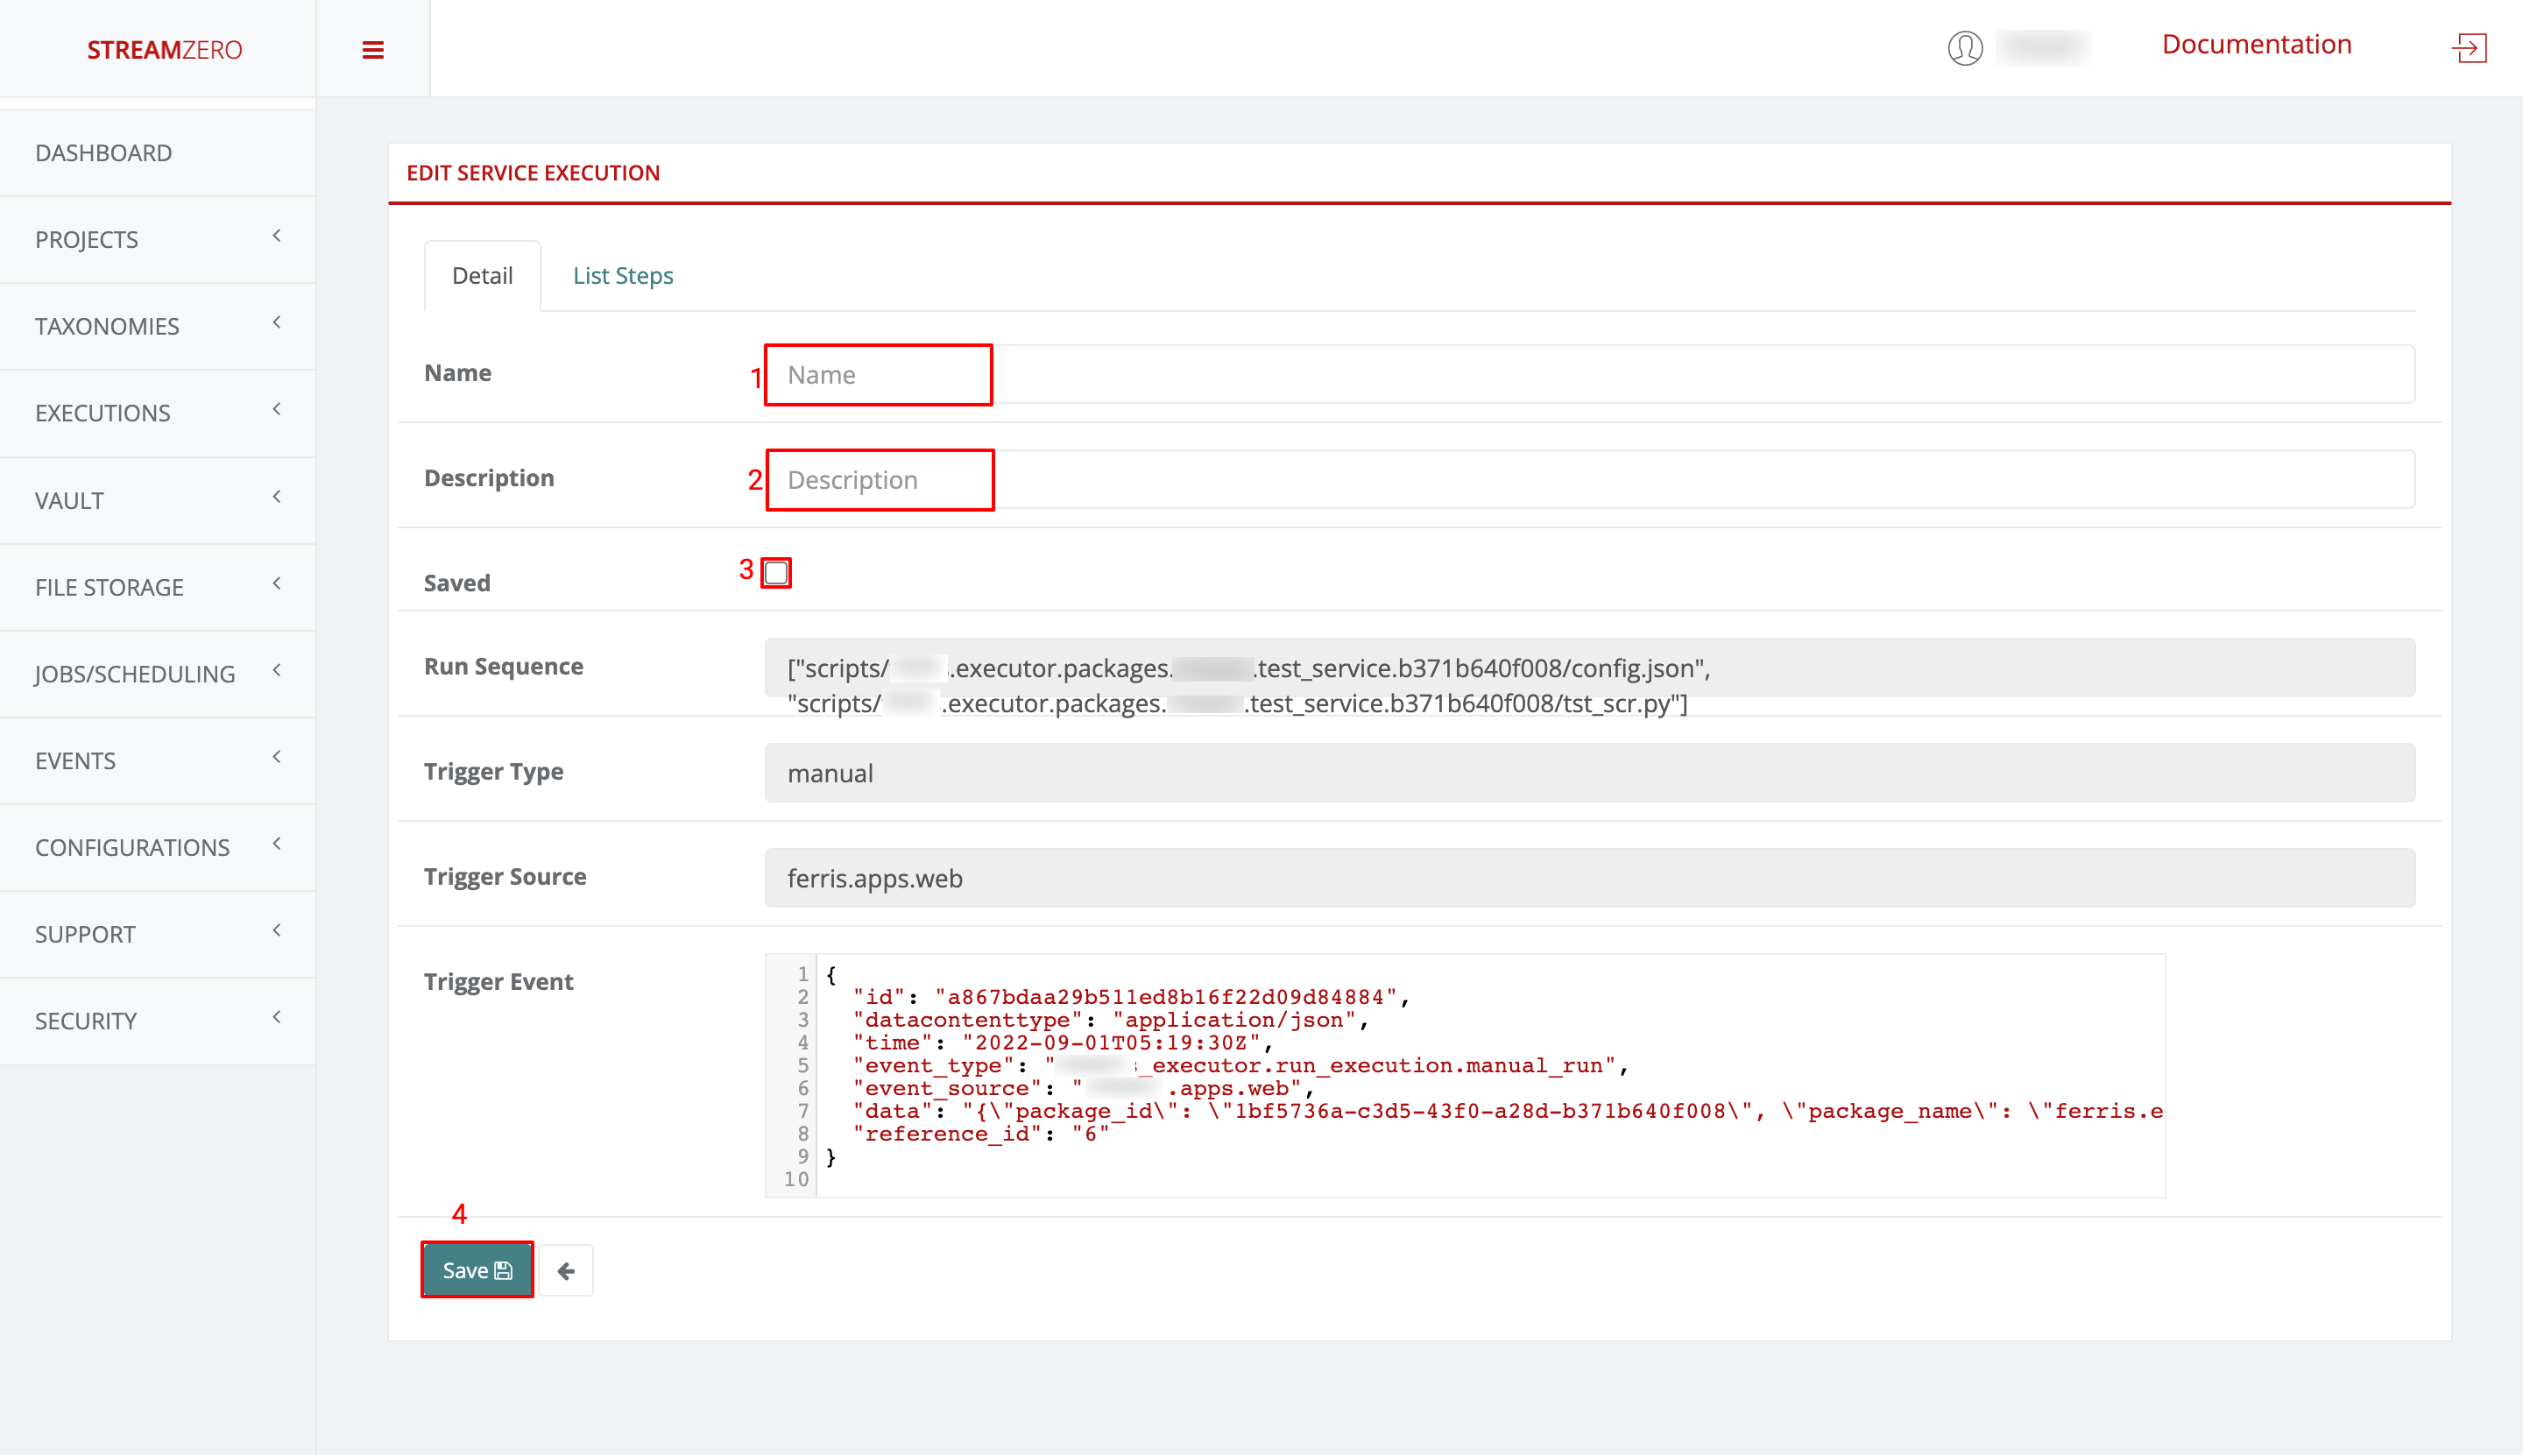
- Click on Executions to open dropdown
- Click on Saved Executions to check the saved run
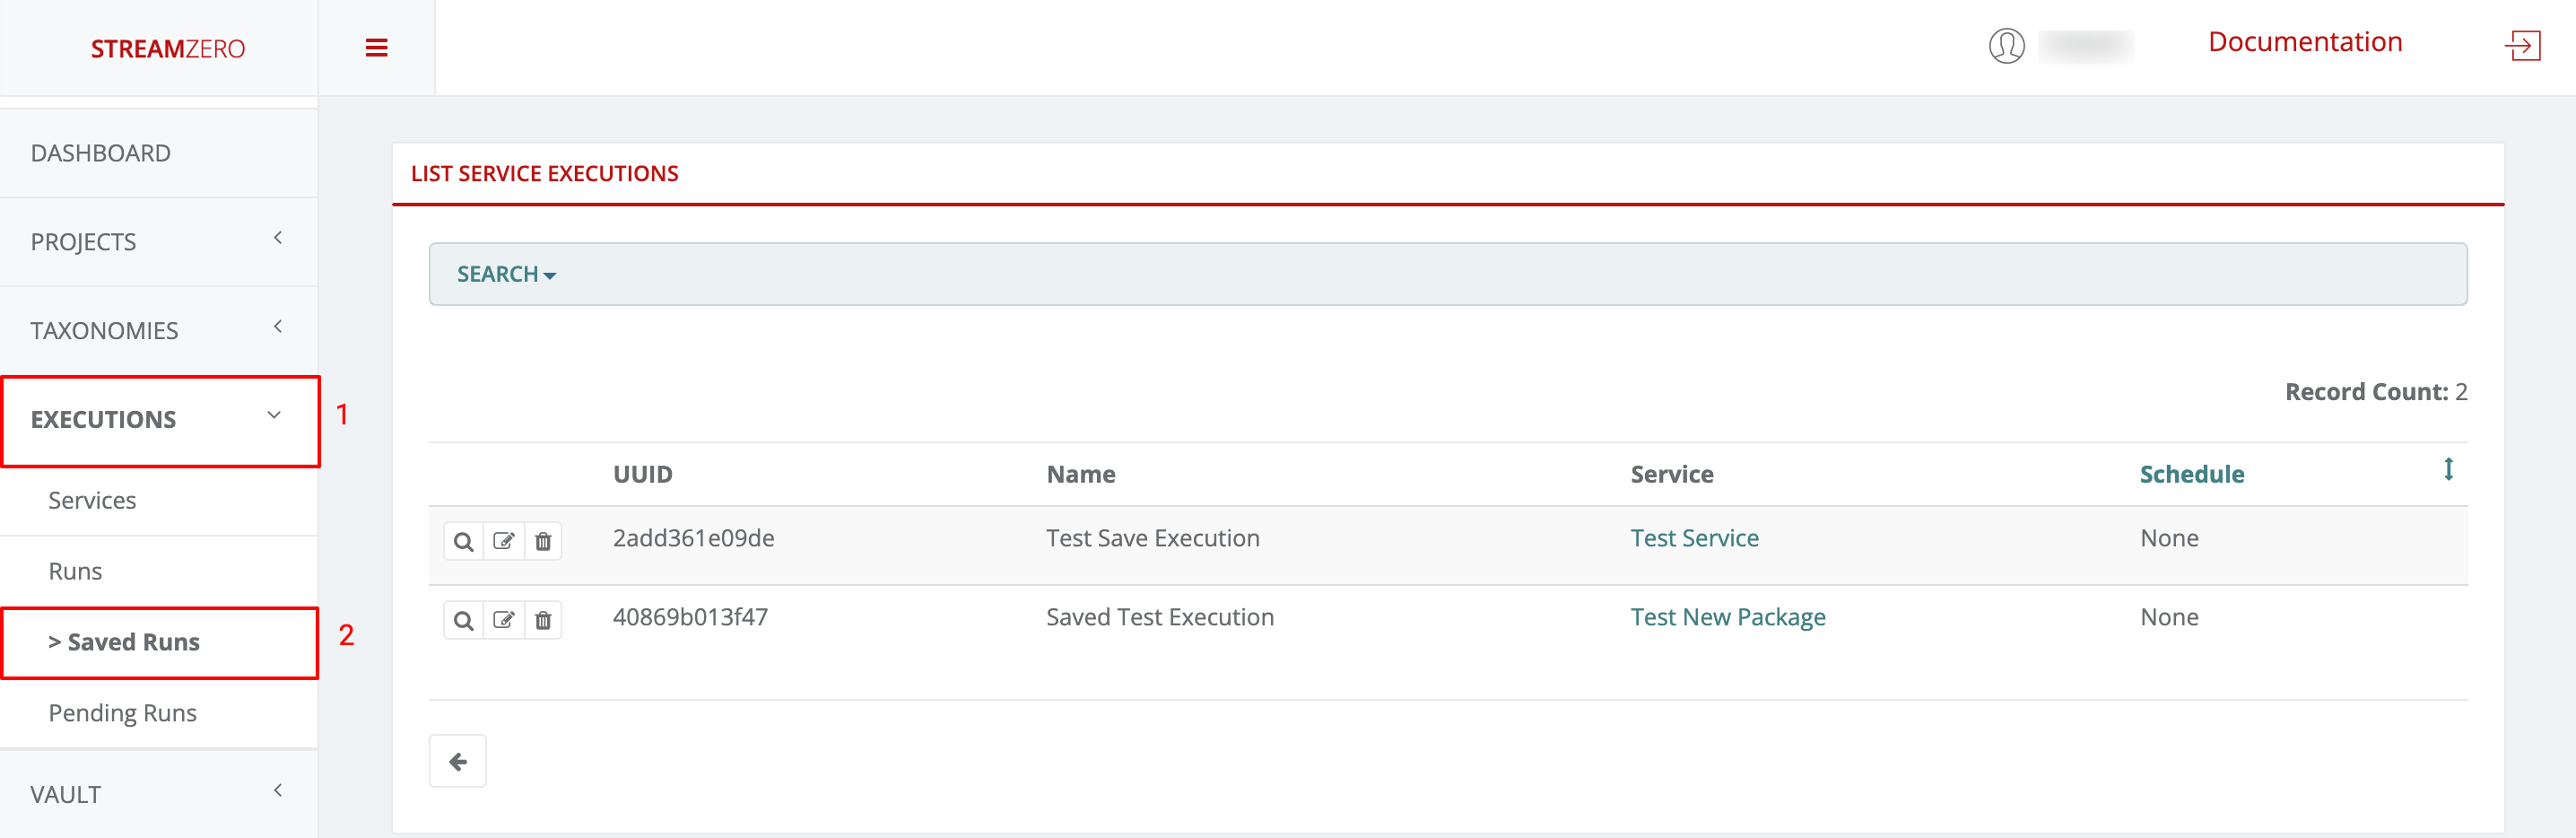
In the next section “UI Generator”, the importance of the saved run will be showcased.
2 - StreamZero K8X
What is StreamZero K8X?
StreamZero K8X brings event driven automation to Kubernetes.
With K8X you can create service flows which span multiple containers written in different programming languages. K8X takes over the responsibility of launching the right container when an event arrives that is mapped to the container. Further it provides the container with the incoming parameters, the service specific configurations and secrets injected into the container environment.
Since each service or container is invoked upon an event trigger, they (service, container) are dormant and require no compute resources.
The event driven nature of K8X makes it not only easy to use and fast to deploy, it brings unprecedented levels of resources efficiency as well as decreases resource contention to any Kubernetes Cluster.
Benefits of K8X
K8X shares the benefits provided by StreamZero FX in that it enables easy to build and operate event-driven microservices platform. In contrast to FX it is no more limited to the services built in the Python Programming language - i.e. the services (and containers) may be written in any lanuage. These can leverage the simple approach of FX to retreive event parameters, service configurations and secrets.
- K8X’s first and foremost benefit is that it significantly decreases developer time to develop event-driven microservices.
- K8X provides a very low learning curve.
- K8X significantly decreases time spent on deployments and CI/CD by offering a built in deployment mechanism.
- K8X improves observability by allowing easy viewing of the status as well as logs of the associated containers.
How it works
The following is a brief explanation of how K8X works.
- Edge Adapters are responsible for sourcing events from external systems, converting the incoming events into cloud events and forwarding them to the appropriate topic in Kafka.
- These events are consumed by the K8X Hub which looks up the mapping of the event to the target services.
- The K8X hub then deploys the appropriate service/container and injects the event parameters, service configs and secrets to the container environment.
- The container executes the service.
- The K8X hub collects the logs from the container for monitoring of the container status.
2.1 - K8X Developer Guide
StreamZero K8X aims to make it easy to build event-driven microservices in polyglot environments. As such it gives you complete freedom in selecting the language of your choice.
In order to ’event-enable’ a service K8X requires 3 artefacts to be created.
- The manifest.json file: Which describes your service to the platform.
- The deployment.yaml: A standard kubernetes deployment file which defines your Kubernetes deployment.
Optional Files
- The parameters.json file: Which can be used to define UI Forms attached to the service for manaully trigerred runs. Please read the section on parameters.json to understand the structure of this file.
- The configs.json file: Defines configurations of the service.
- The secrets.json file: Any secrets that are to be associated with the service. These will be injected to the container on launch.
The manifest.json
The following is a sample manifest.json file.
|
|
The following table describes the attributes of the manifest.json file.
| Attribute | Description |
|---|---|
| name | Name of the service. Spaces will be replaced by underscores. |
| type | The type of the service must always be ‘k8x_job’ |
| description | Description of the service which will be displayed in the UI. |
| allow_manual_triggering | Values are either ’true’ or ‘false’ . Defines whether the service may be trigerred manually from the UI. Which normally means the service is either trigerred from a micro-ui or does not expect any event parameters. |
| active | Values are either ’true’ or ‘false’ . Can be used to selectively deactivate the service. |
| trigger_events | An array of trigger events. The service will be trigerred when any of these events arrive on the platform. |
| tags | An array of tags. Tags are used for organising and finding related services easily. |
The deployment.yaml file
The following is a sample deployment.yaml file
|
|
The above is a standard kubernetes job deployment yaml file. As you will note there is nothing special about it. When the above file is processed by K8X it will add the incoming parameters, service secrets and configs into the environment.
2.2 - User Guide
StreamZero K8X is fully integrated with FX in the StreamZero Management UI. Hence K8X jobs will be visible in projects view along with the FX based jobs.
FX and K8X jobs can also share the same GIT Repos.
List Services
The list services view of projects will display both FX and K8X jobs. K8X jobs are differentiated by the job type.
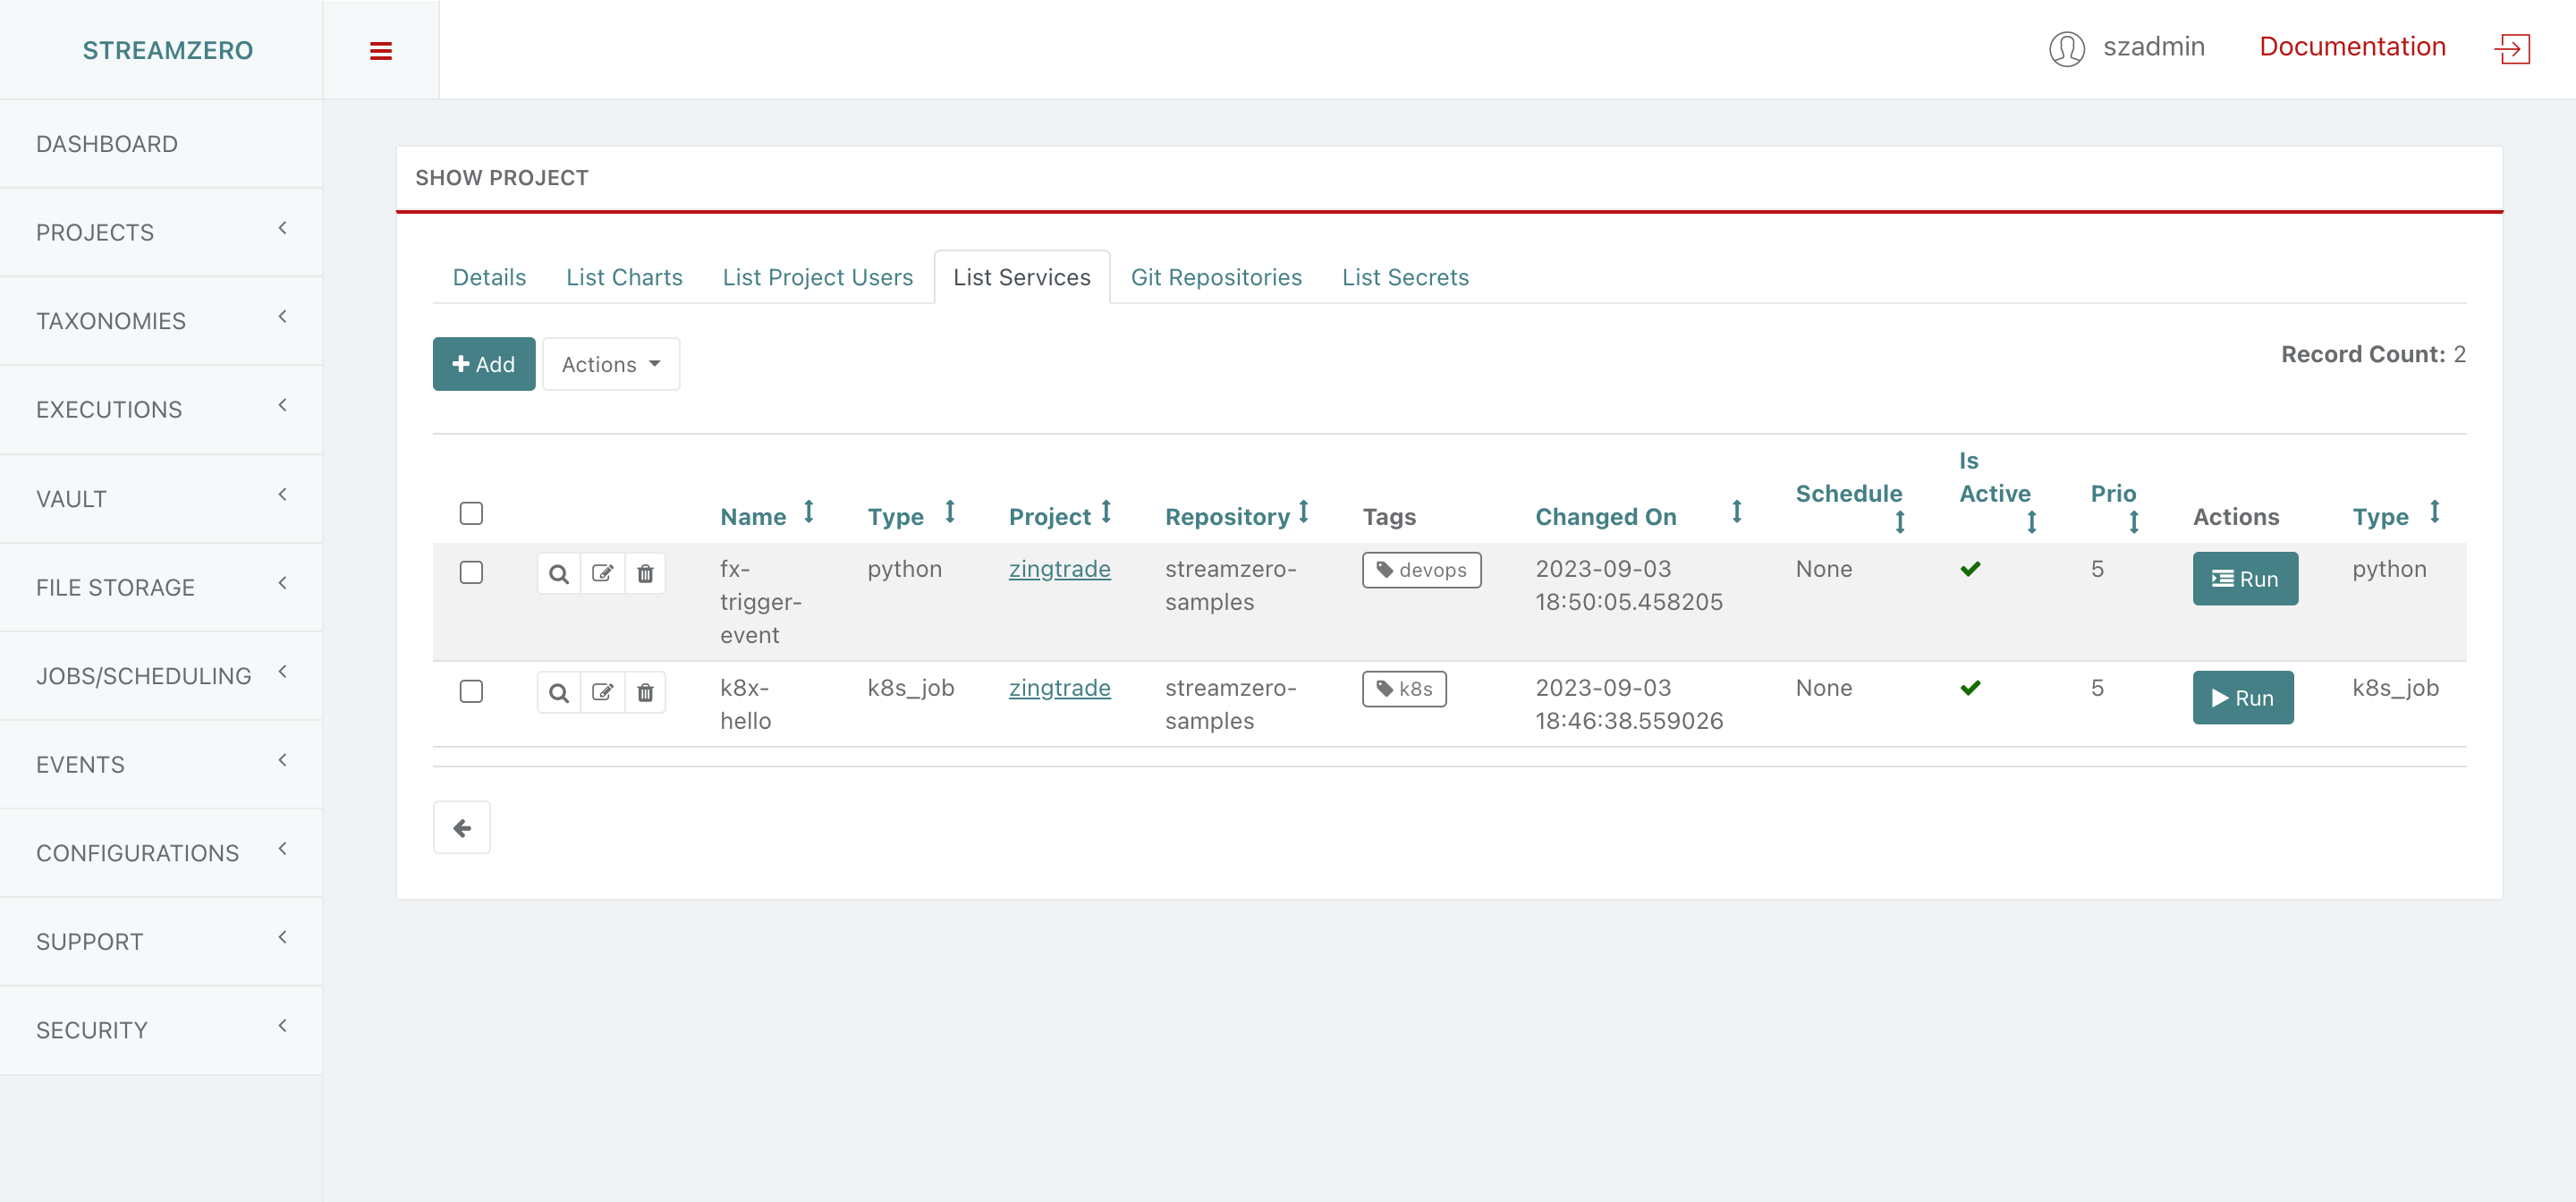
2.3 - Architecture
Lorem ipsum dolor sit amet, consectetur adipiscing elit, sed do eiusmod tempor incididunt ut labore et dolore magna aliqua. Ut enim ad minim veniam, quis nostrud exercitation ullamco laboris nisi ut aliquip ex ea commodo consequat. Duis aute irure dolor in reprehenderit in voluptate velit esse cillum dolore eu fugiat nulla pariatur. Excepteur sint occaecat cupidatat non proident, sunt in culpa qui officia deserunt mollit anim id est laborum.
3 - StreamZero SX
Overview
StreamZero SX is a streaming automation solution for the StreamZero Platform. It utilizes Apache Kafka, the distributed message broker used by thousands of companies, to enable data processing across the data mesh.
StreamZero SX drastically simplifies the creation of data pipelines and deployment of data streams, speeding up the time it takes to build stream processing applications.
It automates sourcing, streaming, and data management, and widely reduces the need for engineers’ involvement in topics management, DevOps, and DataOps.
What is Stream-Processing
Stream processing is a data management technique that involves ingesting a continuous data stream to quickly analyze, filter, transform or enhance the data in real time. Apache Kafka is the most popular open-source stream-processing software for collecting, processing, storing, and analyzing data at scale.
Most known for its excellent performance and fault tolerance, Kafka is designed to deliver high throughput and at the same time maintain low latency for real-time data feeds. It can handle thousands of messages per second with an average latency of 5–15ms.
Kafka serves as an ideal platform for building real-time streaming applications such as online streaming analytics or real-time message queue.
Apache Kafka has several advantages over other tools. Some notable benefits are:
- Building data pipelines.
- Leveraging real-time data streams.
- Enabling operational metrics.
- Data integration across countless sources.
Common Struggles For Companies Trying to Implement Kafka as an Integration Pattern
Now, while Kafka is great for building scalable and high-performance streaming applications, it’s actually hard to implement and maintain.
- For one thing, the system is large and complex, which is why most companies fail to meet their goals.
- On top of that, integrating client systems with Kafka brings additional challenges that can be difficult even for experienced teams, because there are many different technical complexities that could potentially cause hiccups in your integration strategy. -> Data schema, supported protocol and serialization are just some of the examples.
- As a result, Kafka requires a dedicated team with advanced knowledge and varying skill sets to handle its adoption — engineers, DevOps specialists, DataOps engineers, and GitOps experts.
- Moreover, due to the complexity of the applications, especially the concern of scalability, it can take a significant time to build each application.
There are many steps involved: from defining and writing business logic, setting up Kafka and integrating it with other services, to automating and deploying the applications.
How Does StreamZero SX Address And Solve These Issues?
StreamZero SX takes streaming automation to a whole new level. And the way it works is simple. It removes the complexity of Kafka connections, integrations, setups, automation, deployments and gives the end user the opportunity to focus on building client applications instead of losing time learning how to manage Kafka.
But how exactly does StreamZero SX solve the common issues and pitfalls mentioned above? By simplifying all processes:
- It is easy to adop and therefore has a low learning curve: Users can start working with StreamZero SX and experience first results within an hour.
- It removes the all complexities of Kafka: Engineers focus strictly on business logic for processing messages. The StreamZero SX python package takes care of configuration, Kafka connections, error handling, logging, and functions to interact with other services inside StreamZero.
- It is flexible. StreamZero SX allows using different underlying images and install additional components or pip modules.
- It enables connecting services code automatically to Streams and Topics.
- It helps you to quickly iterate on your service architecture. With StreamZero SX, once the images are deployed and the services are running, results are displayed right away.
- It takes care of all the underlying core processes. This means that you don’t need to worry about any technical or operational considerations.
- It is highly scalable and provides flexibility to up- or down-scale at any time, adjusted to the user’s needs and the number of topic partitions.
With the experience and knowledge gained over the past 7 years, the StreamZero Labs team has built an out-of-the-box module that lets developers concentrate on coding while taking care of all the complex processes that come with stream-processing data integrations.
3.1 - Developer Guide
Overview
StreamZero is a container level solution for building highly scalable, cross-network sync or async applications.
Using the StreamZero SX platform to run and manage stream processing containers utilizing StreamZero messaging infrastructure significantly reduces the cost of deploying enterprise application and offers standardized data streaming between workflow steps. This will simplify the development and as result create a platform with agile data processing and ease of integration.
Getting started with Stream Processors
Take a look at this library for creating Stream Processors on top of Kafka and running them inside StreamZero platform: StreamZero-SX
Example of a Stream Processor
Below you can find an example application that is using StreamZero-sx python library functions to count the number of words in incoming messages and then sending the result to twitter_feed_wc Kafka topic.
|
|
Creating Docker Container
Below is an example of a dockerfile to create a Docker image for the Twitter Word Count application shown in the previous section. The user is free to use whatever base python image and then add StreamZero module and other libraries.
FROM python:3.9-alpine
#RUN pip install -i https://test.pypi.org/simple/ StreamZero-sx==0.0.8 --extra-index-url https://pypi.org/simple/ StreamZero-sx
RUN pip install StreamZero-sx
COPY twitter_word_count.py app.py
After the user have built an image and pushed it to some Docker image regitry, he can run it in StreamZero SX UI.
3.2 - Integrations Guide
How does it Work?
There are two main approaches to implementing the external notifications support.
- Implementation within a StreamZero SX container
- Implementation in an Exit Gateway
The 2nd option is used in platforms which are behind a firewall and therefore require the gateway to be outside the firewall for accessing external services. In these cases the adapter runs as a separate container.
Irrespective of the infrastructure implementation the service internal API (as illustrated above) does not change.
3.3 - User Guide
StreamZero SX Management UI
Create a Stream Adapter
After a developer has built an image of a stream processing task and stored it to a container register, we can configure and launch it with StreamZero Management UI.
On left side menu, open Stream Adapters menu and select “Stream Adapter Definition”. Fill in the details.

Go to the “List Stream Adapters” page. You should find your the Stream Adapter that we created on the list. You can start the container by clicking the “Run”-button. The download and start-up of the image can take few minutes.

When the Stream Adapter is running you can find it in the list of running adapters.

StreamZero also has a list of all the Kafka topics that are currently attached to Stream Adapters or available to Stream Adapters.

3.4 - Solutions snippets / explain problem solved / link to relevant use case
Twitter message processing example
The first example application is using StreamZero-sx python library to implement stream processor to count the number of words in incoming messages. The messages are queried from Twitter API with specific filter condition and then fed to the processor. The results are sent to a Kafka topic.
|
|
3.5 - Containers + Purpose
Creating a Docker Container
Below is an example of a dockerfile to create a Docker image for some StreamZero SX application. The user is free to choose what base python image to use and then add StreamZero module and other libraries.
FROM python:3.9-alpine
#RUN pip install -i https://test.pypi.org/simple/ StreamZero-sx==0.0.8 --extra-index-url https://pypi.org/simple/ StreamZero-sx
RUN pip install StreamZero-sx
COPY app.py utils.py
After the user have built an image and pushed it to a Docker image regitsry, they can run it in StreamZero SX Management UI.
3.6 - Architecture
StreamZero SX Architecture Principles
Stream processing is a technique for processing large volumes of data in real-time as it is generated or received. One way to implement a stream processing architecture is to use Docker containers for individual workflow steps and Apache Kafka for the data pipeline.
Docker is a platform for creating, deploying, and running containers, which are lightweight and portable units of software that can be run on any system with a compatible container runtime. By using Docker containers for each step in the stream processing workflow, developers can easily package and deploy their code, along with any dependencies, in a consistent and reproducible way. This can help to improve the reliability and scalability of the stream processing system.
Apache Kafka is a distributed streaming platform that can be used to build real-time data pipelines and streaming applications. It provides a publish-subscribe model for sending and receiving messages, and can handle very high throughput and low latency. By using Kafka as the backbone of the data pipeline, developers can easily scale their stream processing system to handle large volumes of data and handle failover scenarios.
Overall, by using Docker containers for the individual workflow steps and Apache Kafka for the data pipeline, developers can create a stream processing architecture that is both scalable and reliable. This architecture can be used for a wide range of use cases, including real-time analytics, event-driven architectures, and data integration.
Below is the high-level architecture diagram of StreamZero SX:

Required Infrastructure
The following are the infrastructure components required for a StreamZero SX installation
| Component | Description |
|---|---|
| Apache Kafka | Apache Kafka serves as the backbone to pass events and operational data within a StreamZero SX Installation. |
| PostgreSQL | Postgres is used as the database for the StreamZero SX Management Application. |
| Consul | Consul is the configuration store used by the StreamZero SX platform. It is also used by the services to store their configurations. |
| MinIO | Minio provides the platform internal storage for scripts and assets used by the Services. |
| Elasticsearch | Elasticsearch is used as a central store for all operational data. Thereby making the data easiliy searchable. |
| Kibana | Kibana is used to view and query the data stored in Elasticsearch. |
| StreamZero Management UI | StreamZero Management UI is the main UI used for all activities on the StreamZero FX platform. |
| StreamZero FX-Router | The Route container is responsible for listening to events flowing through the system and forwarding the events to the appropriate micro-services that you create. |
| StreamZero FX-Executor | The executor container(s) is where the code gets executed. |
4 - Integrations Guide
4.1 - Database Guide
Install Database Drivers
StreamZero DX requires a Python DB-API database driver and a SQLAlchemy dialect to be installed for each datastore you want to connect to within the executor image.
Configuring Database Connections
StreamZero can manage preset connection configurations. This enables a platform wide set up for both confidential as well as general access databases.
StreamZero uses the SQL Alchemy Engine along with the URL template based approach to connection management. The connection configurations are maintained as secrets within the platform and are therefore not publicly accessible i.e. access is provided for administrators only.
Retrieving DB Connections
The following is how to retrieve a named connection. The following sample assumes that the connection identifier key is uploaded to the package as a secrets.json.
|
|
In the above example the db_url is set up as a secret with name 'my_connection'.
Depending on whether this is a service, project or platform level secret there are different approaches to set up the secret. For service level secret the following is a sample set up for a secrets.json file of the package.
|
|
- For Project scope use the
'secrets'tab of the Project Management UI. - For Platform scope secrets use the
Vault UIin the DX Manager Application.
Database Drivers
The following table provides a guide on the python libs to be installed within the Executor docker image. For instructions on how to extend the Executor docker image please check this page: /docs/extending_executor_image
You can read more here about how to install new database drivers and libraries into your StreamZero FX executor image.
Note that many other databases are supported, the main criteria being the existence of a functional SQLAlchemy dialect and Python driver. Searching for the keyword “sqlalchemy + (database name)” should help get you to the right place.
If your database or data engine isn’t on the list but a SQL interface exists, please file an issue so we can work on documenting and supporting it.
A list of some of the recommended packages.
| Database | PyPI package |
|---|---|
| Amazon Athena | pip install "PyAthenaJDBC>1.0.9 , pip install "PyAthena>1.2.0 |
| Amazon Redshift | pip install sqlalchemy-redshift |
| Apache Drill | pip install sqlalchemy-drill |
| Apache Druid | pip install pydruid |
| Apache Hive | pip install pyhive |
| Apache Impala | pip install impyla |
| Apache Kylin | pip install kylinpy |
| Apache Pinot | pip install pinotdb |
| Apache Solr | pip install sqlalchemy-solr |
| Apache Spark SQL | pip install pyhive |
| Ascend.io | pip install impyla |
| Azure MS SQL | pip install pymssql |
| Big Query | pip install pybigquery |
| ClickHouse | pip install clickhouse-driver==0.2.0 && pip install clickhouse-sqlalchemy==0.1.6 |
| CockroachDB | pip install cockroachdb |
| Dremio | pip install sqlalchemy_dremio |
| Elasticsearch | pip install elasticsearch-dbapi |
| Exasol | pip install sqlalchemy-exasol |
| Google Sheets | pip install shillelagh[gsheetsapi] |
| Firebolt | pip install firebolt-sqlalchemy |
| Hologres | pip install psycopg2 |
| IBM Db2 | pip install ibm_db_sa |
| IBM Netezza Performance Server | pip install nzalchemy |
| MySQL | pip install mysqlclient |
| Oracle | pip install cx_Oracle |
| PostgreSQL | pip install psycopg2 |
| Trino | pip install sqlalchemy-trino |
| Presto | pip install pyhive |
| SAP Hana | pip install hdbcli sqlalchemy-hana or pip install apache-Feris[hana] |
| Snowflake | pip install snowflake-sqlalchemy |
| SQLite | No additional library needed |
| SQL Server | pip install pymssql |
| Teradata | pip install teradatasqlalchemy |
| Vertica | pip install sqlalchemy-vertica-python |
| Yugabyte | pip install psycopg2 |
4.1.1 - Supported Databases
4.1.1.1 - Ascend.io
Ascend.io
The recommended connector library to Ascend.io is impyla.
The expected connection string is formatted as follows:
ascend://{username}:{password}@{hostname}:{port}/{database}?auth_mechanism=PLAIN;use_ssl=true
4.1.1.2 - Amazon Athena
AWS Athena
PyAthenaJDBC
PyAthenaJDBC is a Python DB 2.0 compliant wrapper for the Amazon Athena JDBC driver.
The connection string for Amazon Athena is as follows:
awsathena+jdbc://{aws_access_key_id}:{aws_secret_access_key}@athena.{region_name}.amazonaws.com/{schema_name}?s3_staging_dir={s3_staging_dir}&...
Note that you’ll need to escape & encode when forming the connection string like so:
s3://... -> s3%3A//...
PyAthena
You can also use PyAthena library (no Java required) with the following connection string:
awsathena+rest://{aws_access_key_id}:{aws_secret_access_key}@athena.{region_name}.amazonaws.com/{schema_name}?s3_staging_dir={s3_staging_dir}&...
4.1.1.3 - Amazon Redshift
AWS Redshift
The sqlalchemy-redshift library is the recommended way to connect to Redshift through SQLAlchemy.
You’ll need to the following setting values to form the connection string:
- User Name: userName
- Password: DBPassword
- Database Host: AWS Endpoint
- Database Name: Database Name
- Port: default 5439
Here’s what the connection string looks like:
redshift+psycopg2://<userName>:<DBPassword>@<AWS End Point>:5439/<Database Name>
4.1.1.4 - Apache Drill
Apache Drill
SQLAlchemy
The recommended way to connect to Apache Drill is through SQLAlchemy. You can use the sqlalchemy-drill package.
Once that is done, you can connect to Drill in two ways, either via the REST interface or by JDBC. If you are connecting via JDBC, you must have the Drill JDBC Driver installed.
The basic connection string for Drill looks like this:
drill+sadrill://<username>:<password>@<host>:<port>/<storage_plugin>?use_ssl=True
To connect to Drill running on a local machine running in embedded mode you can use the following connection string:
drill+sadrill://localhost:8047/dfs?use_ssl=False
JDBC
Connecting to Drill through JDBC is more complicated and we recommend following this tutorial.
The connection string looks like:
drill+jdbc://<username>:<passsword>@<host>:<port>
ODBC
We recommend reading the Apache Drill documentation and read the Github README to learn how to work with Drill through ODBC.
4.1.1.5 - Apache Druid
Apache Druid
Use the SQLAlchemy / DBAPI connector made available in the pydruid library.
The connection string looks like:
druid://<User>:<password>@<Host>:<Port-default-9088>/druid/v2/sql
Customizing Druid Connection
When adding a connection to Druid, you can customize the connection a few different ways in the Add Database form.
Custom Certificate
You can add certificates in the Root Certificate field when configuring the new database connection to Druid:
<img src={useBaseUrl("/img/root-cert-example.png")} />{" “}
When using a custom certificate, pydruid will automatically use https scheme.
Disable SSL Verification
To disable SSL verification, add the following to the Extras field:
engine_params:
{"connect_args":
	{"scheme": "https", "ssl_verify_cert": false}}
4.1.1.6 - Apache Hive
Apache Hive
The pyhive library is the recommended way to connect to Hive through SQLAlchemy.
The expected connection string is formatted as follows:
hive://hive@{hostname}:{port}/{database}
4.1.1.7 - Apache Impala
Apache Impala
The recommended connector library to Apache Impala is impyla.
The expected connection string is formatted as follows:
impala://{hostname}:{port}/{database}
4.1.1.8 - Apache Kylin
Apache Kylin
The recommended connector library for Apache Kylin is kylinpy.
The expected connection string is formatted as follows:
kylin://<username>:<password>@<hostname>:<port>/<project>?<param1>=<value1>&<param2>=<value2>
4.1.1.9 - Apache Pinot
Apache Pinot
The recommended connector library for Apache Pinot is pinotdb.
The expected connection string is formatted as follows:
pinot+http://<pinot-broker-host>:<pinot-broker-port>/query?controller=http://<pinot-controller-host>:<pinot-controller-port>/``
4.1.1.10 - Apache Solr
Apache Solr
The sqlalchemy-solr library provides a Python / SQLAlchemy interface to Apache Solr.
The connection string for Solr looks like this:
solr://{username}:{password}@{host}:{port}/{server_path}/{collection}[/?use_ssl=true|false]
4.1.1.11 - Apache Spark SQL
Apache Spark SQL
The recommended connector library for Apache Spark SQL pyhive.
The expected connection string is formatted as follows:
hive://hive@{hostname}:{port}/{database}
4.1.1.12 - Clickhouse
Clickhouse
To use Clickhouse with StreamZero you will need to add the following Python libraries:
clickhouse-driver==0.2.0
clickhouse-sqlalchemy==0.1.6
If running StreamZero using Docker Compose, add the following to your ./docker/requirements-local.txt file:
clickhouse-driver>=0.2.0
clickhouse-sqlalchemy>=0.1.6
The recommended connector library for Clickhouse is sqlalchemy-clickhouse.
The expected connection string is formatted as follows:
clickhouse+native://<user>:<password>@<host>:<port>/<database>[?options…]clickhouse://{username}:{password}@{hostname}:{port}/{database}
Here’s a concrete example of a real connection string:
clickhouse+native://demo:demo@github.demo.trial.altinity.cloud/default?secure=true
If you’re using Clickhouse locally on your computer, you can get away with using a native protocol URL that uses the default user without a password (and doesn’t encrypt the connection):
clickhouse+native://localhost/default
4.1.1.13 - CockroachDB
CockroachDB
The recommended connector library for CockroachDB is sqlalchemy-cockroachdb.
The expected connection string is formatted as follows:
cockroachdb://root@{hostname}:{port}/{database}?sslmode=disable
4.1.1.14 - CrateDB
CrateDB
The recommended connector library for CrateDB is crate. You need to install the extras as well for this library. We recommend adding something like the following text to your requirements file:
crate[sqlalchemy]==0.26.0
The expected connection string is formatted as follows:
crate://crate@127.0.0.1:4200
4.1.1.15 - Databricks
Databricks
To connect to Databricks, first install databricks-dbapi with the optional SQLAlchemy dependencies:
|
|
There are two ways to connect to Databricks: using a Hive connector or an ODBC connector. Both ways work similarly, but only ODBC can be used to connect to SQL endpoints.
Hive
To use the Hive connector you need the following information from your cluster:
- Server hostname
- Port
- HTTP path
These can be found under “Configuration” -> “Advanced Options” -> “JDBC/ODBC”.
You also need an access token from “Settings” -> “User Settings” -> “Access Tokens”.
Once you have all this information, add a database of type “Databricks (Hive)” in StreamZero, and use the following SQLAlchemy URI:
databricks+pyhive://token:{access token}@{server hostname}:{port}/{database name}
You also need to add the following configuration to “Other” -> “Engine Parameters”, with your HTTP path:
{"connect_args": {"http_path": "sql/protocolv1/o/****"}}
ODBC
For ODBC you first need to install the ODBC drivers for your platform.
For a regular connection use this as the SQLAlchemy URI:
databricks+pyodbc://token:{access token}@{server hostname}:{port}/{database name}
And for the connection arguments:
{"connect_args": {"http_path": "sql/protocolv1/o/****", "driver_path": "/path/to/odbc/driver"}}
The driver path should be:
/Library/simba/spark/lib/libsparkodbc_sbu.dylib(Mac OS)/opt/simba/spark/lib/64/libsparkodbc_sb64.so(Linux)
For a connection to a SQL endpoint you need to use the HTTP path from the endpoint:
{"connect_args": {"http_path": "/sql/1.0/endpoints/****", "driver_path": "/path/to/odbc/driver"}}
4.1.1.16 - Dremio
Dremio
The recommended connector library for Dremio is sqlalchemy_dremio.
The expected connection string for ODBC (Default port is 31010) is formatted as follows:
dremio://{username}:{password}@{host}:{port}/{database_name}/dremio?SSL=1
The expected connection string for Arrow Flight (Dremio 4.9.1+. Default port is 32010) is formatted as follows:
dremio+flight://{username}:{password}@{host}:{port}/dremio
This blog post by Dremio has some additional helpful instructions on connecting StreamZero to Dremio.
4.1.1.17 - Elasticsearch
Elasticsearch
The recommended connector library for Elasticsearch is elasticsearch-dbapi.
The connection string for Elasticsearch looks like this:
elasticsearch+http://{user}:{password}@{host}:9200/
Using HTTPS
elasticsearch+https://{user}:{password}@{host}:9200/
Elasticsearch as a default limit of 10000 rows, so you can increase this limit on your cluster or set Feris’s row limit on config
ROW_LIMIT = 10000
You can query multiple indices on SQL Lab for example
SELECT timestamp, agent FROM "logstash"
But, to use visualizations for multiple indices you need to create an alias index on your cluster
POST /_aliases
{
    "actions" : [
        { "add" : { "index" : "logstash-**", "alias" : "logstash_all" } }
    ]
}
Then register your table with the alias name logstasg_all
Time zone
By default, StreamZero uses UTC time zone for elasticsearch query. If you need to specify a time zone, please edit your Database and enter the settings of your specified time zone in the Other > ENGINE PARAMETERS:
{
    "connect_args": {
        "time_zone": "Asia/Shanghai"
    }
}
Another issue to note about the time zone problem is that before elasticsearch7.8, if you want to convert a string into a DATETIME object,
you need to use the CAST function,but this function does not support our time_zone setting. So it is recommended to upgrade to the version after elasticsearch7.8.
After elasticsearch7.8, you can use the DATETIME_PARSE function to solve this problem.
The DATETIME_PARSE function is to support our time_zone setting, and here you need to fill in your elasticsearch version number in the Other > VERSION setting.
the StreamZero will use the DATETIME_PARSE function for conversion.
4.1.1.18 - Exasol
Exasol
The recommended connector library for Exasol is sqlalchemy-exasol.
The connection string for Exasol looks like this:
exa+pyodbc://{username}:{password}@{hostname}:{port}/my_schema?CONNECTIONLCALL=en_US.UTF-8&driver=EXAODBC
4.1.1.19 - Firebird
Firebird
The recommended connector library for Firebird is sqlalchemy-firebird.
StreamZero has been tested on sqlalchemy-firebird>=0.7.0, <0.8.
The recommended connection string is:
firebird+fdb://{username}:{password}@{host}:{port}//{path_to_db_file}
Here’s a connection string example of StreamZero connecting to a local Firebird database:
firebird+fdb://SYSDBA:masterkey@192.168.86.38:3050//Library/Frameworks/Firebird.framework/Versions/A/Resources/examples/empbuild/employee.fdb
4.1.1.20 - Firebolt
Firebolt
The recommended connector library for Firebolt is firebolt-sqlalchemy.
StreamZero has been tested on firebolt-sqlalchemy>=0.0.1.
The recommended connection string is:
firebolt://{username}:{password}@{database}
or
firebolt://{username}:{password}@{database}/{engine_name}
Here’s a connection string example of StreamZero connecting to a Firebolt database:
firebolt://email@domain:password@sample_database
or
firebolt://email@domain:password@sample_database/sample_engine
4.1.1.21 - Google BigQuery
Google BigQuery
The recommended connector library for BigQuery is pybigquery.
Install BigQuery Driver
Follow the steps here about how to install new database drivers when setting up StreamZero locally via docker-compose.
echo "pybigquery" >> ./docker/requirements-local.txt
Connecting to BigQuery
When adding a new BigQuery connection in StreamZero, you’ll need to add the GCP Service Account credentials file (as a JSON).
- Create your Service Account via the Google Cloud Platform control panel, provide it access to the appropriate BigQuery datasets, and download the JSON configuration file for the service account.
- In StreamZero you can either upload that JSON or add the JSON blob in the following format (this should be the content of your credential JSON file):
{
        "type": "service_account",
        "project_id": "...",
        "private_key_id": "...",
        "private_key": "...",
        "client_email": "...",
        "client_id": "...",
        "auth_uri": "...",
        "token_uri": "...",
        "auth_provider_x509_cert_url": "...",
        "client_x509_cert_url": "..."
    }
-
Additionally, can connect via SQLAlchemy URI instead
The connection string for BigQuery looks like:
bigquery://{project_id}Go to the Advanced tab, Add a JSON blob to the Secure Extra field in the database configuration form with the following format:
{
"credentials_info": <contents of credentials JSON file>
}
The resulting file should have this structure:
{
 "credentials_info": {
     "type": "service_account",
     "project_id": "...",
     "private_key_id": "...",
     "private_key": "...",
     "client_email": "...",
     "client_id": "...",
     "auth_uri": "...",
     "token_uri": "...",
     "auth_provider_x509_cert_url": "...",
     "client_x509_cert_url": "..."
     }
 }
You should then be able to connect to your BigQuery datasets.
To be able to upload CSV or Excel files to BigQuery in StreamZero, you’ll need to also add the pandas_gbq library.
4.1.1.22 - Google Sheets
Google Sheets
Google Sheets has a very limited SQL API. The recommended connector library for Google Sheets is shillelagh.
4.1.1.23 - Hana
Hana
The recommended connector library is sqlalchemy-hana.
The connection string is formatted as follows:
hana://{username}:{password}@{host}:{port}
4.1.1.24 - Hologres
Hologres
Hologres is a real-time interactive analytics service developed by Alibaba Cloud. It is fully compatible with PostgreSQL 11 and integrates seamlessly with the big data ecosystem.
Hologres sample connection parameters:
- User Name: The AccessKey ID of your Alibaba Cloud account.
- Password: The AccessKey secret of your Alibaba Cloud account.
- Database Host: The public endpoint of the Hologres instance.
- Database Name: The name of the Hologres database.
- Port: The port number of the Hologres instance.
The connection string looks like:
postgresql+psycopg2://{username}:{password}@{host}:{port}/{database}
4.1.1.25 - IBM DB2
IBM DB2
The IBM_DB_SA library provides a Python / SQLAlchemy interface to IBM Data Servers.
Here’s the recommended connection string:
db2+ibm_db://{username}:{passport}@{hostname}:{port}/{database}
There are two DB2 dialect versions implemented in SQLAlchemy. If you are connecting to a DB2 version without LIMIT [n] syntax, the recommended connection string to be able to use the SQL Lab is:
ibm_db_sa://{username}:{passport}@{hostname}:{port}/{database}
4.1.1.26 - IBM Netezza Performance Server
IBM Netezza Performance Server
The nzalchemy library provides a Python / SQLAlchemy interface to IBM Netezza Performance Server (aka Netezza).
Here’s the recommended connection string:
netezza+nzpy://{username}:{password}@{hostname}:{port}/{database}
4.1.1.27 - Microsoft SQL Server
SQL Server
The recommended connector library for SQL Server is pymssql.
The connection string for SQL Server looks like this:
mssql+pymssql://<Username>:<Password>@<Host>:<Port-default:1433>/<Database Name>/?Encrypt=yes
4.1.1.28 - MySQL
MySQL
The recommended connector library for MySQL is mysqlclient.
Here’s the connection string:
mysql://{username}:{password}@{host}/{database}
Host:
- For Localhost or Docker running Linux:
localhostor127.0.0.1 - For On Prem: IP address or Host name
- For Docker running in OSX:
docker.for.mac.host.internalPort:3306by default
One problem with mysqlclient is that it will fail to connect to newer MySQL databases using caching_sha2_password for authentication, since the plugin is not included in the client. In this case, you should use [mysql-connector-python](https://pypi.org/project/mysql-connector-python/) instead:
mysql+mysqlconnector://{username}:{password}@{host}/{database}
4.1.1.29 - Oracle
Oracle
The recommended connector library is cx_Oracle.
The connection string is formatted as follows:
oracle://<username>:<password>@<hostname>:<port>
4.1.1.30 - Postgres
Postgres
Note that, if you’re using docker-compose, the Postgres connector library psycopg2 comes out of the box with Feris.
Postgres sample connection parameters:
- User Name: UserName
- Password: DBPassword
- Database Host:
- For Localhost: localhost or 127.0.0.1
- For On Prem: IP address or Host name
- For AWS Endpoint
- Database Name: Database Name
- Port: default 5432
The connection string looks like:
postgresql://{username}:{password}@{host}:{port}/{database}
You can require SSL by adding ?sslmode=require at the end:
postgresql://{username}:{password}@{host}:{port}/{database}?sslmode=require
You can read about the other SSL modes that Postgres supports in Table 31-1 from this documentation.
More information about PostgreSQL connection options can be found in the SQLAlchemy docs and the PostgreSQL docs.
4.1.1.31 - Presto
Presto
The pyhive library is the recommended way to connect to Presto through SQLAlchemy.
The expected connection string is formatted as follows:
presto://{hostname}:{port}/{database}
You can pass in a username and password as well:
presto://{username}:{password}@{hostname}:{port}/{database}
Here is an example connection string with values:
presto://datascientist:securepassword@presto.example.com:8080/hive
By default StreamZero assumes the most recent version of Presto is being used when querying the datasource. If you’re using an older version of Presto, you can configure it in the extra parameter:
{
    "version": "0.123"
}
4.1.1.32 - Rockset
Rockset
The connection string for Rockset is:
rockset://apikey:{your-apikey}@api.rs2.usw2.rockset.com/
For more complete instructions, we recommend the Rockset documentation.
4.1.1.33 - Snowflake
Snowflake
The recommended connector library for Snowflake is snowflake-sqlalchemy<=1.2.4.
The connection string for Snowflake looks like this:
snowflake://{user}:{password}@{account}.{region}/{database}?role={role}&warehouse={warehouse}
The schema is not necessary in the connection string, as it is defined per table/query. The role and warehouse can be omitted if defaults are defined for the user, i.e.
snowflake://{user}:{password}@{account}.{region}/{database}
Make sure the user has privileges to access and use all required databases/schemas/tables/views/warehouses, as the Snowflake SQLAlchemy engine does not test for user/role rights during engine creation by default. However, when pressing the “Test Connection” button in the Create or Edit Database dialog, user/role credentials are validated by passing “validate_default_parameters”: True to the connect() method during engine creation. If the user/role is not authorized to access the database, an error is recorded in the StreamZero logs.
4.1.1.34 - Teradata
Teradata
The recommended connector library is teradatasqlalchemy.
The connection string for Teradata looks like this:
teradata://{user}:{password}@{host}
ODBC Driver
There’s also an older connector named sqlalchemy-teradata that requires the installation of ODBC drivers. The Teradata ODBC Drivers are available here: https://downloads.teradata.com/download/connectivity/odbc-driver/linux
Here are the required environment variables:
export ODBCINI=/.../teradata/client/ODBC_64/odbc.ini
export ODBCINST=/.../teradata/client/ODBC_64/odbcinst.ini
We recommend using the first library because of the lack of requirement around ODBC drivers and because it’s more regularly updated.
4.1.1.35 - Trino
Trino
Supported trino version 352 and higher
The sqlalchemy-trino library is the recommended way to connect to Trino through SQLAlchemy.
The expected connection string is formatted as follows:
trino://{username}:{password}@{hostname}:{port}/{catalog}
If you are running trino with docker on local machine please use the following connection URL
trino://trino@host.docker.internal:8080
Reference: Trino-Feris-Podcast
4.1.1.36 - Vertica
Vertica
The recommended connector library is sqlalchemy-vertica-python. The Vertica connection parameters are:
- User Name: UserName
- Password: DBPassword
- Database Host:
- For Localhost : localhost or 127.0.0.1
- For On Prem : IP address or Host name
- For Cloud: IP Address or Host Name
- Database Name: Database Name
- Port: default 5433
The connection string is formatted as follows:
vertica+vertica_python://{username}:{password}@{host}/{database}
Other parameters:
- Load Balancer - Backup Host
4.1.1.37 - YugabyteDB
YugabyteDB
YugabyteDB is a distributed SQL database built on top of PostgreSQL.
Note that, if you’re using docker-compose, the Postgres connector library psycopg2 comes out of the box with StreamZero.
The connection string looks like:
postgresql://{username}:{password}@{host}:{port}/{database}
4.2 - Notifications and Messaging
StreamZero provides you access to over 40 notification services such as Slack, Email and Telegram.
StreamZero FX uses the Apprise Python Libs as an engine for notifiation dispatch. The power of Apprise gives you access to over 40 notification services. A complete list is provided in a table and the end of the document.
In order to send notifications from your package you need is to create and emit a pre-defined event type.
How to send notifications from your package
In order to send notifications from your package you need to send a ‘ferris.notifications.apprise.notification’ event from your package
You can do it like so.
|
|
How does it Work?
There are 2 approaches to implementing the notifications support.
- Implementation within a StreamZero Service
- Implementation in an Exit Gateway
The 2nd option is used in platforms which are behind a firewall and therefore require the gateway to be outside the firewall for accessing external services. In these cases the adapter runs as a separate container.
Irrespective of the infrastructure implementation the service internal API (as illustrated above) does not change.
The following documentation refers to Option 1.
Pre-Requisites
In order to send notifcations
-
The Apprise Libs must be present in the Executor Image.
-
You must have the Apprise Notifications Packages installed and running. You can find the code base further below in document.
-
You must upload a secrets.json file for the Apprise Notifications Package. Please note that you should maintain a separate copy of the configs since this will not be displayed in your configuration manager since it contains credentials.
-
A sample configuration file is provided below. Please use the table based on Apprise documentation to understand the URL Template structure.
-
Once the Apprise Notifications Package is installed along with the configurations you must link the package to be triggered by the ‘ferris.notifications.apprise.notification’ event.
The StreamZero Apprise Package
The following is code for an StreamZero executor package to send apprise based notifications.
To send a notification from within your python application, just do the following:
|
|
Configuration
The following is a sample configuration which is uploaded as a secrets.json file for the StreamZero Apprise Package.
The configuration consists of a set of named URL templates. With each url_template being based on the Apprise URL schema as shown in the sections further in document.
While you are free to name URL templates as you wish it is preferred to prefix them with an indication of the underlying service being used to send notifications.
|
|
The configurations must be added to a secrets.json file and uploaded as part of the apprise_package.
The apprise package must be configured to be triggered by the ‘ferris.notifications.apprise.notification’ event.
Popular Notification Services
The table below identifies the services this tool supports and some example service urls you need to use in order to take advantage of it.
Click on any of the services listed below to get more details on how you can configure Apprise to access them.
| Notification Service | Service ID | Default Port | Example Syntax |
|---|---|---|---|
| Apprise API | apprise:// or apprises:// | (TCP) 80 or 443 | apprise://hostname/Token |
| AWS SES | ses:// | (TCP) 443 | ses://user@domain/AccessKeyID/AccessSecretKey/RegionName ses://user@domain/AccessKeyID/AccessSecretKey/RegionName/email1/email2/emailN |
| Discord | discord:// | (TCP) 443 | discord://webhook_id/webhook_token discord://avatar@webhook_id/webhook_token |
| Emby | emby:// or embys:// | (TCP) 8096 | emby://user@hostname/ emby://user:password@hostname |
| Enigma2 | enigma2:// or enigma2s:// | (TCP) 80 or 443 | enigma2://hostname |
| Faast | faast:// | (TCP) 443 | faast://authorizationtoken |
| FCM | fcm:// | (TCP) 443 | fcm://project@apikey/DEVICE_ID fcm://project@apikey/#TOPIC fcm://project@apikey/DEVICE_ID1/#topic1/#topic2/DEVICE_ID2/ |
| Flock | flock:// | (TCP) 443 | flock://token flock://botname@token flock://app_token/u:userid flock://app_token/g:channel_id flock://app_token/u:userid/g:channel_id |
| Gitter | gitter:// | (TCP) 443 | gitter://token/room gitter://token/room1/room2/roomN |
| Google Chat | gchat:// | (TCP) 443 | gchat://workspace/key/token |
| Gotify | gotify:// or gotifys:// | (TCP) 80 or 443 | gotify://hostname/token gotifys://hostname/token?priority=high |
| Growl | growl:// | (UDP) 23053 | growl://hostname growl://hostname:portno growl://password@hostname growl://password@hostname:portNote: you can also use the get parameter version which can allow the growl request to behave using the older v1.x protocol. An example would look like: growl://hostname?version=1 |
| Home Assistant | hassio:// or hassios:// | (TCP) 8123 or 443 | hassio://hostname/accesstoken hassio://user@hostname/accesstoken hassio://user:password@hostname:port/accesstoken hassio://hostname/optional/path/accesstoken |
| IFTTT | ifttt:// | (TCP) 443 | ifttt://webhooksID/Event ifttt://webhooksID/Event1/Event2/EventN ifttt://webhooksID/Event1/?+Key=Value ifttt://webhooksID/Event1/?-Key=value1 |
| Join | join:// | (TCP) 443 | join://apikey/device join://apikey/device1/device2/deviceN/ join://apikey/group join://apikey/groupA/groupB/groupN join://apikey/DeviceA/groupA/groupN/DeviceN/ |
| KODI | kodi:// or kodis:// | (TCP) 8080 or 443 | kodi://hostname kodi://user@hostname kodi://user:password@hostname:port |
| Kumulos | kumulos:// | (TCP) 443 | kumulos://apikey/serverkey |
| LaMetric Time | lametric:// | (TCP) 443 | lametric://apikey@device_ipaddr lametric://apikey@hostname:port lametric://client_id@client_secret |
| Mailgun | mailgun:// | (TCP) 443 | mailgun://user@hostname/apikey mailgun://user@hostname/apikey/email mailgun://user@hostname/apikey/email1/email2/emailN mailgun://user@hostname/apikey/?name=“From%20User” |
| Matrix | matrix:// or matrixs:// | (TCP) 80 or 443 | matrix://hostname matrix://user@hostname matrixs://user:pass@hostname:port/#room_alias matrixs://user:pass@hostname:port/!room_id matrixs://user:pass@hostname:port/#room_alias/!room_id/#room2 matrixs://token@hostname:port/?webhook=matrix matrix://user:token@hostname/?webhook=slack&format=markdown |
| Mattermost | mmost:// or mmosts:// | (TCP) 8065 | mmost://hostname/authkey mmost://hostname:80/authkey mmost://user@hostname:80/authkey mmost://hostname/authkey?channel=channel mmosts://hostname/authkey mmosts://user@hostname/authkey |
| Microsoft Teams | msteams:// | (TCP) 443 | msteams://TokenA/TokenB/TokenC/ |
| MQTT | mqtt:// or mqtts:// | (TCP) 1883 or 8883 | mqtt://hostname/topic mqtt://user@hostname/topic mqtts://user:pass@hostname:9883/topic |
| Nextcloud | ncloud:// or nclouds:// | (TCP) 80 or 443 | ncloud://adminuser:pass@host/User nclouds://adminuser:pass@host/User1/User2/UserN |
| NextcloudTalk | nctalk:// or nctalks:// | (TCP) 80 or 443 | nctalk://user:pass@host/RoomId nctalks://user:pass@host/RoomId1/RoomId2/RoomIdN |
| Notica | notica:// | (TCP) 443 | notica://Token/ |
| Notifico | notifico:// | (TCP) 443 | notifico://ProjectID/MessageHook/ |
| Office 365 | o365:// | (TCP) 443 | o365://TenantID:AccountEmail/ClientID/ClientSecret o365://TenantID:AccountEmail/ClientID/ClientSecret/TargetEmail o365://TenantID:AccountEmail/ClientID/ClientSecret/TargetEmail1/TargetEmail2/TargetEmailN |
| OneSignal | onesignal:// | (TCP) 443 | onesignal://AppID@APIKey/PlayerID onesignal://TemplateID:AppID@APIKey/UserID onesignal://AppID@APIKey/#IncludeSegment onesignal://AppID@APIKey/Email |
| Opsgenie | opsgenie:// | (TCP) 443 | opsgenie://APIKey opsgenie://APIKey/UserID opsgenie://APIKey/#Team opsgenie://APIKey/*Schedule opsgenie://APIKey/^Escalation |
| ParsePlatform | parsep:// or parseps:// | (TCP) 80 or 443 | parsep://AppID:MasterKey@Hostname parseps://AppID:MasterKey@Hostname |
| PopcornNotify | popcorn:// | (TCP) 443 | popcorn://ApiKey/ToPhoneNo popcorn://ApiKey/ToPhoneNo1/ToPhoneNo2/ToPhoneNoN/ popcorn://ApiKey/ToEmail popcorn://ApiKey/ToEmail1/ToEmail2/ToEmailN/ popcorn://ApiKey/ToPhoneNo1/ToEmail1/ToPhoneNoN/ToEmailN |
| Prowl | prowl:// | (TCP) 443 | prowl://apikey prowl://apikey/providerkey |
| PushBullet | pbul:// | (TCP) 443 | pbul://accesstoken pbul://accesstoken/#channel pbul://accesstoken/A_DEVICE_ID pbul://accesstoken/email@address.com pbul://accesstoken/#channel/#channel2/email@address.net/DEVICE |
| Push (Techulus) | push:// | (TCP) 443 | push://apikey/ |
| Pushed | pushed:// | (TCP) 443 | pushed://appkey/appsecret/ pushed://appkey/appsecret/#ChannelAlias pushed://appkey/appsecret/#ChannelAlias1/#ChannelAlias2/#ChannelAliasN pushed://appkey/appsecret/@UserPushedID pushed://appkey/appsecret/@UserPushedID1/@UserPushedID2/@UserPushedIDN |
| Pushover | pover:// | (TCP) 443 | pover://user@token pover://user@token/DEVICE pover://user@token/DEVICE1/DEVICE2/DEVICEN Note: you must specify both your user_id and token |
| PushSafer | psafer:// or psafers:// | (TCP) 80 or 443 | psafer://privatekey psafers://privatekey/DEVICE psafer://privatekey/DEVICE1/DEVICE2/DEVICEN |
| reddit:// | (TCP) 443 | reddit://user:password@app_id/app_secret/subreddit reddit://user:password@app_id/app_secret/sub1/sub2/subN |
|
| Rocket.Chat | rocket:// or rockets:// | (TCP) 80 or 443 | rocket://user:password@hostname/RoomID/Channel rockets://user:password@hostname:443/#Channel1/#Channel1/RoomID rocket://user:password@hostname/#Channel rocket://webhook@hostname rockets://webhook@hostname/@User/#Channel |
| Ryver | ryver:// | (TCP) 443 | ryver://Organization/Token ryver://botname@Organization/Token |
| SendGrid | sendgrid:// | (TCP) 443 | sendgrid://APIToken:FromEmail/ sendgrid://APIToken:FromEmail/ToEmail sendgrid://APIToken:FromEmail/ToEmail1/ToEmail2/ToEmailN/ |
| ServerChan | serverchan:// | (TCP) 443 | serverchan://token/ |
| SimplePush | spush:// | (TCP) 443 | spush://apikey spush://salt:password@apikey spush://apikey?event=Apprise |
| Slack | slack:// | (TCP) 443 | slack://TokenA/TokenB/TokenC/ slack://TokenA/TokenB/TokenC/Channel slack://botname@TokenA/TokenB/TokenC/Channel slack://user@TokenA/TokenB/TokenC/Channel1/Channel2/ChannelN |
| SMTP2Go | smtp2go:// | (TCP) 443 | smtp2go://user@hostname/apikey smtp2go://user@hostname/apikey/email smtp2go://user@hostname/apikey/email1/email2/emailN smtp2go://user@hostname/apikey/?name=“From%20User” |
| Streamlabs | strmlabs:// | (TCP) 443 | strmlabs://AccessToken/ strmlabs://AccessToken/?name=name&identifier=identifier&amount=0¤cy=USD |
| SparkPost | sparkpost:// | (TCP) 443 | sparkpost://user@hostname/apikey sparkpost://user@hostname/apikey/email sparkpost://user@hostname/apikey/email1/email2/emailN sparkpost://user@hostname/apikey/?name=“From%20User” |
| Spontit | spontit:// | (TCP) 443 | spontit://UserID@APIKey/ spontit://UserID@APIKey/Channel spontit://UserID@APIKey/Channel1/Channel2/ChannelN |
| Syslog | syslog:// | (UDP) 514 (if hostname specified) | syslog:// syslog://Facility syslog://hostname syslog://hostname/Facility |
| Telegram | tgram:// | (TCP) 443 | tgram://bottoken/ChatID tgram://bottoken/ChatID1/ChatID2/ChatIDN |
| twitter:// | (TCP) 443 | twitter://CKey/CSecret/AKey/ASecret twitter://user@CKey/CSecret/AKey/ASecret twitter://CKey/CSecret/AKey/ASecret/User1/User2/User2 twitter://CKey/CSecret/AKey/ASecret?mode=tweet |
|
| Twist | twist:// | (TCP) 443 | twist://pasword:login twist://password:login/#channel twist://password:login/#team:channel twist://password:login/#team:channel1/channel2/#team3:channel |
| XMPP | xmpp:// or xmpps:// | (TCP) 5222 or 5223 | xmpp://user:password@hostname xmpps://user:password@hostname:port?jid=user@hostname/resource xmpps://user:password@hostname/target@myhost, target2@myhost/resource |
| Webex Teams (Cisco) | wxteams:// | (TCP) 443 | wxteams://Token |
| Zulip Chat | zulip:// | (TCP) 443 | zulip://botname@Organization/Token zulip://botname@Organization/Token/Stream zulip://botname@Organization/Token/Email |
SMS Notification Support
| Notification Service | Service ID | Default Port | Example Syntax |
|---|---|---|---|
| AWS SNS | sns:// | (TCP) 443 | sns://AccessKeyID/AccessSecretKey/RegionName/+PhoneNo sns://AccessKeyID/AccessSecretKey/RegionName/+PhoneNo1/+PhoneNo2/+PhoneNoN sns://AccessKeyID/AccessSecretKey/RegionName/Topic sns://AccessKeyID/AccessSecretKey/RegionName/Topic1/Topic2/TopicN |
| ClickSend | clicksend:// | (TCP) 443 | clicksend://user:pass@PhoneNo clicksend://user:pass@ToPhoneNo1/ToPhoneNo2/ToPhoneNoN |
| DAPNET | dapnet:// | (TCP) 80 | dapnet://user:pass@callsign dapnet://user:pass@callsign1/callsign2/callsignN |
| D7 Networks | d7sms:// | (TCP) 443 | d7sms://user:pass@PhoneNo d7sms://user:pass@ToPhoneNo1/ToPhoneNo2/ToPhoneNoN |
| DingTalk | dingtalk:// | (TCP) 443 | dingtalk://token/ dingtalk://token/ToPhoneNo dingtalk://token/ToPhoneNo1/ToPhoneNo2/ToPhoneNo1/ |
| Kavenegar | kavenegar:// | (TCP) 443 | kavenegar://ApiKey/ToPhoneNo kavenegar://FromPhoneNo@ApiKey/ToPhoneNo kavenegar://ApiKey/ToPhoneNo1/ToPhoneNo2/ToPhoneNoN |
| MessageBird | msgbird:// | (TCP) 443 | msgbird://ApiKey/FromPhoneNo msgbird://ApiKey/FromPhoneNo/ToPhoneNo msgbird://ApiKey/FromPhoneNo/ToPhoneNo1/ToPhoneNo2/ToPhoneNoN/ |
| MSG91 | msg91:// | (TCP) 443 | msg91://AuthKey/ToPhoneNo msg91://SenderID@AuthKey/ToPhoneNo msg91://AuthKey/ToPhoneNo1/ToPhoneNo2/ToPhoneNoN/ |
| Nexmo | nexmo:// | (TCP) 443 | nexmo://ApiKey:ApiSecret@FromPhoneNo nexmo://ApiKey:ApiSecret@FromPhoneNo/ToPhoneNo nexmo://ApiKey:ApiSecret@FromPhoneNo/ToPhoneNo1/ToPhoneNo2/ToPhoneNoN/ |
| Sinch | sinch:// | (TCP) 443 | sinch://ServicePlanId:ApiToken@FromPhoneNo sinch://ServicePlanId:ApiToken@FromPhoneNo/ToPhoneNo sinch://ServicePlanId:ApiToken@FromPhoneNo/ToPhoneNo1/ToPhoneNo2/ToPhoneNoN/ sinch://ServicePlanId:ApiToken@ShortCode/ToPhoneNo sinch://ServicePlanId:ApiToken@ShortCode/ToPhoneNo1/ToPhoneNo2/ToPhoneNoN/ |
| Twilio | twilio:// | (TCP) 443 | twilio://AccountSid:AuthToken@FromPhoneNo twilio://AccountSid:AuthToken@FromPhoneNo/ToPhoneNo twilio://AccountSid:AuthToken@FromPhoneNo/ToPhoneNo1/ToPhoneNo2/ToPhoneNoN/ twilio://AccountSid:AuthToken@FromPhoneNo/ToPhoneNo?apikey=Key twilio://AccountSid:AuthToken@ShortCode/ToPhoneNo twilio://AccountSid:AuthToken@ShortCode/ToPhoneNo1/ToPhoneNo2/ToPhoneNoN/ |
Desktop Notification Support
| Notification Service | Service ID | Default Port | Example Syntax |
|---|---|---|---|
| Linux DBus Notifications | dbus:// qt:// glib:// kde:// |
n/a | dbus:// qt:// glib:// kde:// |
| Linux Gnome Notifications | gnome:// | n/a | gnome:// |
| MacOS X Notifications | macosx:// | n/a | macosx:// |
| Windows Notifications | windows:// | n/a | windows:// |
Email Support
| Service ID | Default Port | Example Syntax |
|---|---|---|
| mailto:// | (TCP) 25 | mailto://userid:pass@domain.com mailto://domain.com?user=userid&pass=password mailto://domain.com:2525?user=userid&pass=password mailto://user@gmail.com&pass=password mailto://mySendingUsername:mySendingPassword@example.com?to=receivingAddress@example.com mailto://userid:password@example.com?smtp=mail.example.com&from=noreply@example.com&name=no%20reply |
| mailtos:// | (TCP) 587 | mailtos://userid:pass@domain.com mailtos://domain.com?user=userid&pass=password mailtos://domain.com:465?user=userid&pass=password mailtos://user@hotmail.com&pass=password mailtos://mySendingUsername:mySendingPassword@example.com?to=receivingAddress@example.com mailtos://userid:password@example.com?smtp=mail.example.com&from=noreply@example.com&name=no%20reply |
Apprise have some email services built right into it (such as yahoo, fastmail, hotmail, gmail, etc) that greatly simplify the mailto:// service. See more details here.
Custom Notifications
| Post Method | Service ID | Default Port | Example Syntax |
|---|---|---|---|
| Form | form:// or form:// | (TCP) 80 or 443 | form://hostname form://user@hostname form://user:password@hostname:port form://hostname/a/path/to/post/to |
| JSON | json:// or jsons:// | (TCP) 80 or 443 | json://hostname json://user@hostname json://user:password@hostname:port json://hostname/a/path/to/post/to |
| XML | xml:// or xmls:// | (TCP) 80 or 443 | xml://hostname xml://user@hostname xml://user:password@hostname:port xml://hostname/a/path/to/post/to |
5 - Security
Concept
StreamZero is taking a multi-layered and integrative approach to security and access rights management, protecting systems, networks, users and data alike.
While the security architecture of StreamZero stands alone and operates well in isolation, it is built to integrate with enterprise security systems such as LDAP and Active Directory.
It supports Single Sign On (SSO) through open protocols such as Auth0 and SAML.
This user guide focuses on the application internal - user controlled - aspects of the seurity functions.
Approach
StreamZero applies the proven notion of #Users, #Roles and #Permissions and linking them to the application elements such as #Menues, Views and Pages.
This approach enables the breaking of the application into granular elements and organizing them into groups of like access control areas. The ultimate benefit is the implementation of user rights on a strict “need-to-know” basis.
Security Components
In the following sections you will learn how the security components work and how to set them up for your purpose.
If you want to follow the instructions and examples, you first need to connect to your StreamZero demo instance.
Navigation
The Security menu is found on left hand navigation of Ferris.
- Click on the Security menu to expand it and display all security relevant menu items.
StreamZero Security Navigation
- List Users: Setup individual users and assign one or more roles to them. If StreamZero is integrated with a company own Single Sign On, here is where all users can be viewed. Each user may be deactivated manually.
- List Roles: Setup and maintain individual roles and assign them viewing, editing, executing and other rights pertinent to the character and scope of the role. Roles can be integrated and inheritet with the company Active Directory.
- Users Statistics: Useful grafical statistic displaying the login behavior of individual users, such as login count and failed logins. For Security Admins only.
- User Registrations: Listing pending registration requests. For Security Admins only.
- Base Permissions: Listing the base permissions. For Security Admins only.
- Views/Menus: Listing of all Menu and View (aka Pages, UI) items. For Security Admins only.
- Permissions on Views/Menus: Listing of the assigned permissions of each Menu and View element. For Security Admins only.
NOTE that it is considered a good practice that security related tasks are provided to only a few dedicated Security Leads within the organization. For that purpose, setting up a dedicated Security Lead role is advised.
Authentication and Authorization
Add text
Data Level Security
Add text
Integrations
Add text
Audit Functions
Add viewing function (below)
Add logging and monitoring capabilities
5.1 - Permissions
Roles
This is us - humans - using StreamZero on a day to day basis. And in this section each user is listed with the most important attributes defininig name, e-mail, status and - most importantly - the associated roles.
To get the the Users page, navigate to: Security > List Roles
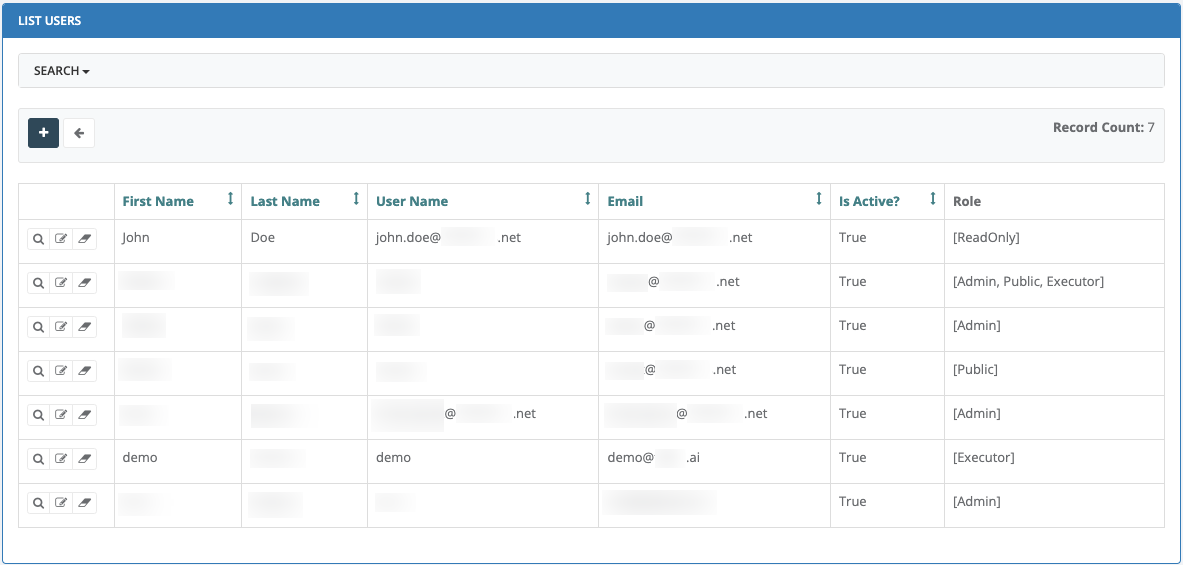
Example: List of Users
Besides displaying the list of all current users, the Users page offers a number of capabilities:
- Add User

- Show User

- Edit User

- Delete User

Note that each of these capabilities depends on the Permissions given to your Role. Some roles may be given full rights (e.g. add, show, edit, delete), where others may only be given viewing rights (e.g. show). As a result, some users may only be seeing the “Show User” magnifying glass icon.
5.2 - Roles
Roles
Roles represent a collection of permissions or rights that can be performed within Ferris. They can be directly associated with the job of job a #User performs.
To get the the Users page, navigate to: Security > List Roles
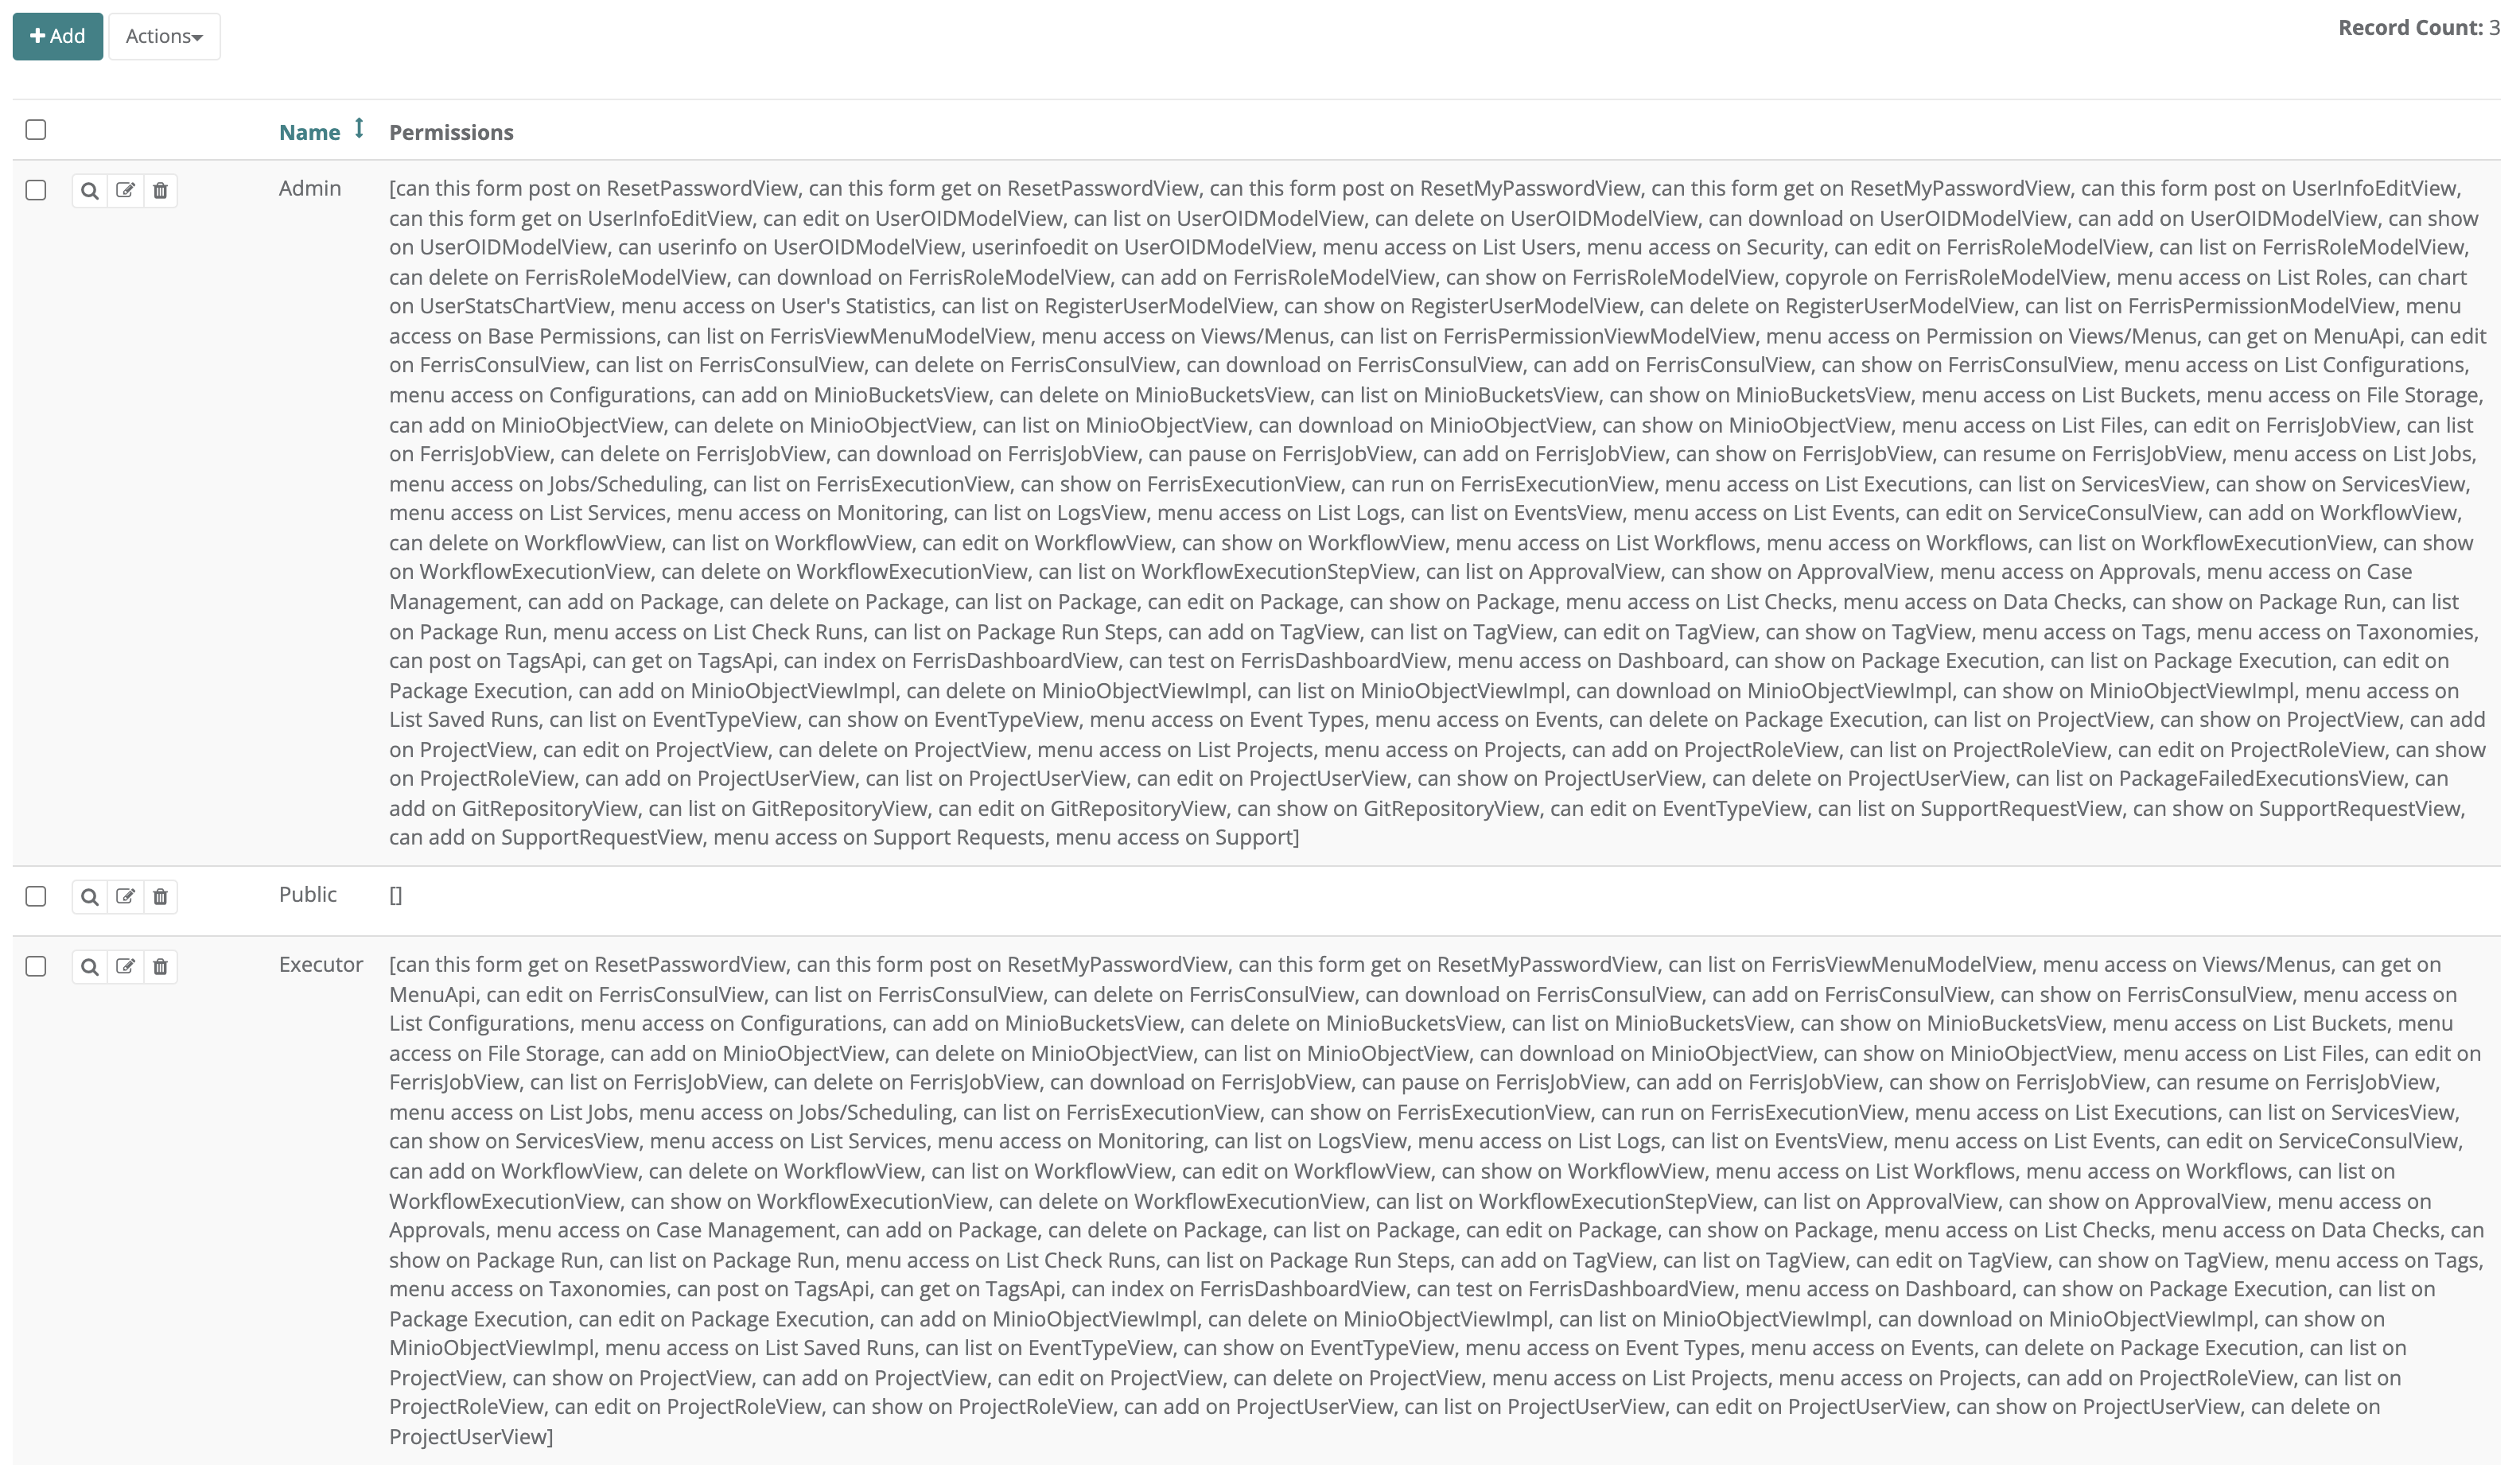
Example: List of StreamZero Roles
Besides displaying the list of all available Roles, the Roles page offers a number of capabilities:
- Add Role

- Actions

- Show Roles

- Edit Roles

- Delete Roles

Note that each of these capabilities depends on the Permissions given to your Role. Some roles may be given full rights (e.g. add, show, edit, delete), where others may only be given viewing rights (e.g. show). As a result, some users may only be seeing the “Show Roles” magnifying glass icon.
Add new Role
Adding a new Role can be done directly within StreamZero by any person who has the necessary permissions to do so. This is normally a designated Security Lead.
Often times, adding new Roles is done by integrating StreamZero with the corporate Identity Access Management (IAM) and Active Directory (AD).
Click on the plus sign
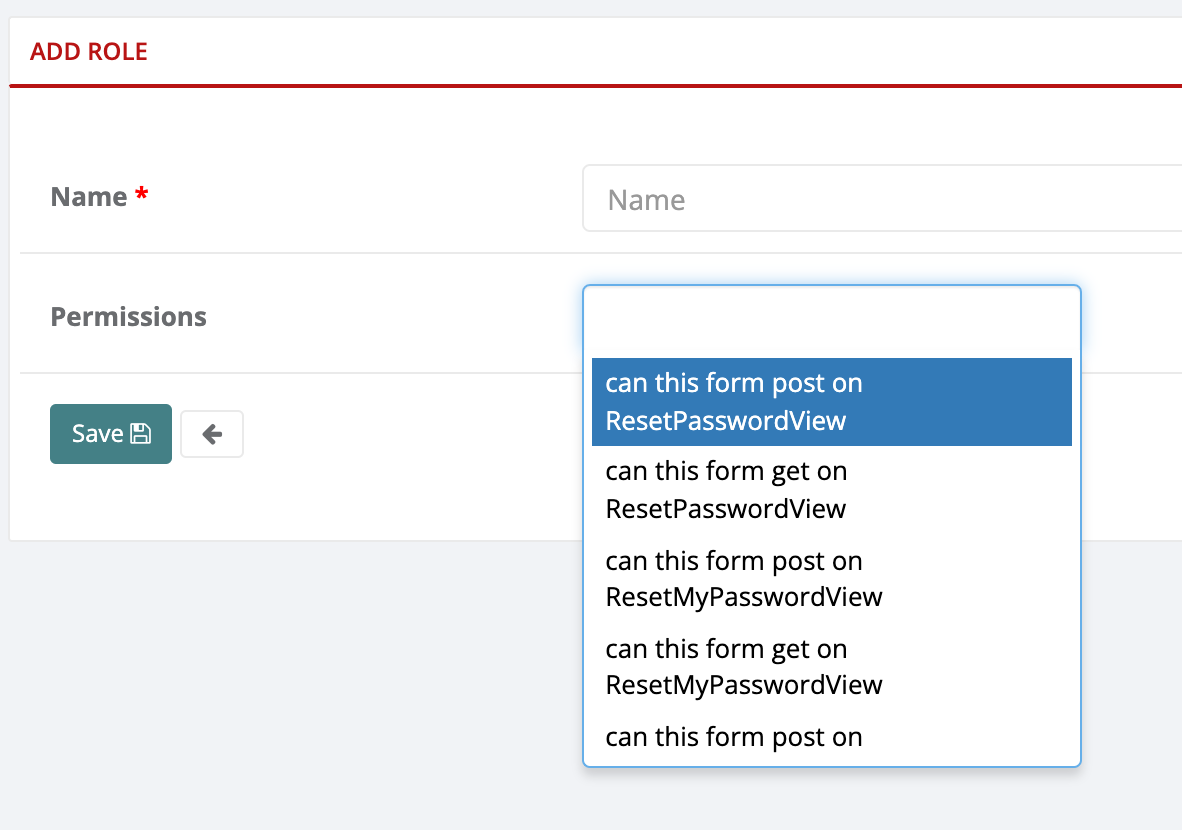
Example: Adding a new Role and Permissions
-
Name: Use a meaningful name for the role, and consider applying naming standards for all Roles
-
Permissions: Chose from the previously setup list of #Permissions
Note that it possible, and common practice, to apply multiple roles to a user. Therefore it is a good idea to keep the number of permissions within one role to a minimum. This enables the enforcement of the “need-to-know” basis for each role.
Actions
In order to apply an Action, first select the Role you want the action to apply to.
- Select a Role then click Actions > Copy Role > click Yes to confirm
- The Role is now copied and can be found in the list of Roles as "[original role name] copy"
5.3 - Users
Users
This is us - humans - using StreamZero on a day to day basis. And in this section each user is listed with the most important attributes defininig name, e-mail, status and - most importantly - the associated roles.
To get the the Users page, navigate to: Security > List Users
Example: List of StreamZero Users
Besides displaying the list of all current users, the Users page offers a number of capabilities:
- Add User
- Show User
- Edit User
- Delete User
Note that each of these capabilities depends on the Permissions given to your Role. Some roles may be given full rights (e.g. add, show, edit, delete), where others may only be given viewing rights (e.g. show). As a result, some users may only be seeing the “Show User” magnifying glass icon.
Add new User
Adding a new User can be done directly within StreamZero by any person who has the necessary permissions to do so. This is normally a designated Security Lead.
Most often though, adding new Users is done by integrating StreamZero with the corporate Identity Access Management (IAM) and Single Sign On (SSO) system.
Click on the plus sign
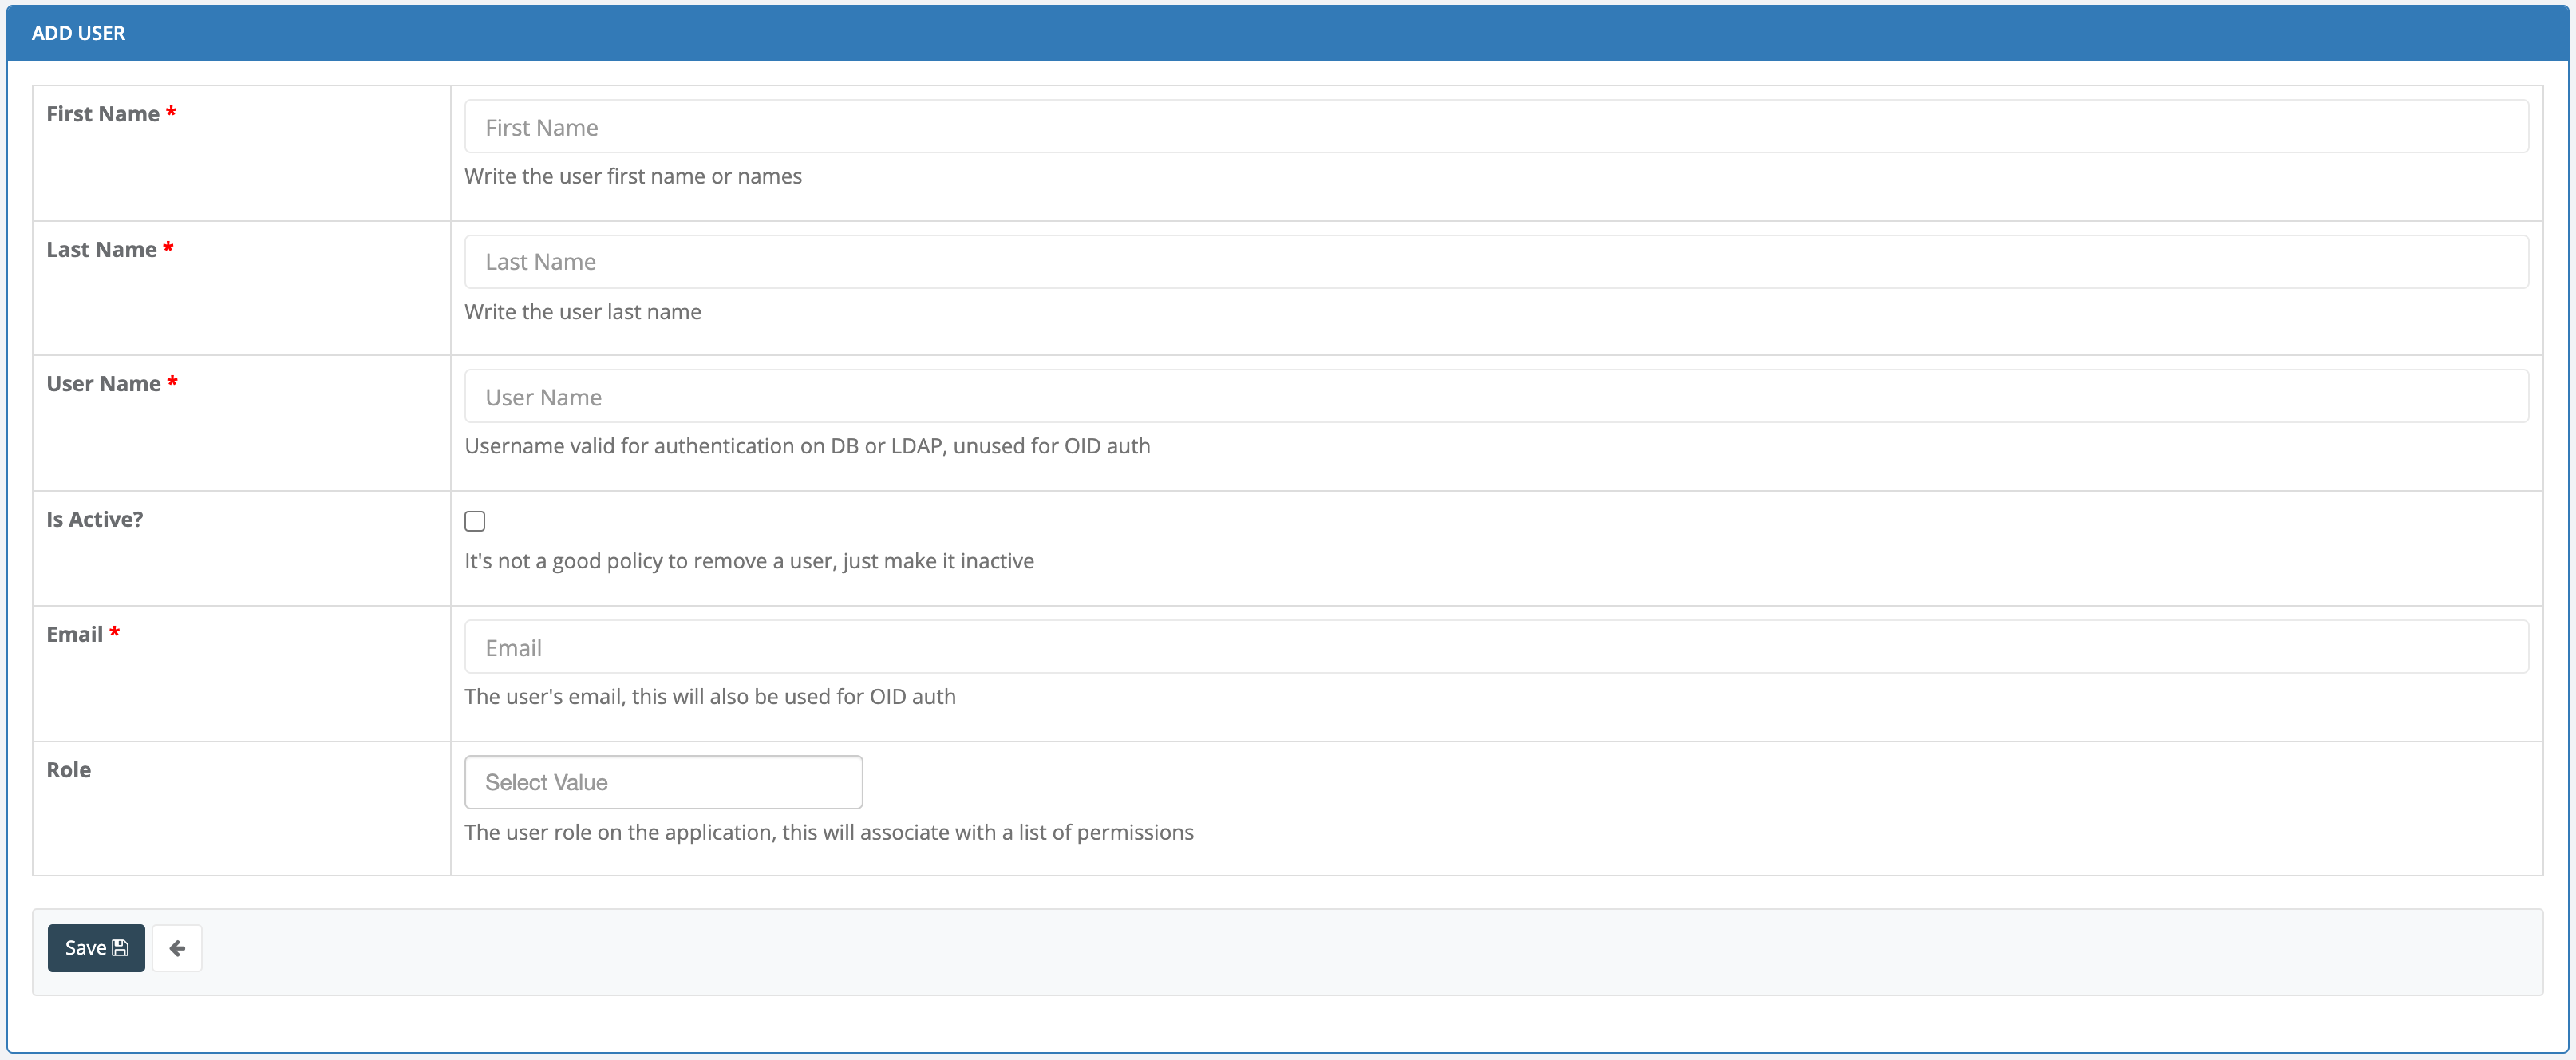
Example: Adding a new StreamZero User
-
First Name, Last Name: Full first and last name of the user
-
User Name: Apply any name or e-mail, but it is advised to adhere to a standard applied to all users.
Possible options may include: Email, Company User ID, first name only or full name
-
Is Active: Keep this boxed checked as long as the user is actively using Ferris.
Uncheck the box once a user is no longer using Ferris. Delete the user after a prolonged period of inactivity.
-
Email: The users email is the primary means of identification and communication.
-
Role: This is where one or more roles - and therefore permissions - are associated with each user.
Roles are setup in advance, and only already existing roles may be selected. A user may be associated to multiple roles.
-
Save: Always save!
Show User
Click on the spyglass icon
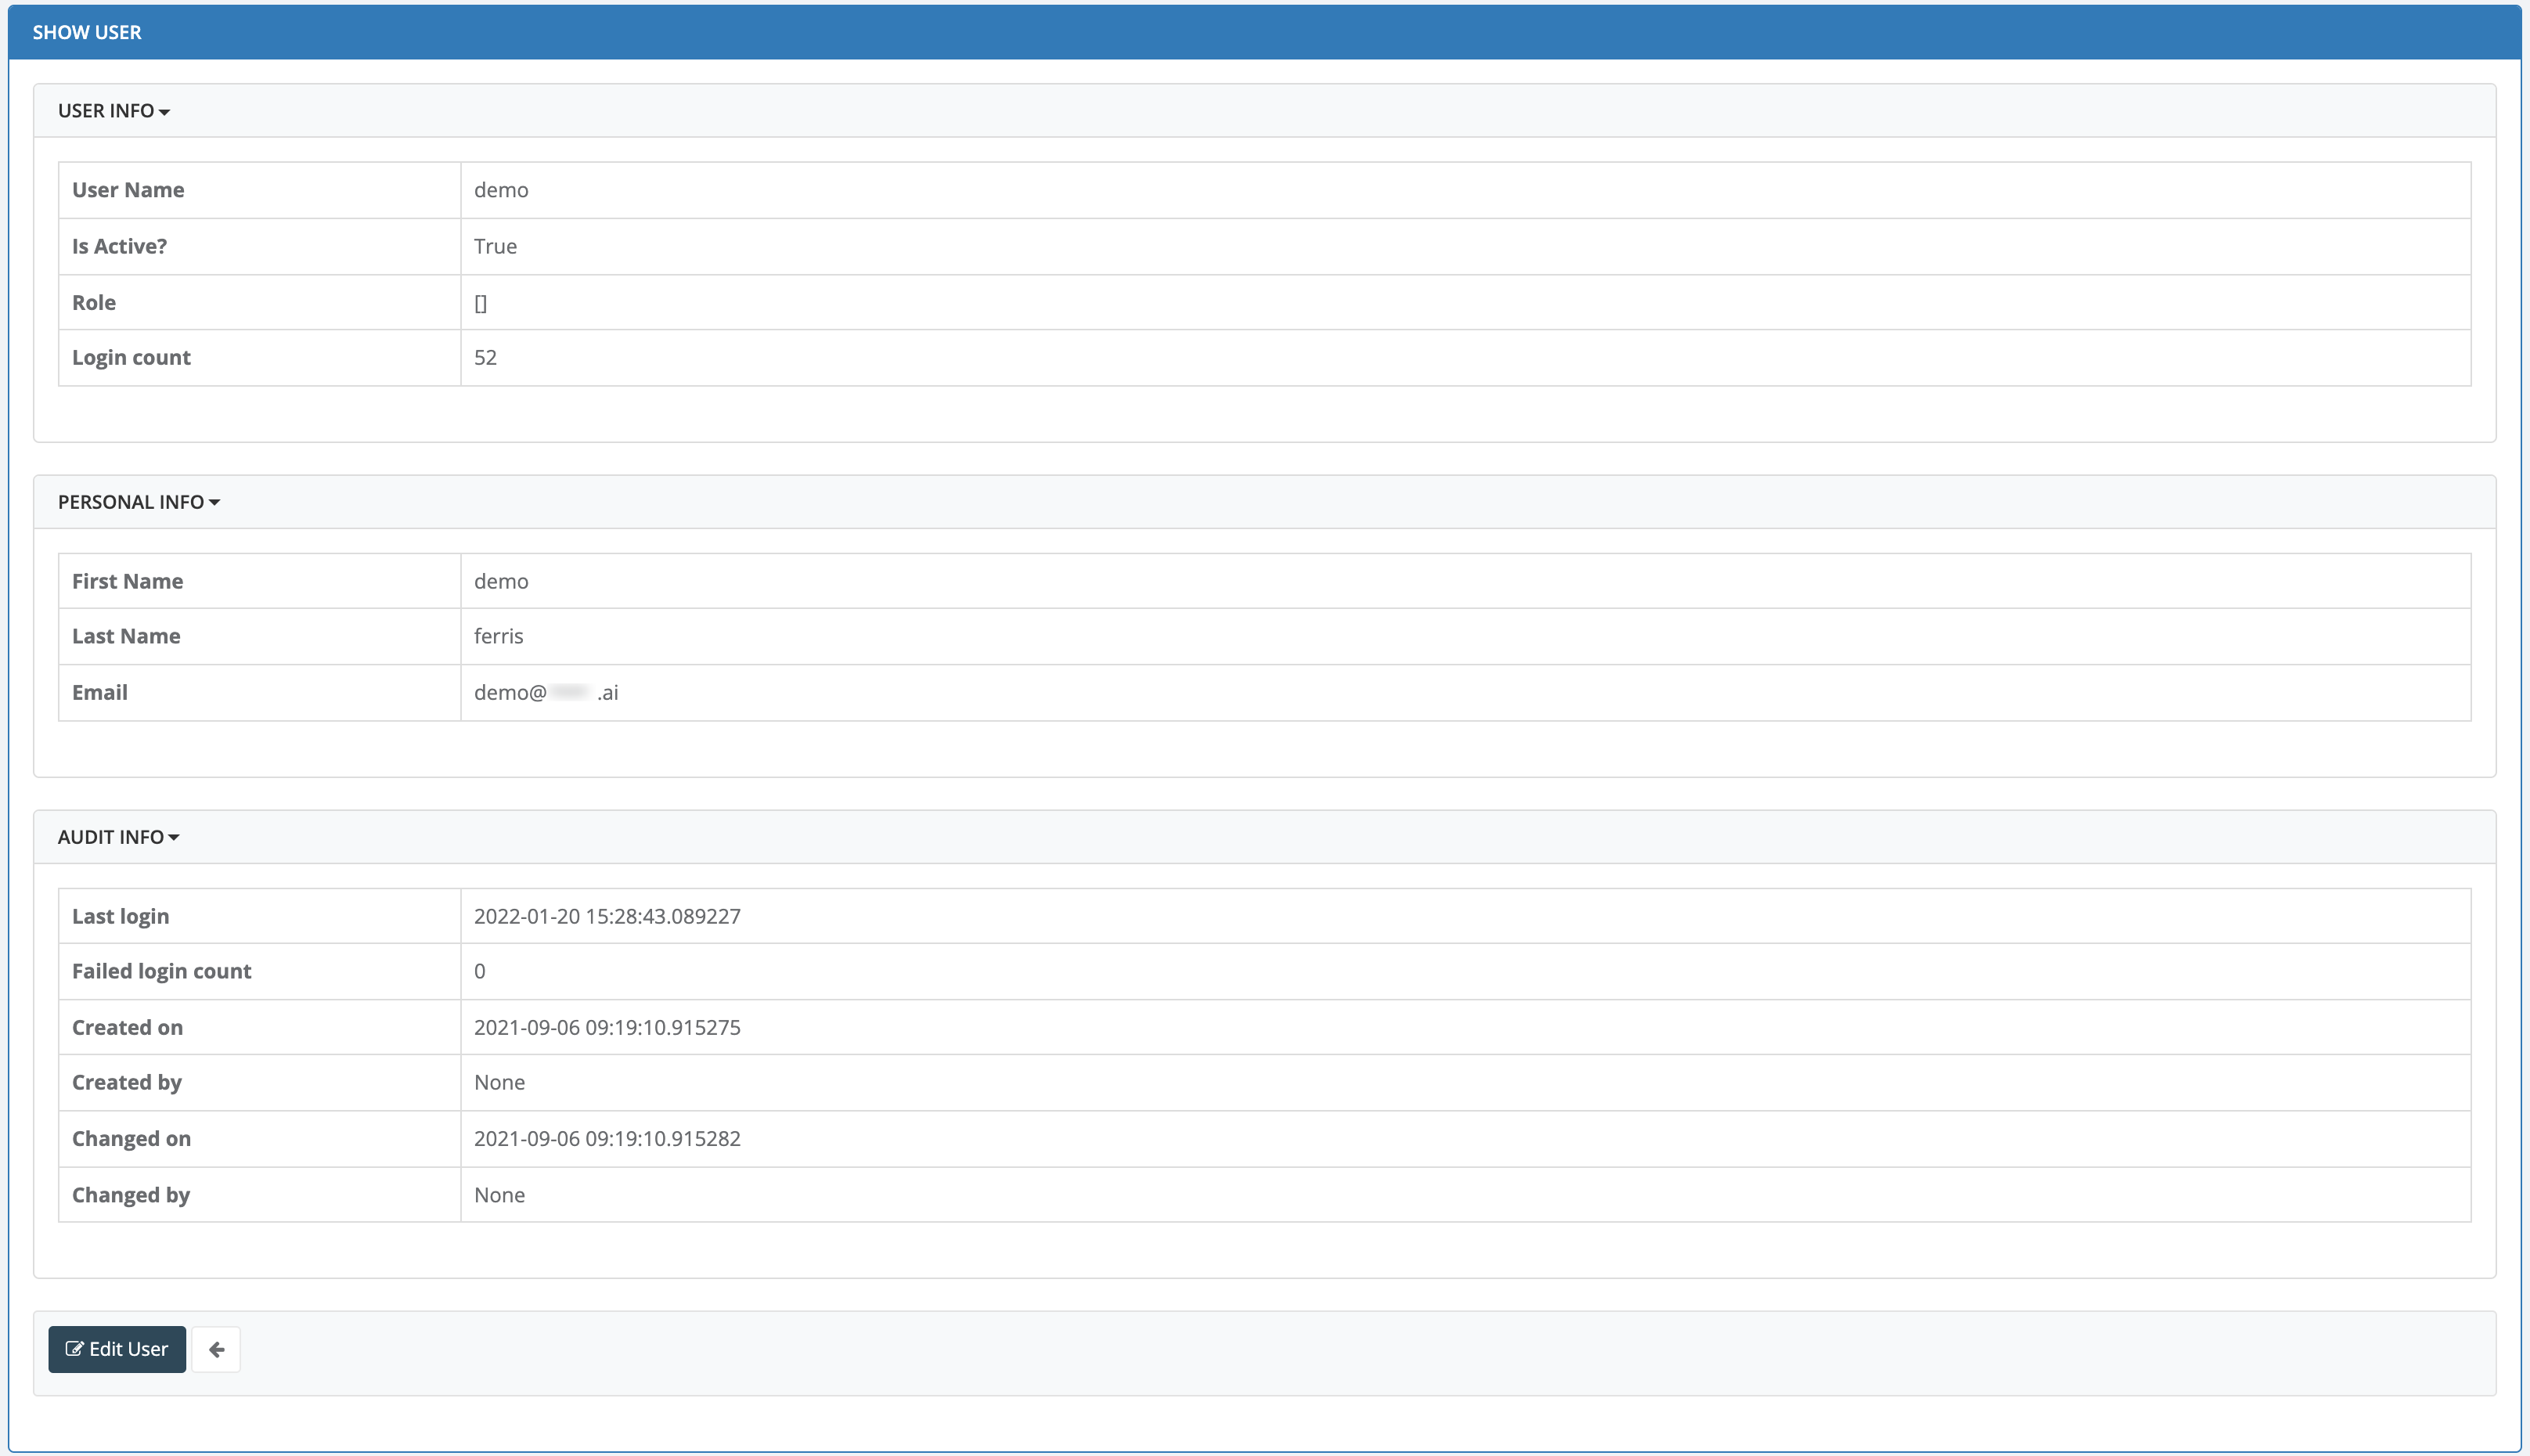
Example: View only List of StreamZero Users
User Info
- User Name: displays user name
- Is Active: shows whether the user is set to active or inactive. Note that an inactivated user may not be able to loginto Ferris
- Role: Associated roles
- Login Count: Count of how many times the user has logged in in total
Personal Info
- First Name: First name as given during setup. This name may also be provided from the corporate directory
- Last Name: Last name as given during setup. This name may also be provided from the corporate directory
- Email: Email as given during setup. This email may also be provided from the corporate directory
Audit Info
- Last login: Last successful login date and time
- Failed login count: Number of unsuccessful login attempts
- Created on: Exact date and time this user was created (manually or via corporate SSO)
- Created by: StreamZero User or corporate integration service
- Changed on: Exact date and time this user was edited (manually or via corporate SSO)
- Changed by: StreamZero User or corporate integration service
Edit User: Depending on your user rights (permission level) you may be able to enter the Edit function.
Back arrow: go back to the List Users page.
Edit User
Editing User details such as name, email or even Role(s) may be done here.
Note though that if the StreamZero Security is integrated with the corporate Identity Access Management (IAM), adding or removing Roles should be done there in order to ensure the change is permanent and not overwritten at the next syncronization.
Click on the edit icon
Delete User
Delete Users permanetly from Ferris.
Note though that if the StreamZero Security is integrated with the corporate Identity Access Management (IAM), deleting users should be done there in order to ensure the change is permanent and not overwritten at the next syncronization.
Also note that before permanetly deleting a user from Ferris, it is advised that the status of the user is first set to “inactive” for a period of time, and until it is sure that the user will not be reactivatet.
Click on the delete icon
5.4 - Statistics
Users Statistics
Here a Security Lead finds useful information on any user’s successful as well as failed login attempts.
Navigate to: Security > User’s Statistics
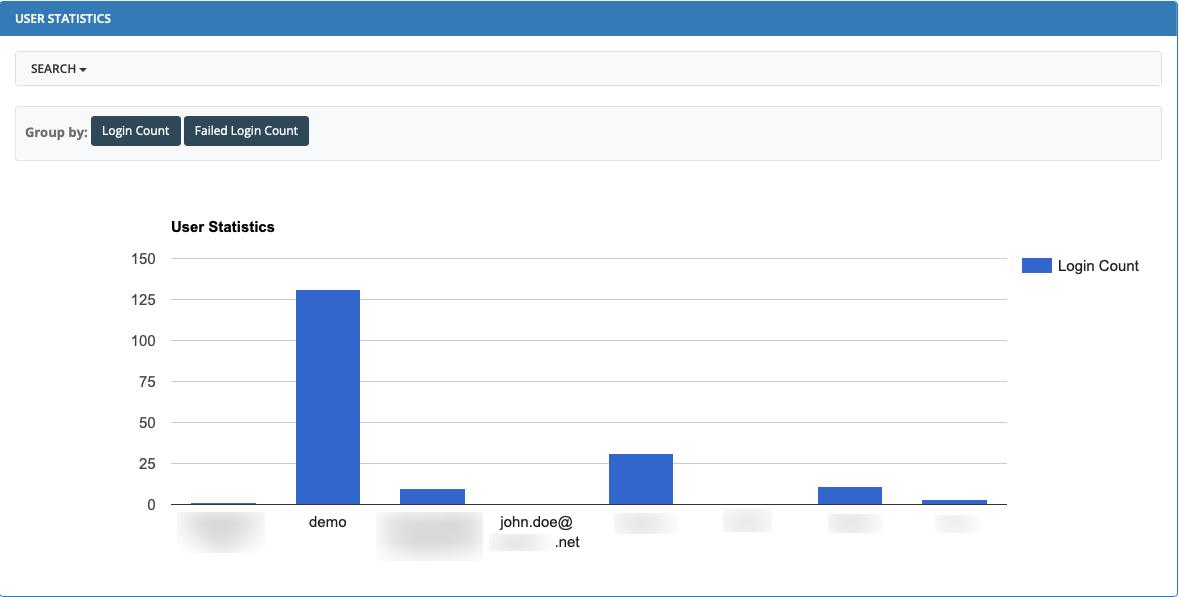
Example: Users Statistics > Login count
6 - Solutions
6.1 -
Balance Sheet Quality Control
Executive summary
It is a routine task for the banks to assess the balance sheet quality for their corporate clients on an annual basis and to categorize them according to the risk ratings. The use case contributes to the optimization of this routine task by automating the balance sheet comparison process and setting up smart notificaton mechanism.
Problem statement
Target market / Industries
Solution
The solution
Balance Sheet Quality Control Model - different use case - for financial services -banks would have to identify the balance sheet quality for the corp clients - look on the balance sheet annually - analize and to give different risk ratings - use case automation of the risk assessment - skip the balance sheets that are very similar to previous years. If significant change - analyze manually - SEPARATE USE CASE - Notification Hierarchy! - depending on the event found in the balance sheet - different people need to be notified.
The solution included:
Slide
Stakeholders
Data elements, Assets and Deliverables
As an Input from the client, the following items were used:
Assets & Artefacts:
The deliverables included:
Impact and benefits
The use-case implementation resulted in:
Testimonials
“…” — Mr. XXX YYY, Title, Company ZZZ.
Tags / Keywords
6.2 -
Corporate Clients Quality Assessment
Executive summary
Implemented a fully automated data ingestion and orchestration system for the structural assessment of Corporate Client‘s balance sheets. Designed and implemented a two-level approach that includes both existing and publicly available information in a structured or semi-structured format. Extraction of relevant changes which are then compared to prior periods, explicit new data deliveries or internal policy baselines and thresholds.
Problem statement
Often banks are facing high staff turnover rate and general lack of advisory staff that is resulting in lack of client intelligence. Detailed client profiles either does not exist or outdated and does not reflect the latest situation. As a result it is hardly possible to increase the share of wallet of existing corporate clients.
Target market / Industries
Target industry for this use-case is Financial Services – Banks, Insurances, Asset Management Firms
Solution
The solution is aimed to understand which corporate clients are able to gain a bigger share of wallet. Using the publicly available information, such as news and social media, the selling proposition for those clients is outlined. At the next stage the segmentation of those clients is performed to understand how much efforts need to be put to increase share of wallet and to shortlist most prominent of them. This use case can be effectively combined with the Churn Analysis use-case.
Stakeholders
-Sales management
- Sales staff / Relationship Management
- Key Account Management
Data elements, Assets and Deliverables
As an Input from the client, the following items were used:
- Client base
- Transaction / product usage history
Assets & Artefacts:
The deliverables included:
Impact and benefits
The use-case implementation resulted in:
Testimonials
“…” — Mr. XXX YYY, Title, Company ZZZ.
Tags / Keywords
6.3 - Automating Marketing Data Analysis
Marketing Data Analysis
Executive summary
Implemented the first service- and on-demand based big data and data science infrastructure for the bank. Data pipelines are built and maintained leveraging two key infrastructure components: a custom-built aggregation tool and the marketing content & event platform. The aggregation tool builds the data lake for all analytics activities and enables the marketing platform to organically grow customer and campaign projects.
Problem statement
Relationship Managers spend too much valuable time researching talking points and themes that fit their different client profiles. A simple product recommender usually cannot grasp the complexity of private banking relationships and hence the product recommendations are usually without impact.
Target market / Industries
Private banking, wealth management, All relationship intense industries, i.e. insurance
Solution
Jointly with the client we developed a private banking marketing ontology (knowledge graph or rule book) that enabled various Machine Learning (ML) models to parse broad catalogue of unstructured data (financial research, company analysis, newsfeeds) to generate personalized investment themes and talking points.
The solution included:
- Private banking marketing ontology
- Thematic aggregator agents
- Personalized clustering
Slide
Stakeholders
- Head of marketing and campaigns
- Market heads
- Relationship Manager
- Chief Investment Officer
Data elements, Assets and Deliverables
As an Input from the client, the following items were used:
- Access to CRM details
- Client transaction history
- Research details
Assets & Artefacts:
- Financial Product Classification
- Product Risk Classification
- Event Lifecycle
The deliverables included:
- Private banking marketing ontology
- Thematic aggregator agents
- Personalized clustering
- End to end event cascade and workflow integration
Impact and benefits
Achieve a fully transparent Close the Loop on Campaigns and increased RoMI by 18%. Furthermore, this first mover program established the big data sandbox as a service capability to the entire bank. Also this project enabled marketing for the first time to close the loop between their digital client touchpoints and the events and campaigns run.
The use-case implementation resulted in:
- +18% increase in RoMI (return on marketing investments)
- -17% savings on campaign spend
Testimonials
“Using StreamZero we were able to digest a massive amount of text and extract personalized investment themes which allows our RMs to increase their face time with the clients and surprise them with the meaningful content.” — Mr. R. Giger, Head of Marketing and Campaigns, Swiss Private Bank
Tags / Keywords
#marketdataanalysis #bigdata #bigdatainfrastructure #datascience #datascienceinfrastructure #financialservices #bank
6.4 - Churn Analysis and Alerting – Financial Services
Churn Analysis and Alerting
Executive summary
Screening your existing client population for signs of dissatisfaction and pending attrition can involve a broad range of analysis. Usually the focus is given to transaction pattern analysis. And while this may prove helpful it can be misleading in smaller banks with limited comparative data. We thus integrate a broader variety of less obvious indicators and include an advisor based reinforcement loop to train the models for a bank‘s specific churn footprint.
Problem statement
When clients close their accounts or cancel their mandates, it usually does not come as a surprise to the Relationship Manager (RM). But for obvious reasons, the RM tries to work against the loss of a client with similar if not the same tools, processes and attitudes that have led to a client being dissatisfied. This is not to say that the RM manager is the sole reason for churn. But often clients do not or not sufficiently voice their issues and simply quit the relationship. To search, become aware and then listen for softer and indirect signs is at the heart of this use case.
Target market / Industries
The described use case can be efficiently applied to any industry that is providing services to a large number of clients and has a large number of transactions. Particularly following industries are benefiting most of this use-case:
- Financial services
- Insurance
Solution
Using historical data, client communication and structured interviews with client advisors, we create a bank-specific churn ontology, that is then used to screen existing clients on an ongoing basis. Creating an interactive reinforcement loop with new churn-cases, this classification, predictor and indicator approach is ever more fine tuned to specific segments, desks and service categories. As direct and ongoing Key Performance Indicators (KPIs) churn ratios and client satisfaction are measured alongside Assets under Management (AuM), profitability and trade volumes for the respective clients are classified as “endangered”. Usually a gradual improvement can be monitored within 3-6 months from the start of the use case.
The solution included:
- Initial typical churn cause analysis based on historical data (client positions, and transactions)
- Ideally inclusion of CRM notes and written advisor to client communication (prior to churn)
- Sales & Churn Ontology setup & subsequent ontology matching
- Identification of likely bank churn footprint & learning / improvement loops
- Aggregation of findings, reporting, alerting & action notifications
Stakeholders
- Chief Operations
- Client advisory, Relationship and Sales management
Data elements, Assets and Deliverables
As an Input from the client, the following items were used:
- Historic data about churned clients
- Client portfolios - positions / transactions
- Ideally pre-leave client-advisor communications
Assets & Artefacts:
- Client Behavioral Model
- Churn Prediction
- Action Monitoring
The deliverables included:
- Sales & Churn Indicator Ontology
- Use case specific orchestration flow
Impact and benefits
Lowered churn rates for distinct client segments by 16% after 6 months. Increased AuM / trades for clients „turned-around“ by about 25% within 6 months after “re-win”.
The use-case implementation resulted in:
+8% clients saved prior to loss of relationship
+24% reduction of customer asset outflows
Testimonials
“Changing the attitude we deal with churn from feeling like a failure to working a structured process, made all the difference. Turning around a dissatisfied client is now something transparent and achievable.” — Mr. Roland Giger, Head of Client Book Development, UBS
Tags / Keywords
#churn #churnanalysis #financialservices #insurance #bank #retention #clientretention #customerretention
6.5 - Classification of products along different regulatory frameworks
Classification of products along different regulatory frameworks
Executive summary
Multi-dimensional and ontology-based classification of products along different regulatory frameworks and systematic mapping of the company’s internal specialist expertise in a knowledge graph that can be used by both humans and algorithms or other systems.
Problem statement
Depending on the applicable regulation, the products and materials need to be classified for further usage. This requires an effective classification approach and also involves the challenge of knowledge management. Respective product / material information need to be extracted from various sources, cuch as core systems, product information systems, etc. This task usually requires lots of time-consuming manual work utilizing the domain knowledge.
Target market / Industries
The use case can be efficiently applied in the following industries:
- Financial services
- Manufacturing
- Retail
Solution
The solution is based on analyzing the domain knowledge and converting it into ontology. Domain knowledge is used as an input for the Machine Learning (ML) model: ontology-based annotator component is analyzing the available data, be it text, unstructured or semi-structured data and feed it into the ML model to perform the classification. The event-based workflow increases the efficiency and stability of the classification process.
Stakeholders
- Management
- Product management
- Domain experts
- Management
Data elements, Assets and Deliverables
As an Input from the client, the following items were used:
- Domain expertise in the ontology
- Detailed data that needs to be classified
Assets & Artefacts:
- Ontology-based annotator (DFA)
- Workflow engine
The deliverables included:
- Automated classification data or documents – final workflow
Impact and benefits
The classification process, that cannot be done manually with reasonable manpower and time resources is now automated.
Tags / Keywords
#classification #classificationofproduct #classificationofmaterial #classificationautomation #automation #production #financialservices #production #retail
6.6 - Curn Analysis and Alerting – General
Churn Analysis and Alerting
Executive summary
Screening your existing client population for signs of dissatisfaction and pending attrition can involve a broad range of analysis. Usually the focus is given to transaction pattern analysis. And while this may prove helpful it can be misleading in smaller companies with limited comparative data. We thus integrate a broader variety of less obvious indicators and include an advisor based reinforcement loop to train the models for a company’s specific churn footprint.
Problem statement
When clients close their accounts or cancel their subscriptions, it usually does not come as a surprise to the sales management. But for obvious reasons, the sales manager tries to work against the loss of a client with similar if not the same tools, processes and attitudes that have led to a client being dissatisfied. This is not to say that the sales manager can the sole reason for churn. But often clients do not or not sufficiently voice their issues and simply quit the relationship. To search, become aware and then listen for softer and indirect signs is at the heart of this use case.
Target market / Industries
The described use case can be efficiently applied to any industry that is providing services to a large number of clients and has a large number of transactions. Particularly following industries are benefiting most of this use-case:
- Retail
- Entertainment
- Mass media
Solution
Using historical data, client communication and structured interviews with sales people, we create a company-specific churn ontology, that is then used to screen existing clients on an ongoing basis. Creating an interactive reinforcement loop with new churn-cases, this classification, predictor and indicator approach is ever more fine tuned to specific segments and service categories. As direct and ongoing KPIs churn ratios and client satisfaction are measured alongside generated revenues, profitability for the respective clients are classified as “endangered”. Usually a gradual improvement can be monitored within 3-6 months from the start of the use case.
The solution included:
- Initial typical churn cause analysis based on historical data (client positions, and transactions)
- Ideally inclusion of CRM notes and written sales to client communication (prior to churn)
- Sales & Churn Ontology setup & subsequent ontology matching
- Identification of likely company churn footprint & learning / improvement loops
- Aggregation of findings, reporting, alerting & action notifications
Stakeholders
- Chief Executive
- Chief Operations
- Sales and Marketing
Data elements, Assets and Deliverables
As an Input from the client, the following items were used:
- Historic data about churned clients
- Client portfolios - positions / transactions
- Ideally pre-leave client-advisor coms
Assets & Artefacts:
- Client Behavioral Model
- Churn Prediction
- Action Monitoring
The deliverables included:
- Sales & Churn Indicator Ontology
- Use case specific orchestration flow
Tags / Keywords
#churn #churnanalysis #retail #entertainment #massmedia #retention #clientretention #customerretention
6.7 - First Notice of Loss Automation
Cross Jurisdictional First Notice of Loss Automation
Executive summary
The handling of cross-jurisdictional accident resolutions involving more than one country was automated for a pan-European insurance group.
Problem statement
The client was bound to a proprietary existing legacy core system which served all operational processes but did not lend itself to agile, digital use cases. Within the cross-jurisdictional context various third-party party core systems of partner network insurers also had to be integrated in the overall flow. In addition to already digital content, file-based and even handwritten forms of the European Accident Standard had to be taken into account. The growth of the customer did not allow for a continued manual processing.
Target market / Industries
Focused on Industry segments, but easily configured to work for similar case management related processes that involve expert knowledge combined with extensive manual fact checking.
Solution
The customer wanted to automate and streamline the handling and ideally straight-through-processing of new cases whenever the context allowed for such an option and involve the correct stakeholders when a human resolution was called for. An existing data warehouse provided historic resolution data that could be used to train various Machine Learning (ML) models. In addition, a knowledge graph contained the expertise on how the company wanted to deal with certain constellations in the future.
The solution included:
- Ingestion of all relevant base data into a use case message bus
- Automated plausibility check of the base claim (e.g. policy paid, client = driver, couterparty validity)
- ML model to assess “Fast Track” options (depending on likely cost footprint)
- Helper ML models to assess cost for vehicle, medical and legal cost
- Curation model to extend “fast track” rules within knowledge graph
Example Use Case Agent Cascade
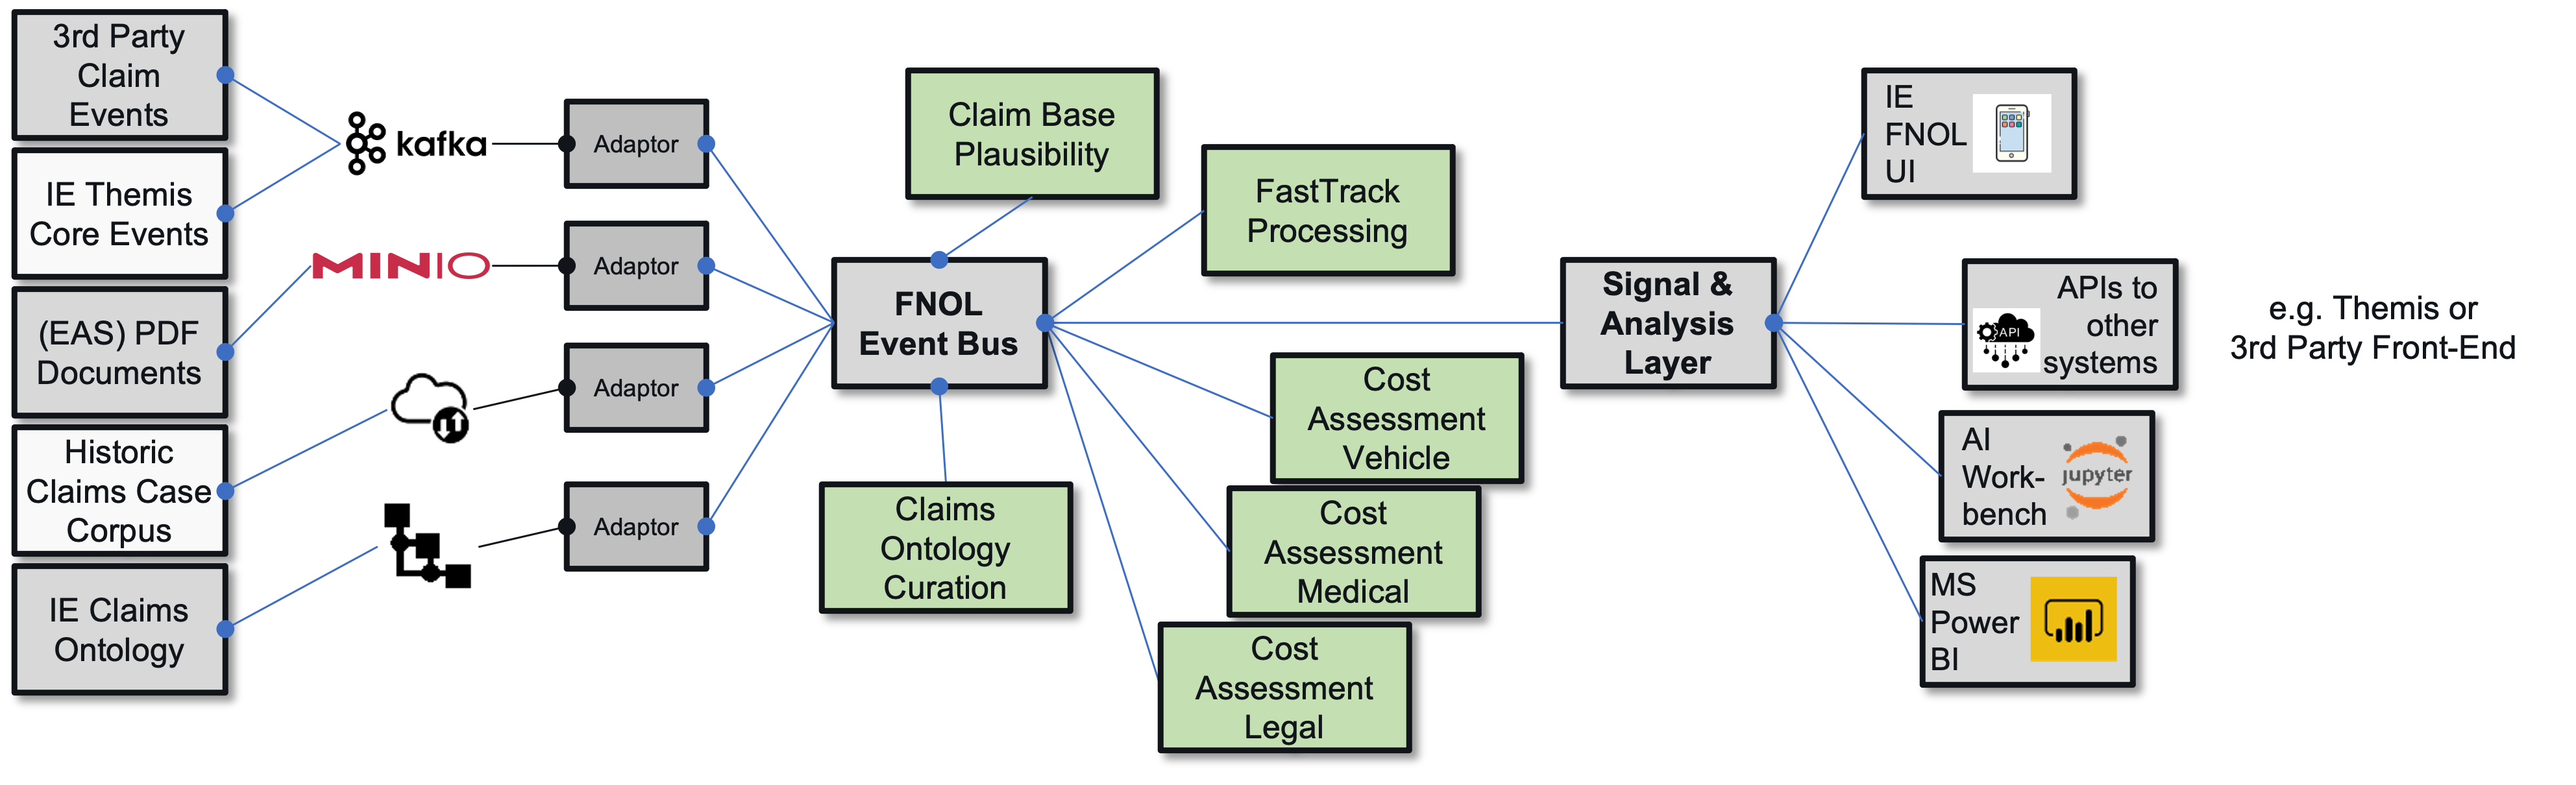
Stakeholders
- Head of Operations / Claims Handling
- Domain Expert for Motor Vehicle Accidents Underwriting
- Domain Expert from Accounting & Controlling
- Tech Expert for mobile field agent application
- Tech Expert for core system
Data elements, Assets and Deliverables
As an Input from the client, the following items were used:
- Core data items on policies, clients, risk vs. claim details
- Core data from insurance partner network
- Historic claims & claim resolution data warehouse
Assets & Artefacts:
- Claims knowledge graph & ontology
- Vehicle, medical and legal cost assessment prediction models
- Fast track viability assessment model
- Ontology curation / extention model
The deliverables included:
- Automated decisioning on human vs. straight-through-processed case handling
Impact and benefits
The use-case implementation resulted in:
- the client was able to manage a +35% annual growth with fewer headcount (-3 FTE)
- turnaround times of automated cases could be reduced by >90%, from 8-10 working days to 1 day
- turnaround times of manual cases could be reduced by 30% due to elimination of manual triage
- the initial use case paved the way for additional AI based automation ideas
Testimonials
“We were sceptical about the limits of automation with rather difficult data quality we initially set out with. The learning loop for both the agents involved as well as the predicition models was a true surprise to me.” — Mr. Okatwiusz Ozimski, Inter Europe AG
Tags / Keywords
#insurance #firstnoticeofloss #FNOL
6.8 - Idea to Trade / Next Best Product - Financial Services
Idea to Trade / Next Best Product
Executive summary
To support advisors and clients with a “next best product” recommendation, a closed loop flow has been established from Research / Chief Investment Officer to Relationship Managers and eventually to the client. Evaluating which recommendations worked for RMs and Clients allowed for a learning loop informing Research & CIO to improve selection & tailoring of investment themes.
Problem statement
The information flow from research or strategic asset allocation (CIO) to client advisors and eventually to clients does rarely follow a structured path. Instead the bank‘s “house view” is communicated broadly to all front-office staff and portfolio managers. They then use their direct client relationship to assess risk appetite and extract specific investment themes or ideas from their client interaction. If these match, the resulting research / advice is forwarded to the client. It seems like a lucky punch if product information leads to a trade / product sale.
Target market / Industries
The challenge of customizing the offering to the customer profile is a common challenge across the industries. Financial services industry is benefiting most from this use case that can be efficiently applied e.g. in Industries, that are benefitting most of this use-case are:
- Banks
- Investment and finance firms
- Real estate brokers
- Tax and accounting firms
- Insurance companies
Solution
Starting with investment themes / product and occasion specific sales / investment opportunities, the existing client‘s portfolios and client to bank communication is screened for possible gap / fit. Research or asset allocation can then focus their efforts on topics suggested by front-office staff and / or clients themselves. Observing and identifying trade success the best practices are understood and can be multiplied across other (similar) client scenarios. Asset allocation and advisors work collaboratively as they both evaluate which information / proposals / investment ideas are forwarded to clients (and then accepted or not) and which ones are kept back by advisors (and for what reasons).
The solution included:
- Clustering & topic mapping of existing marketing material & client portfolio structures
- Optionally inclusion of CRM notes and written advisor to client communication
- Sales Ontology setup & learning loop inclusion & topic matching
- Identification of individual investment themes / topics of interest
- Aggregation of findings, reporting, alerting & action recommendation
Stakeholders
- Chief Investment Officers (CIO)
- Client Advisors / Relationship Managers
- Product Managers
Data elements, Assets and Deliverables
As an Input from the client, the following items were used:
- Sales organization setup (desks / books)
- Client to Client / Client to Company graphs
Capabilities utilized:
- Unstructured Data
- Semantic Harmonization
- Natural Language Processing
- Personalization
Assets & Artefacts:
- Financial Product Ontology
- Analytical CRM Models
The deliverables included:
- Sales & Onboarding Ontology
- Use case specific orchestration flow
- Integration with many info sources
Impact and benefits
Proposal / offer conversion rates were increased by 42% after an initial learning curve & algorithm calibration phase of 6 months resulting in additional Asset under Management growth of 8% from targeted clients.
The use-case implementation resulted in:
+18% increased targeted product sales
+8% share of wallet
Tags / Keywords
#ideatotrade #nextbestproduct #salesadvice #financialservices #bank #insurance #investment
6.9 - Idea to Trade / Next Best Product - General
Idea to Trade / Next Best Product recommendation
Executive summary
To support sales people and clients with a “next best product” recommendation, a closed loop flow has been established from Marketing / Research to Sales and eventually to the client. Evaluating which recommendations worked for Sales and Clients allowed for a learning loop informing Product Management to improve selection & tailoring of the offerings.
Problem statement
The information flow from Development and Product Management to Sales and Marketing and eventually to clients does rarely follow a structured path. Instead the company‘s “house view” is communicated broadly to all staff. Sales then use their direct client relationship to assess customer needs and extract specific requirements or ideas from their client interaction. If these match, the resulting research / advice is forwarded to the client. It seems like a lucky punch if product information leads to a trade / product sale.
Target market / Industries
Any industry which has enough data about the customer to make a recommendation for the next action / product will greatly benefit from this use-case.
Solution
Starting with product review and occasion specific sales opportunities, the existing client‘s portfolios and client communication are screened for possible gap / fit. Research / Product Management can then focus their efforts on topics suggested by Sales and Marketing staff and / or clients themselves. Observing and identifying trade success the best practices are understood and can be multiplied across other (similar) client scenarios. Product Management and Sales work collaboratively as they both evaluate which information / proposals / products are presented to clients (and then accepted or not) and which ones are kept back (and for what reasons).
The solution included:
- Clustering & topic mapping of existing marketing material & client portfolio structures
- Optionally inclusion of CRM notes and written Sales to client communication
- Sales Ontology setup & learning loop inclusion & topic matching
- Identification of individual products / topics of interest
- Aggregation of findings, reporting, alerting & action recommendation
Stakeholders
- Top Management
- Sales and Marketing
- Product Managers
Data elements, Assets and Deliverables
As an Input from the client, the following items were used:
- Sales organization setup (desks / books)
- Client to Client / Client to Company graphs
Capabilities utilized:
- Unstructured Data
- Semantic Harmonization
- NLP
- Personalization
Assets & Artefacts:
- Product Ontology
- Analytical CRM Models
The deliverables included:
- Sales & Onboarding Ontology
- Use case specific orchestration flow
- Integration with many info sources
Tags / Keywords
#ideatotrade #nextbestproduct #salesadvice #crossindustry
6.10 - Intraday Liquidity Management Optimization
Intraday Liquidity Management Optimization
Executive summary
In order to avoid long internal lead times and to cater to stringent time-to-market expectations, an end-to-end Analytics Design and streaming real time analytics environment for group wide BCBS (Basel III) Intraday Liquidity Management was implemented. The bank’s predictive liquidity and cash management models were rebuilt from scratch using real-time streams from 13 different SWIFT messaging gateways.
Problem statement
All financial institutions need to be on top of their liquidity levels throughout the entire day. Since every organization usually experiencing many cash inflows and outflows during the day, it is diffcult to understand what are the currenct liquidity levels. To be compliant with the regulations, the liquidity levels need to be monitored. Having too much cash is not commerically viable and too little cash is too risky. Knowing the current cash levels the bank can adjust accordingly. The entire cash balancing act is based on the cascade of different events. Cash flow events and also cash-related events need to be integrated from various transaction management systems.
Target market / Industries
The use case is applicable in all regualted and cash-intence industries, i.e.
- Financial service
- Treasury departments of large corporations
Solution
During the use case implementation 16 different cash-flow generating order systems were integrated using different schemas of how they handle transactions. StreamZero Data Platform was able to resolve the complexities of the event handling to absorb all different situations and rules that need to be applied depending on the different states that the system can take. Data sourcing patterns evolved quickly from single file batch to data streaming using Kafka and Flink. A global end-user enablement was achieved with a multi network environment for regional user and both logical and physical data segregation. Irreversible client data protection using SHA 256 hash algorithm allowed for globally integrated algorithms in spite of highly confidential raw input data. We were able to implement dynamic throttling and acceleration of cash flows depending on current market situations and liquidity levels.
The solution included:
- Adaptor agents to 16 cash-flow generating systems
- Throttling and acceleration logic
- Machine Learning (ML) models for liquidity projection
- Harmonized event architecture
Stakeholders
- Group treasury
- Group risk and compliance
- CFO
Data elements, Assets and Deliverables
As an Input from the client, the following items were used:
- Cash-flows
Assets & Artefacts:
- Harmonized transactional event model
- Throttling and acceleration rule book
The deliverables included:
- End to end solution for intraday liquidity
Impact and benefits
The use-case implementation resulted in:
- 10 MCHF annual savings on liquidity buffers
- 23% reduction of operations & treasury staff
Testimonials
“Moving from a batch to a real-time liquidity monitoring was a substantial task that had countless positive knock-on effects throughout the organization.”
— Mr. Juerg Schnyder, Liquidity expert, Global universal bank
Tags / Keywords
#liquidity #liquiditymanagement #intradayliquiditymanagement #cashmanagement #BCBS #Basel3 #financialservices
6.11 - Metadata-controlled Data Quality & Data Lineage in Production
Metadata-controlled Data Quality & Data Lineage in Production
Executive summary
Metadata-controlled data quality & data lineage along the production chain integrated with a laboratory information system for monitoring and quality documentation of various BoM & formulation variations in the biochemical production of active pharmaceutical ingredients (preliminary production of active ingredients in transplant medicine).
Problem statement
Neither technical, nor rule based approaches can adequately help in raising data quality without domain expertise. Using the domain expertise to create the rules is time consuming and often not feasible from the manpower prospective.
Target market / Industries
The use case is applicable to any industry dealing with large volumes of data if insufficient quality, e.g.:
- Serial manufacturing
- Mass production
- Retail
- Financial services
- Cross-industry applications
Solution
The approach is based on few shot manual learning, when the expert creates a few dozens of examples with real-life data. Later on from these examples the model learns strategies to identify and correct data quality errors.
Example Use Case Agent Cascade
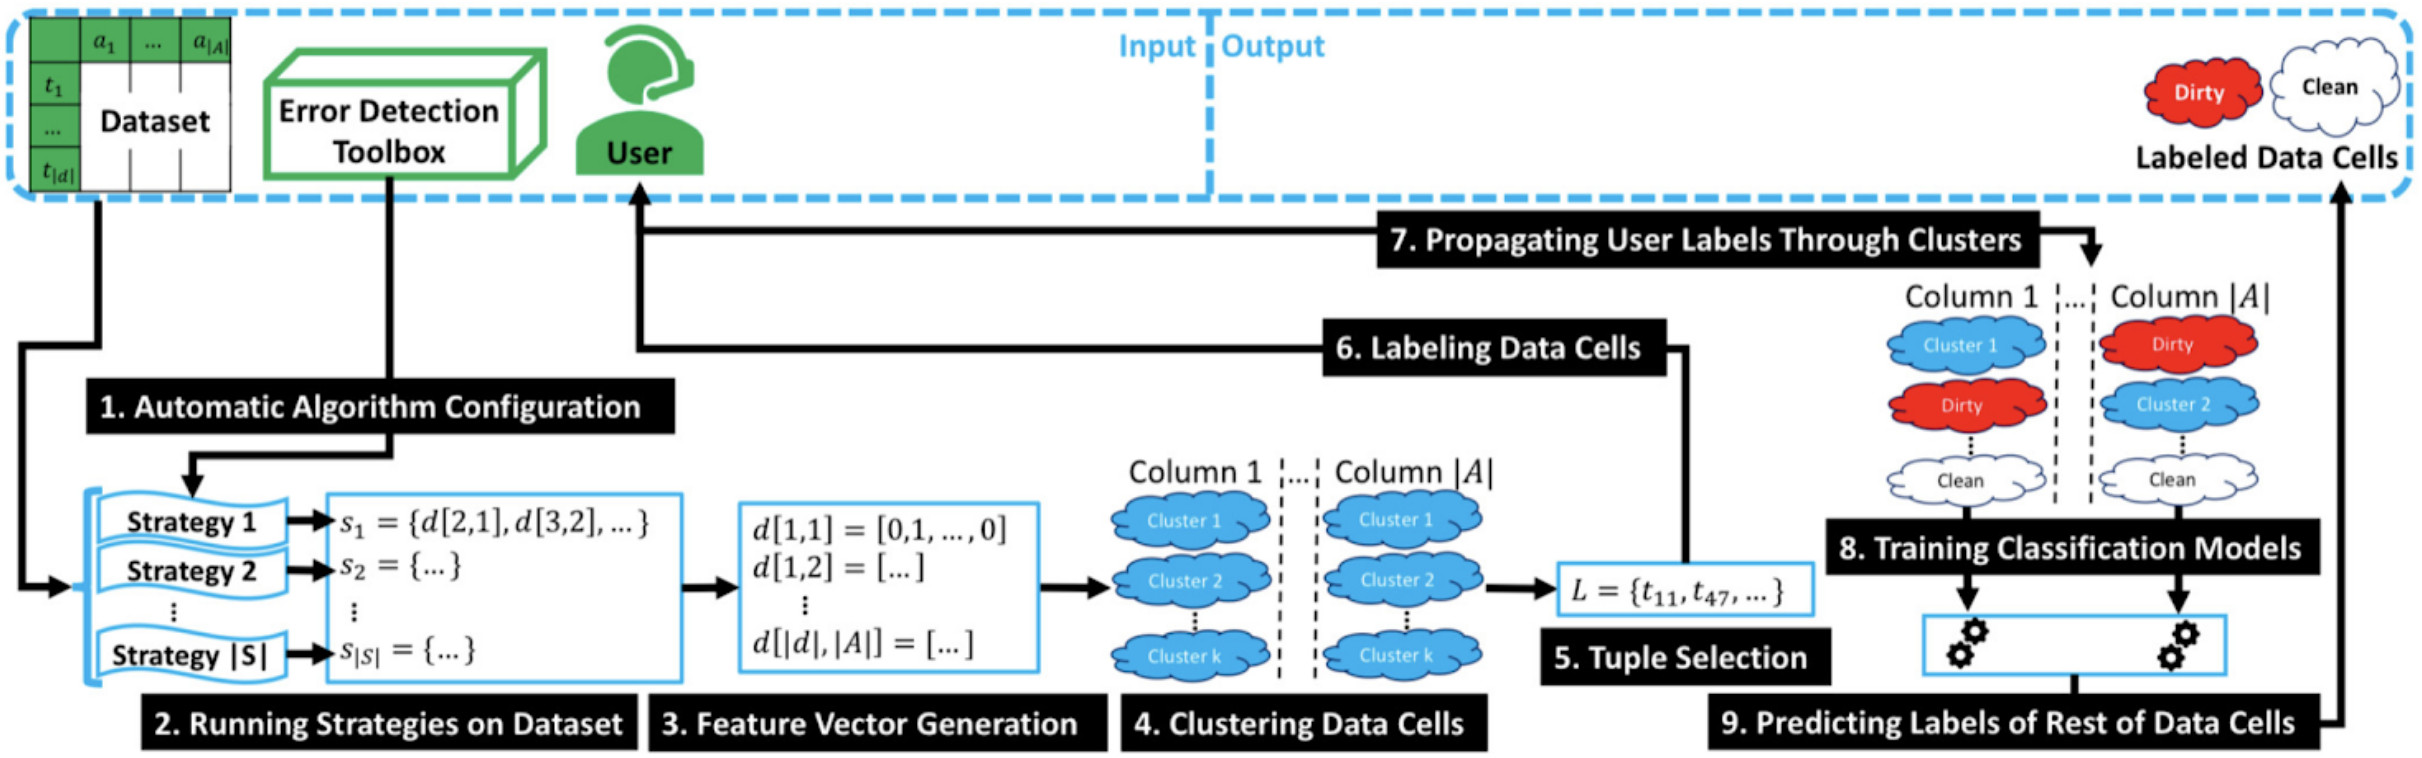
Stakeholders
- Domain experts
- Product data quality
- Functional experts
- Risk managers
Data elements, Assets and Deliverables
As an Input from the client, the following items were used:
- Detailed data sets where the quality to be improved
- 20-30 examples of errors and their manual corrections
- Judgement on automated model performance
Assets & Artefacts:
- StreamZero error correction toolbox
The deliverables included:
- Customized data quality improvement workflow
Impact and benefits
The use case implementation allows to address data quality issues in an efficient manner with high quality of the process automation. If the data quality management process would remain manual, this would result in 5-6 Full Time Employees dedicated for this task. The Machine Learning model will over time accumulate respective knowledge and support domain expertise with relevant automated data quality improvement proposals.
Tags / Keywords
#dataquality #dataqualityimprovement #machinelearning #production #manufacturing #serialmanufacturing #massproduction #medicine #laboratory #pharma #financialservices #crossindustry
6.12 - Onboarding and Fraud Remodelling - Financial Services
Onboarding and Fraud Remodelling
Executive summary
Leverage an industry proven onboarding and Know Your Customer (KYC) ontology and fine-tune it to your corporate compliance policies. Ensure manual processing, existing triggers and information sources are tied together by a unified and harmonized process supporting front-office and compliance simultaneously.
Problem statement
Many financial service providers struggle with the complexity and inefficiency of their client onboarding and recurring KYC monitoring practice. And many have issues, when it comes to Anti-Money Laundering (AML), source of funds and transaction monitoring compliance. The front-office staff often tries to cut corners and the compliance staff is overwhelmed with the number of cases and follow-ups that are required from them. Disintegrated and high-maintenance systems and processes are the usual status quo, with little budget and energy to change from due to the inherent risk.
Target market / Industries
The use case is primarily applicable to the industries that are exposed to frauds and where fraud tracking and prevention is needed. The financial services industry benefiting most from this use-case.
Solution
We combine the domain knowledge of what is really required by law and regulation with the opportunity to automate many aspects of the background screening and adverse media monitoring. By integrating the robustness of process of global players and the lean and mean approach FinTech startups take, we usually are able to raise quality while reducing effort. Creating a centralized compliance officer workbench that is integrated with both front-office systems as well as risk-management and compliance tools, we are able to iteratively improve the situation by synchronizing the learning of the models and predictions with the feedback from compliance experts.
The solution included: -Integrated Compliance Officer Workbench
- Onboarding & Compliance Ontology configuration & subsequent ontology matching
- Integration of existing screening & trigger sources with learning / improvement loops
- Automation of standard cases and pre-filling of high-probability issues
- Aggregation of findings, reporting, alerting & compliance action notifications
Stakeholders
- Compliance
- Security
Data elements, Assets and Deliverables
As an Input from the client, the following items were used:
- Existing client onboarding / KYC policies
- KYC/AML/onboarding management cases
- Client‘s contracts, positions & transactions
Assets & Artefacts:
- Client risk attributes
- Historic client behavior information
The deliverables included:
- Compliance & KYC Ontology
- Compliance Officer Workbench
- Use case specific orchestration flow
Impact and benefits
Decreased compliance team by 30% from 18 down to 12 Fuull-Time Employees by automating standard case load. Increased compliance quality and decreased client case resolution time by eliminating aspects not required by current jurisdictional scope.
Testimonials
“This is a compliance expert‘s dream come true. Before I never had an oversight of where I or my team where standing. Now we can actually support our client facing colleagues.” — Mr. XXX YYY, Title, Company ZZZ.
Tags / Keywords
#fraud #fraudremodelling #compliance #kyc #financialservices #bank
6.13 - Onboarding and Fraud Remodelling - General
Onboarding and Fraud Remodelling
Executive summary
Leverage an industry proven onboarding and Know Your Customer (KYC) ontology and fine-tune it to your corporate compliance policies. Ensure manual processing, existing triggers and information sources are tied together by a unified and harmonized process supporting sales and compliance simultaneously.
Problem statement
Many service providers struggle with the complexity and inefficiency of their client onboarding and recurring KYC monitoring practice. And many have issues, when it comes to various types of monitoring of client’s activities. The front-office staff often tries to cut corners and the compliance staff is overwhelmed with the number of cases and follow-ups that are required from them. Disintegrated and high-maintenance systems and processes are the usual status quo, with little budget and energy to change from due to the inherent risk.
Target market / Industries
The use case is primarily applicable to the industries that are exposed to frauds and where fraud tracking and prevention is needed.
Solution
We combine the domain knowledge of what is really required by law and regulation with the opportunity to automate many aspects of the background screening and adverse media monitoring. By integrating the robustness of process of global players and the lean and mean approach, we usually are able to raise quality while reducing effort. Creating a centralized compliance officer workbench that is integrated with both front-office systems as well as risk-management and compliance tools, we are able to iteratively improve the situation by synchronizing the learning of the models and predictions with the feedback from compliance experts.
The solution included: -Integrated Compliance Officer Workbench
- Onboarding & Compliance Ontology configuration & subsequent ontology matching
- Integration of existing screening & trigger sources with learning / improvement loops
- Automation of standard cases and pre-filling of high-probability issues
- Aggregation of findings, reporting, alerting & compliance action notifications
Stakeholders
- Compliance
- Security
Data elements, Assets and Deliverables
As an Input from the client, the following items were used:
- Existing client onboarding / KYC policies
- KYC / onboarding management cases
- Client‘s contracts, positions & transactions
Assets & Artefacts:
- Client risk attributes
- Historic client behavior information
The deliverables included:
- Compliance & KYC Ontology
- Compliance Officer Workbench
- Use case specific orchestration flow
Tags / Keywords
#fraud #fraudremodelling #frauddetection #fraudtracking #compliance #kyc
6.14 - Prospecting 360 Degree
Prospect 360°
Executive summary
For many strategic prospects the preparation of possible offers and establishment of a real relationship either involves great effort or lacks structure and focus. The Prospect 360° use case augments traditional advisor intelligence with automation to improve this original dilemma.
Problem statement
Hunting for new important clients usually is driven by referrals and the search for an “ideal event“ to introduce a product or service. Existing client relationships are usually screened manually and approached directly to request an introduction, prior to offering any services. Monitoring the market and a prospect’s connections can be cumbersome and is error prone – either introductions are awkward or they do not focus on a specific and urgent need. Hence the success and conversion rates seem hard to plan.
Target market / Industries
This use case is traditionally applicable to such industries where the customer engagement and acquisition process is long and costs per customer are high:
- Financial Services
- Insurance
- General Business Services
Solution
We introduce the idea of “soft onboarding”. Instead of selling hard to a new prospect, we start to engage them with tailored and relevant pieces of information or advice free of charge. We do, however, tempt this prospect to embrace little initial pieces of an onboarding-like process, extending the period we are allowed to profile the needs and preferences of the client and the related social graph. Turning a prospect into an interested party and then increasing the levels of engagement of the period of up to six months allows for a more natural and client-driven advisory experience, that is shifting from a “product push” towards a “client pull”.
The solution included:
- Integration of disparate news & event information sources (licensed & public origins)
- Provisioning of select RM & client data points to understand social graphs
- Word parsing of text-based inputs (e.g. news articles and liquidity event streams)
- Onboarding & Sales Ontology matching
- Identification of possible liquidity events, new referral paths & sales topics of interest
- Aggregation of findings, reporting, notifications and organizational routing
- Ideally inclusion of reinforcement learning (via RM, client & assistant feedback loops)
Example Use Case Agent Cascade
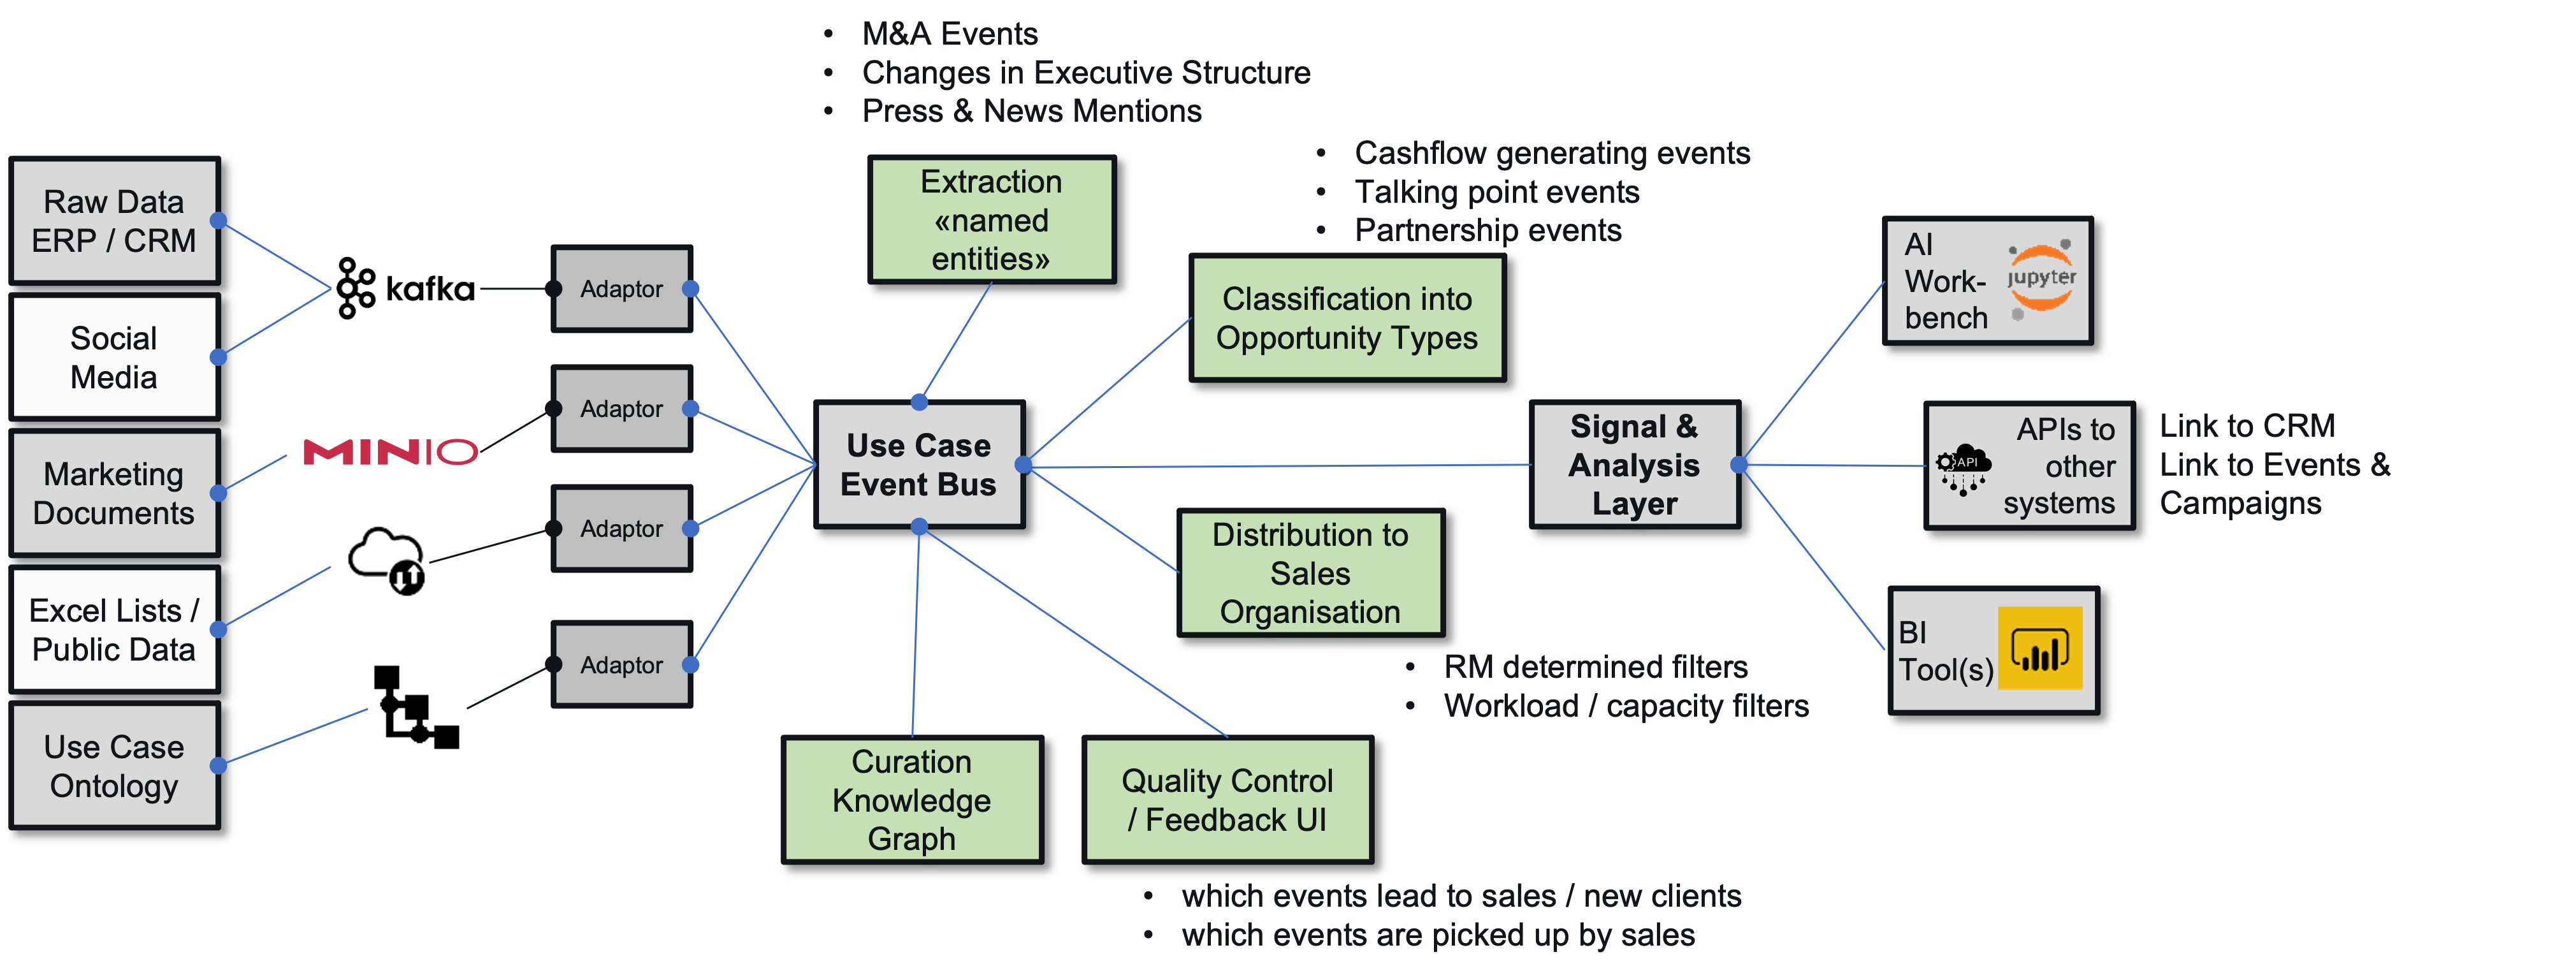
Stakeholders
- Relationship Management
- Sales
- Marketing
Data elements, Assets and Deliverables
As an Input from the client, the following items were used:
-
Sales organization setup (desks / books)
-
Client to Client / Client to Company graphs
Capabilities utilized:
- Unstructured Data
- Semantic Harmonization
- NLP
- Personalization
Assets & Artefacts:
- Financial Product Ontology
- Analytical CRM Models
The deliverables included:
- Sales & Onboarding Ontology
- Use case specific orchestration flow
- Integration with many info sources
Impact and benefits
Strategic client team originally covered 200 prospects manually. Introducing Prospect 360° allowed to double that number while reducing the time-to-close by 35% — from more than 12 to an average of about 7 months.
The use-case implementation resulted in:
+8% growth of corporate loan book
+22% reduction on credit defaults
Testimonials
“I feel a lot more as a real advisor. I can be helpful and feel informed. And I still can make my own judgments of what is relevant for my personal relationship to existing clients and new referrals. I learn as the system learns.”
— Mr. Pius Brändli, Managing Director, Credit Suisse
Tags / Keywords
#kyc, #knowyourcustomer, #finance, #financialservices, #onboarding, #prospecting, #prospect360
6.15 - Prospecting 360 Degree - general
Prospect 360°
Executive summary
For many strategic prospects the preparation of possible offers and establishment of a real relationship either involves great effort or lacks structure and focus. The Prospect 360° use case augments traditional sales and marketing intelligence with automation to improve this original dilemma.
Problem statement
Hunting for new important clients usually is driven by advertisement, referrals and the search for an “ideal event“ to introduce a product or service. Existing client relationships are usually screened manually and approached directly to request an introduction, prior to offering any services. Monitoring the market and a prospect’s connections can be cumbersome and is error prone – either introductions are awkward or they do not focus on a specific and urgent need. Hence the success and conversion rates seem hard to plan.
Target market / Industries
This use case is suitable for the industries where the customer engagement and acquisition process is long and costs per customer are high.
Solution
We introduce the idea of “soft onboarding”. Instead of selling hard to a new prospect, we start to engage them with tailored and relevant pieces of information or advice free of charge. We do, however, tempt this prospect to embrace little initial pieces of an onboarding-like process, extending the period we are allowed to profile the needs and preferences of the client and the related social graph. Turning a prospect into an interested party and then increasing the levels of engagement of the period of up to six months allows for a more natural and client-driven sales experience, that is shifting from a “product push” towards a “client pull”.
The solution included:
- Integration of disparate news & event information sources (licensed & public origins)
- Provisioning of select sales & client data points to understand social graphs
- Word parsing of text-based inputs (e.g. news articles)
- Onboarding & Sales Ontology matching
- Identification of new referral paths & sales topics of interest
- Aggregation of findings, reporting, notifications and organizational routing
- Ideally inclusion of reinforcement learning (via sales, client & assistant feedback loops)
Example Use Case Agent Cascade
Stakeholders
- Relationship Management
- Sales
- Marketing
Data elements, Assets and Deliverables
As an Input from the client, the following items were used:
- Sales organization setup (desks / books)
- Client to Client / Client to Company graphs
Capabilities utilized:
- Unstructured Data
- Semantic Harmonization
- NLP
- Personalization
Assets & Artefacts:
- Product Ontology
- Analytical CRM Models
The deliverables included:
- Sales & Onboarding Ontology
- Use case specific orchestration flow
- Integration with many info sources
Tags / Keywords
#newclients #salesfunnel #sales #marketing #salesautomation #prospecting #prospect360
6.16 - Regulatory Single Source of Truth
Regulatory Single Source of Truth
Executive summary
Leveraging all existing data sources from core banking, risk- and trading systems to the Customer Relationship Management (CRM) and general ledger as granular input for your regulatory Single Source of Truth (SSoT).
Problem statement
Most regulatory solutions today require huge maintenance effort on both business and technology teams. Ever more granular and ever more near-time regulatory requirements further increase this pressure. Usually the various regulatory domains have created and continue to create silos for central bank, credit risk, liquidity, Anti-Money Laundering (ALM) / Know Your Customer (KYC) and transaction monitoring regulations. Further requirements from ePrivacy, Product Suitability and Sustainability regulations even further dilute these efforts.
Target market / Industries
- Financial services
- Insurance
Solution
Leveraging the semantic integration capabilities of StreamZero Data Platform, it allows you to reuse all the integration efforts you have previously started and yet converge on a common path towards an integrated (regulatory) enterprise view. The ability to eliminate high-maintenance Extraction Transformation Loading (ETL) coding or ETL tooling in favor of a transparent and business driven process will save you money during the initial implementation and during ongoing maintenance. Templates and a proven process were applied to use what exists and build what’s missing without long-term lock in.
The solution included:
- Semantic Integration leveraging all your prior integration investments
- Business driven data standardization and data quality improvements
- No Code implementation => business analysis is sufficient to generate the integration layer
- Implement data governance & data quality via reusable business checks
- Multiply your regulatory investments to be used for analytics, sales and risk
Stakeholders
- Compliance
Data elements, Assets and Deliverables
As an Input from the client, the following items were used:
- Full regulatory granular scope master & reference data (incl. UBO hierarchies)
- Client portfolio (positions / transactions)
Assets & Artefacts:
- Private Bank Data Model
- Optimization Algorithms
- Data Quality Business Rules
The deliverables included:
- E2E Models & Integration Schema
- Library of Business Checks
Impact and benefits
The semantic SSoT is now used by other functions across the bank leveraging regulatory investments for sales support, operations and risk management.
The use-case implementation resulted in:
9% reduction of risk weighted assets
9 FTE (50%) reduction of regulatory reporting team
In addition, recurring Cost of Capital savings of over 15m CHF p.a. were achieved.
Testimonials
“We have semantically integrated +220 different data sources at Switzerland largest independent Private Bank. The regulatory team was able to deliver better results faster and yet decreased the team size by 30%.” — Mr. XXX YYY, Title, Company ZZZ.
Tags / Keywords
#singlesourceoftruth #ssot #bank #privatebank #financialservices #insurance
6.17 - Sensor-based Monitoring of Sensitive Goods
Sensor-based Monitoring of Sensitive Goods
Executive summary
Sensor-based monitoring of sensitive goods along the transport chain (location, light, temperature, humidity & shocks in one sensor) and integration of these IoT components in a smart and decentralized cloud including the event-controlled connection to the relevant peripheral systems.
Problem statement
One of the biggest problems that exist in supply chain management is the lack of visibility and control once materials have left the site or warehouse. This leads to billions in losses due to missing or damaged products and leads to business inefficiency.
Target market / Industries
The use case can be applied for the following solutions:
- Intelligent packaging
- Intelligent logistics
- Industrial applications – Industry 4.0
- Consumer and luxury goods
- Home protection
Solution
A small-size energy-autonomous intelligent cells (microelectronic parts) are integrated into any object / package to enable remain in contact to it, identify it electronically, provide a location and sense temperature, pressure, movement, light, and more. They are intelligent, able to make basic decisions and save small information pieces. The cells communicate bidirectionally with the software through global IoT networks of our partners selecting the best energy-efficient technologies available where they are and building a neuronal backbone of objects in constant communication. Bidirectional capabilities allow transmitting data of the sensors and receiving instructions and updates remotely. Cells can also interact with the electronics of the objects they are attached to, they can read and transmit any parameters and providing remote control of them wherever they are. All data of the cells are transmitted to our own cloud applications, a learning brain using the power of data management and AI of Google Cloud and Microsoft Azure where we can combine IoT data of objects with any other data in intelligent and self-learning algorithms. The location or any other parameter of the objects can be displayed in any Browser or Smart device. The user interfaces can be customized and allow to interact at any moment changing frequency of connection, SMS or email alarm values and who receives them (human or machine) or acting as remote control of any object. All of this can be offered fully pay peruse, to ensure a very low entry point for the technology. You can turn the cell on and off remotely, and only pay cents per day when you use the cell capabilities or buy the solution.
Stakeholders
- Manufacturers
- Logistic services providers
- General management
- Supply chain
- Digitalization
- Quality control
- Risk management
Data elements, Assets and Deliverables
As an Input from the client, the following items were used:
- Container / goods data
- Transport routing
- Thresholds / boundary conditions
- Past Quality Control data for pattern recognition
Assets & Artefacts:
- Routing optimization model
- IoT cloud backbone
The deliverables included:
- Driver dispatcher and client apps
- Operational routing optimization
Tags / Keywords
#sensorbasedmonitoring #iot #sensitivegoods #intelligentpackaging #intelligentlogistics #industry40 #industry #packaging #logistics #homeprotection #consumergoods #luxurygoods
6.18 - Voice-based Trade Compliance
Voice-based Trade Compliance
Executive summary
Convert the voice-based advisor to client phone conversations into text. Analyze for possible breaches of regulatory and compliance policies. This multi-step analytical process involves voice-to-text transcription, a compliance ontology, text parsing & natural language understanding.
Problem statement
Many if not most client advisors to client communications still occur via phone. These conversations happen in a black box environment that is difficult to track and audit. Potential compliance breaches in areas such as insider trading or conflict of interest can only be identified and intercepted at great cost while only listening in on select phone calls. The vast majority of conversation remains unchecked, leaving the organization in the dark and at risk. Often compliance is at odds with sales – one controlling the business, the other pushing the boundaries of acceptable risk.
Target market / Industries
Described use case can be efficiently applied in the industries where the track / audit of the voice-based communication is required.
Solution
Leveraging your existing Public Branch eXchange (PBX) phone recording infrastructure & partnering with your choice of voice-to-text transcription service, the solution is to automatically screen every conversion. The transcribed text files are parsed against the Sales & Compliance Ontology. Using Natural Language Understanding (NLU) the use case identifies which call advice and trade decisions occurred and high-lights possible compliance breaches.
Once the predictions become more accurate a sales focused “topics-of-interest“ screening can be added.
The solution included:
- Voice to text transcription
- Word parsing of text-based inputs
- Compliance & Sales Ontology matching
- Identification of possible compliance breaches (and / or sales topics of interest)
- Aggregation of findings, reporting, alerting
- Action recommendation
Example Use Case Agent Cascade
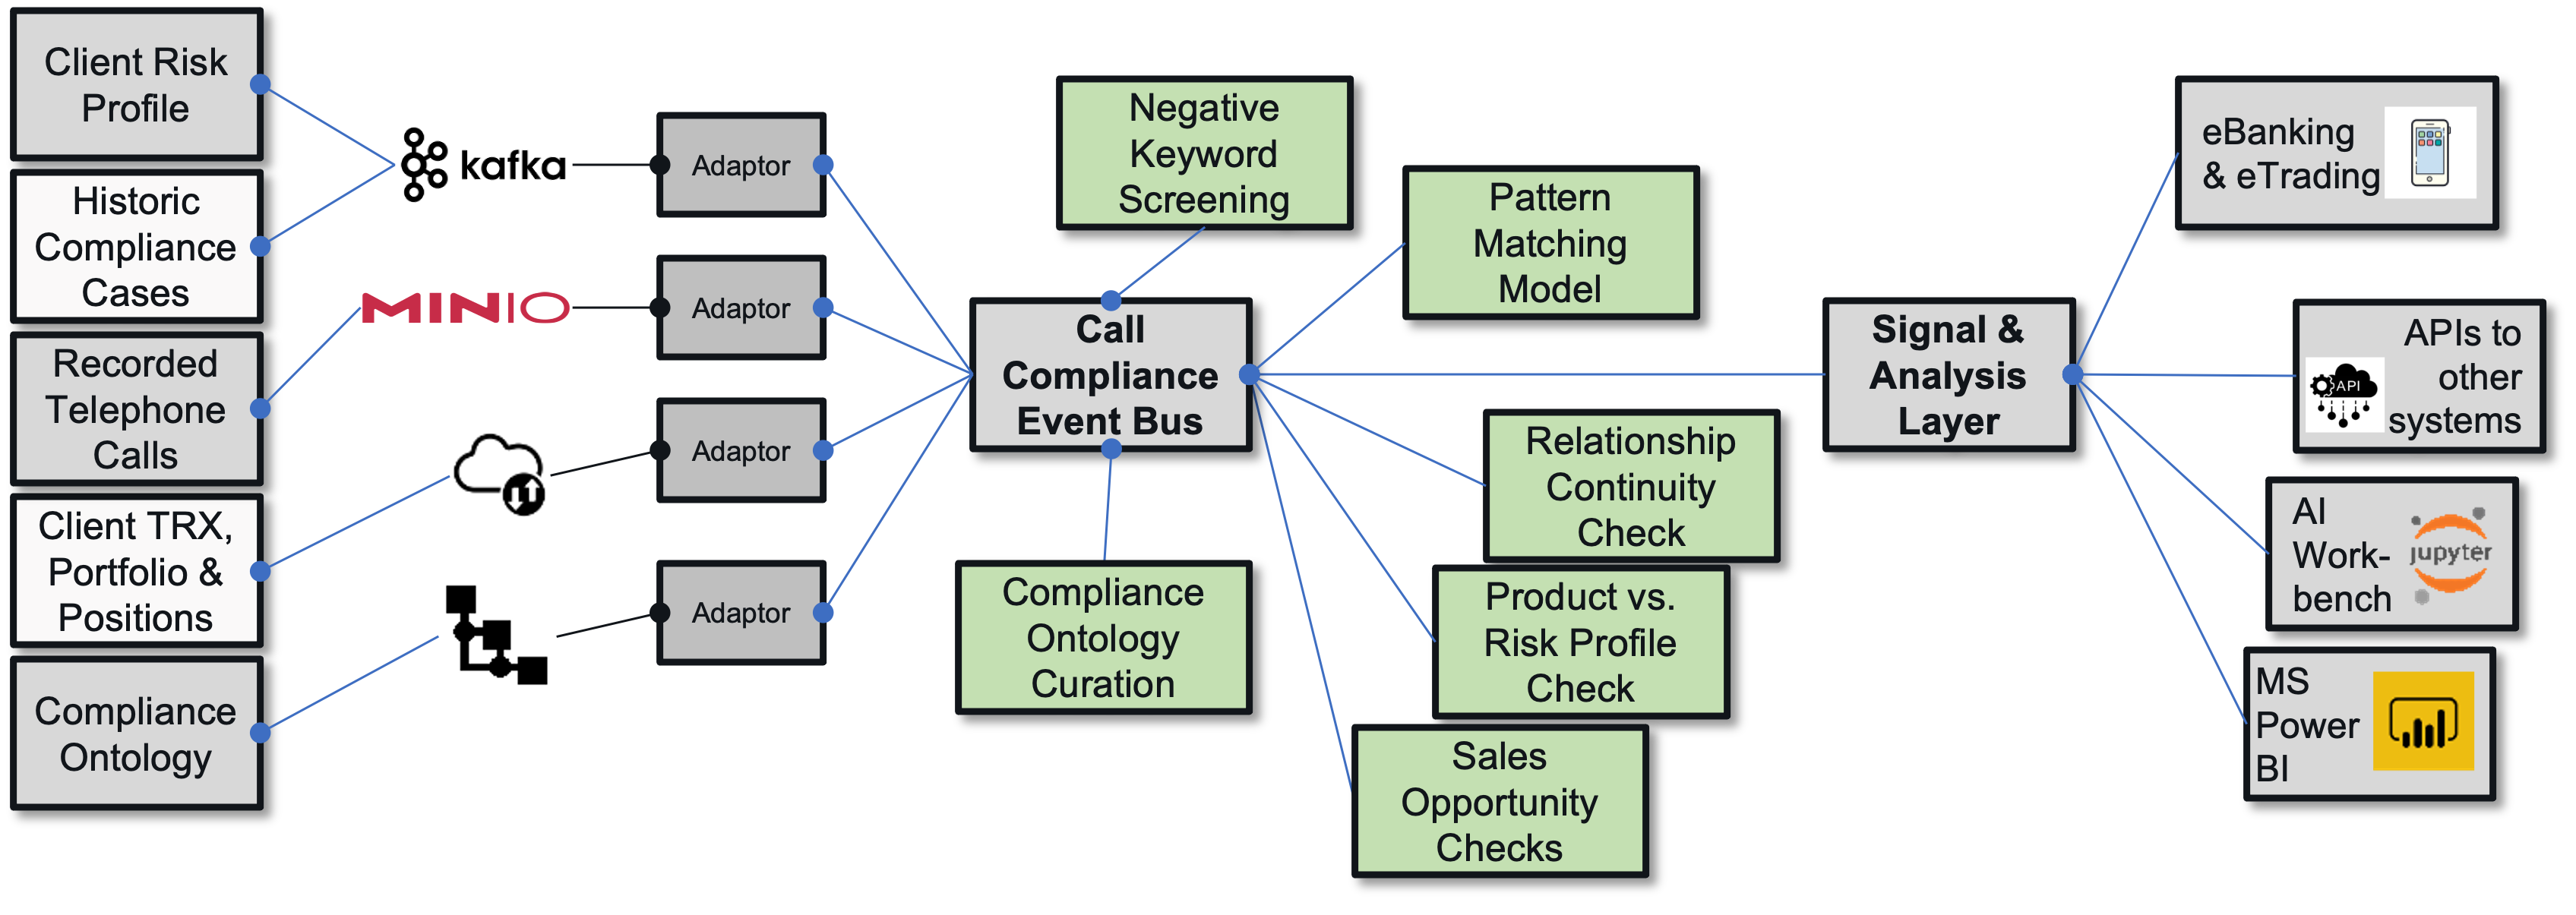
Stakeholders
- Compliance
- Security
Data elements, Assets and Deliverables
As an Input from the client, the following items were used:
- Relationship Manager – Client Conversations (Voice or Text)
- Client portfolios - positions / transactions
Assets & Artefacts:
- Unstructured Data
- Semantic Harmonization
- Natural language processing
- Personalization
The deliverables included:
- Sales & Transaction Monitoring Ontology
- Use case specific orchestration flow
Impact and benefits
Sales Compliance headcount was reduced by 3 Full Time Employees while screening coverage increased to 90% (before only spot checks) and resolution quality focuses on sales and compliance.
Testimonials
“The overall sensitivity of advisors to client‘s sentiment and requirements has increased. Also, we improved the understanding how compliance and sales can work together to achieve client satisfaction.” — Ms. Milica L., Chief Risk Officer, Swiss Private Bank
Tags / Keywords
#voicetradecompliance #tradecompliance #compliance #bank #communicationscreening #financialservices
7 - Release Notes
7.1 - Release 1.0.2
New 
- The new Services Overview is a useful page to monitor and manage all platform services.
- The Configuration Manager is a central point to manage configurations for all deployed services.
- The Executor Framework is a powerful new utility that enables creating, orchestrating, sequencing and running of pretty much any combination of jobs and services.
- With the Job Scheduler we have added a newly embedded console for scheduling, running and monitoring jobs, without the need of embedding third-party job scheduler.
- We have introduced a new Workflow Manager to support the building of processes, including four-eye reviews, approval chains and quality gates.
- We have integrated our Slack Support Channel into the Control Center menu so that you can contact us directly and easily with your questions.
- To get quicker access to the most frequently used services and components we’ve built a list of Platform Services links and placed them into the Control Center navigation.
- We have added a new File Storage capability for creating and uploading files and managing buckets.
- Introduced a new User Interface and Navigation.
- Made important improvements of Access Rights Management.
Changed 
- no changes to report
Improved 
- We have improved the Files Manager and in particular Files Onboarding Monitor to embed user credentials and therefore to make the files uploading and management more user specific.
- We have taken further strides to streamline and simplify the User Management. Creating users and assign their own secured container (working space) is now fully automated - albeit not yet self-service
Fixed 
- no fixes to report
7.2 - Release 1.0.3
New
- We have introduced a Tagging capability, which enables users to tag almost any data element on the platform making it easy and user friendly to navigate through the application and find items.
- The Checks Framework greatly improves the data quality monitoring around any kind of data sources, data types and event types.
- The Topics & Consumer Monitor listens in on Kafka and provides an up-to-the-second view of data sourcing and streaming.
- New Service Logs can be used to track all services running within the network as well as their logs and events that occur between them. Each log or event have their own data stored within elasticsearch and can be filtered by numerous fields.
- Jupyter Auto Deploy makes the onboarding of new users even faster and self-serviced.
- Events are stored and managed in the new Event Registry.
Changed
- no changes to report
Improved
- We have improved elements of the Security and Access Rights Management in the areas of User and Access Management (Keycloak), Certificates Management as well as Authentication and Authorization (OpenID). Each role has its own set of permissions, which makes it possible to restrict users access to specific areas of the platform based on their role.
- Parametrised Workflows can be defined with by users with easy json files by following a specific set of rules. Complex use cases are supported such as chaining multiple actions one by another and having control over what happens in a different scenarios. Built in approval capability for each workflow action is supported and easy to implement by default.
- The new StreamZero Executor has become even better and more powerful. Add any Python, SQL or JSON to execute any type of jobs.
- The Scheduler is now fully embedded with the Executor.
- Files Upload has improved and is integrated with the Workflow and Approvals functionality. Files have type specific validation and are stored in different buckets. Bucket creation can be done within the same FAB module.
- The StreamZero Application Builder (FAB) is now capable of auto generating new pages (UI) on the fly.
Fixed
- no fixes to report
7.3 - Release 1.0.4
New
- We have collected our growing list StreamZero APIs and documented them in a Service Inventory.
- Introduced Projects as a new concept, enabling the of grouping of like processes as well as the security based segregation of them.
- Integrated StreamZero with Voilà, turning Jupyter notebooks into standalone web applications.
- Live logs are there, providing real-time log data.
Changed
- no changes to report
Improved
- The self-service onboarding has received further improvement. The onboarding flow as well as the corresponding documentation have been made even easier to follow.
- The FAB (StreamZero Application Builder) has improved in the area performance.
- We have linked Minio to the FAB UI, API and Database.
- The Executor framework is being continuosly improved.
- Tags have been implemented across all StreamZero components.
Fixed
- A number of general bug fixes have been implement.
7.4 - Release 2.0.1
New
- We have introduced the Simple StreamZero Dashboard (Landing Page/Dashboard) developed in ReactJS to provide insights and analytics around typical platform related metrics mostly related to Data Ops and detailed event handling. It can be finetuned and tailored to customer specific needs. The details can be found under the Landing Page(Dashboard) subcategory in the User Guide.
- The first version of the Open API REST Server - Generator has been built which can be used for generating standardised REST APIs from the OpenAPI specification.
- Created Dashboard API which is used for feeding various charts on StreamZero Dashboard including statistics for Executions by status, trigger type, average time of executions, number of executions per package etc.
- Introduction of manifest.json files which can be uploaded with a package and used to define package execution entrypoint (name of the script that will be executed), order of scripts execution, schedule, tags, trigger event, etc.
- Added Execution Context to ferris_ef package which is accessible to any .py script at runtime and can be used for fetching configuration, secrets, parameters, information of the executing package and for manipulating the package state.
Changed
- PostgreSQL wrapper was added to StreamZero CLI
Improved
- Overall performance of the UI was enhanced
Fixed
- Synchronisation of Git Repositories that contain empty packages
7.5 - Release 2.0.2
New
- Introduction of Secrets Management UI & API that can be used for securely storing and accessing secrets on the Platform and Project level.
Changed
- Re-enabling of the Project/Package/Git Repository/Execution deletion feature.
- Version 2 of ferris_cli package published to public Pypi repository.
Improved
- Executor fx_ef package adjusted for local development.
- Various changes on the StreamZero UI.
Fixed
- no fixes to report
8 - Privacy Policy
Last updated: February 12, 2021
This Privacy Policy describes Our policies and procedures on the collection, use and disclosure of Your information when You use the Service and tells You about Your privacy rights and how the law protects You.
We use Your Personal data to provide and improve the Service. By using the Service, You agree to the collection and use of information in accordance with this Privacy Policy.
Interpretation and Definitions
Interpretation
The words of which the initial letter is capitalized have meanings defined under the following conditions. The following definitions shall have the same meaning regardless of whether they appear in singular or in plural.
Definitions
For the purposes of this Privacy Policy:
-
Account means a unique account created for You to access our Service or parts of our Service.
-
Company (referred to as either “the Company”, “We”, “Us” or “Our” in this Agreement) refers to GridMine GmbH, Baarerstrasse 5, 6300 Zug.
For the purpose of the GDPR, the Company is the Data Controller.
-
Cookies are small files that are placed on Your computer, mobile device or any other device by a website, containing the details of Your browsing history on that website among its many uses.
-
Country refers to: Switzerland
-
Data Controller, for the purposes of the GDPR (General Data Protection Regulation), refers to the Company as the legal person which alone or jointly with others determines the purposes and means of the processing of Personal Data.
-
Device means any device that can access the Service such as a computer, a cellphone or a digital tablet.
-
Personal Data is any information that relates to an identified or identifiable individual.
For the purposes for GDPR, Personal Data means any information relating to You such as a name, an identification number, location data, online identifier or to one or more factors specific to the physical, physiological, genetic, mental, economic, cultural or social identity.
-
Service refers to the Website.
-
Service Provider means any natural or legal person who processes the data on behalf of the Company. It refers to third-party companies or individuals employed by the Company to facilitate the Service, to provide the Service on behalf of the Company, to perform services related to the Service or to assist the Company in analyzing how the Service is used. For the purpose of the GDPR, Service Providers are considered Data Processors.
-
Third-party Social Media Service refers to any website or any social network website through which a User can log in or create an account to use the Service.
-
Usage Data refers to data collected automatically, either generated by the use of the Service or from the Service infrastructure itself (for example, the duration of a page visit).
-
Website refers to GridMine GmbH, accessible from www.gridmine.com
-
You means the individual accessing or using the Service, or the company, or other legal entity on behalf of which such individual is accessing or using the Service, as applicable.
Under GDPR (General Data Protection Regulation), You can be referred to as the Data Subject or as the User as you are the individual using the Service.
Collecting and Using Your Personal Data
Types of Data Collected
Personal Data
While using Our Service, We may ask You to provide Us with certain personally identifiable information that can be used to contact or identify You. Personally identifiable information may include, but is not limited to:
- Email address
- First name and last name
- Usage Data
Usage Data
Usage Data is collected automatically when using the Service.
Usage Data may include information such as Your Device’s Internet Protocol address (e.g. IP address), browser type, browser version, the pages of our Service that You visit, the time and date of Your visit, the time spent on those pages, unique device identifiers and other diagnostic data.
When You access the Service by or through a mobile device, We may collect certain information automatically, including, but not limited to, the type of mobile device You use, Your mobile device unique ID, the IP address of Your mobile device, Your mobile operating system, the type of mobile Internet browser You use, unique device identifiers and other diagnostic data.
We may also collect information that Your browser sends whenever You visit our Service or when You access the Service by or through a mobile device.
Tracking Technologies and Cookies
We use Cookies and similar tracking technologies to track the activity on Our Service and store certain information. Tracking technologies used are beacons, tags, and scripts to collect and track information and to improve and analyze Our Service. The technologies We use may include:
- Cookies or Browser Cookies. A cookie is a small file placed on Your Device. You can instruct Your browser to refuse all Cookies or to indicate when a Cookie is being sent. However, if You do not accept Cookies, You may not be able to use some parts of our Service. Unless you have adjusted Your browser setting so that it will refuse Cookies, our Service may use Cookies.
- Flash Cookies. Certain features of our Service may use local stored objects (or Flash Cookies) to collect and store information about Your preferences or Your activity on our Service. Flash Cookies are not managed by the same browser settings as those used for Browser Cookies. For more information on how You can delete Flash Cookies, please read “Where can I change the settings for disabling, or deleting local shared objects?” available at https://helpx.adobe.com/flash-player/kb/disable-local-shared-objects-flash.html#main_Where_can_I_change_the_settings_for_disabling__or_deleting_local_shared_objects_
- Web Beacons. Certain sections of our Service and our emails may contain small electronic files known as web beacons (also referred to as clear gifs, pixel tags, and single-pixel gifs) that permit the Company, for example, to count users who have visited those pages or opened an email and for other related website statistics (for example, recording the popularity of a certain section and verifying system and server integrity).
Cookies can be “Persistent” or “Session” Cookies. Persistent Cookies remain on Your personal computer or mobile device when You go offline, while Session Cookies are deleted as soon as You close Your web browser. Learn more about cookies: What Are Cookies?.
We use both Session and Persistent Cookies for the purposes set out below:
-
Necessary / Essential Cookies
Type: Session Cookies
Administered by: Us
Purpose: These Cookies are essential to provide You with services available through the Website and to enable You to use some of its features. They help to authenticate users and prevent fraudulent use of user accounts. Without these Cookies, the services that You have asked for cannot be provided, and We only use these Cookies to provide You with those services.
-
Cookies Policy / Notice Acceptance Cookies
Type: Persistent Cookies
Administered by: Us
Purpose: These Cookies identify if users have accepted the use of cookies on the Website.
-
Functionality Cookies
Type: Persistent Cookies
Administered by: Us
Purpose: These Cookies allow us to remember choices You make when You use the Website, such as remembering your login details or language preference. The purpose of these Cookies is to provide You with a more personal experience and to avoid You having to re-enter your preferences every time You use the Website.
-
Tracking and Performance Cookies
Type: Persistent Cookies
Administered by: Third-Parties
Purpose: These Cookies are used to track information about traffic to the Website and how users use the Website. The information gathered via these Cookies may directly or indirectly identify you as an individual visitor. This is because the information collected is typically linked to a pseudonymous identifier associated with the device you use to access the Website. We may also use these Cookies to test new pages, features or new functionality of the Website to see how our users react to them.
For more information about the cookies we use and your choices regarding cookies, please visit our Cookies Policy or the Cookies section of our Privacy Policy.
Use of Your Personal Data
The Company may use Personal Data for the following purposes:
- To provide and maintain our Service, including to monitor the usage of our Service.
- To manage Your Account: to manage Your registration as a user of the Service. The Personal Data You provide can give You access to different functionalities of the Service that are available to You as a registered user.
- For the performance of a contract: the development, compliance and undertaking of the purchase contract for the products, items or services You have purchased or of any other contract with Us through the Service.
- To contact You: To contact You by email, telephone calls, SMS, or other equivalent forms of electronic communication, such as a mobile application’s push notifications regarding updates or informative communications related to the functionalities, products or contracted services, including the security updates, when necessary or reasonable for their implementation.
- To provide You with news, special offers and general information about other goods, services and events which we offer that are similar to those that you have already purchased or enquired about unless You have opted not to receive such information.
- To manage Your requests: To attend and manage Your requests to Us.
- For business transfers: We may use Your information to evaluate or conduct a merger, divestiture, restructuring, reorganization, dissolution, or other sale or transfer of some or all of Our assets, whether as a going concern or as part of bankruptcy, liquidation, or similar proceeding, in which Personal Data held by Us about our Service users is among the assets transferred.
- For other purposes: We may use Your information for other purposes, such as data analysis, identifying usage trends, determining the effectiveness of our promotional campaigns and to evaluate and improve our Service, products, services, marketing and your experience.
We may share Your personal information in the following situations:
- With Service Providers: We may share Your personal information with Service Providers to monitor and analyze the use of our Service, to contact You.
- For business transfers: We may share or transfer Your personal information in connection with, or during negotiations of, any merger, sale of Company assets, financing, or acquisition of all or a portion of Our business to another company.
- With Affiliates: We may share Your information with Our affiliates, in which case we will require those affiliates to honor this Privacy Policy. Affiliates include Our parent company and any other subsidiaries, joint venture partners or other companies that We control or that are under common control with Us.
- With business partners: We may share Your information with Our business partners to offer You certain products, services or promotions.
- With other users: when You share personal information or otherwise interact in the public areas with other users, such information may be viewed by all users and may be publicly distributed outside. If You interact with other users or register through a Third-Party Social Media Service, Your contacts on the Third-Party Social Media Service may see Your name, profile, pictures and description of Your activity. Similarly, other users will be able to view descriptions of Your activity, communicate with You and view Your profile.
- With Your consent: We may disclose Your personal information for any other purpose with Your consent.
Retention of Your Personal Data
The Company will retain Your Personal Data only for as long as is necessary for the purposes set out in this Privacy Policy. We will retain and use Your Personal Data to the extent necessary to comply with our legal obligations (for example, if we are required to retain your data to comply with applicable laws), resolve disputes, and enforce our legal agreements and policies.
The Company will also retain Usage Data for internal analysis purposes. Usage Data is generally retained for a shorter period of time, except when this data is used to strengthen the security or to improve the functionality of Our Service, or We are legally obligated to retain this data for longer time periods.
Transfer of Your Personal Data
Your information, including Personal Data, is processed at the Company’s operating offices and in any other places where the parties involved in the processing are located. It means that this information may be transferred to — and maintained on — computers located outside of Your state, province, country or other governmental jurisdiction where the data protection laws may differ than those from Your jurisdiction.
Your consent to this Privacy Policy followed by Your submission of such information represents Your agreement to that transfer.
The Company will take all steps reasonably necessary to ensure that Your data is treated securely and in accordance with this Privacy Policy and no transfer of Your Personal Data will take place to an organization or a country unless there are adequate controls in place including the security of Your data and other personal information.
Disclosure of Your Personal Data
Business Transactions
If the Company is involved in a merger, acquisition or asset sale, Your Personal Data may be transferred. We will provide notice before Your Personal Data is transferred and becomes subject to a different Privacy Policy.
Law enforcement
Under certain circumstances, the Company may be required to disclose Your Personal Data if required to do so by law or in response to valid requests by public authorities (e.g. a court or a government agency).
Other legal requirements
The Company may disclose Your Personal Data in the good faith belief that such action is necessary to:
- Comply with a legal obligation
- Protect and defend the rights or property of the Company
- Prevent or investigate possible wrongdoing in connection with the Service
- Protect the personal safety of Users of the Service or the public
- Protect against legal liability
Security of Your Personal Data
The security of Your Personal Data is important to Us, but remember that no method of transmission over the Internet, or method of electronic storage is 100% secure. While We strive to use commercially acceptable means to protect Your Personal Data, We cannot guarantee its absolute security.
Detailed Information on the Processing of Your Personal Data
The Service Providers We use may have access to Your Personal Data. These third-party vendors collect, store, use, process and transfer information about Your activity on Our Service in accordance with their Privacy Policies.
Analytics
We may use third-party Service providers to monitor and analyze the use of our Service.
-
Google Analytics
Google Analytics is a web analytics service offered by Google that tracks and reports website traffic. Google uses the data collected to track and monitor the use of our Service. This data is shared with other Google services. Google may use the collected data to contextualize and personalize the ads of its own advertising network.
You can opt-out of having made your activity on the Service available to Google Analytics by installing the Google Analytics opt-out browser add-on. The add-on prevents the Google Analytics JavaScript (ga.js, analytics.js and dc.js) from sharing information with Google Analytics about visits activity.
For more information on the privacy practices of Google, please visit the Google Privacy & Terms web page: https://policies.google.com/privacy
Email Marketing
We may use Your Personal Data to contact You with newsletters, marketing or promotional materials and other information that may be of interest to You. You may opt-out of receiving any, or all, of these communications from Us by following the unsubscribe link or instructions provided in any email We send or by contacting Us.
We may use Email Marketing Service Providers to manage and send emails to You.
-
Mailchimp
Mailchimp is an email marketing sending service provided by The Rocket Science Group LLC.
For more information on the privacy practices of Mailchimp, please visit their Privacy policy: https://mailchimp.com/legal/privacy/
Usage, Performance and Miscellaneous
We may use third-party Service Providers to provide better improvement of our Service.
-
Invisible reCAPTCHA
We use an invisible captcha service named reCAPTCHA. reCAPTCHA is operated by Google.
The reCAPTCHA service may collect information from You and from Your Device for security purposes.
The information gathered by reCAPTCHA is held in accordance with the Privacy Policy of Google: https://www.google.com/intl/en/policies/privacy/
GDPR Privacy
Legal Basis for Processing Personal Data under GDPR
We may process Personal Data under the following conditions:
- Consent: You have given Your consent for processing Personal Data for one or more specific purposes.
- Performance of a contract: Provision of Personal Data is necessary for the performance of an agreement with You and/or for any pre-contractual obligations thereof.
- Legal obligations: Processing Personal Data is necessary for compliance with a legal obligation to which the Company is subject.
- Vital interests: Processing Personal Data is necessary in order to protect Your vital interests or of another natural person.
- Public interests: Processing Personal Data is related to a task that is carried out in the public interest or in the exercise of official authority vested in the Company.
- Legitimate interests: Processing Personal Data is necessary for the purposes of the legitimate interests pursued by the Company.
In any case, the Company will gladly help to clarify the specific legal basis that applies to the processing, and in particular whether the provision of Personal Data is a statutory or contractual requirement, or a requirement necessary to enter into a contract.
Your Rights under the GDPR
The Company undertakes to respect the confidentiality of Your Personal Data and to guarantee You can exercise Your rights.
You have the right under this Privacy Policy, and by law if You are within the EU, to:
- Request access to Your Personal Data. The right to access, update or delete the information We have on You. Whenever made possible, you can access, update or request deletion of Your Personal Data directly within Your account settings section. If you are unable to perform these actions yourself, please contact Us to assist You. This also enables You to receive a copy of the Personal Data We hold about You.
- Request correction of the Personal Data that We hold about You. You have the right to to have any incomplete or inaccurate information We hold about You corrected.
- Object to processing of Your Personal Data. This right exists where We are relying on a legitimate interest as the legal basis for Our processing and there is something about Your particular situation, which makes You want to object to our processing of Your Personal Data on this ground. You also have the right to object where We are processing Your Personal Data for direct marketing purposes.
- Request erasure of Your Personal Data. You have the right to ask Us to delete or remove Personal Data when there is no good reason for Us to continue processing it.
- Request the transfer of Your Personal Data. We will provide to You, or to a third-party You have chosen, Your Personal Data in a structured, commonly used, machine-readable format. Please note that this right only applies to automated information which You initially provided consent for Us to use or where We used the information to perform a contract with You.
- Withdraw Your consent. You have the right to withdraw Your consent on using your Personal Data. If You withdraw Your consent, We may not be able to provide You with access to certain specific functionalities of the Service.
Exercising of Your GDPR Data Protection Rights
You may exercise Your rights of access, rectification, cancellation and opposition by contacting Us. Please note that we may ask You to verify Your identity before responding to such requests. If You make a request, We will try our best to respond to You as soon as possible.
You have the right to complain to a Data Protection Authority about Our collection and use of Your Personal Data. For more information, if You are in the European Economic Area (EEA), please contact Your local data protection authority in the EEA.
Children’s Privacy
Our Service does not address anyone under the age of 13. We do not knowingly collect personally identifiable information from anyone under the age of 13. If You are a parent or guardian and You are aware that Your child has provided Us with Personal Data, please contact Us. If We become aware that We have collected Personal Data from anyone under the age of 13 without verification of parental consent, We take steps to remove that information from Our servers.
If We need to rely on consent as a legal basis for processing Your information and Your country requires consent from a parent, We may require Your parent’s consent before We collect and use that information.
Links to Other Websites
Our Service may contain links to other websites that are not operated by Us. If You click on a third party link, You will be directed to that third party’s site. We strongly advise You to review the Privacy Policy of every site You visit.
We have no control over and assume no responsibility for the content, privacy policies or practices of any third party sites or services.
Changes to this Privacy Policy
We may update Our Privacy Policy from time to time. We will notify You of any changes by posting the new Privacy Policy on this page.
We will let You know via email and/or a prominent notice on Our Service, prior to the change becoming effective and update the “Last updated” date at the top of this Privacy Policy.
You are advised to review this Privacy Policy periodically for any changes. Changes to this Privacy Policy are effective when they are posted on this page.
Contact Us
If you have any questions about this Privacy Policy, You can contact us:
- By email: info@gridmine.com
- By visiting this page on our website: www.gridmine.com
- By phone number: +41(0)41 561 0105
- By mail: Baarerstrasse 5, 6300 Zug, Switzerland
Privacy Policy for GridMine GmbH
9 - Terms & Conditions
Last updated: February 12, 2021
Please read these terms and conditions carefully before using Our Service.
Interpretation and Definitions
Interpretation
The words of which the initial letter is capitalized have meanings defined under the following conditions. The following definitions shall have the same meaning regardless of whether they appear in singular or in plural.
Definitions
For the purposes of these Terms and Conditions:
- Affiliate means an entity that controls, is controlled by or is under common control with a party, where “control” means ownership of 50% or more of the shares, equity interest or other securities entitled to vote for election of directors or other managing authority.
- Country refers to: Switzerland
- Company (referred to as either “the Company”, “We”, “Us” or “Our” in this Agreement) refers to GridMine GmbH, Baarerstrasse 5, 6300 Zug .
- Device means any device that can access the Service such as a computer, a cellphone or a digital tablet.
- Service refers to the Website.
- Terms and Conditions (also referred as “Terms”) mean these Terms and Conditions that form the entire agreement between You and the Company regarding the use of the Service.
- Third-party Social Media Service means any services or content (including data, information, products or services) provided by a third-party that may be displayed, included or made available by the Service.
- Website refers to GridMine GmbH, accessible from www.gridmine.com
- You means the individual accessing or using the Service, or the company, or other legal entity on behalf of which such individual is accessing or using the Service, as applicable.
Acknowledgment
These are the Terms and Conditions governing the use of this Service and the agreement that operates between You and the Company. These Terms and Conditions set out the rights and obligations of all users regarding the use of the Service.
Your access to and use of the Service is conditioned on Your acceptance of and compliance with these Terms and Conditions. These Terms and Conditions apply to all visitors, users and others who access or use the Service.
By accessing or using the Service You agree to be bound by these Terms and Conditions. If You disagree with any part of these Terms and Conditions then You may not access the Service.
You represent that you are over the age of 18. The Company does not permit those under 18 to use the Service.
Your access to and use of the Service is also conditioned on Your acceptance of and compliance with the Privacy Policy of the Company. Our Privacy Policy describes Our policies and procedures on the collection, use and disclosure of Your personal information when You use the Application or the Website and tells You about Your privacy rights and how the law protects You. Please read Our Privacy Policy carefully before using Our Service.
Intellectual Property
The Service and its original content (excluding Content provided by You or other users), features and functionality are and will remain the exclusive property of the Company and its licensors.
The Service is protected by copyright, trademark, and other laws of both the Country and foreign countries.
Our trademarks and trade dress may not be used in connection with any product or service without the prior written consent of the Company.
Links to Other Websites
Our Service may contain links to third-party web sites or services that are not owned or controlled by the Company.
The Company has no control over, and assumes no responsibility for, the content, privacy policies, or practices of any third party web sites or services. You further acknowledge and agree that the Company shall not be responsible or liable, directly or indirectly, for any damage or loss caused or alleged to be caused by or in connection with the use of or reliance on any such content, goods or services available on or through any such web sites or services.
We strongly advise You to read the terms and conditions and privacy policies of any third-party web sites or services that You visit.
Termination
We may terminate or suspend Your access immediately, without prior notice or liability, for any reason whatsoever, including without limitation if You breach these Terms and Conditions.
Upon termination, Your right to use the Service will cease immediately.
Limitation of Liability
Notwithstanding any damages that You might incur, the entire liability of the Company and any of its suppliers under any provision of this Terms and Your exclusive remedy for all of the foregoing shall be limited to the amount actually paid by You through the Service or 100 USD if You haven’t purchased anything through the Service.
To the maximum extent permitted by applicable law, in no event shall the Company or its suppliers be liable for any special, incidental, indirect, or consequential damages whatsoever (including, but not limited to, damages for loss of profits, loss of data or other information, for business interruption, for personal injury, loss of privacy arising out of or in any way related to the use of or inability to use the Service, third-party software and/or third-party hardware used with the Service, or otherwise in connection with any provision of this Terms), even if the Company or any supplier has been advised of the possibility of such damages and even if the remedy fails of its essential purpose.
Some states do not allow the exclusion of implied warranties or limitation of liability for incidental or consequential damages, which means that some of the above limitations may not apply. In these states, each party’s liability will be limited to the greatest extent permitted by law.
“AS IS” and “AS AVAILABLE” Disclaimer
The Service is provided to You “AS IS” and “AS AVAILABLE” and with all faults and defects without warranty of any kind. To the maximum extent permitted under applicable law, the Company, on its own behalf and on behalf of its Affiliates and its and their respective licensors and service providers, expressly disclaims all warranties, whether express, implied, statutory or otherwise, with respect to the Service, including all implied warranties of merchantability, fitness for a particular purpose, title and non-infringement, and warranties that may arise out of course of dealing, course of performance, usage or trade practice. Without limitation to the foregoing, the Company provides no warranty or undertaking, and makes no representation of any kind that the Service will meet Your requirements, achieve any intended results, be compatible or work with any other software, applications, systems or services, operate without interruption, meet any performance or reliability standards or be error free or that any errors or defects can or will be corrected.
Without limiting the foregoing, neither the Company nor any of the company’s provider makes any representation or warranty of any kind, express or implied: (i) as to the operation or availability of the Service, or the information, content, and materials or products included thereon; (ii) that the Service will be uninterrupted or error-free; (iii) as to the accuracy, reliability, or currency of any information or content provided through the Service; or (iv) that the Service, its servers, the content, or e-mails sent from or on behalf of the Company are free of viruses, scripts, trojan horses, worms, malware, timebombs or other harmful components.
Some jurisdictions do not allow the exclusion of certain types of warranties or limitations on applicable statutory rights of a consumer, so some or all of the above exclusions and limitations may not apply to You. But in such a case the exclusions and limitations set forth in this section shall be applied to the greatest extent enforceable under applicable law.
Governing Law
The laws of the Country, excluding its conflicts of law rules, shall govern this Terms and Your use of the Service. Your use of the Application may also be subject to other local, state, national, or international laws.
Disputes Resolution
If You have any concern or dispute about the Service, You agree to first try to resolve the dispute informally by contacting the Company.
For European Union (EU) Users
If You are a European Union consumer, you will benefit from any mandatory provisions of the law of the country in which you are resident in.
United States Legal Compliance
You represent and warrant that (i) You are not located in a country that is subject to the United States government embargo, or that has been designated by the United States government as a “terrorist supporting” country, and (ii) You are not listed on any United States government list of prohibited or restricted parties.
Severability and Waiver
Severability
If any provision of these Terms is held to be unenforceable or invalid, such provision will be changed and interpreted to accomplish the objectives of such provision to the greatest extent possible under applicable law and the remaining provisions will continue in full force and effect.
Waiver
Except as provided herein, the failure to exercise a right or to require performance of an obligation under this Terms shall not effect a party’s ability to exercise such right or require such performance at any time thereafter nor shall be the waiver of a breach constitute a waiver of any subsequent breach.
Translation Interpretation
These Terms and Conditions may have been translated if We have made them available to You on our Service. You agree that the original English text shall prevail in the case of a dispute.
Changes to These Terms and Conditions
We reserve the right, at Our sole discretion, to modify or replace these Terms at any time. If a revision is material We will make reasonable efforts to provide at least 30 days’ notice prior to any new terms taking effect. What constitutes a material change will be determined at Our sole discretion.
By continuing to access or use Our Service after those revisions become effective, You agree to be bound by the revised terms. If You do not agree to the new terms, in whole or in part, please stop using the website and the Service.
Contact Us
If you have any questions about these Terms and Conditions, You can contact us:
- By email: info@gridmine.com
- By phone number: +41 (0)41 561 0105
Terms and Conditions for GridMine GmbHƒ